16 Christmas Pearl Mesh Bun Hairstyle Ideas
Pearl mesh turns a simple bun into a festive Christmas hairstyle, adding soft shimmer and dimensional detail without covering the beauty of the hair itself.
A pearl mesh bun usually combines a structured or softly textured bun with a lightweight net-like accessory decorated with small pearls. The mesh may cover the full bun, drape across one section, or sit as a partial overlay, allowing you to change how decorative the finished style feels.
These Christmas ideas range from sleek low buns to curls, braids, side placements, double buns, ribbons, and softer textured finishes. Before choosing one, consider your hair length, density, bun size, and how securely the mesh can be anchored without pulling. The accessory should enhance the bun rather than distort its shape.
Quick List
- Classic Low Christmas Pearl Mesh Bun Hairstyle
- High Crown Christmas Pearl Mesh Bun Hairstyle
- Side Swept Christmas Pearl Mesh Bun Hairstyle
- Soft Twisted Christmas Pearl Mesh Bun Hairstyle
- Sleek Center Part Christmas Pearl Mesh Bun Hairstyle
- Curly Christmas Pearl Mesh Bun Hairstyle
- Braided Christmas Pearl Mesh Bun Hairstyle
- Low Side Christmas Pearl Mesh Bun Hairstyle
- Half Mesh Christmas Pearl Bun Hairstyle
- Draped Pearl Mesh Christmas Bun Hairstyle
- Mini Pearl Mesh Christmas Bun Hairstyle
- Velvet Ribbon Christmas Pearl Mesh Bun Hairstyle
- Face Framing Christmas Pearl Mesh Bun Hairstyle
- Double Christmas Pearl Mesh Bun Hairstyle
- Textured Christmas Pearl Mesh Bun Hairstyle
- Polished Christmas Pearl Mesh Bun Hairstyle
1. Classic Low Christmas Pearl Mesh Bun Hairstyle
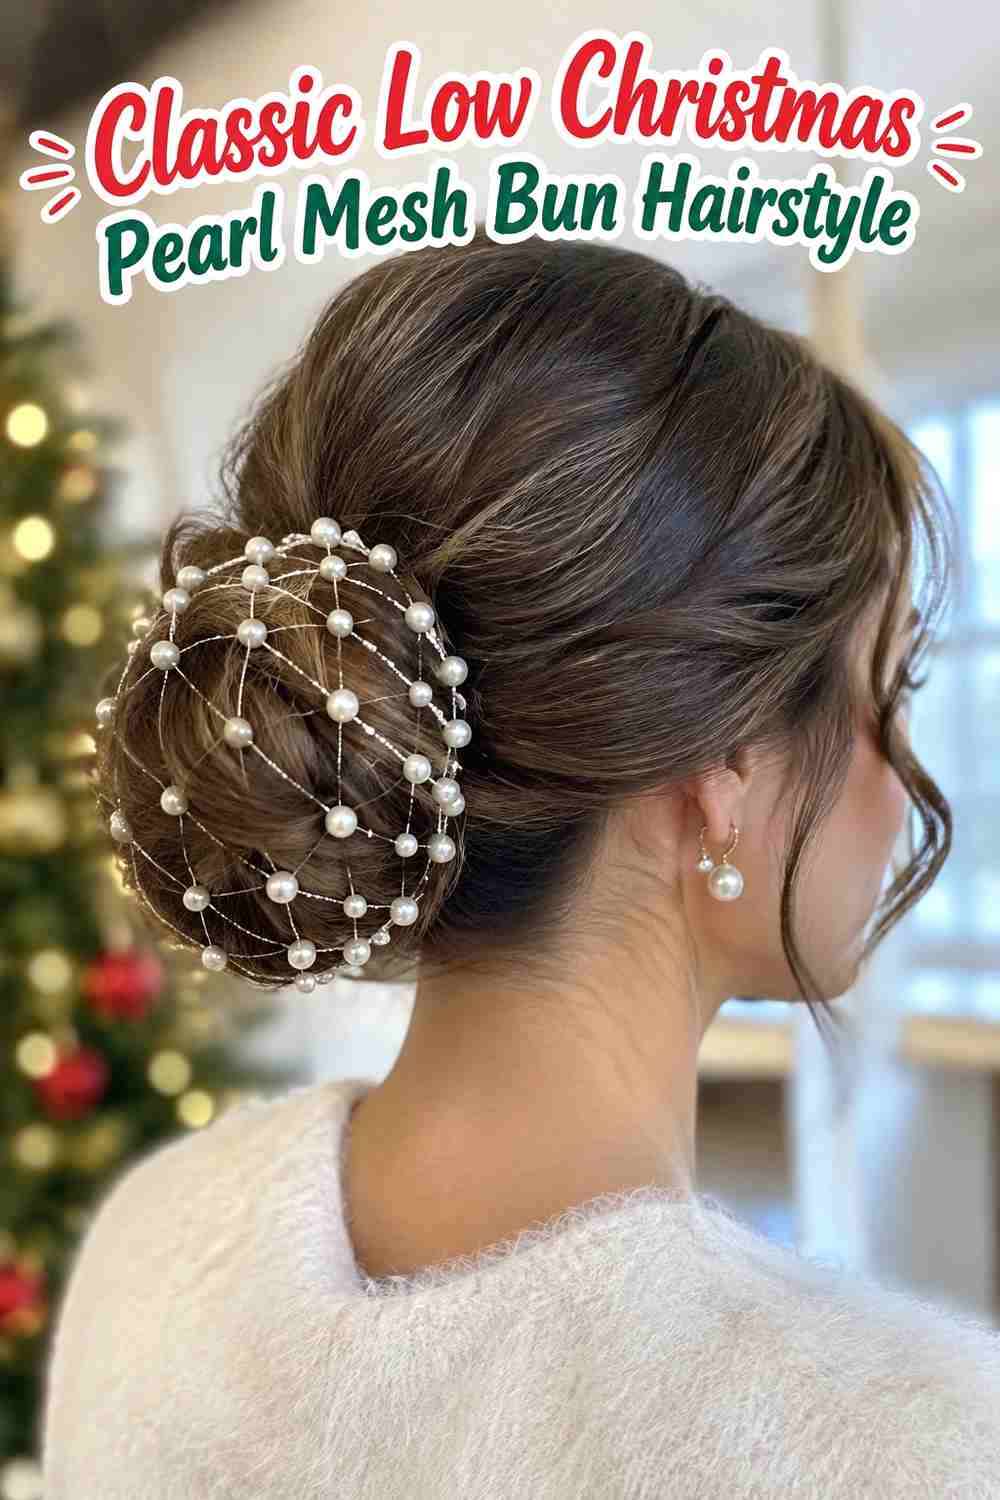
The classic low pearl mesh bun places a smooth rounded bun at the nape and covers it with a delicate pearl-dotted mesh. The accessory should follow the bun’s natural shape rather than squeezing it into an unnaturally tight ball. Medium to long hair works especially well because the bun can be formed securely before the mesh is added. Keep the crown softly controlled and allow a little natural root lift so the hairstyle does not feel overly severe. Choose a mesh with evenly spaced small pearls for a refined Christmas effect. Secure the bun independently with pins first, then anchor the mesh discreetly around the outer edge so it remains decorative rather than structural.
Styling Notes
Fit the mesh after the bun is completely shaped. Starting with the accessory too early can make the hair harder to arrange evenly.
Best For
This version suits Christmas dinners, church services, holiday portraits, office parties, and elegant family gatherings.
2. High Crown Christmas Pearl Mesh Bun Hairstyle
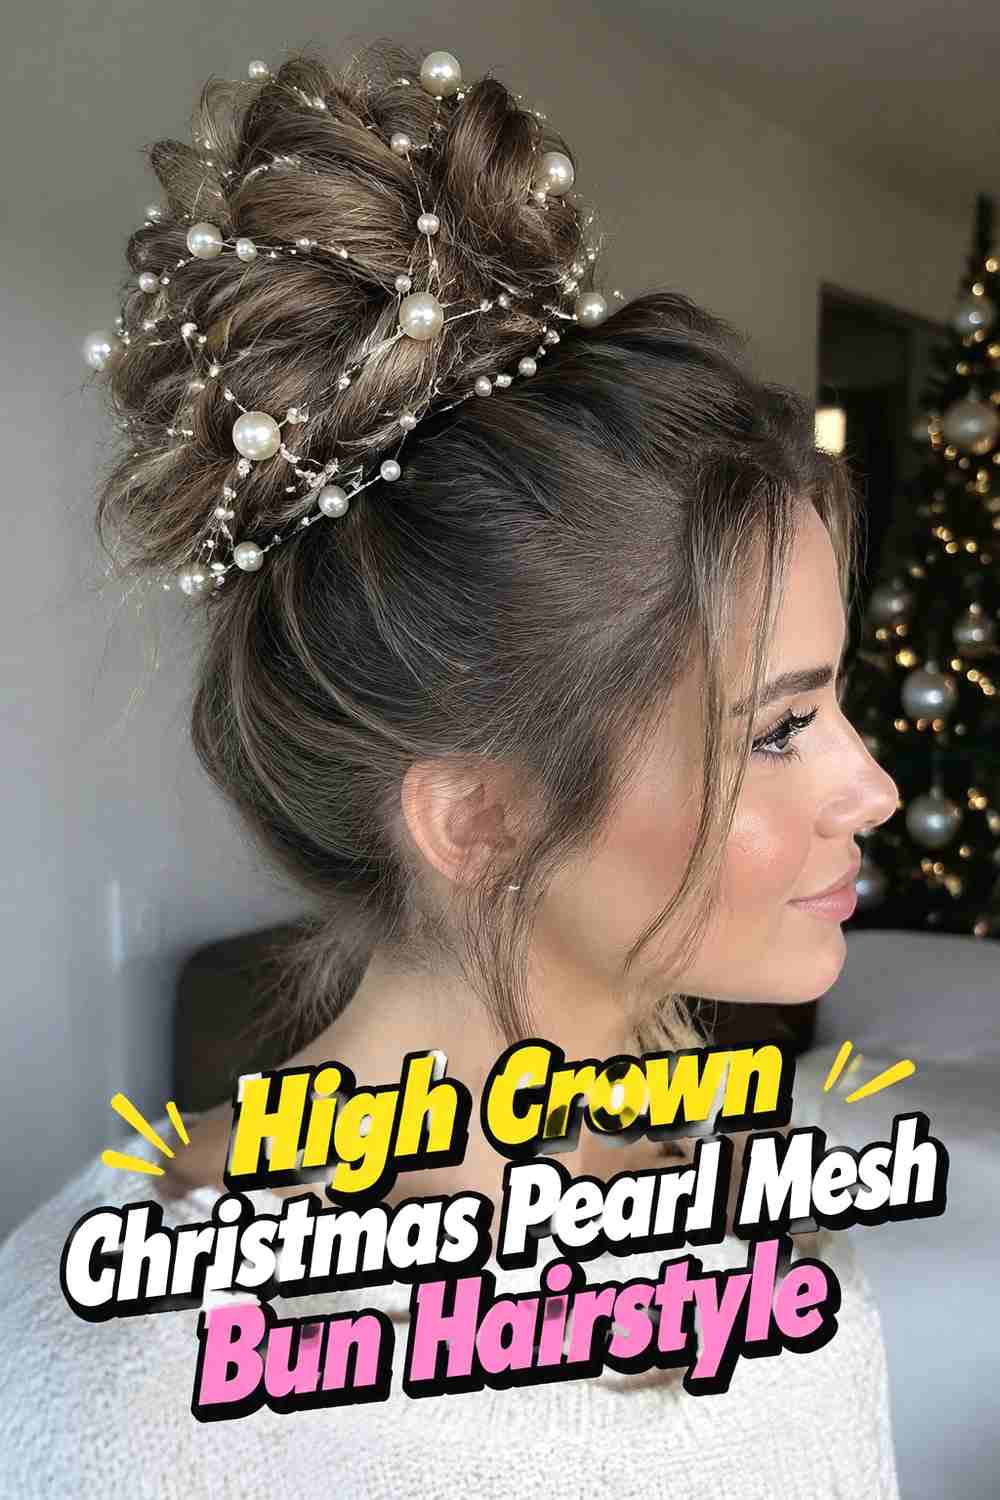
A high crown pearl mesh bun keeps the hairstyle clear of scarves, high collars, and winter layers while creating a festive focal point near the top of the head. Gather the hair upward and form a rounded bun with enough width to balance the height. Once pinned securely, fit the pearl mesh loosely around the bun so individual strands and the overall silhouette remain visible. Long or dense hair may be easier to build in smaller wrapped sections rather than one tight coil. Keep the base firm enough for support without pulling the hairline excessively. A fine mesh with small pearls usually looks more refined than a heavily decorated net on a high bun.
Wear & Maintenance
Check that the mesh anchors are hidden and comfortable before adding hairspray or finishing details, especially around the bun base.
Why It Works
The elevated placement creates a festive silhouette while keeping the decorative pearl detail easy to see from several angles.
3. Side Swept Christmas Pearl Mesh Bun Hairstyle
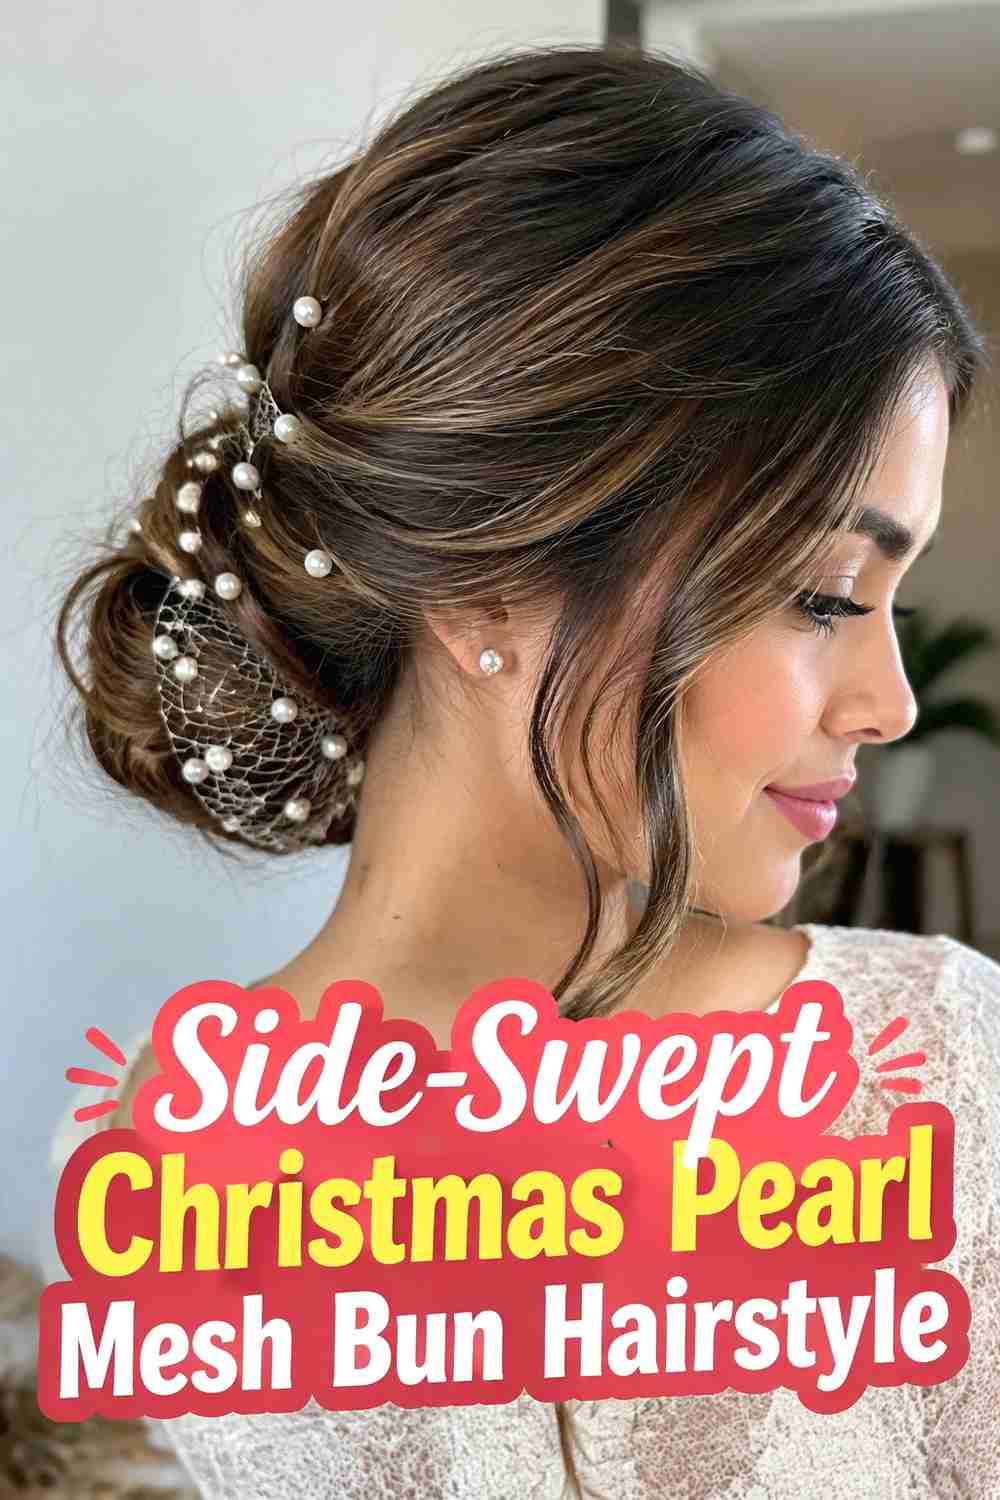
The side-swept version creates movement through the front before gathering the hair into a pearl-covered bun at the back. A deep or moderate side part can guide the heavier section diagonally across the head, while the opposite side remains smoother and more controlled. The bun itself can sit centrally at the nape, allowing the asymmetry to come mainly from the front. Medium to long hair gives the side sweep enough length to blend smoothly into the gathering point. Once the bun is secure, add a light pearl mesh that follows its outer shape. Avoid covering the front sweep with extra accessories because the contrast between the clean direction and decorated bun provides enough visual interest.
Why It Works
The side movement adds sophistication to the front while the pearl mesh creates the strongest festive detail at the back.
Pro Tip
Finish and pin the side sweep before forming the bun so its direction does not collapse when the lower hair is gathered.
4. Soft Twisted Christmas Pearl Mesh Bun Hairstyle
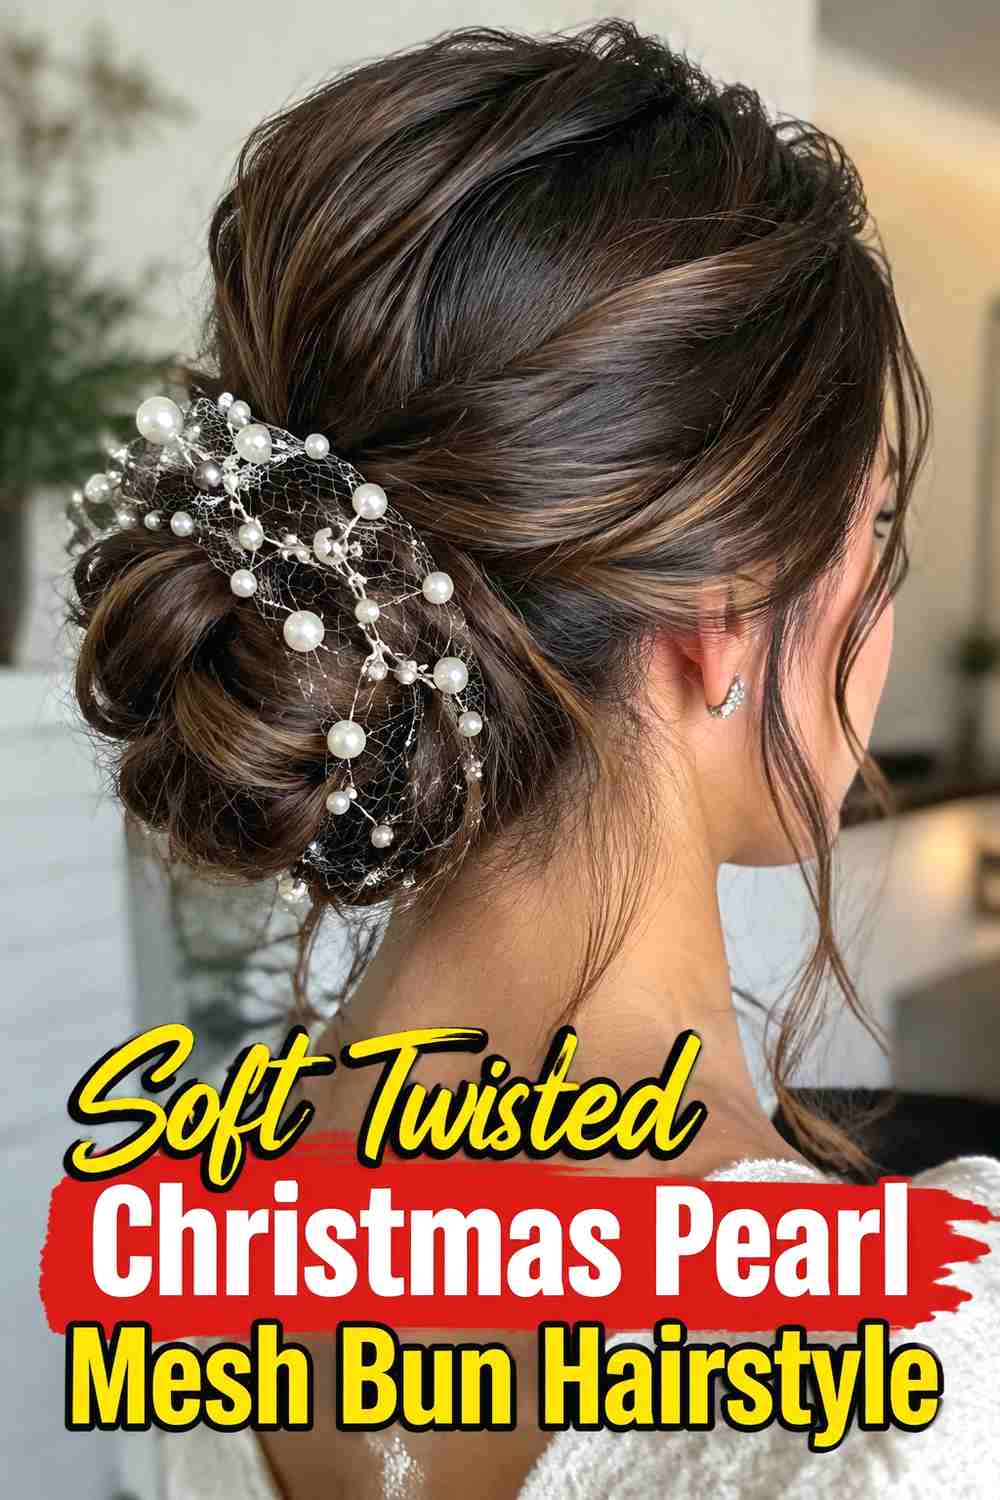
This pearl mesh bun begins with broad side twists that meet at the nape before the remaining hair is formed into a low bun. The twists introduce texture without requiring a complicated braid, while the mesh brings a decorative Christmas finish to the bun itself. Keep each side section softly rolled instead of tightly wound so the shape remains relaxed and dimensional. Medium to long hair works best because there is enough length for the twists to merge naturally into the lower section. Secure the twisted foundation first, form the bun, and then fit the pearl mesh over only the rounded bun portion. This keeps the accessory from hiding the side detail.
Styling Notes
Anchor each twist separately before creating the bun. Independent support keeps the design stable if one section loosens slightly.
Best For
Try this look for romantic Christmas dinners, winter weddings, family portraits, and softer holiday outfits.
5. Sleek Center Part Christmas Pearl Mesh Bun Hairstyle
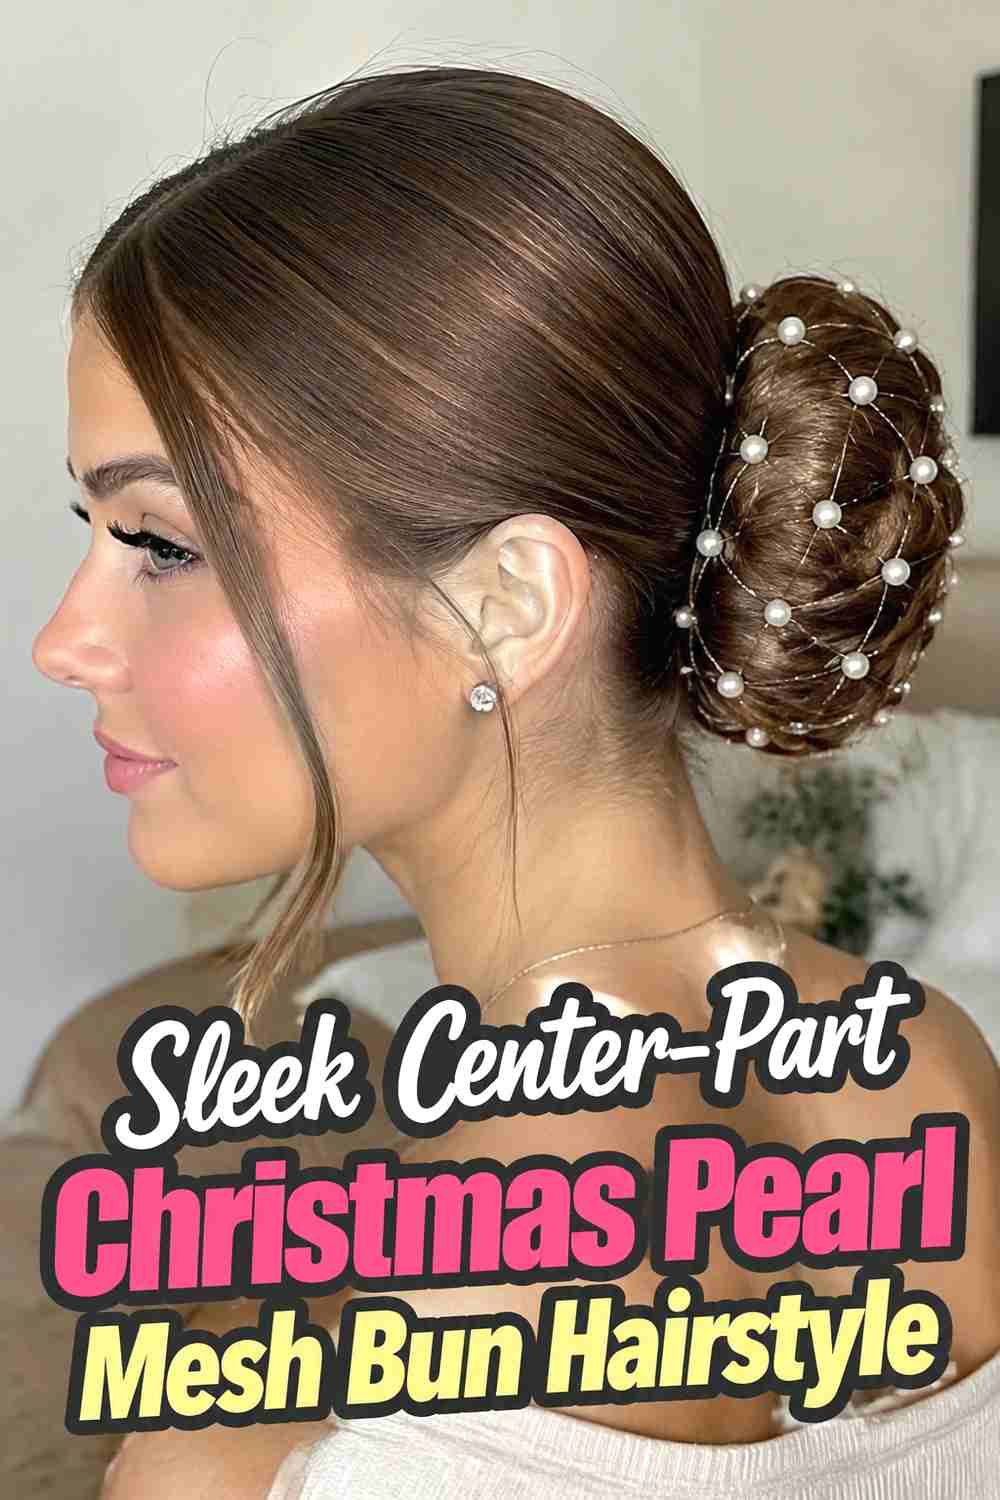
A sleek center part gives the pearl mesh bun a clean, modern front with the decoration concentrated at the back. Divide the hair evenly, smooth both sides toward a low gathering point, and form a compact rounded bun at the nape. The surface should look controlled without becoming wet or excessively flat, allowing realistic strand detail and natural shine to remain visible. A fine pearl mesh provides contrast against the minimalist front and can make the bun feel more festive without adding other accessories. Medium to long hair is easiest to tuck cleanly, especially when the front sections reach the anchor point without excessive pinning.
Wear & Maintenance
Use flexible smoothing products around the front so the style stays neat while maintaining natural movement and comfort.
Why It Works
The restrained center part allows the pearl-covered bun to become the clear decorative focus without making the hairstyle feel busy.
6. Curly Christmas Pearl Mesh Bun Hairstyle
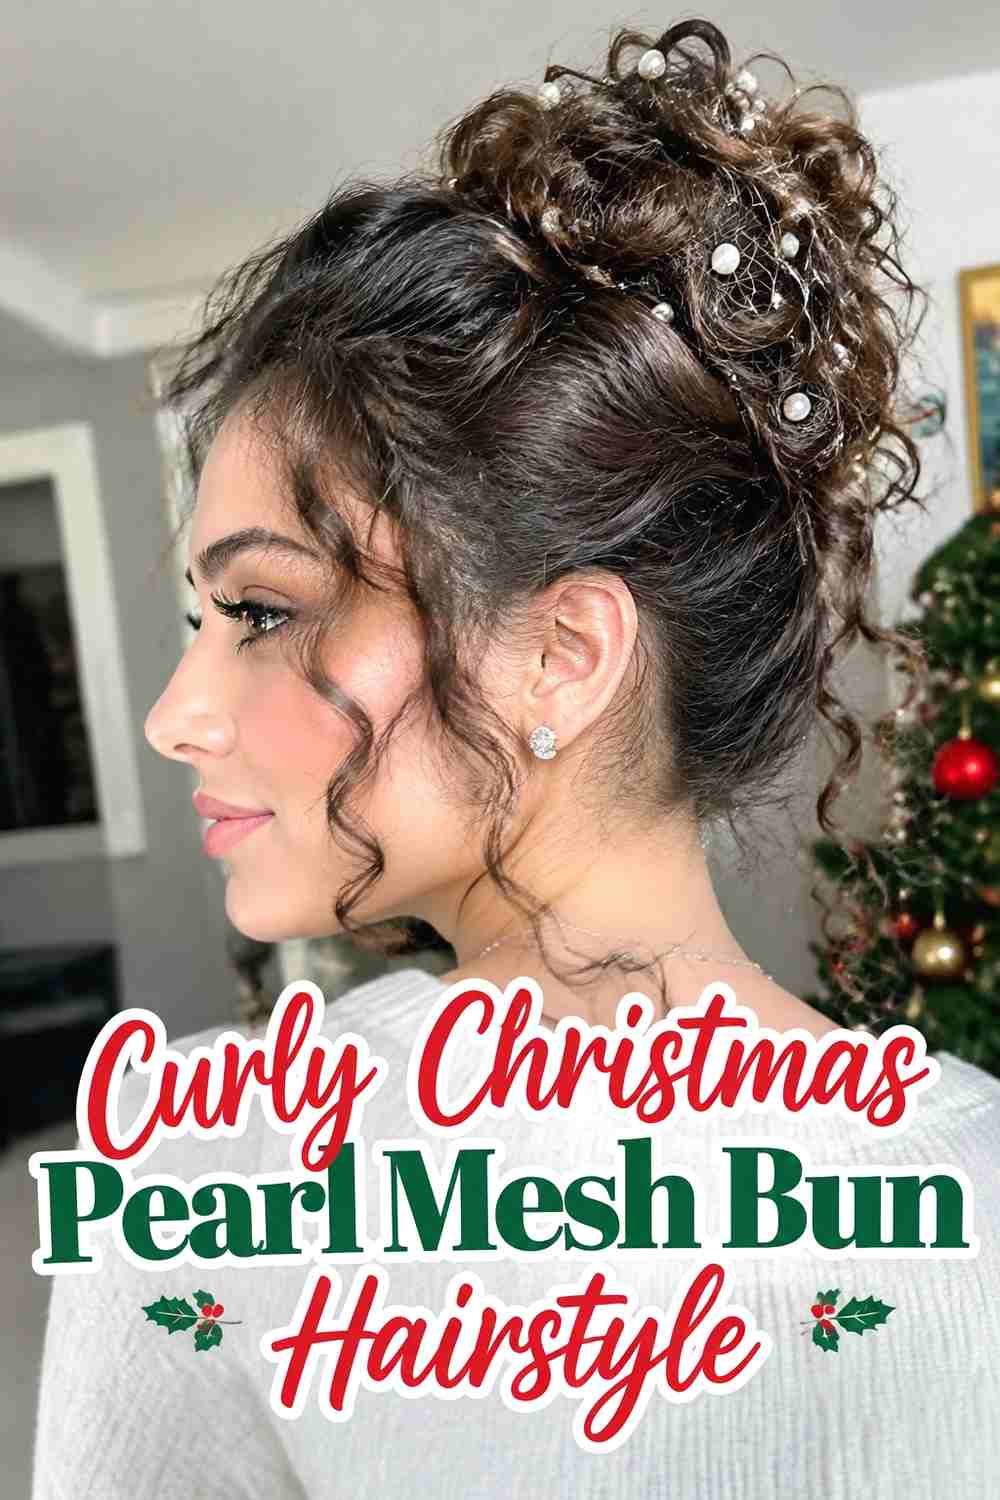
A curly pearl mesh bun preserves visible curl definition around the bun instead of smoothing every section into a uniform surface. Gather curls gently toward the back or crown and pin them in overlapping sections to create a rounded cluster. The pearl mesh should sit loosely enough that individual curls remain visible between its openings. Curly and coily medium to long hair can create plenty of fullness without teasing, though dense hair may require several internal anchor points. Refresh visible curls individually after the bun is secure, then add the mesh last. A flexible net with widely spaced pearls works especially well because it enhances the texture rather than flattening it.
Hair Type & Length
Curly and coily hair with enough length to gather comfortably works beautifully, with bun size adjusted to natural density.
Pro Tip
Avoid using the mesh to compress loose curls into place; pin the bun first and treat the accessory purely as decoration.
7. Braided Christmas Pearl Mesh Bun Hairstyle
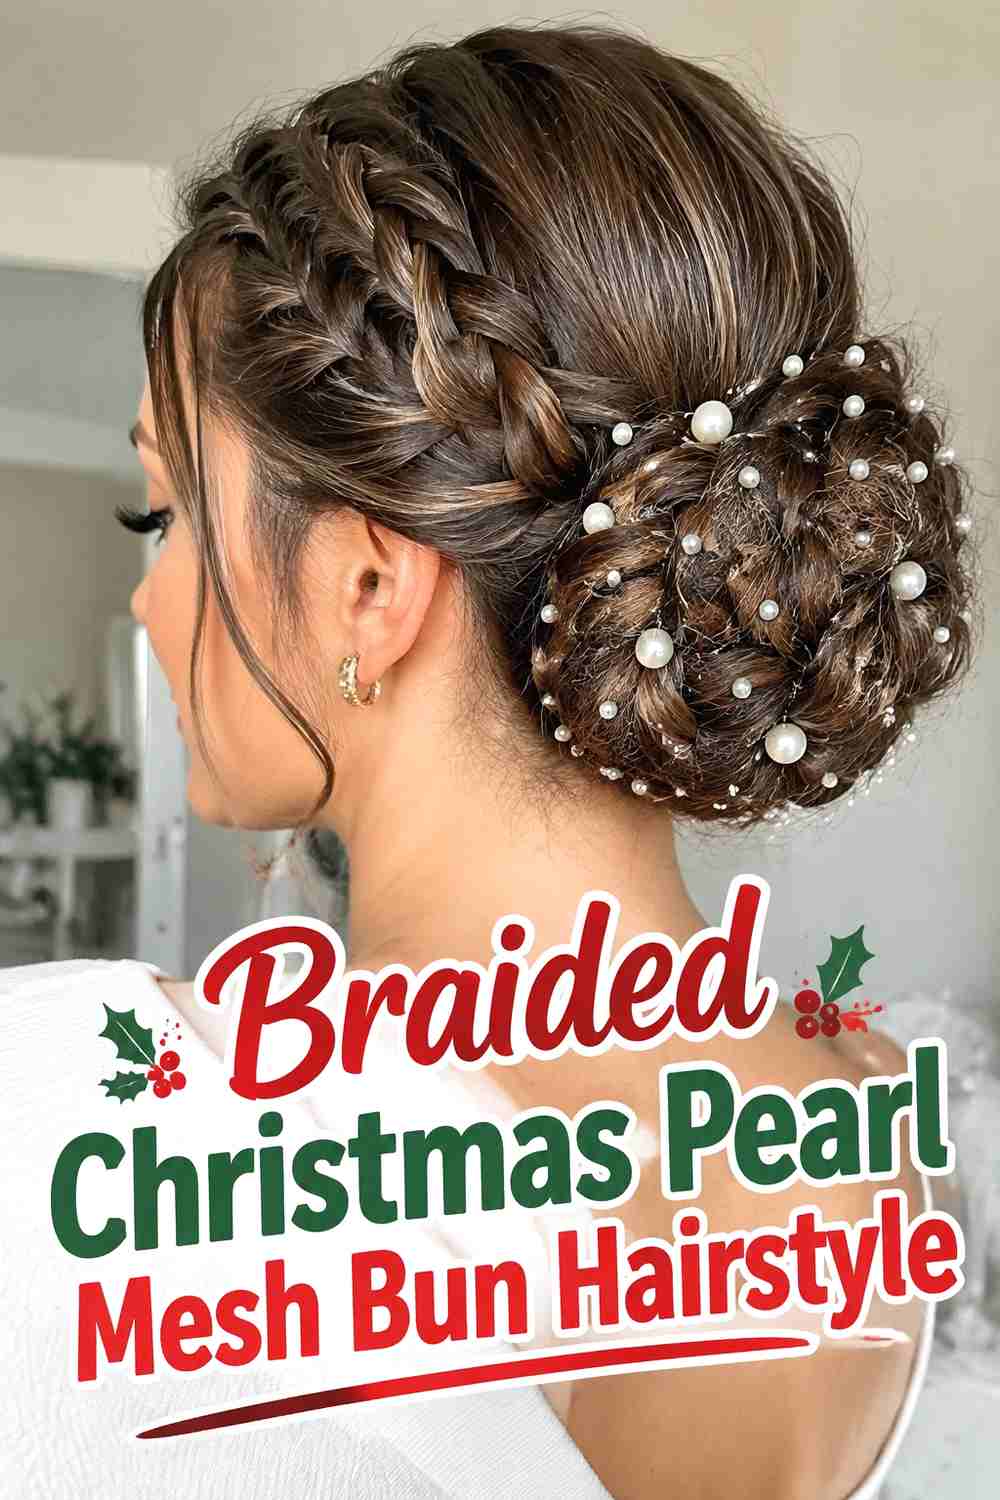
A braided pearl mesh bun combines two types of texture: a visible braid and a delicate pearl overlay. The hair can be gathered into a low ponytail, braided in a classic three-strand pattern, and then wrapped into a bun. Another option is to add a side braid that feeds into a simpler bun. Keep enough of the woven texture visible beneath the mesh so the braid remains recognizable. Medium to long hair works best because extra length gives the braid room to form before it is coiled. Once the bun is pinned, stretch the mesh gently over the finished shape and anchor it around the outer edge.
Why It Works
The braid adds structural texture beneath the pearl pattern, creating a layered finish that looks detailed without needing multiple accessories.
Styling Notes
Use a mesh with relatively open spacing so it does not completely cover the braid pattern underneath.
8. Low Side Christmas Pearl Mesh Bun Hairstyle
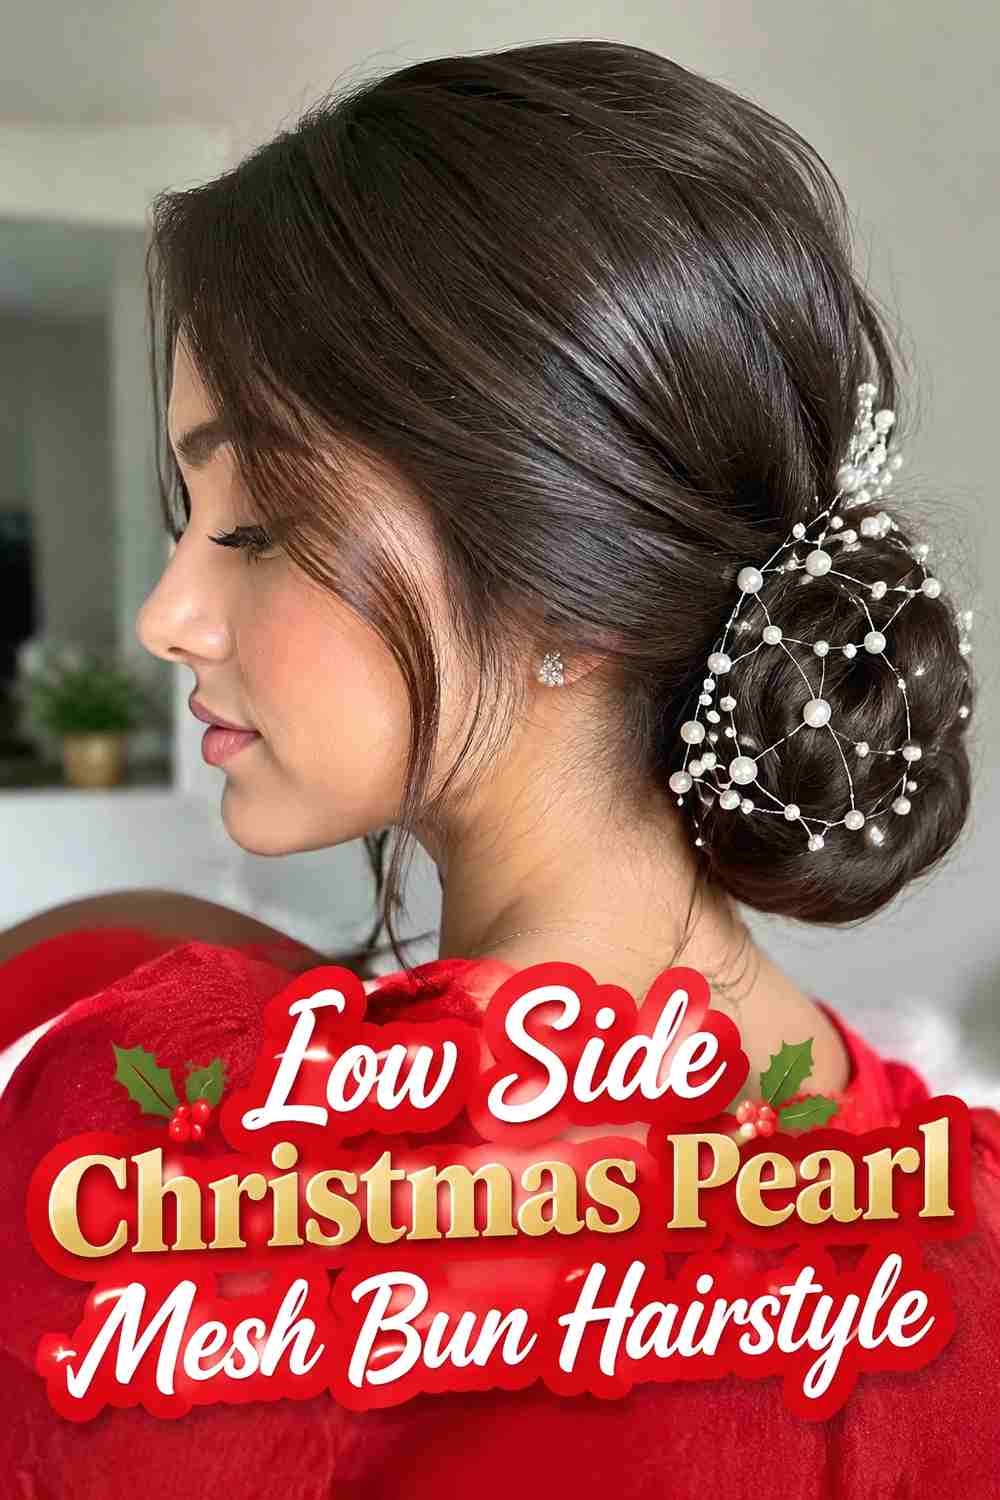
A low side pearl mesh bun sits just behind or below one ear, creating a softer asymmetrical silhouette. Sweep the hair diagonally across the back and build the bun where the head curves toward the nape. The off-center placement makes both the bun and pearl detail visible from front-facing angles, which can be useful for holiday portraits. Medium to long hair provides enough flexibility for a balanced side bun, while dense hair may benefit from sectioned pinning. Once the bun is stable, fit the pearl mesh around its rounded shape and keep the opposite side of the hairstyle relatively simple.
Wear & Maintenance
Use crossed structural pins underneath the bun because the off-center position places more weight on one side.
Best For
This option suits Christmas parties, winter weddings, formal dinners, and anyone who prefers asymmetrical updos.
9. Half Mesh Christmas Pearl Bun Hairstyle
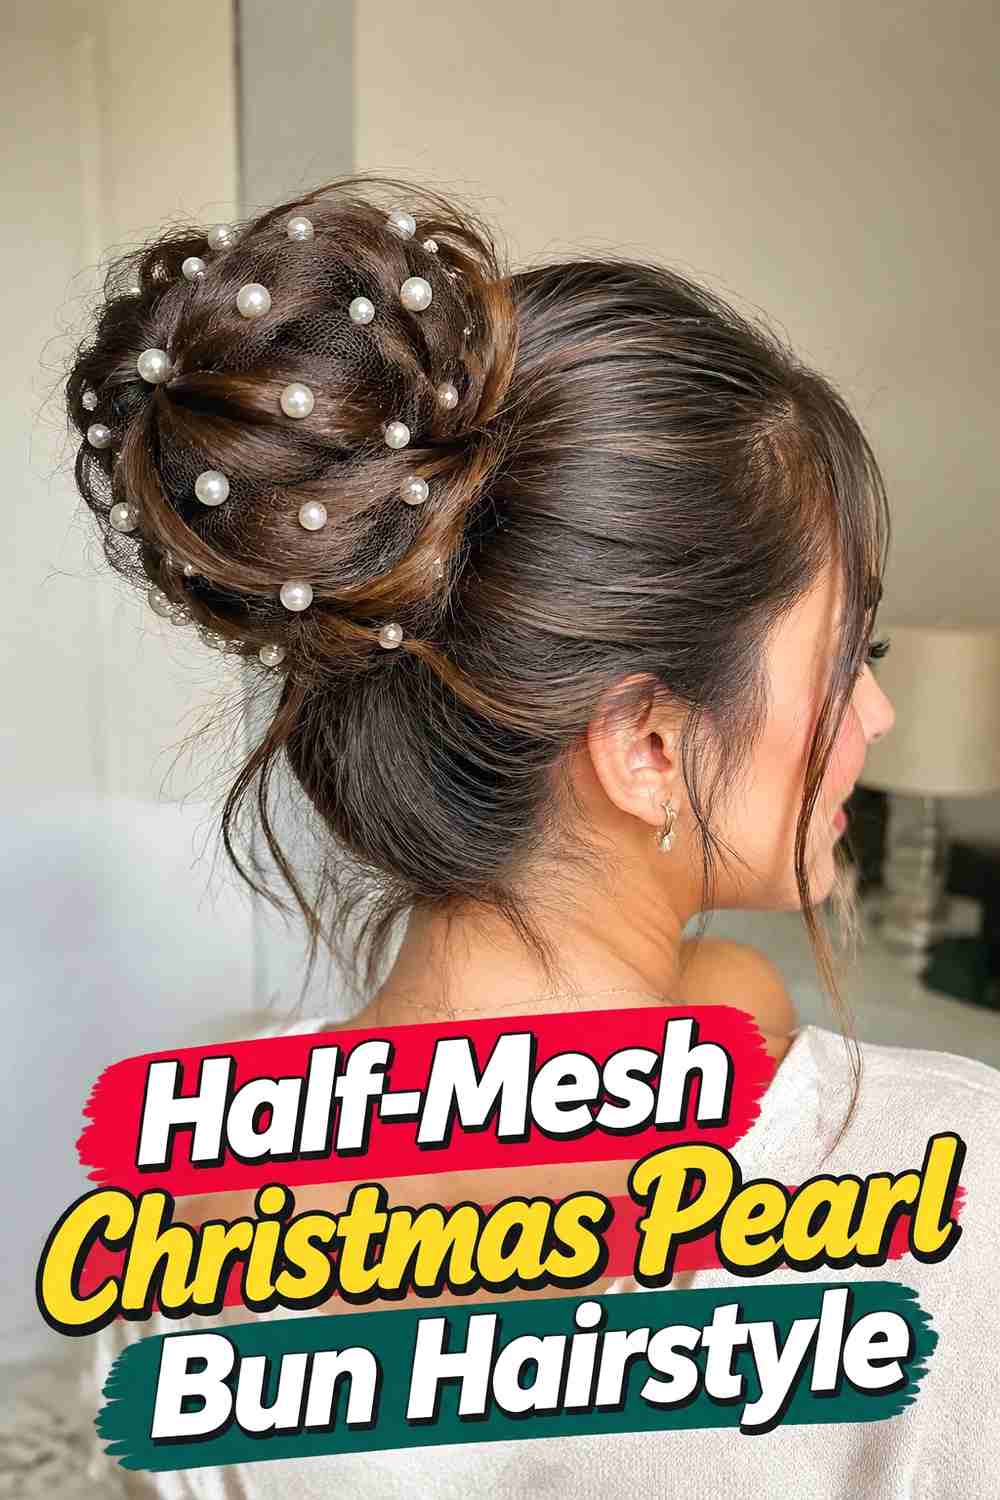
The half-mesh pearl bun uses the accessory on only part of the bun, allowing more of the hair texture to remain exposed. A small mesh panel can drape across the upper half, one side, or lower curve of a smooth or textured bun. This creates a lighter decorative effect than a fully covered bun and works especially well when the hair itself has waves, twists, highlights, or braided detail worth showing. Medium and long hair can both support the style as long as the bun is large enough to display the partial overlay clearly. Anchor the mesh at several discreet points so the edge lies neatly instead of lifting away.
Why It Works
Partial coverage adds pearl detail while keeping the bun’s natural texture and construction visible.
Pro Tip
Position the most decorative part of the mesh away from the bun’s strongest textural feature so both elements can be appreciated.
10. Draped Pearl Mesh Christmas Bun Hairstyle
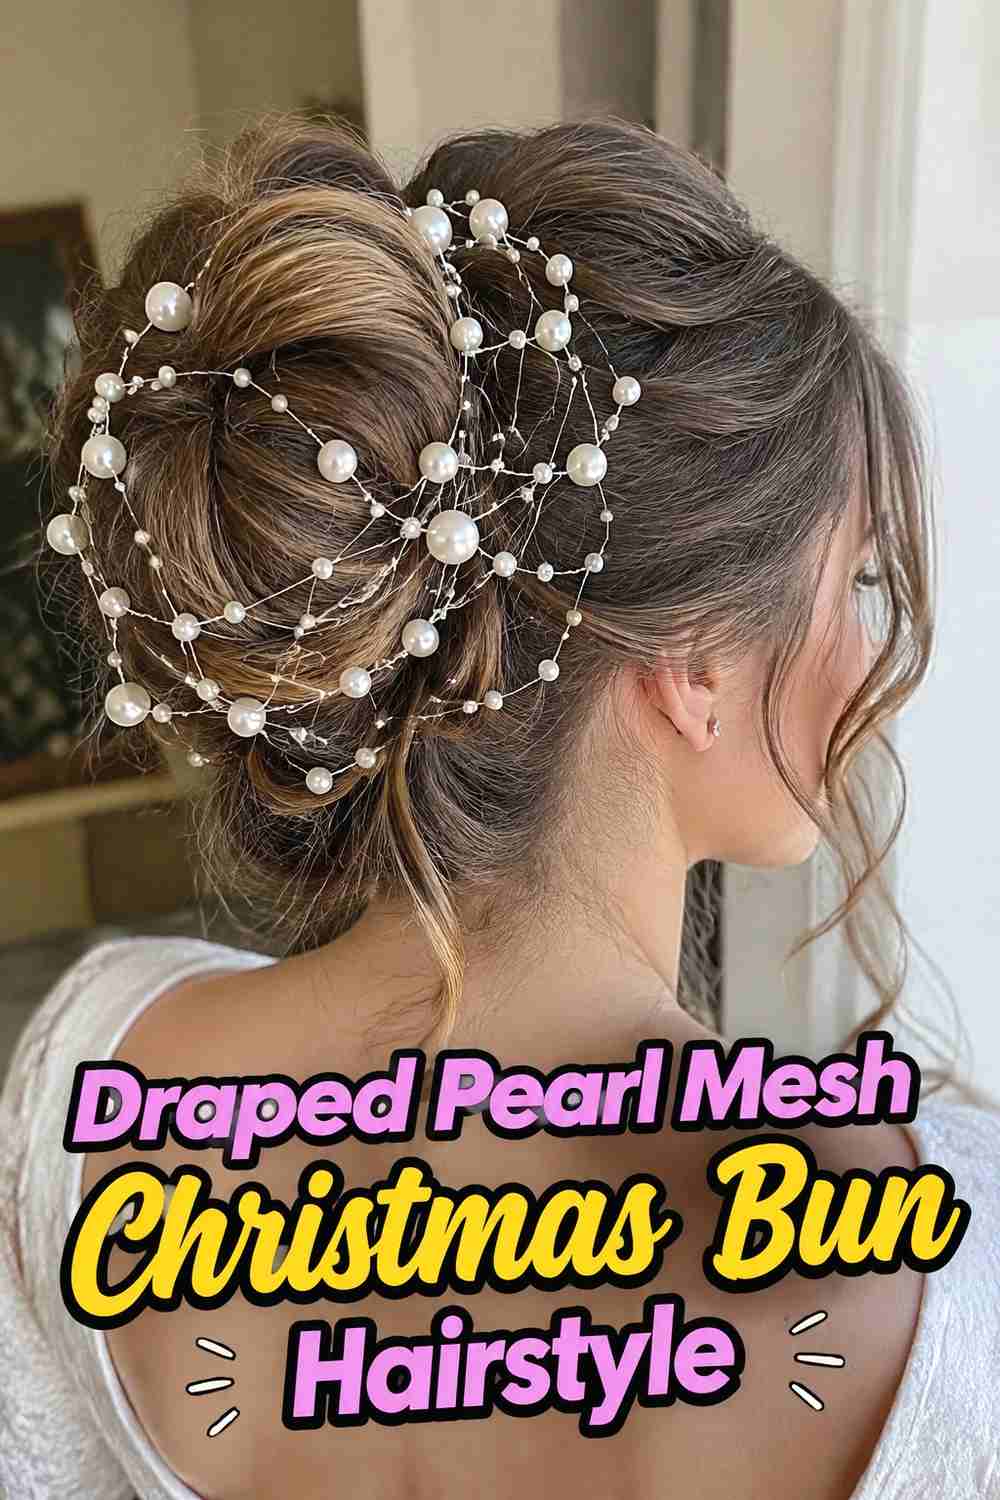
The draped version allows the pearl mesh to fall more loosely across the bun instead of fitting tightly around its entire shape. Create a secure low or mid-height bun first, then place a lightweight mesh panel so it curves across the surface with a little softness at the edges. The drape should remain controlled and never hang so far that it obscures the neck or catches easily on clothing. A compact smooth bun provides a clean foundation, while a textured bun creates a more romantic effect. Keep the attachment points hidden beneath the outer hair or bun edge, and use only a small amount of extra decoration.
Styling Notes
Choose lightweight mesh so the draped effect looks airy rather than pulling downward on the bun.
Best For
This variation works well for elegant Christmas dinners, winter receptions, holiday portraits, and dressier evening styling.
11. Mini Pearl Mesh Christmas Bun Hairstyle
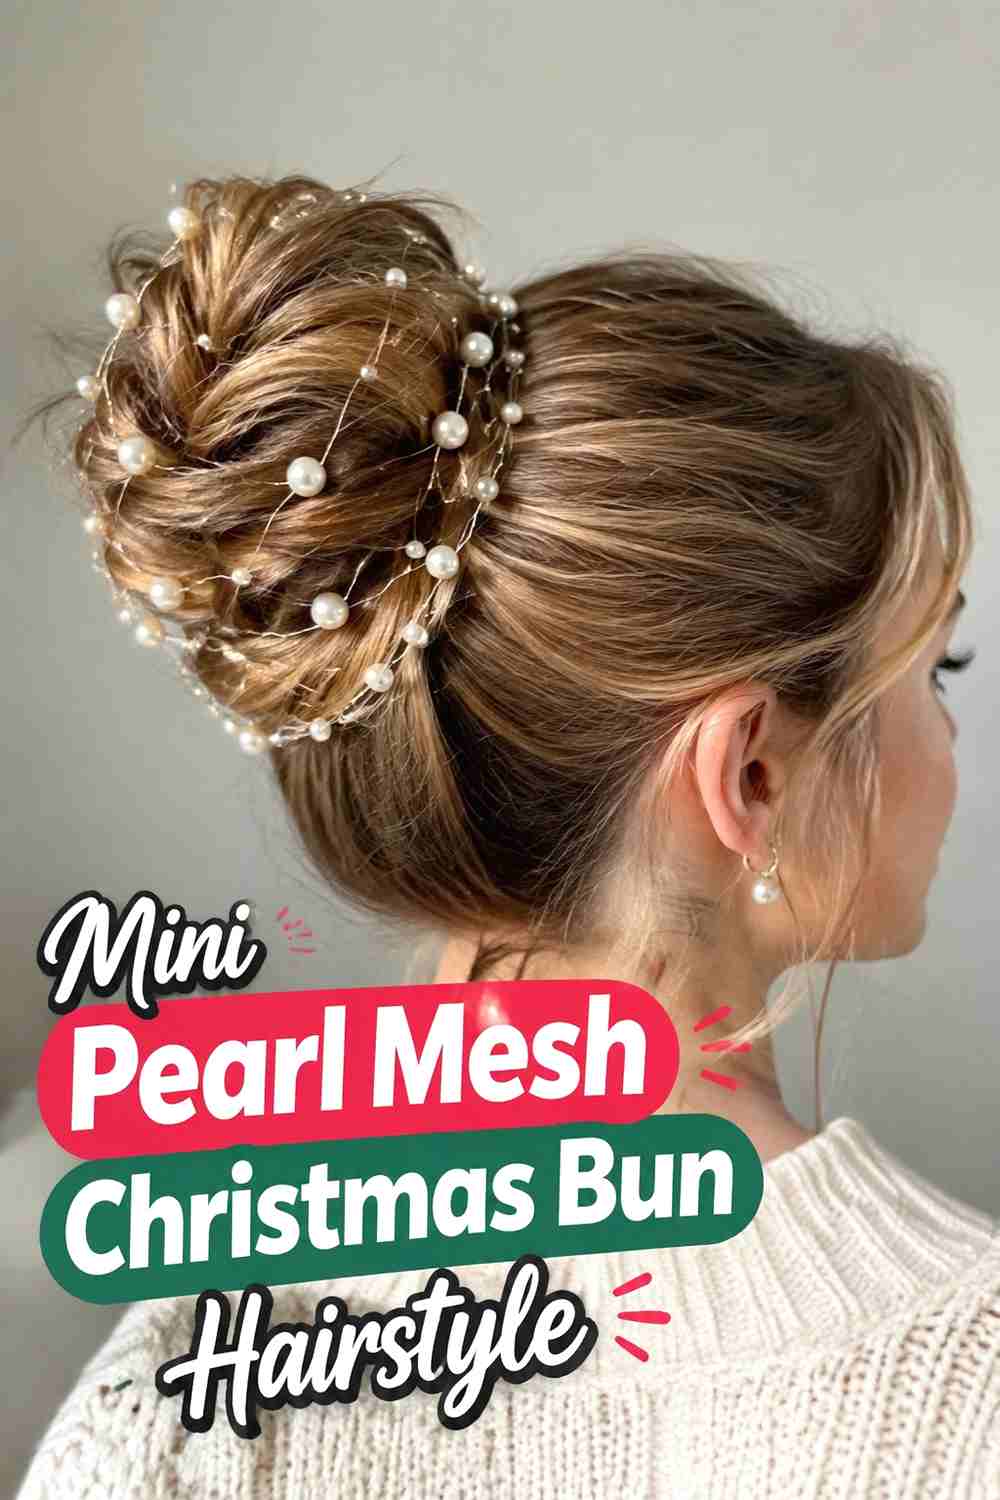
A mini pearl mesh bun offers a subtler interpretation for shoulder-length or medium hair that cannot create a large wrapped bun. Form a compact bun at the nape using the available length, tucking shorter ends underneath with small pins. A smaller pearl mesh piece can then fit around the bun without overwhelming its scale. Keep the pearls fine and evenly spaced so the accessory remains proportional to the hairstyle. The crown can stay softly smooth or slightly textured depending on preference. This version proves that the pearl mesh idea does not require very long hair, as long as the accessory size matches the bun and the anchor points remain discreet.
Hair Type & Length
Shoulder-length and medium hair can work especially well when the bun stays compact and the mesh is scaled accordingly.
Wear & Maintenance
Use smaller pins around short ends so they remain tucked without making the bun unnecessarily tight.
12. Velvet Ribbon Christmas Pearl Mesh Bun Hairstyle
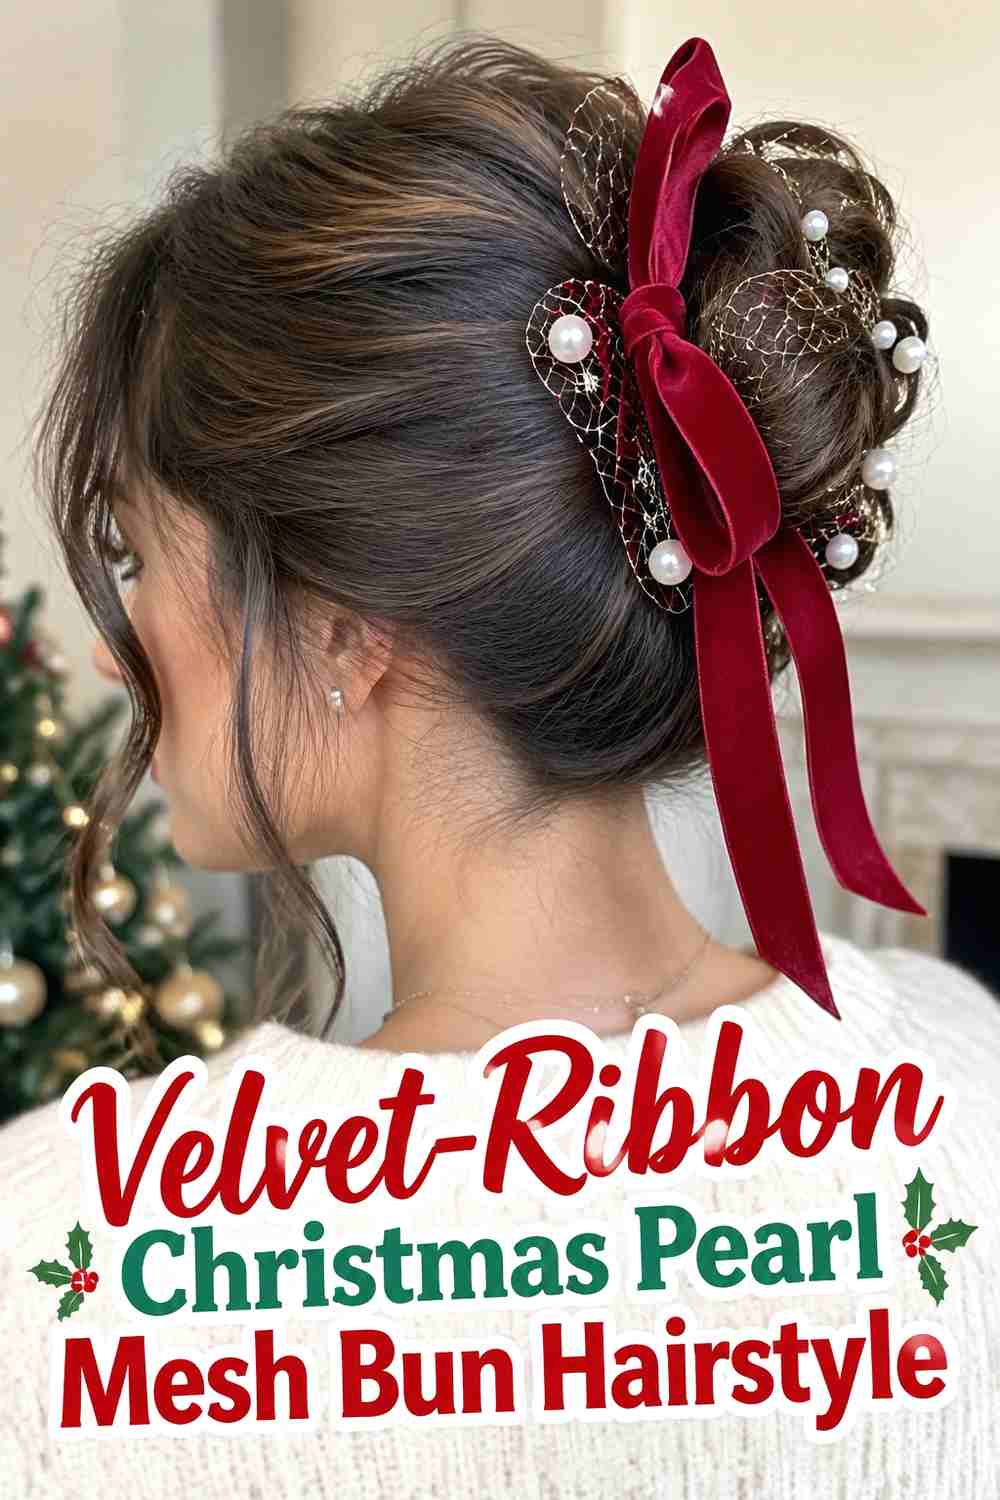
Velvet and pearls create a distinctly festive texture combination when used with restraint. Build a low or mid-height bun and cover it with a delicate pearl mesh, then add a narrow velvet ribbon around the base or tie a small bow just below the bun. Deep green, cranberry, navy, cream, or black velvet can complement pearl details beautifully while keeping the look seasonal. Avoid using a very wide ribbon, which can hide both the mesh and bun shape. Secure the hairstyle and mesh completely before tying the ribbon so the accessory remains easy to adjust. Medium to long hair gives you the most flexibility in bun size and placement.
Why It Works
The matte softness of velvet contrasts with luminous pearls, creating festive detail without requiring a large decorative clip.
Pro Tip
Keep the bow compact and place it away from the most visible pearl pattern so the two accessories do not compete.
13. Face Framing Christmas Pearl Mesh Bun Hairstyle
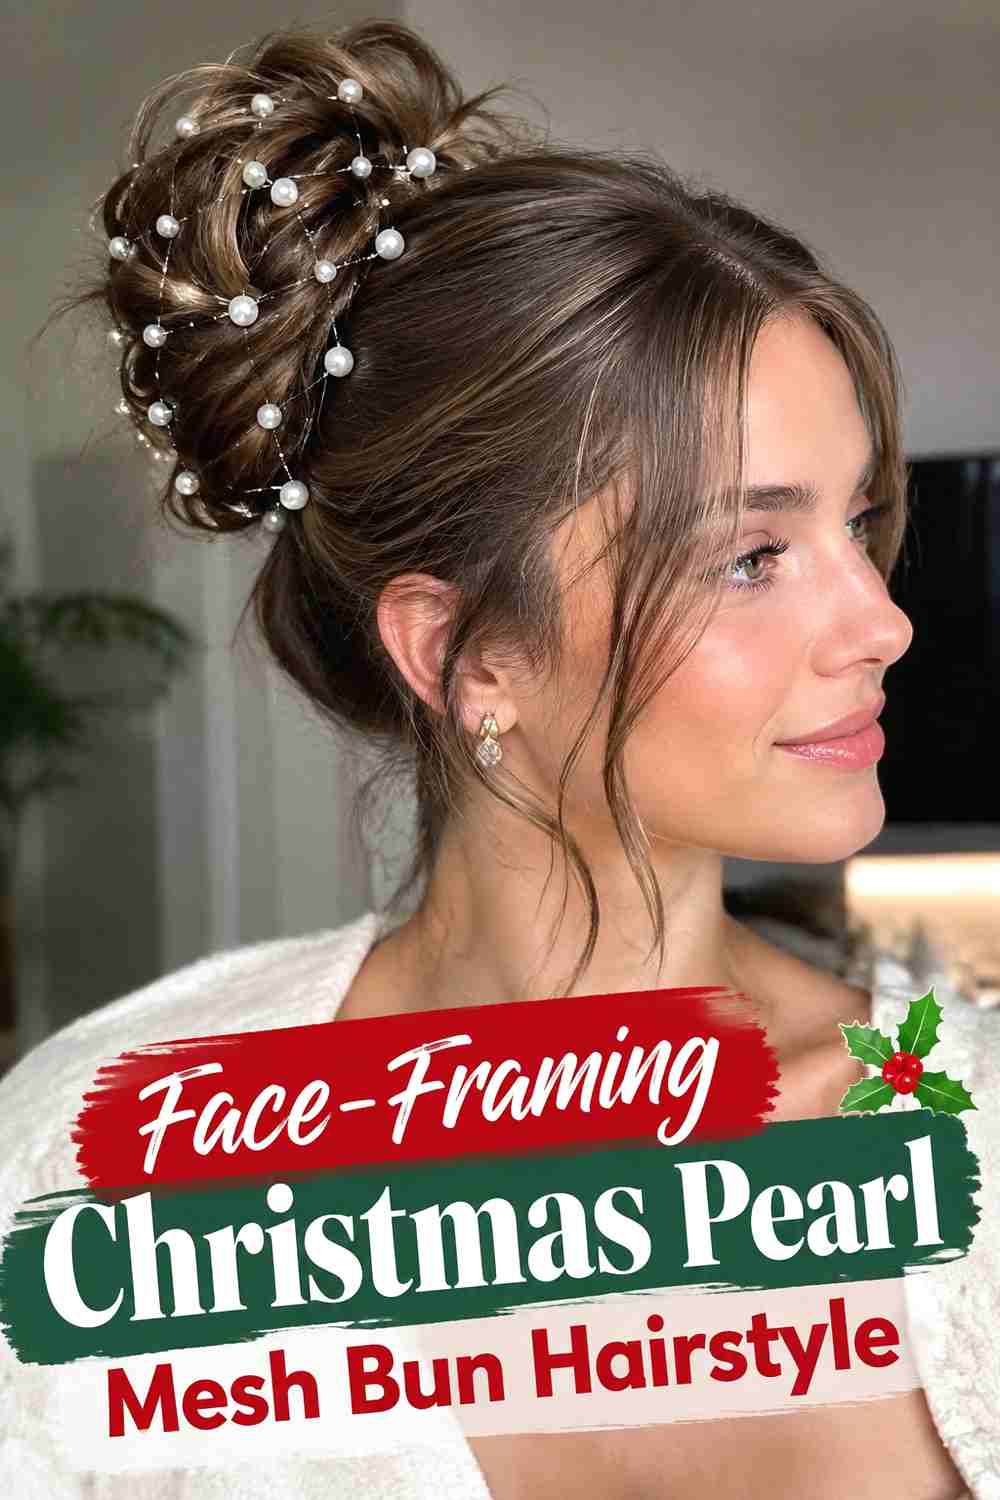
Face-framing pieces soften a pearl mesh bun by keeping a few shorter layers loose around the temples and cheeks. Separate these sections before styling, then gather the remaining hair into a low or mid-height bun and secure it completely. Add the pearl mesh only after the bun is stable, ensuring it does not catch the front pieces. The loose sections can receive a gentle bend or follow their natural texture, creating movement around the face while the back remains structured and festive. Layered medium to long hair works particularly well. Keep the number of free pieces limited so the hairstyle still looks intentional and the pearl-covered bun remains the main feature.
Styling Notes
Choose the face-framing sections before gathering the hair so you do not have to pull strands out of the finished bun later.
Best For
This style suits Christmas date nights, family portraits, dinners, parties, and romantic winter events.
14. Double Christmas Pearl Mesh Bun Hairstyle
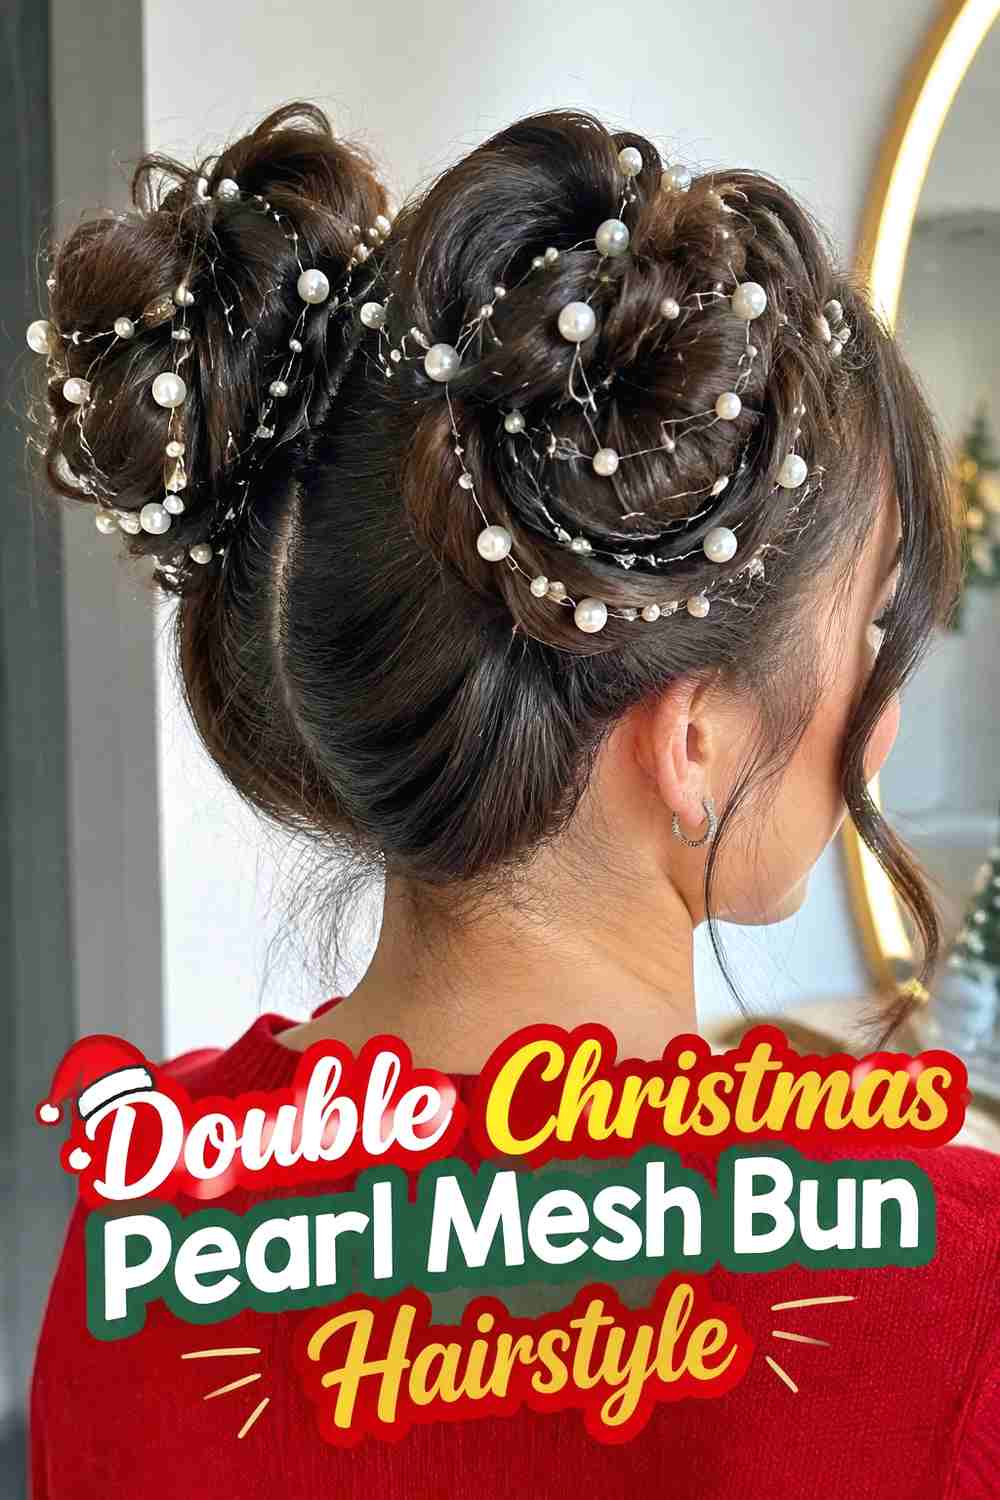
The double pearl mesh bun divides the hair into two smaller buns instead of concentrating all the volume in one place. The buns can sit vertically at the back or side by side, depending on hair length and preferred silhouette. Use matching lightweight mesh covers on both sections so the design feels coordinated. Medium to long hair with enough density to divide evenly works best, though the buns do not need to be perfectly identical. Secure each one independently before adding the pearl mesh. Keep the rest of the hairstyle relatively simple because the paired buns already create a distinctive shape and plenty of festive detail.
Hair Type & Length
Medium-long to long hair with moderate density provides enough volume to create two clearly defined buns without making either section too small.
Pro Tip
Check both buns from the back before adding the mesh so their placement and scale feel balanced.
15. Textured Christmas Pearl Mesh Bun Hairstyle
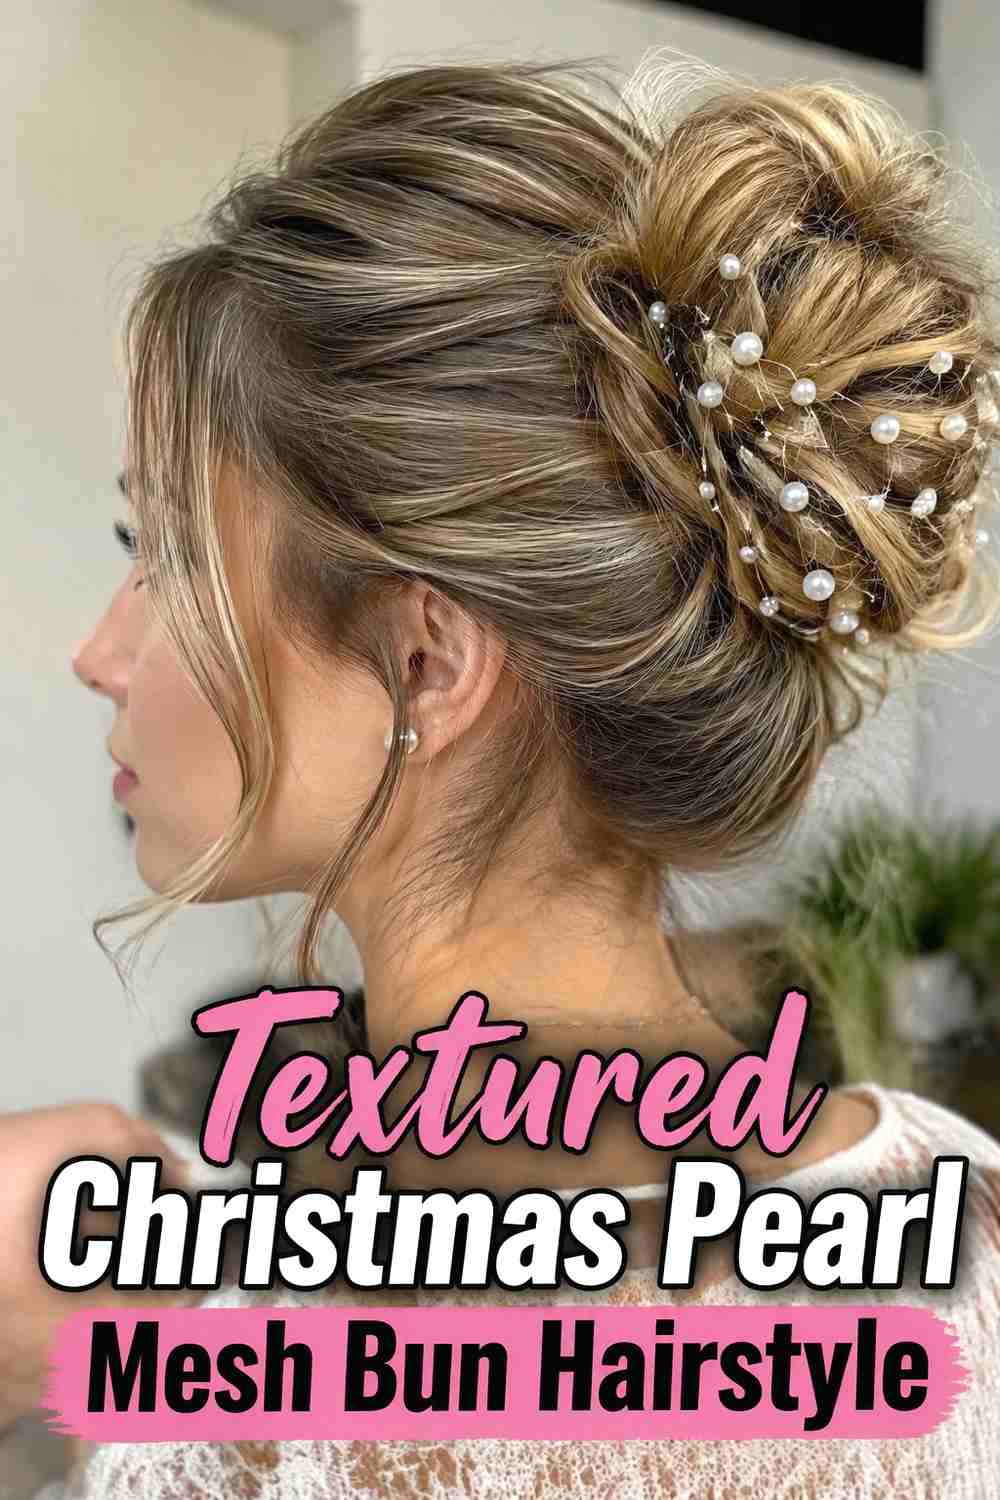
A textured pearl mesh bun uses loose bends, soft separation, and slightly expanded sections to create a more relaxed Christmas updo. Start with waves or natural texture, then gather the hair into a broad low bun without smoothing away every variation. Once the hidden pins are secure, loosen only a few outer sections to create an airy surface. Fit an open pearl mesh over the bun so the texture remains visible between the strands. Layered medium to long hair works particularly well because shorter pieces naturally add dimension. Keep the crown controlled enough that the bun looks deliberately textured rather than unfinished.
Why It Works
The contrast between irregular hair texture and evenly spaced pearls creates visual depth while preserving a relaxed seasonal finish.
Wear & Maintenance
Keep the internal anchors firm; softness should come from the outer surface rather than from a loose foundation.
16. Polished Christmas Pearl Mesh Bun Hairstyle
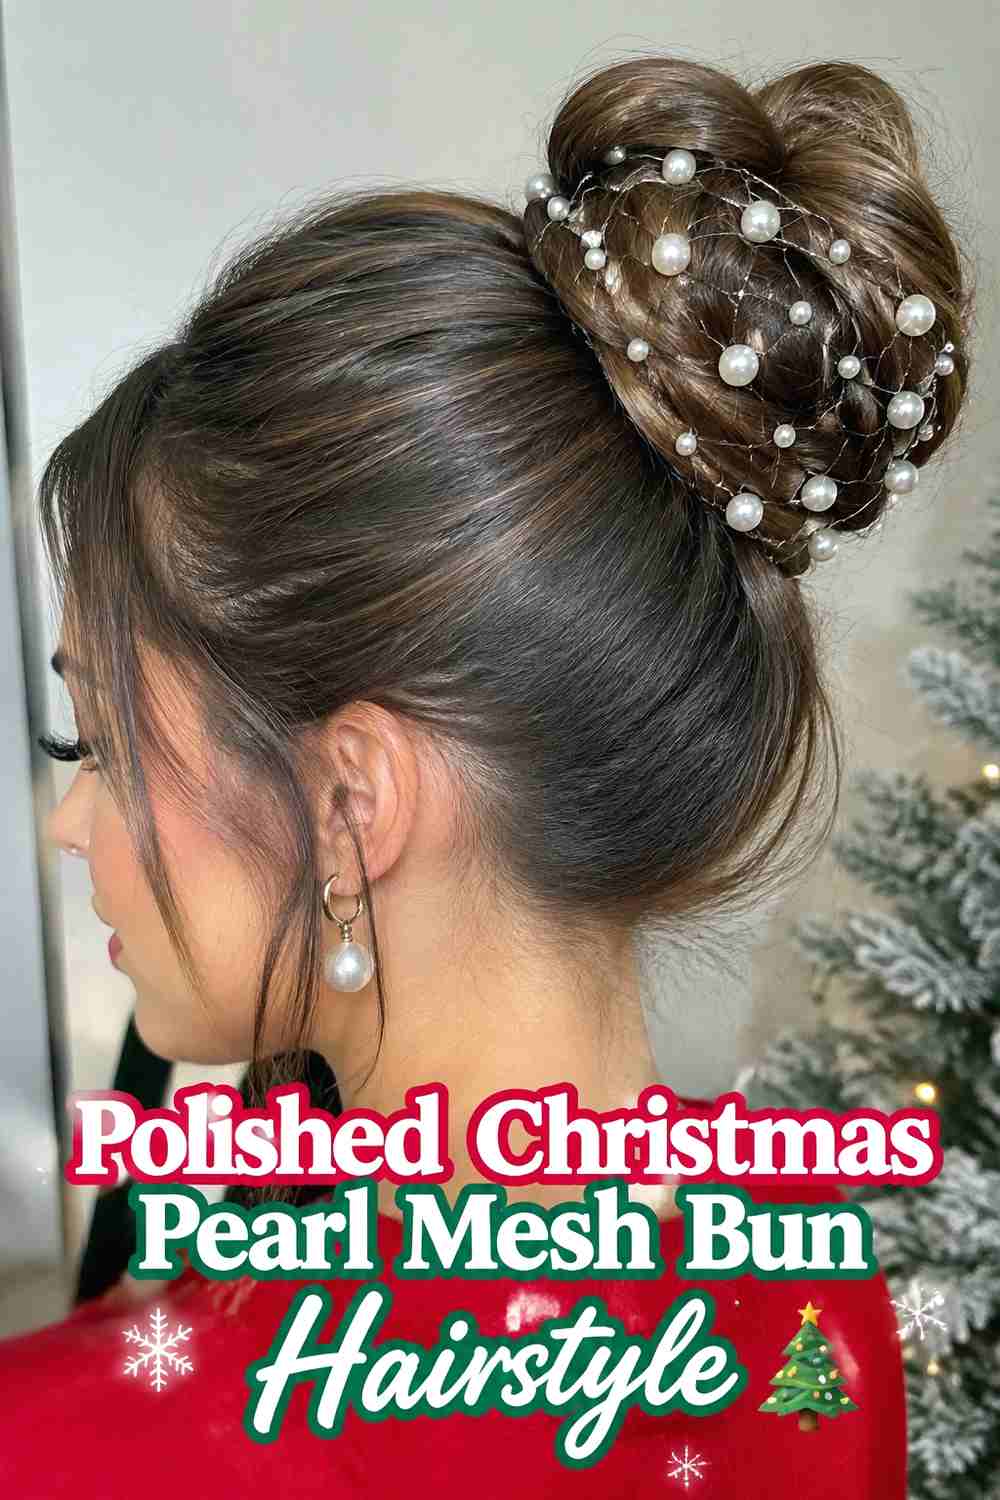
The polished pearl mesh bun emphasizes a smooth crown, balanced bun shape, and carefully placed accessory. Hair is gathered neatly at the nape or mid-back of the head and wrapped into an even rounded bun with the ends fully concealed. A fine pearl mesh is then fitted over the bun, following its shape without puckering or sagging. The finish should be controlled but still show realistic strands and natural shine rather than a stiff, lacquered surface. Medium to long hair works best, especially when the bun can be built without excessive padding. Keep other accessories minimal so the pearl mesh remains the single festive focal point.
Best For
This look suits formal Christmas dinners, winter weddings, holiday parties, church events, and elegant seasonal portraits.
Pro Tip
Anchor the mesh at evenly spaced points around the bun so the pearl pattern stays balanced from every viewing angle.
How to Choose the Right Look
Start with your hair length and bun size. Shoulder-length or medium hair often works best with mini pearl mesh buns, compact low styles, or partial mesh coverage. Longer hair provides more flexibility for braided buns, high crowns, side placements, and larger textured shapes.
Next, consider your natural texture. Curly and coily hair can create a full bun with visible definition beneath an open mesh, while straighter hair can make polished and sleek designs especially clear. Wavy or layered hair works beautifully with textured buns and softer twists.
The accessory itself matters too. Choose a pearl mesh size that matches the bun rather than trying to stretch a small piece over too much hair. Open mesh preserves more hair detail, while denser pearl placement creates a stronger decorative effect.
Finally, think about comfort and clothing. High buns stay clear of winter collars, while low buns should sit high enough to avoid repeated rubbing against scarves or coats.
Final Thoughts
Christmas pearl mesh bun hairstyles can feel sleek, romantic, playful, or formal depending on bun placement and texture. The most believable result starts with a secure bun that looks complete on its own. Add the mesh afterward as decoration, then adjust pearls, ribbons, loose pieces, or texture without compromising the underlying structure.
FAQs
1. What is a pearl mesh bun hairstyle?
It is a bun finished with a lightweight net or mesh accessory decorated with pearls, either covering the full bun or draping across part of it.
2. Can pearl mesh work on curly hair?
Yes. An open mesh can sit over a curly bun while allowing natural curl texture to remain visible between the pearl details.
3. Do I need long hair for a pearl mesh bun?
No. Medium or shoulder-length hair can create a compact bun, especially when paired with a smaller mesh piece sized to the hairstyle.
4. How should pearl mesh be secured to a bun?
Build and pin the bun first, then anchor the mesh discreetly around its outer edge with suitable small pins so the accessory does not carry the bun’s weight.
5. What accessories pair well with a Christmas pearl mesh bun?
Narrow velvet ribbons, understated metallic pins, or a few simple festive accents can work, but keeping extra decoration minimal usually lets the pearl mesh stand out best.
Save your favorite Christmas pearl mesh bun ideas, share them for holiday inspiration, and explore more festive hairstyle ideas for your next celebration.