18 Pearl Mesh Hair Net Updo Hairstyle Ideas for Elegant Detail
Delicate pearls layered over a beautifully shaped updo create an elegant finish that feels decorative, refined, and surprisingly versatile.
Pearl mesh hair nets combine structure and ornament in one accessory. Rather than placing individual pearl pins throughout an updo, the mesh can drape over, wrap around, or partially frame a bun or twist, creating a coordinated pattern with less visual clutter. The effect can range from understated and modern to romantic or vintage-inspired depending on the updo underneath.
When choosing a look, consider the size and placement of the bun, how much of the mesh you want visible, and whether you prefer a smooth or textured finish. Secure the hairstyle itself first whenever possible, then position the pearl net as a decorative layer so it does not carry all the weight of the updo.
Quick List
- Sleek Low Chignon With Pearl Mesh Hair Net Hairstyle
- Soft Bridal Bun With Pearl Mesh Hair Net Hairstyle
- Twisted Low Bun With Pearl Mesh Hair Net Hairstyle
- French Twist With Pearl Mesh Hair Net Hairstyle
- Center Part Sculpted Bun With Pearl Mesh Hair Net Hairstyle
- Romantic Textured Bun With Pearl Mesh Hair Net Hairstyle
- High Ballet Bun With Pearl Mesh Hair Net Hairstyle
- Side Swept Low Bun With Pearl Mesh Hair Net Hairstyle
- Braided Bun With Pearl Mesh Hair Net Hairstyle
- Rolled Nape Updo With Pearl Mesh Hair Net Hairstyle
- Sleek Knot Updo With Pearl Mesh Hair Net Hairstyle
- Soft Face Framing Bun With Pearl Mesh Hair Net Hairstyle
- Vintage Inspired Tucked Updo With Pearl Mesh Hair Net Hairstyle
- Double Twist Bun With Pearl Mesh Hair Net Hairstyle
- Polished Loop Bun With Pearl Mesh Hair Net Hairstyle
- Curly Low Updo With Pearl Mesh Hair Net Hairstyle
- Minimalist Chignon With Pearl Mesh Hair Net Hairstyle
- Statement Wrapped Bun With Pearl Mesh Hair Net Hairstyle
1. Sleek Low Chignon With Pearl Mesh Hair Net Hairstyle
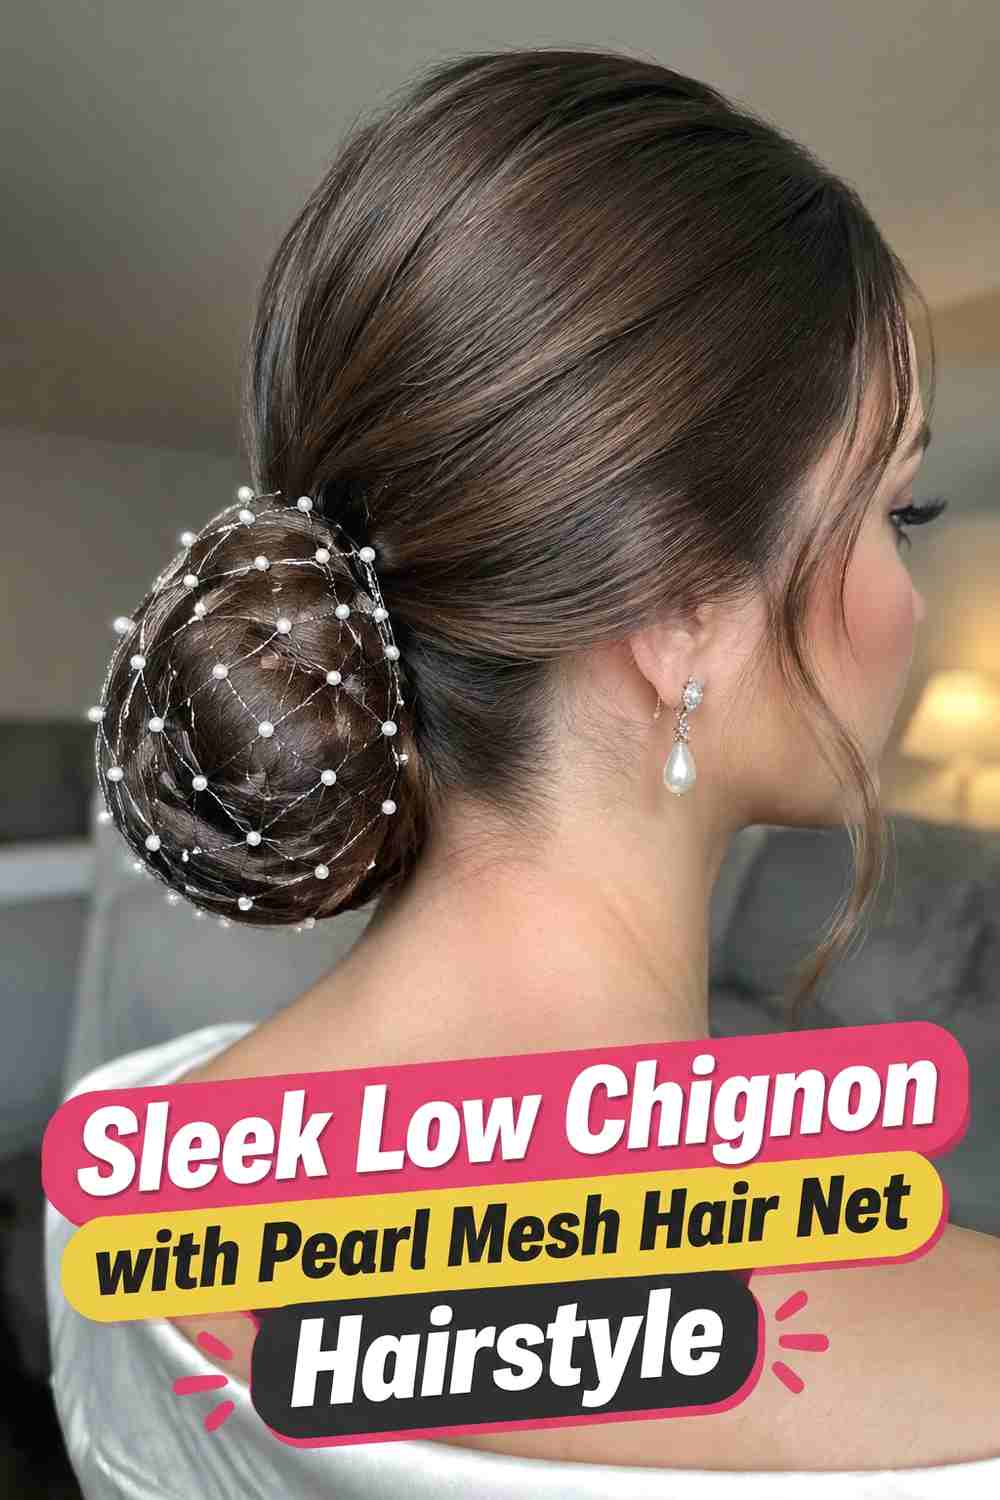
A sleek low chignon gives the pearl mesh a clean, sculptural base. The hair is smoothed toward the nape and formed into a compact rounded chignon, then the pearl net is placed over the bun so the decorative pattern remains clearly visible. Because the underlying style is simple, each pearl becomes part of the design instead of competing with curls, braids, or extra accessories. A center part can sharpen the look, while a subtle side part makes it softer. Medium to long hair is easiest to shape into this silhouette. The finished result works especially well when the mesh fits closely around the bun rather than hanging loosely below it.
Styling Notes
Secure the chignon completely before adding the net, then anchor the mesh with discreet pins around the outer edge of the bun.
Best For
This option suits elegant weddings, formal dinners, receptions, and polished evening looks where understated detail feels appropriate.
2. Soft Bridal Bun With Pearl Mesh Hair Net Hairstyle
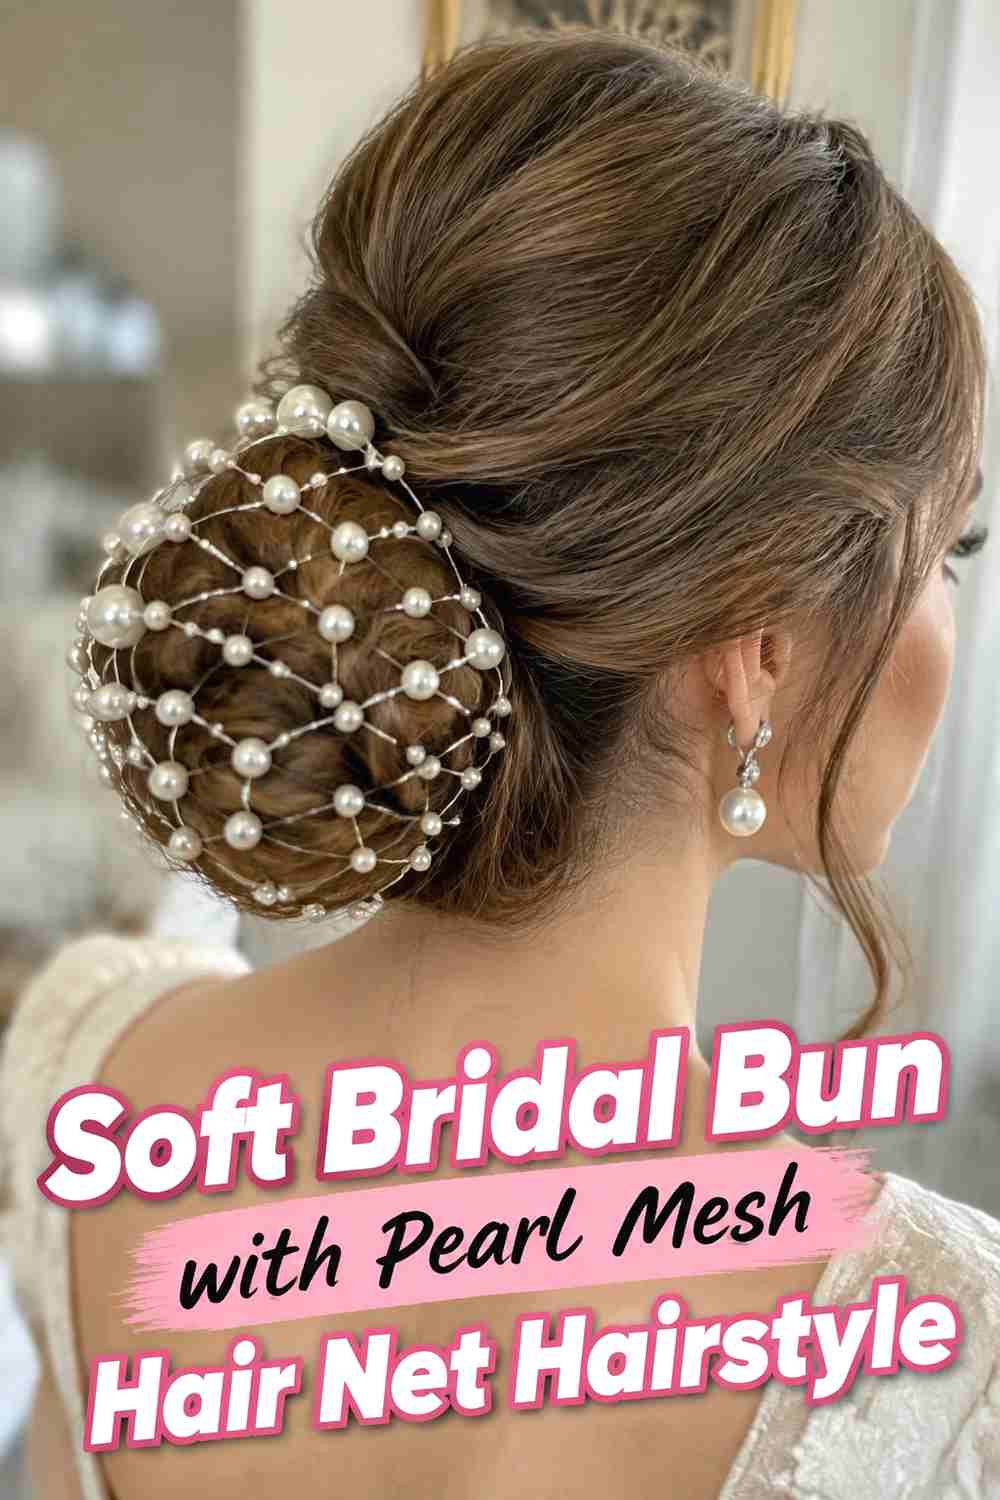
The soft bridal bun pairs gentle volume with a pearl mesh layer that feels romantic without overwhelming the hairstyle. Instead of creating a tightly slicked base, the crown can retain subtle lift while the hair is gathered into a rounded low bun. The pearl mesh is then draped over the finished shape, allowing sections of hair to remain visible between the decorative strands. This works particularly well with a slightly textured bun because the contrast between soft hair and structured pearls creates dimension. A few carefully chosen face-framing pieces can soften the front. The accessory should feel integrated with the bun rather than floating above it, so secure the edges close to the hairstyle.
Wear & Maintenance
Test the pearl net with your veil or other accessories beforehand so clips, combs, and pins do not compete for the same placement.
Pro Tip
Keep additional jewelry in the hair minimal when the pearl mesh already provides a strong decorative focal point.
3. Twisted Low Bun With Pearl Mesh Hair Net Hairstyle
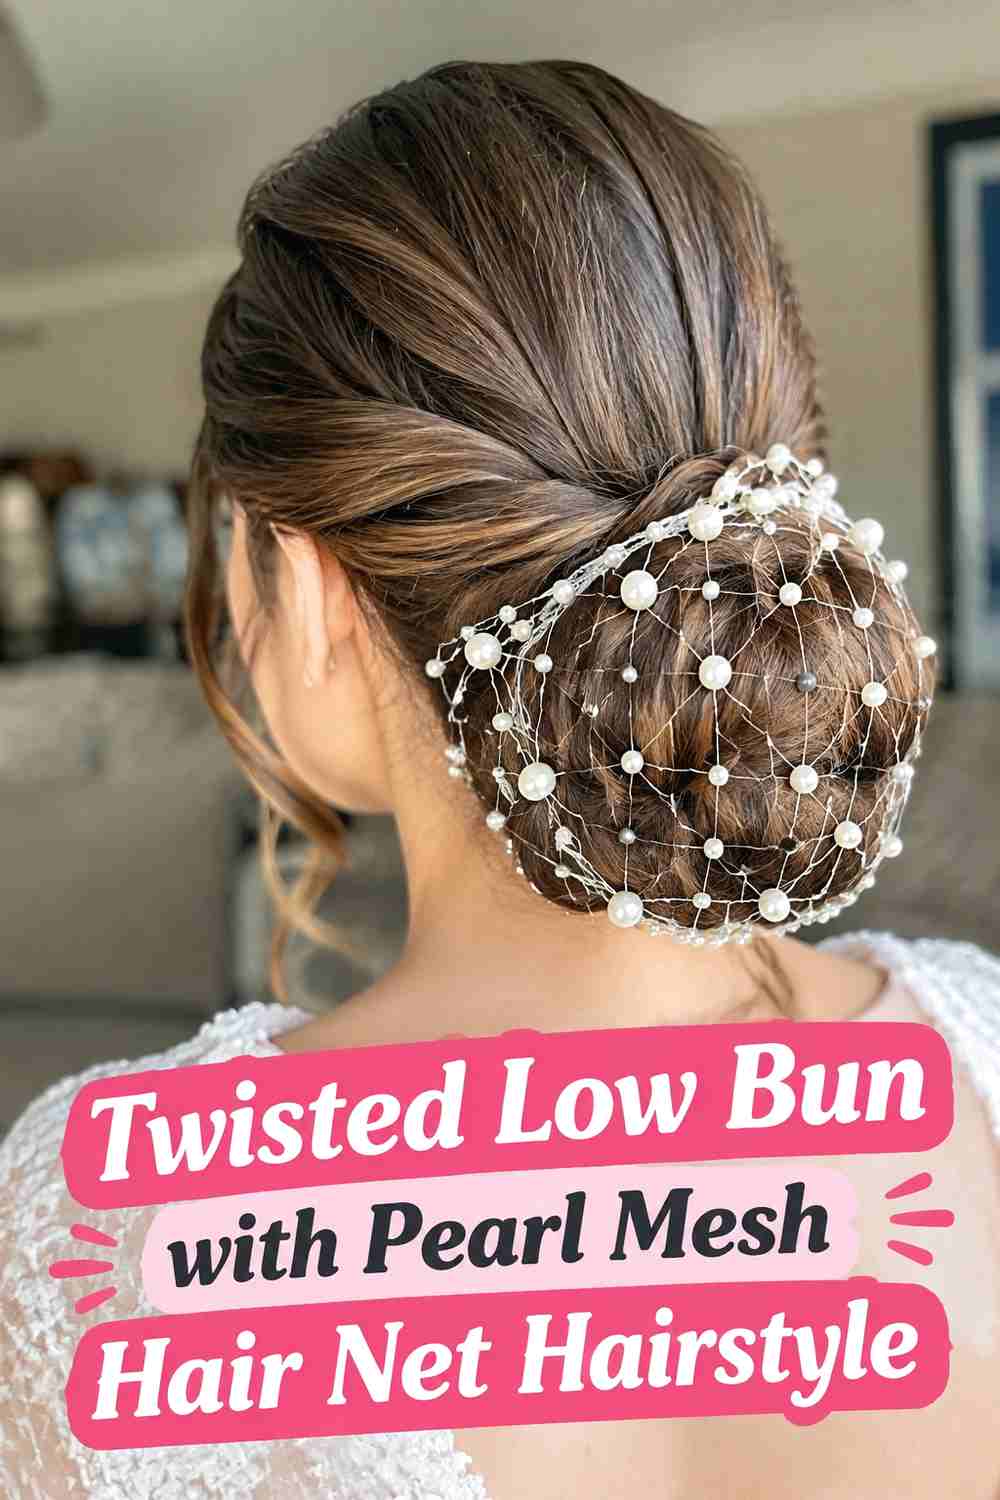
A twisted low bun creates curved lines beneath the pearl mesh, making this variation more textured than a smooth chignon without becoming overly elaborate. Sections of hair can be twisted toward the nape before being coiled into a compact bun, leaving enough definition for the twists to remain visible through the openings in the net. The pearls then sit across those curves, adding small points of light and emphasizing the rounded shape. Medium and long hair work well, particularly when the hair has enough grip to hold a twist securely. The finished style can be polished or slightly relaxed, but keeping the bun controlled prevents the decorative mesh from looking tangled with the hair.
Why It Works
The twisted structure creates movement underneath the geometric mesh, giving the updo dimension while maintaining an elegant, unified silhouette.
Styling Notes
Position pins beneath the twists whenever possible so the mesh can sit over a clean surface without catching on exposed hardware.
4. French Twist With Pearl Mesh Hair Net Hairstyle
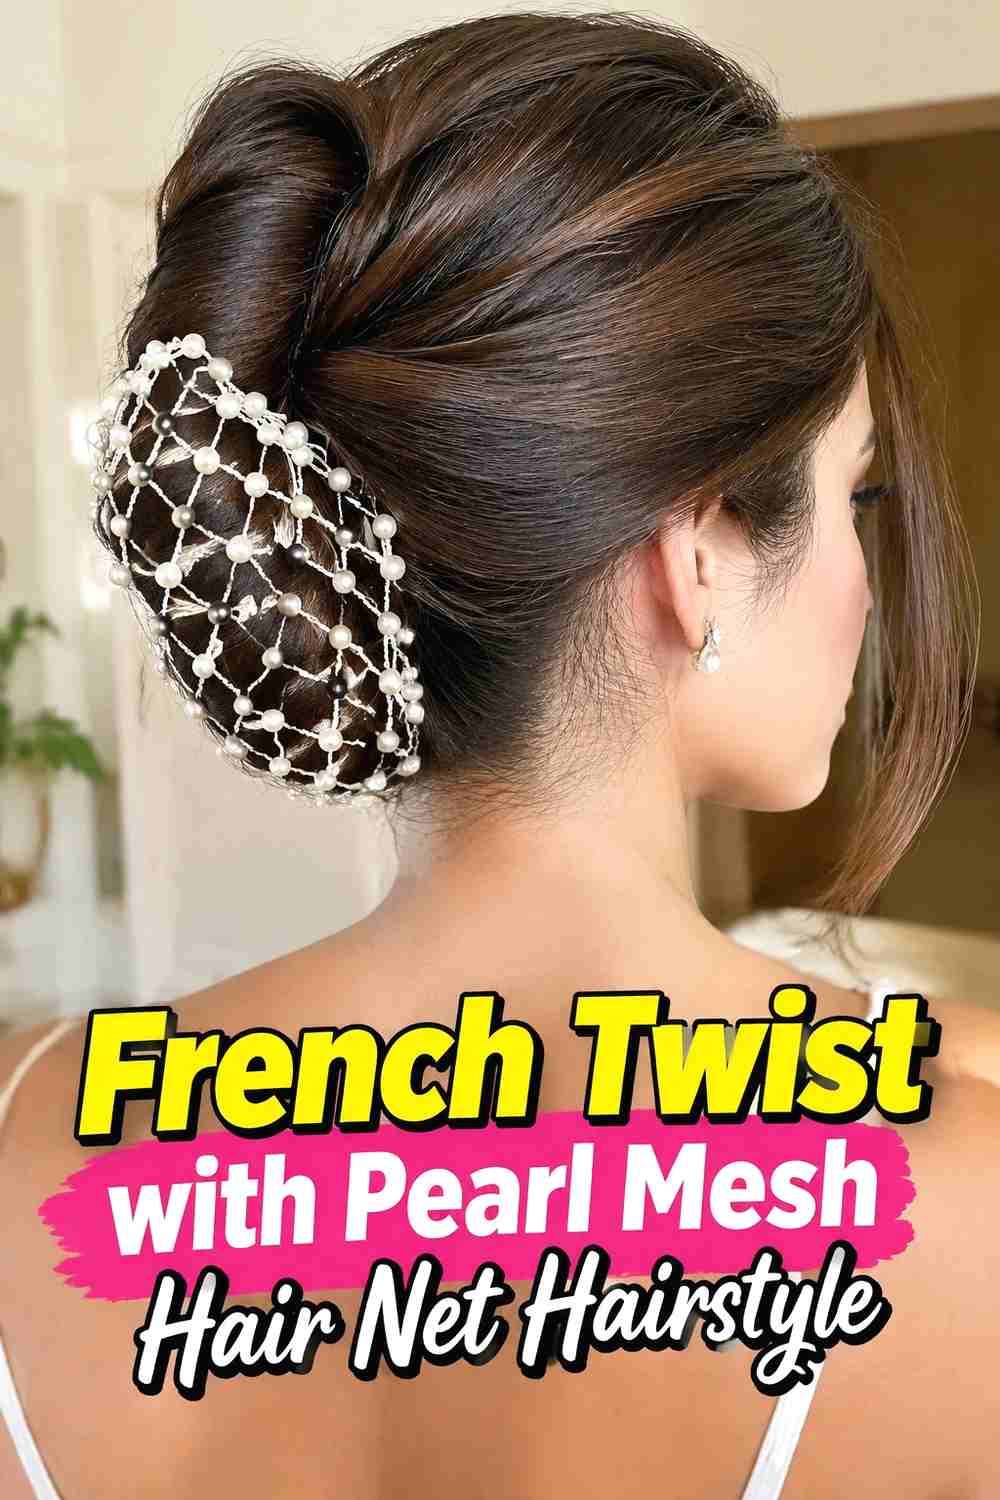
A French twist gives the pearl mesh hair net a taller, more vertical silhouette than a traditional bun. The lengths are rolled inward along the back of the head and pinned securely, creating a smooth column with softly tucked ends. The mesh can then cover the central twist or wrap around its upper section, depending on the accessory’s shape. This placement allows the pearls to follow the upward direction of the hairstyle and creates a refined back view. A little crown lift can keep the profile balanced, while smooth sides reinforce the classic structure. Longer hair may require extra internal pins, especially if the pearl accessory adds weight to the finished twist.
Hair Type & Length
Medium to long hair usually offers enough length to create the rolled structure, although thick hair may need sectioning for a compact result.
Pro Tip
Anchor the hairstyle independently before applying the mesh so removing or adjusting the accessory does not loosen the entire French twist.
5. Center Part Sculpted Bun With Pearl Mesh Hair Net Hairstyle
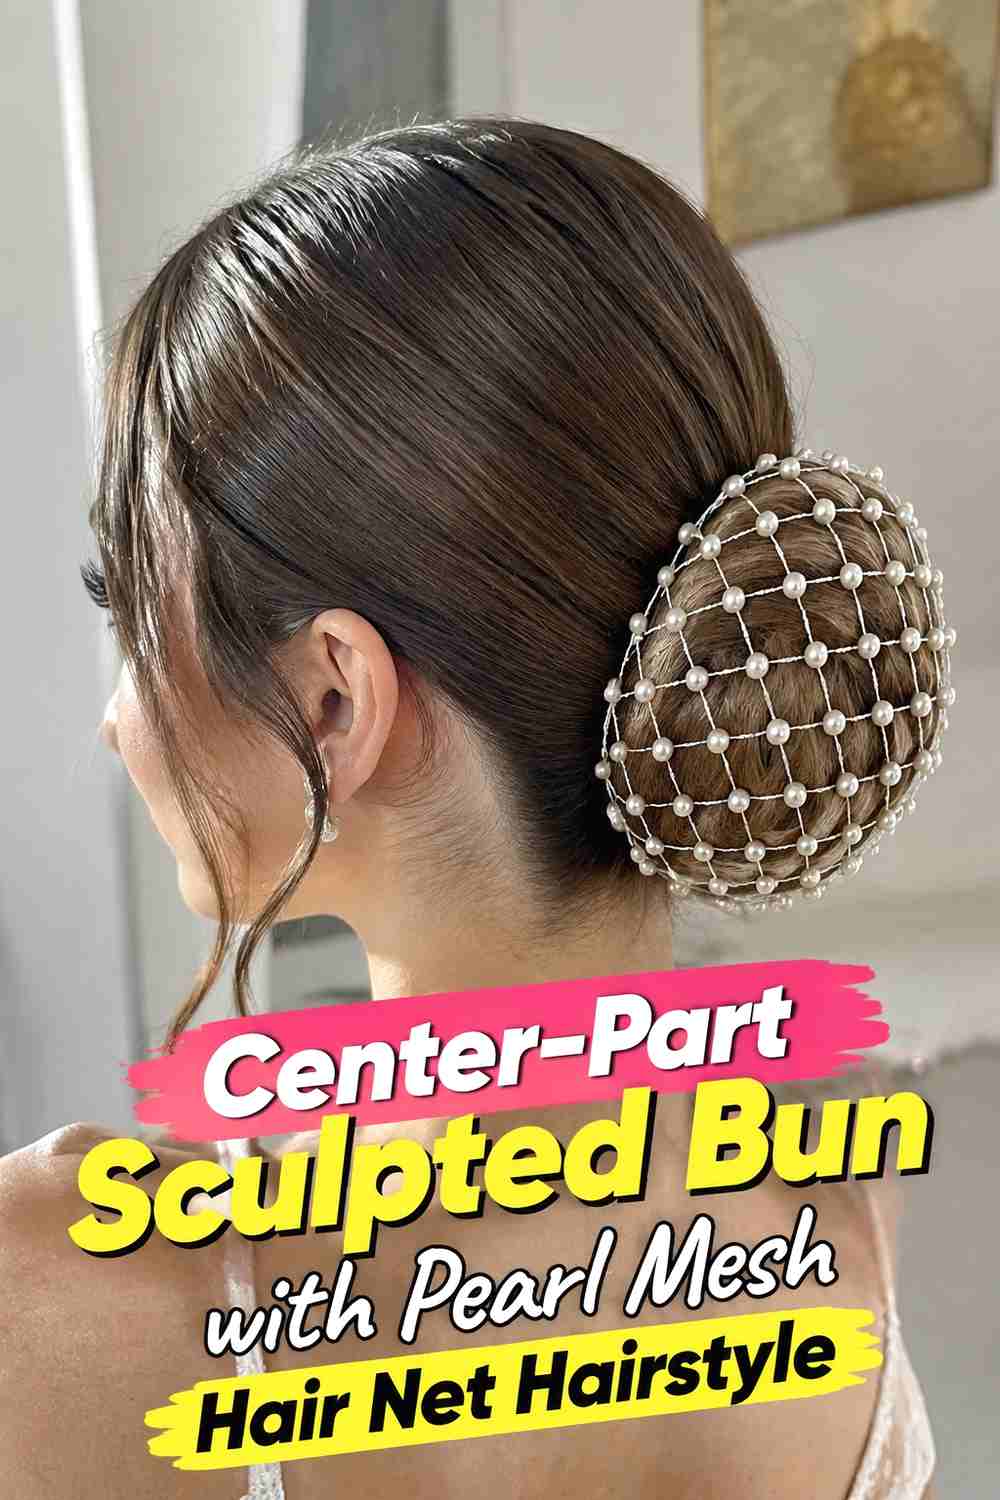
The center-part sculpted bun combines a precise front with an intentionally shaped back, creating an excellent base for a pearl mesh overlay. The hair is smoothed evenly from the center part toward the nape, where it is folded or coiled into a symmetrical bun. A fitted mesh net can cover the shape almost like decorative wrapping, allowing the pearls to form a regular pattern across the surface. This look benefits from controlled shine and clean edges because the accessory highlights the underlying silhouette rather than hiding it. The final result feels modern and formal, particularly when the bun stays compact. Avoid excessive volume if you want the mesh to sit evenly without stretching awkwardly.
Styling Notes
Check the bun from both sides before adding the net. A balanced underlying shape makes the pearl pattern look more symmetrical once secured.
Best For
This polished variation suits minimalist bridal looks, formal celebrations, evening events, and outfits with clean architectural lines.
6. Romantic Textured Bun With Pearl Mesh Hair Net Hairstyle
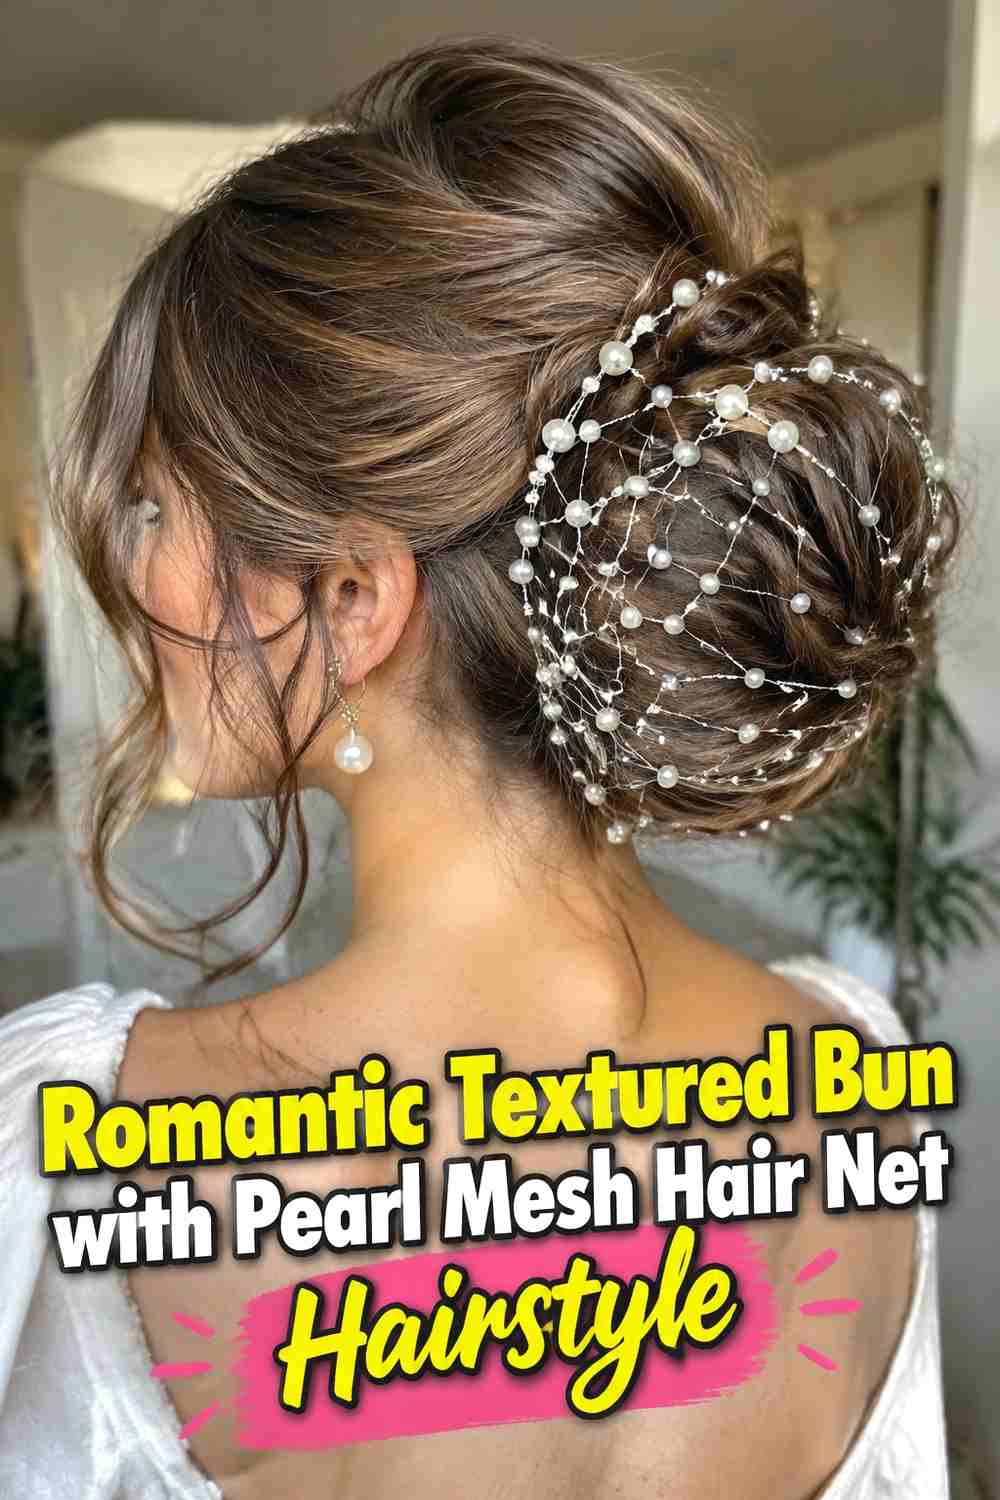
A romantic textured bun allows the pearl mesh to sit over soft loops, bends, and subtle surface movement rather than an entirely sleek base. The hair can be loosely curled first, then gathered into a low bun with several sections pinned individually for dimension. Once the structure is secure, the pearl net drapes over the outer shape while the texture remains visible underneath. The effect is softer and more organic than a sculpted chignon, making it particularly suited to romantic event styling. A little volume through the crown and a few restrained face-framing strands can complete the look. Keep the texture controlled enough that loose pieces do not become tangled in the mesh.
Wear & Maintenance
Position the net after all textured sections are pinned. Reworking curls beneath an already secured mesh can disturb both the pearl pattern and the bun.
Why It Works
The irregular texture creates depth beneath the evenly spaced pearls, balancing romantic softness with a clear decorative structure.
7. High Ballet Bun With Pearl Mesh Hair Net Hairstyle
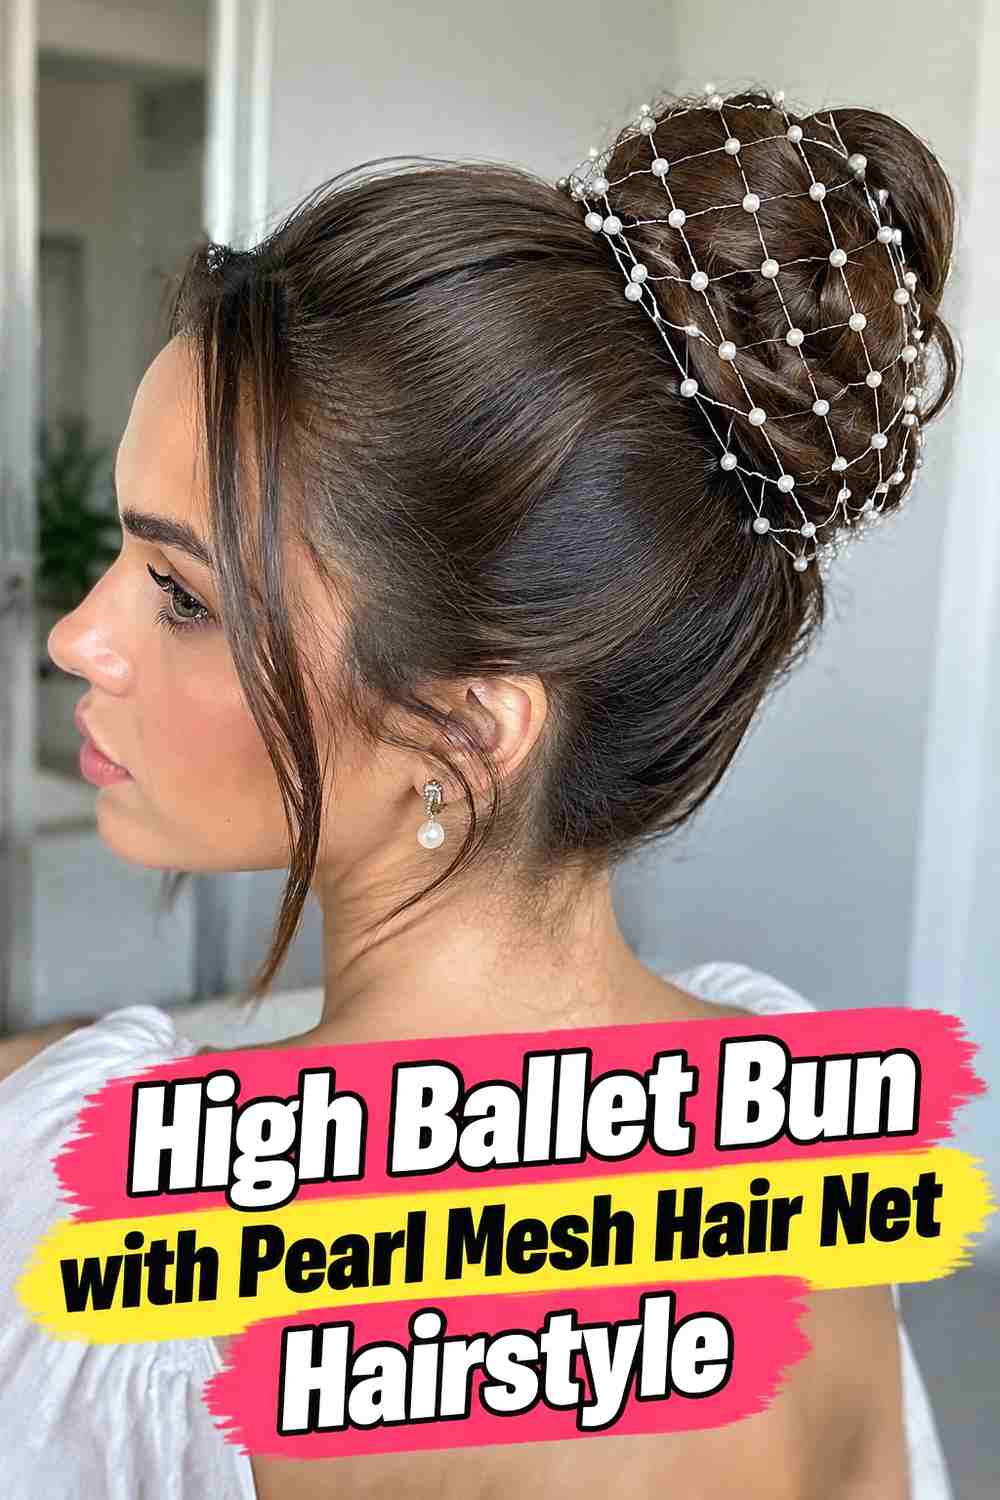
The high ballet bun shifts the pearl detail upward, creating a clean and noticeable silhouette near the crown. Hair is brushed into a secure high ponytail and wrapped into a smooth, rounded bun before the pearl mesh is fitted over the shape. Because the bun is fully visible from multiple angles, the net becomes an especially prominent design element. This style works best when the mesh is appropriately sized and does not extend far beyond the bun’s edge. The polished base contrasts beautifully with the pearl pattern, while the elevated placement keeps the neck and shoulders visually open. Comfortable tension is essential, especially if the accessory has any noticeable weight.
Styling Notes
Build the bun around a stable ponytail base and distribute pins evenly so the pearl net is decorative rather than structural.
Best For
Choose this style for formal receptions, ballet-inspired looks, sleek bridal styling, or occasions where you want a crisp, elevated updo.
8. Side Swept Low Bun With Pearl Mesh Hair Net Hairstyle
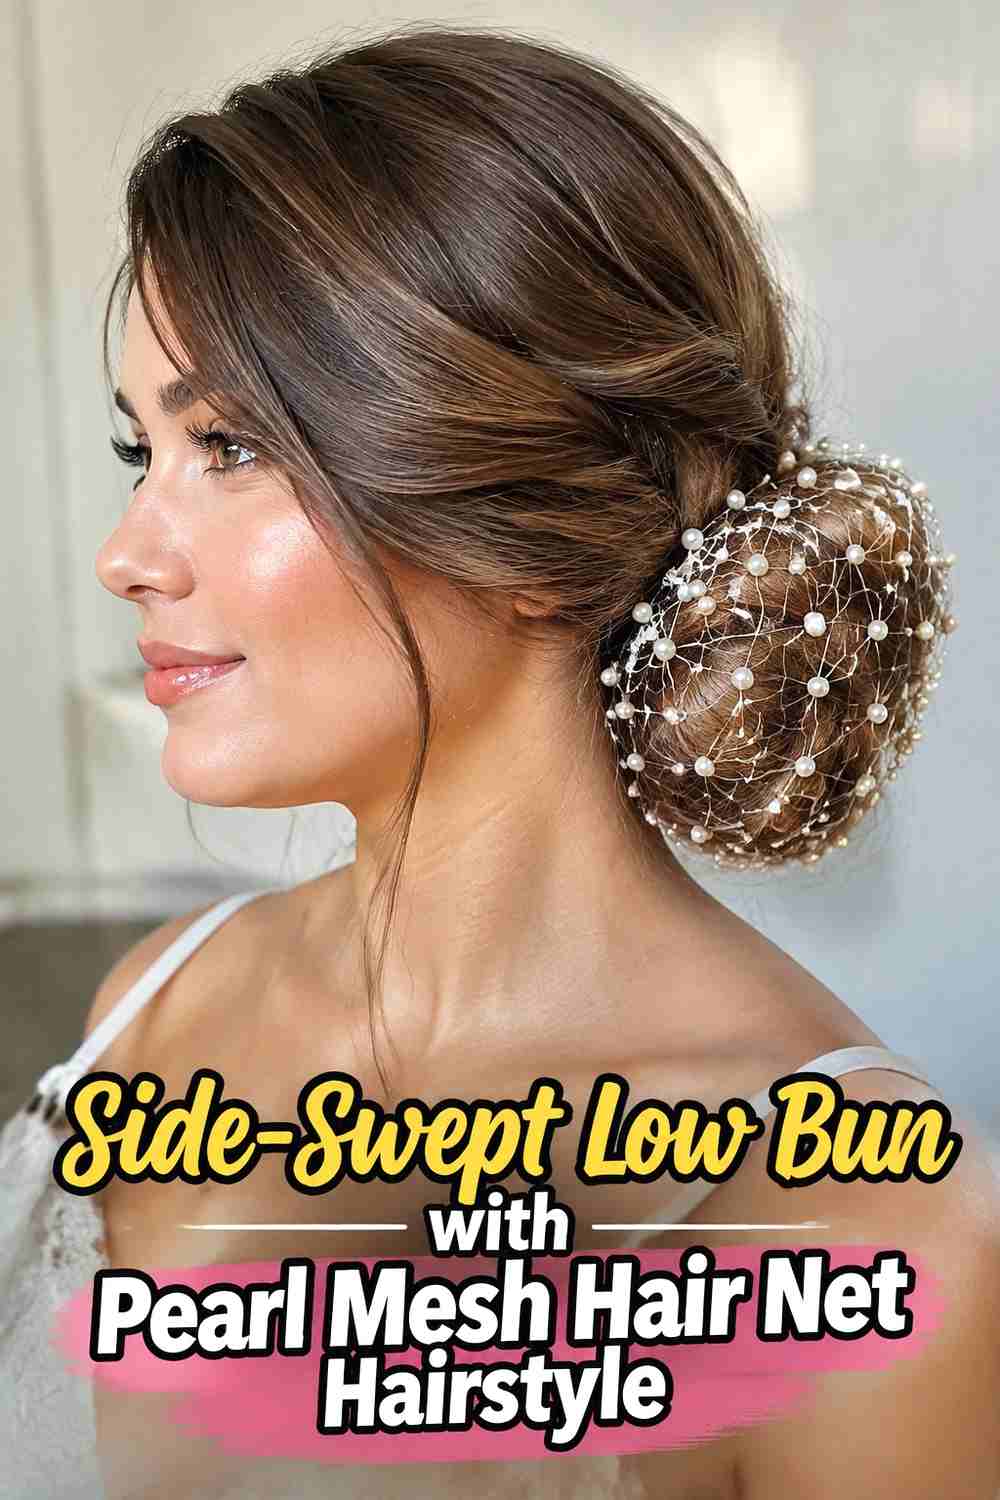
A side-swept low bun introduces graceful asymmetry while keeping the pearl mesh elegant and easy to see. The front is divided with a deeper side part, then swept gently toward a low bun positioned slightly off-center at the nape. The pearl mesh can cover the bun itself or extend delicately across one side, reinforcing the directional movement of the hairstyle. Because the placement is asymmetric, the overall shape should remain balanced rather than bulky. Soft shine through the swept front keeps the style polished, while a small amount of volume prevents it from looking overly flat. This version pairs especially well with earrings or necklines that benefit from one side being more exposed.
Styling Notes
Place the bun only slightly off-center unless you want a strongly dramatic profile. Too much displacement can make the accessory feel visually heavy.
Pro Tip
Check the net placement from the front and side, not just the back, since pearl accents may become visible around the silhouette.
9. Braided Bun With Pearl Mesh Hair Net Hairstyle
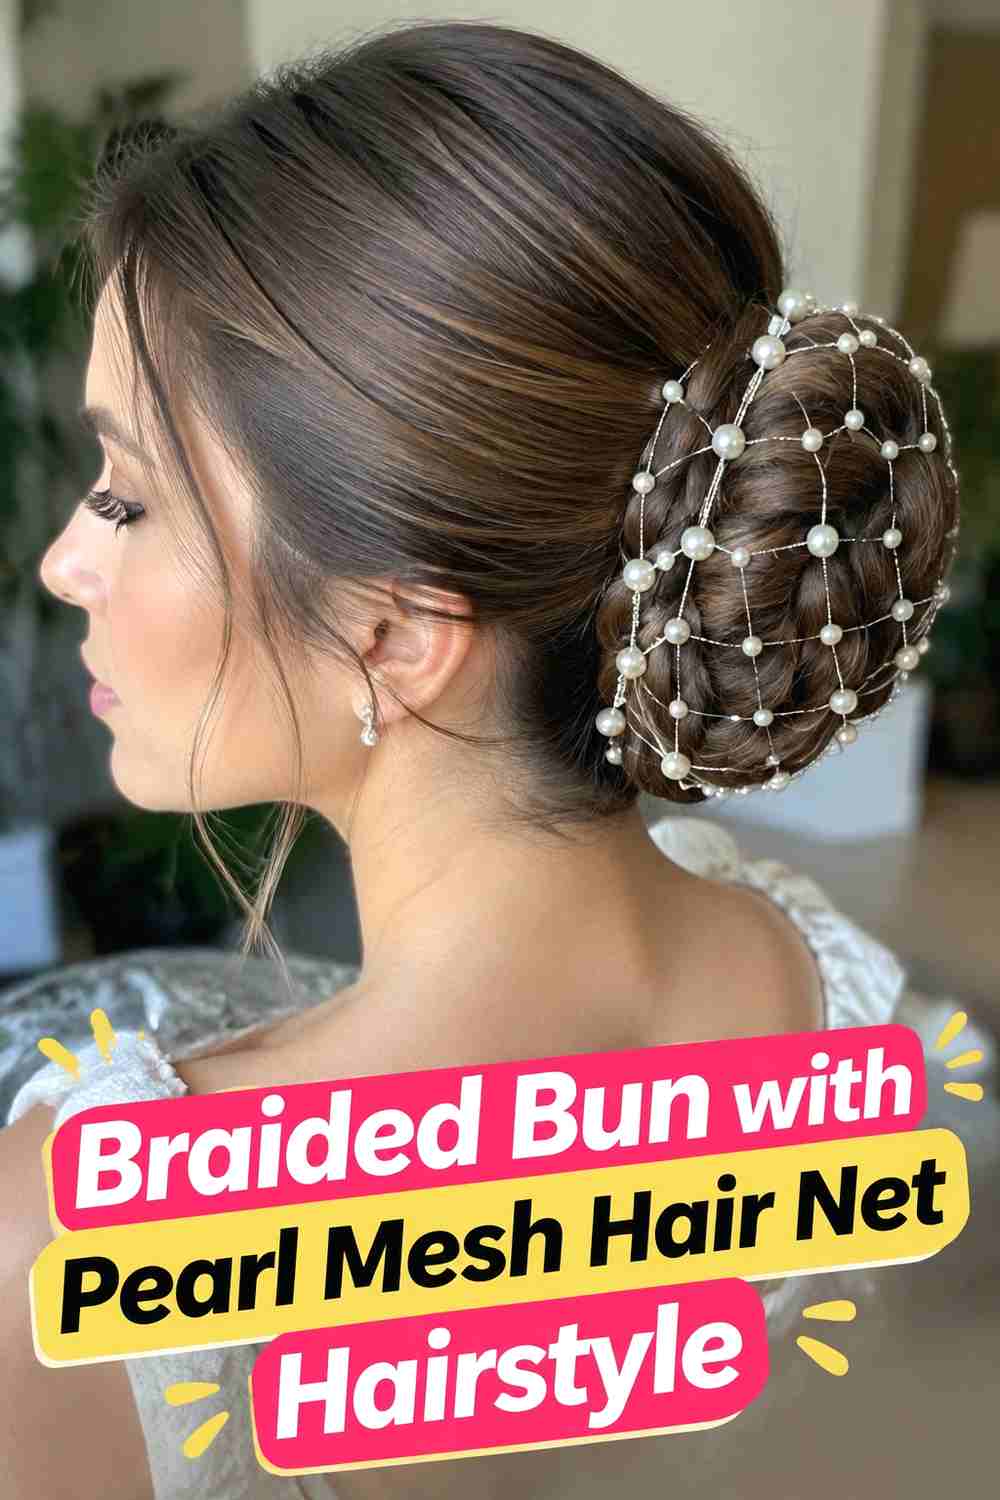
The braided bun gives a pearl mesh hair net a detailed foundation without requiring additional decorative pins. Hair is gathered into a ponytail, braided, and wrapped around the base to create a patterned bun. The mesh then sits across the braid, letting the woven hair texture show through between the pearls. A standard three-strand braid creates a clean look, while a slightly wider braid can produce more visible texture on thicker hair. The key is keeping the braid compact enough that the pearl net does not distort its shape. Smooth hair around the crown creates contrast and allows the decorated bun to remain the main focal point from the back.
Why It Works
The braid and mesh create two different repeating patterns, adding visual detail while still keeping the overall hairstyle contained and polished.
Wear & Maintenance
Secure the braid and bun independently before fitting the net so the decorative layer can be adjusted without loosening the braided structure.
10. Rolled Nape Updo With Pearl Mesh Hair Net Hairstyle
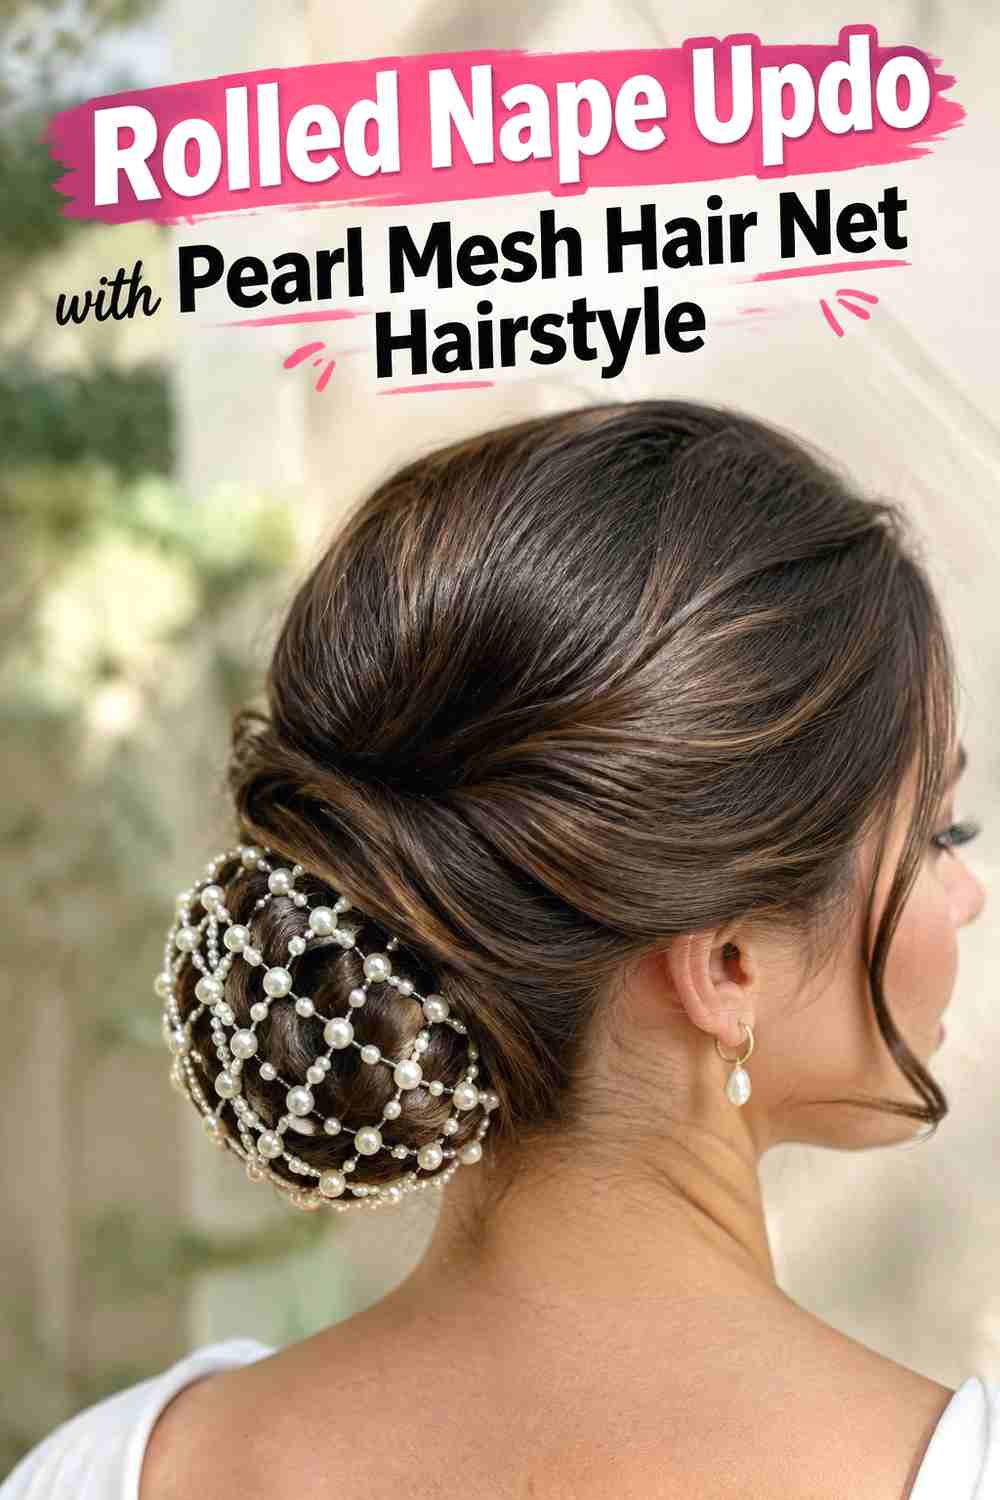
A rolled nape updo creates a soft horizontal shape that gives the pearl mesh a different silhouette from a round bun. The hair is directed downward and rolled inward along the nape, with the ends tucked neatly inside the structure. The pearl net can then span the length of the roll or gather around its center, depending on its size and flexibility. This style feels elegant with a subtle vintage influence but remains modern when the crown stays smooth and the shape is not overly voluminous. Medium-length hair can work particularly well because excessive length is not required. Keep the roll secure and compact so the mesh follows its curve rather than sagging.
Hair Type & Length
Medium to long hair works well, while very dense hair may need to be divided into smaller sections before forming the roll.
Styling Notes
Use pins inside the rolled section whenever possible so the outer surface remains clear for the mesh to sit smoothly.
11. Sleek Knot Updo With Pearl Mesh Hair Net Hairstyle
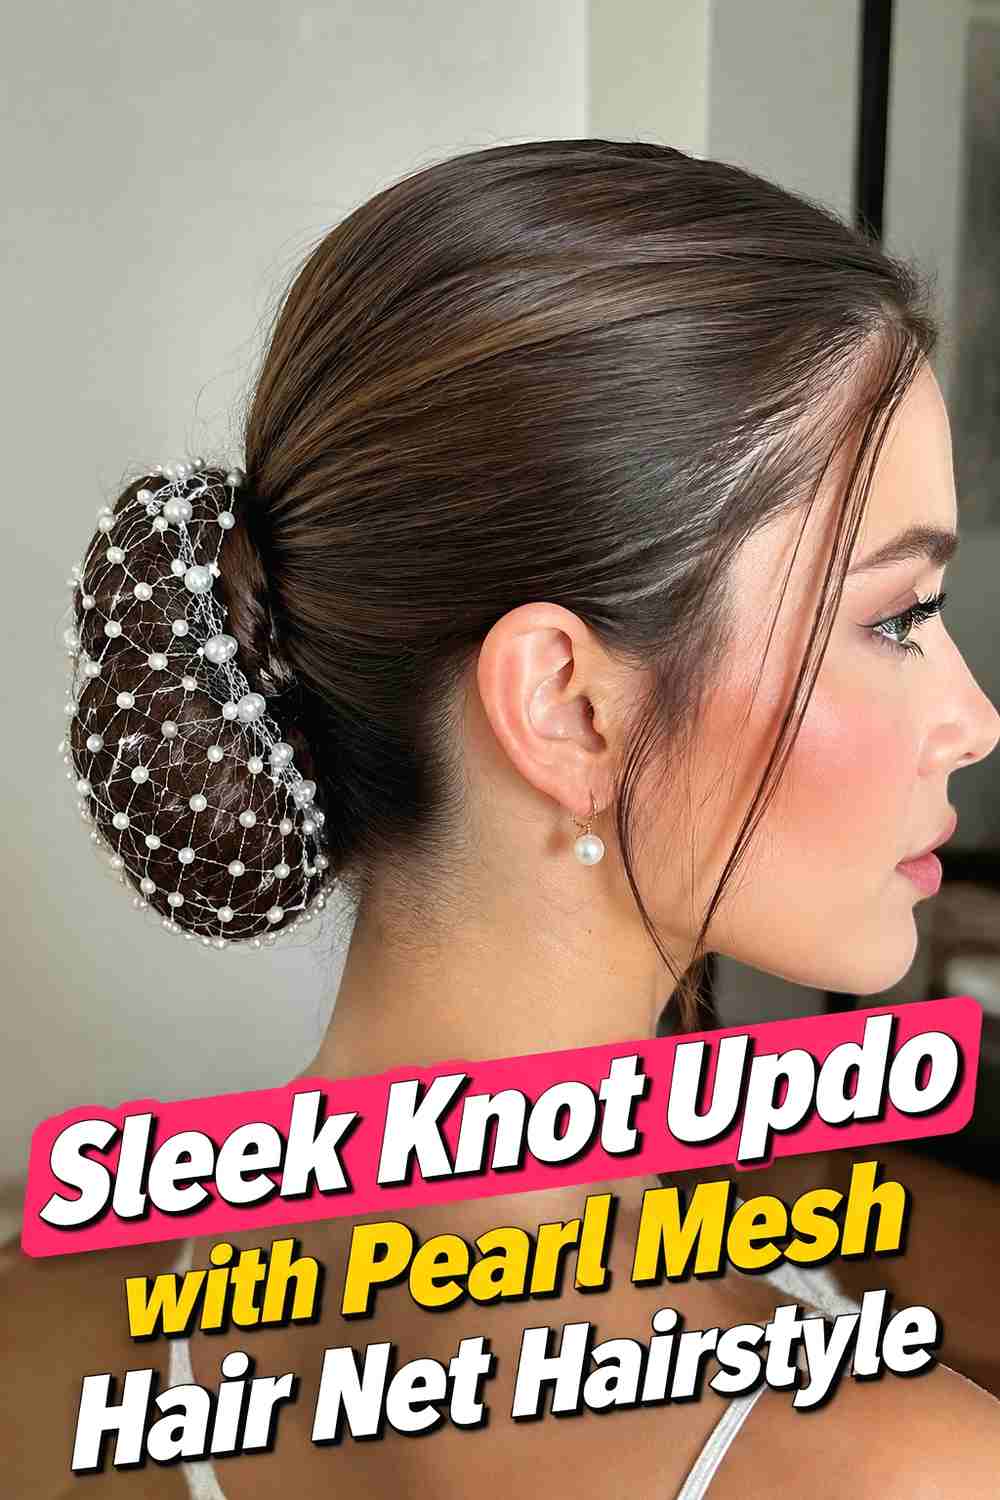
A sleek knot updo keeps the hair close to the head and turns the pearl mesh into the main decorative feature. The lengths are twisted or folded into a compact knot at the nape, with the ends hidden cleanly underneath. Instead of creating a large traditional bun, the shape remains narrow and controlled, giving the accessory a modern base. The pearl mesh can be placed directly over the knot or wrapped around its outer edge for a more restrained effect. Smooth sides and a clean part complement the minimal shape particularly well. This design is useful when you want the elegance of pearls without a highly romantic or voluminous hairstyle underneath.
Best For
This version suits modern bridal looks, formal dinners, sleek gowns, and occasions where a smaller updo balances the outfit better than a large bun.
Pro Tip
Use a mesh with smaller spacing if the knot is compact so the pearl pattern remains proportional to the hairstyle.
12. Soft Face Framing Bun With Pearl Mesh Hair Net Hairstyle
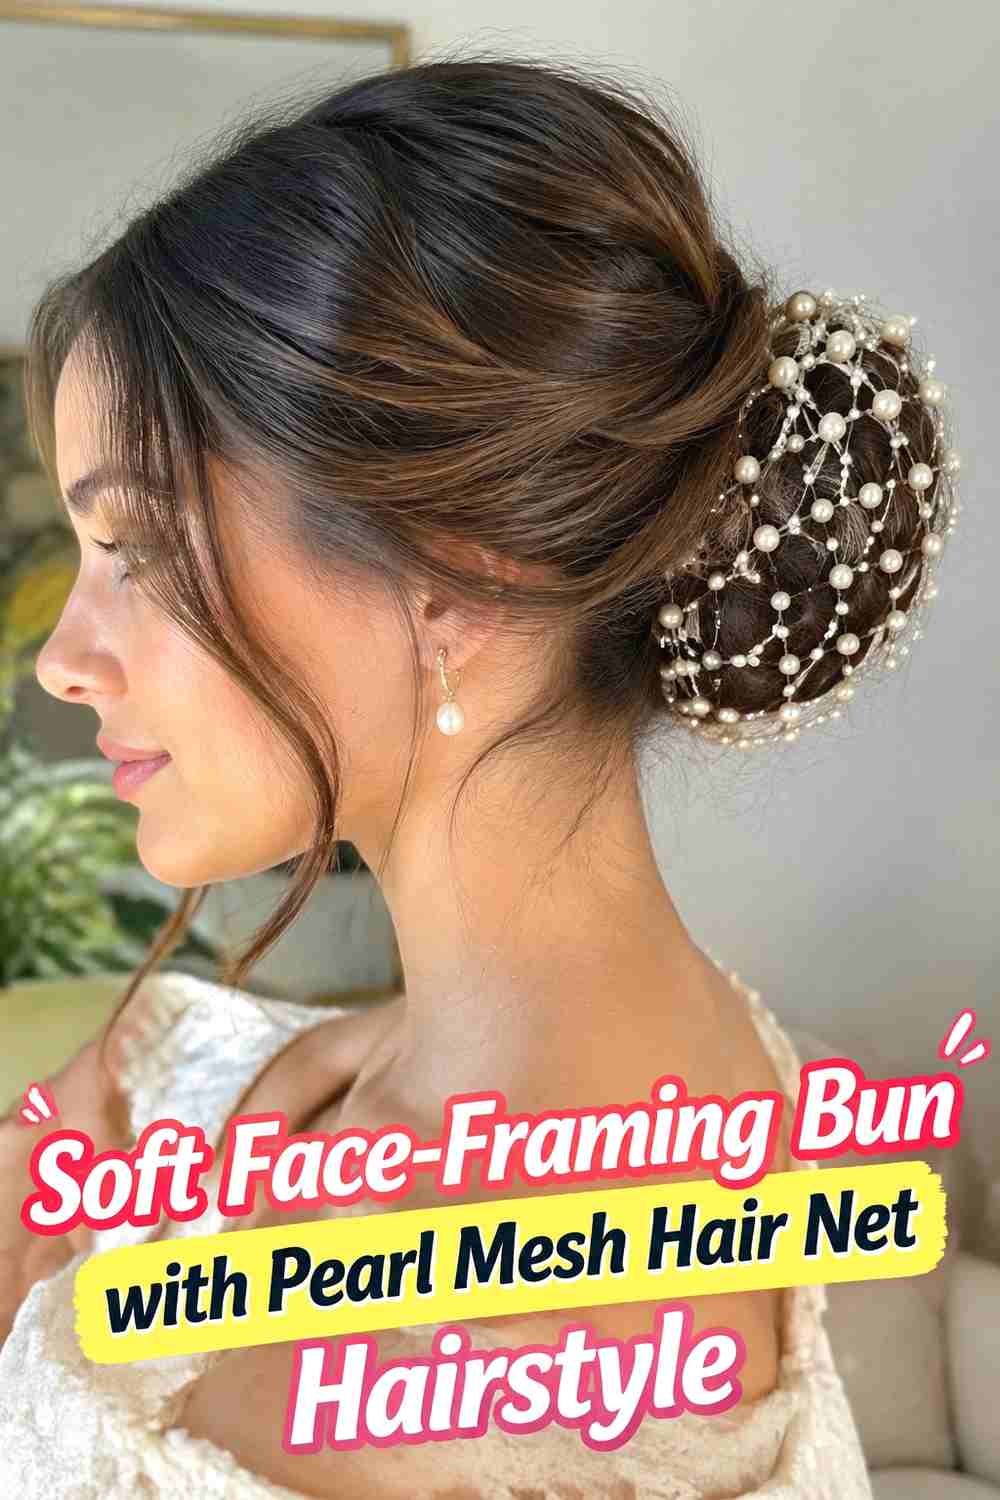
The soft face-framing bun combines an ornamented back with a relaxed front, making the pearl mesh feel less formal. Most of the hair is gathered into a low bun, but slim pieces near the temples or cheekbones are left loose before the updo is secured. The net is fitted over the bun so the pearls remain concentrated at the back instead of extending into the face-framing sections. Those loose pieces can stay naturally textured or be softly curved away from the face. This balance works well when you want a decorative bridal or event hairstyle without a completely slick finish. Keep the front pieces limited so they look intentional and do not compete with the accessory.
Styling Notes
Separate the face-framing pieces before forming the bun. Pulling them out later may loosen the sections that support the mesh.
Why It Works
The clean pearl-covered bun provides structure, while the softer front keeps the overall style approachable and gently romantic.
13. Vintage Inspired Tucked Updo With Pearl Mesh Hair Net Hairstyle
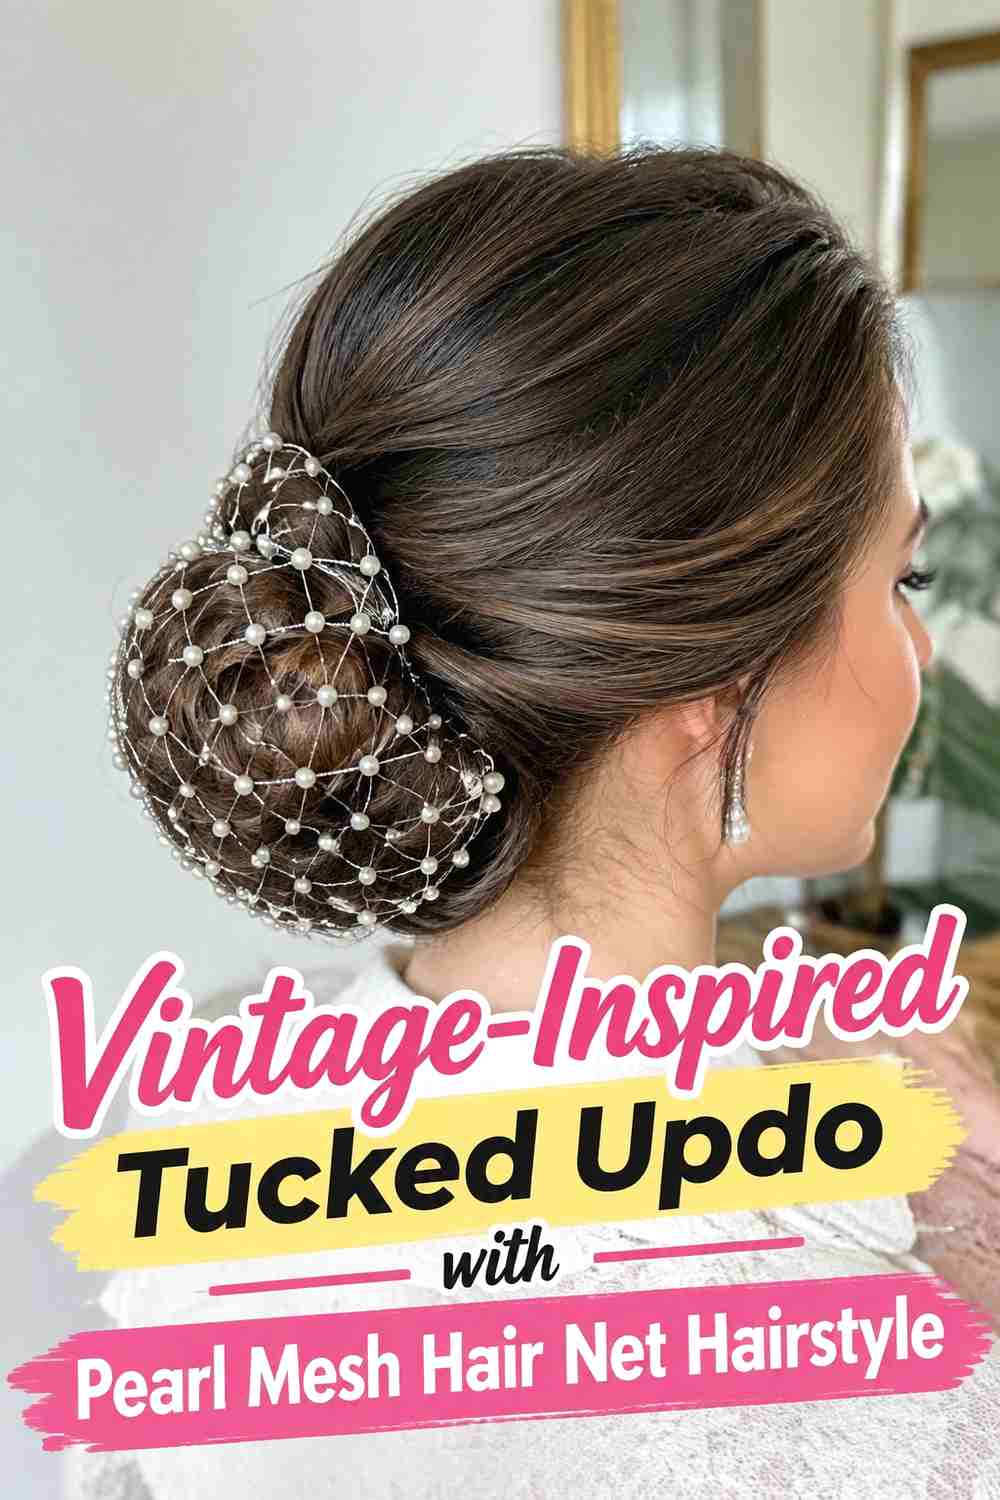
A vintage-inspired tucked updo uses smooth rolled sections and hidden ends to create a refined shape beneath the pearl mesh. The hair can be swept backward with a little crown volume before the lower lengths are tucked upward and pinned into a rounded nape section. A pearl net placed over the tucked area reinforces the retro mood without requiring extra jeweled combs or decorative rolls. The style looks especially effective when the front remains softly polished rather than aggressively slick. A subtle side part or gentle wave near the hairline can enhance the vintage influence. Keep the accessory fitted close to the updo so the result feels intentional rather than costume-like.
Styling Notes
Build the tucked shape before placing the net, then use small pins at the mesh edges rather than pushing pins through prominent pearl details.
Best For
This look works beautifully for vintage-inspired weddings, evening events, classic dresses, and formal occasions with a softer nostalgic aesthetic.
14. Double Twist Bun With Pearl Mesh Hair Net Hairstyle
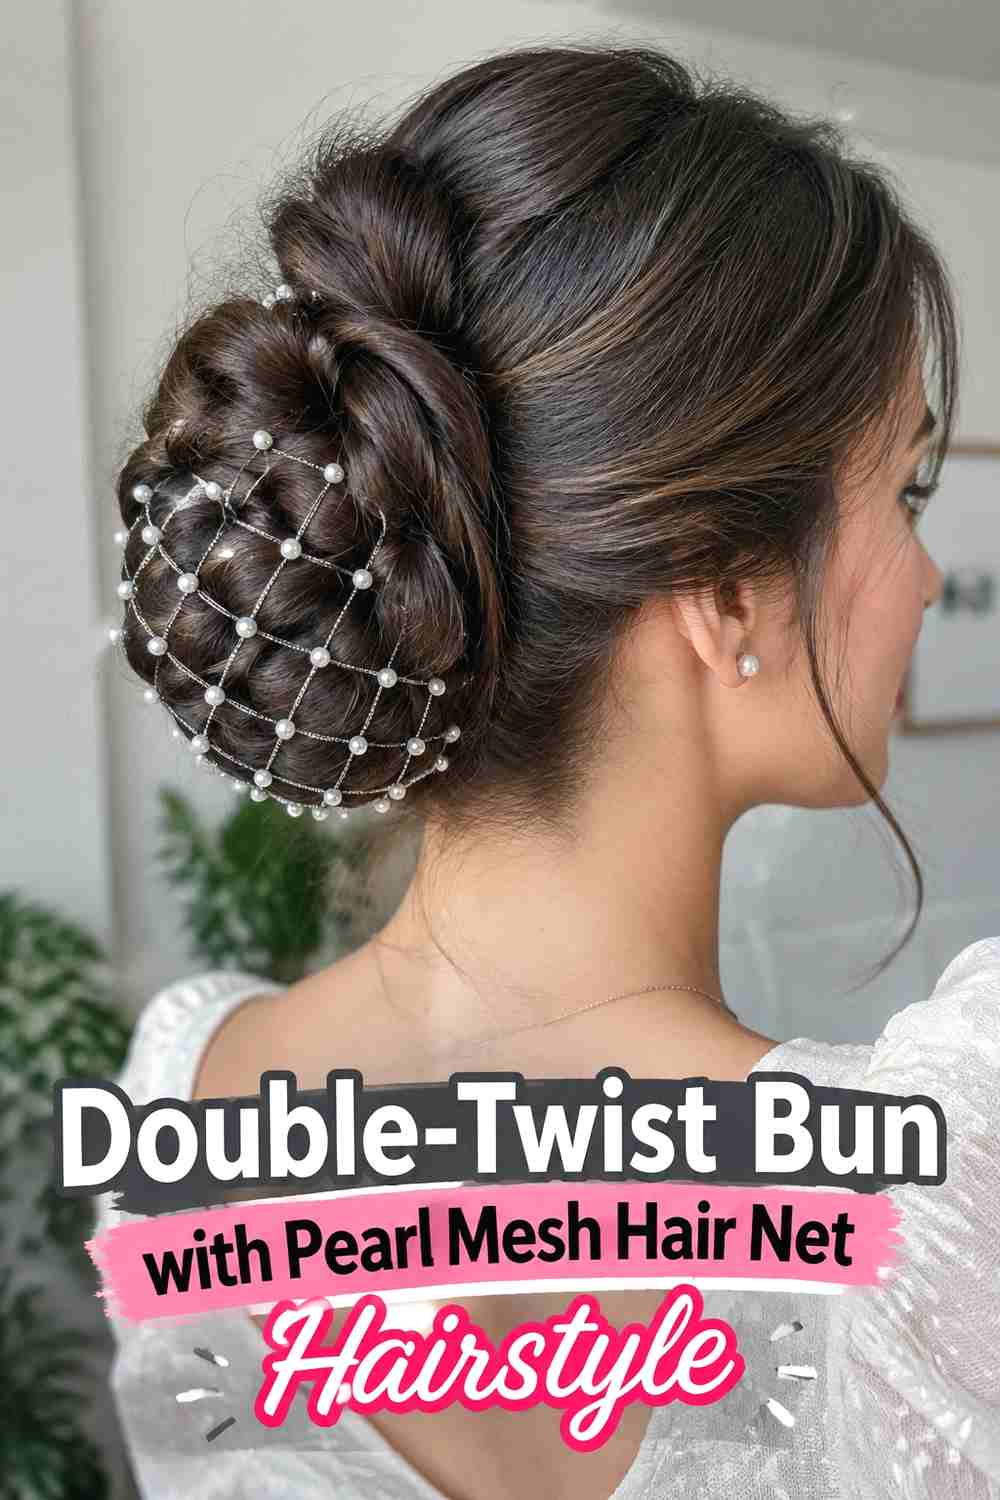
The double-twist bun creates symmetry by bringing two twisted sections together at the back before shaping them into one low bun. The twists add directional texture across the sides, while the pearl mesh concentrates decoration around the finished center shape. This makes the hairstyle interesting from multiple angles without requiring an elaborate braid or oversized bun. The twisted sections should be firm enough to hold but not so tight that they lose dimension. Once they meet, the remaining lengths can be coiled or tucked into a compact bun and secured before adding the mesh. The resulting style feels structured yet soft, especially when the crown retains a small amount of natural volume.
Why It Works
The matching twists create a balanced frame that leads toward the pearl-covered bun, giving the accessory a clear visual focal point.
Pro Tip
Secure the two twists together before forming the bun so their tension remains stable when you position the pearl mesh.
15. Polished Loop Bun With Pearl Mesh Hair Net Hairstyle
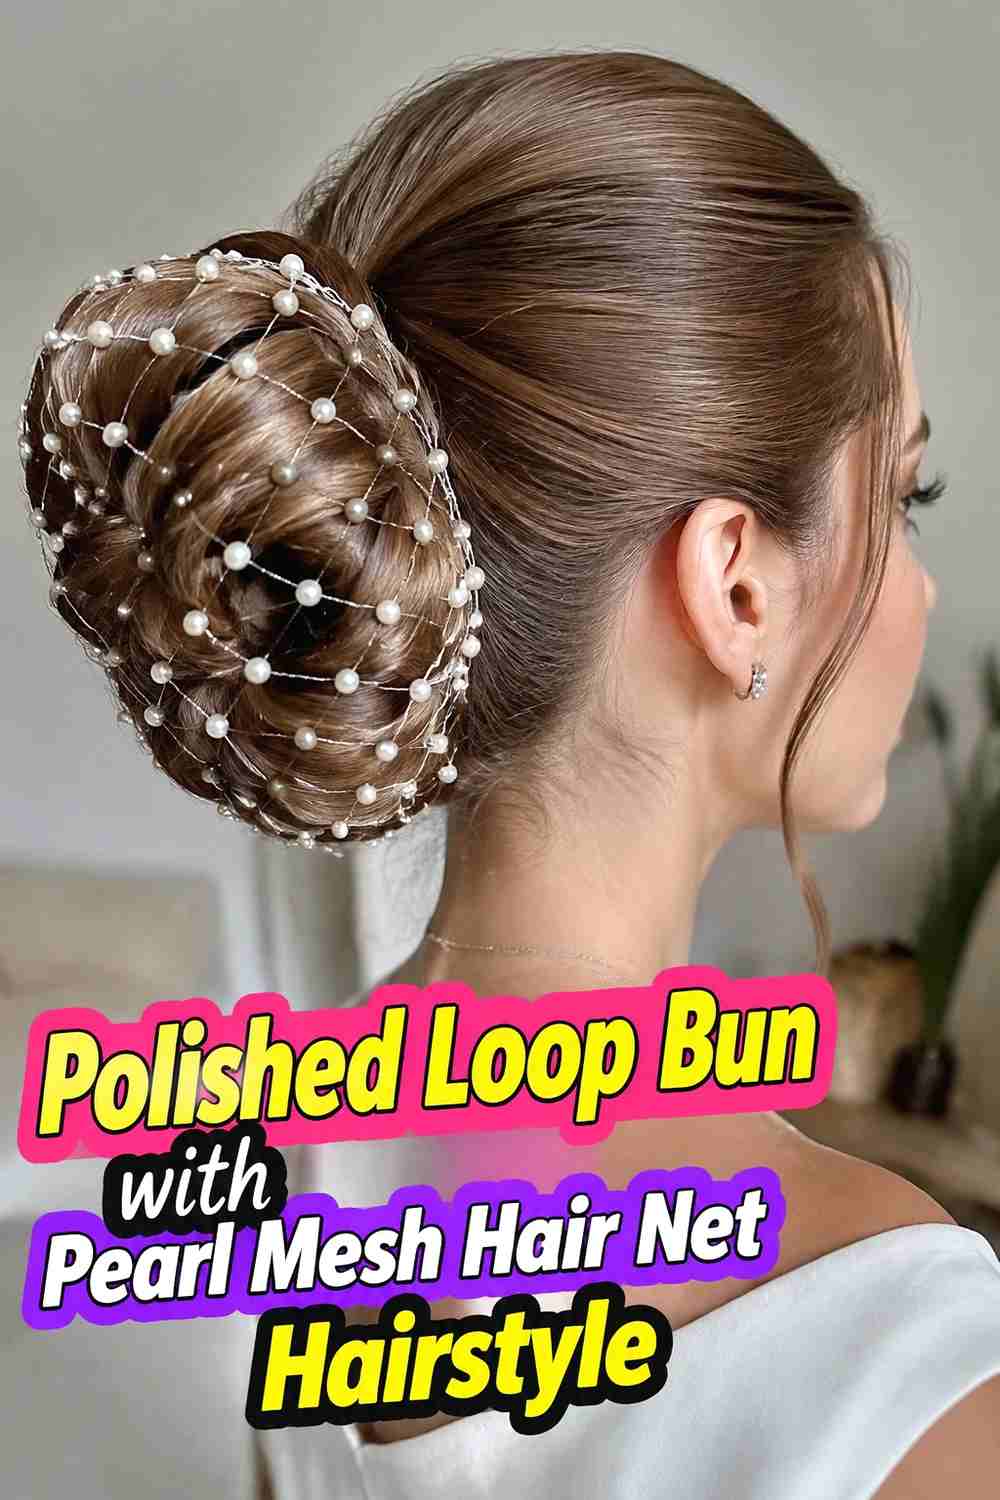
A polished loop bun creates a distinctive folded silhouette underneath the pearl mesh. Instead of wrapping the hair into a complete coil, the ponytail is folded into a smooth loop and the remaining ends are tucked or wrapped around its base. The mesh can cover the outer curve, emphasizing the loop’s clean architecture with evenly spaced pearl details. Straight or smoothed hair works particularly well because it keeps the folded shape easy to identify. The style feels contemporary and slightly more fashion-forward than a standard round bun while remaining elegant enough for formal events. Keeping the loop proportional to the head ensures the pearl net enhances the shape rather than making it appear oversized.
Styling Notes
Form and pin the loop completely before adding the accessory. Adjusting the fold after the mesh is secured can distort the pearl placement.
Hair Type & Length
Medium to long hair with enough length to fold back on itself works best, while very layered ends may need extra internal pinning.
16. Curly Low Updo With Pearl Mesh Hair Net Hairstyle
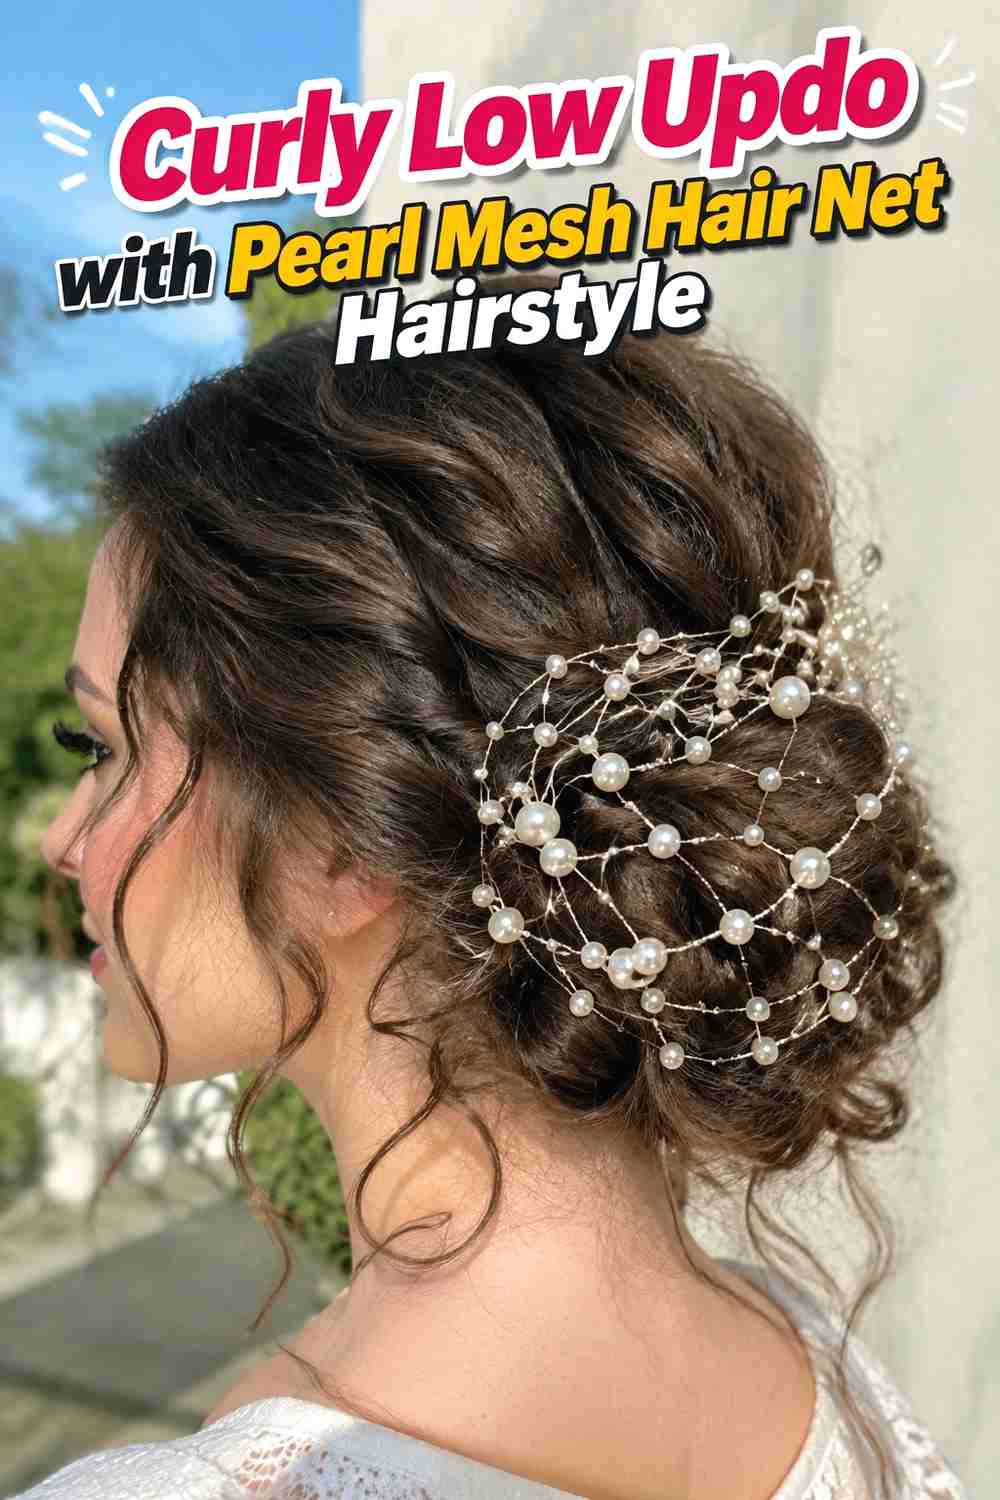
A curly low updo showcases natural or styled curls beneath the pearl mesh, creating a dimensional finish with plenty of visible texture. Rather than smoothing the hair into a uniform bun, curls are gathered and pinned individually or in small groups around the nape. The pearl mesh is then placed over the finished shape so the curls remain visible between its openings. The result can feel romantic and full without requiring excessive teasing. This approach works especially well when the curl pattern is preserved through the crown and sides instead of being completely flattened. The accessory should sit lightly over the curls so it decorates the surface without compressing their natural shape.
Wear & Maintenance
Use the underlying pins to hold the curls securely and avoid relying on the net to contain loose sections throughout the event.
Pro Tip
Place larger curls first to establish the silhouette, then fill smaller gaps before adding the pearl mesh as the final decorative layer.
17. Minimalist Chignon With Pearl Mesh Hair Net Hairstyle
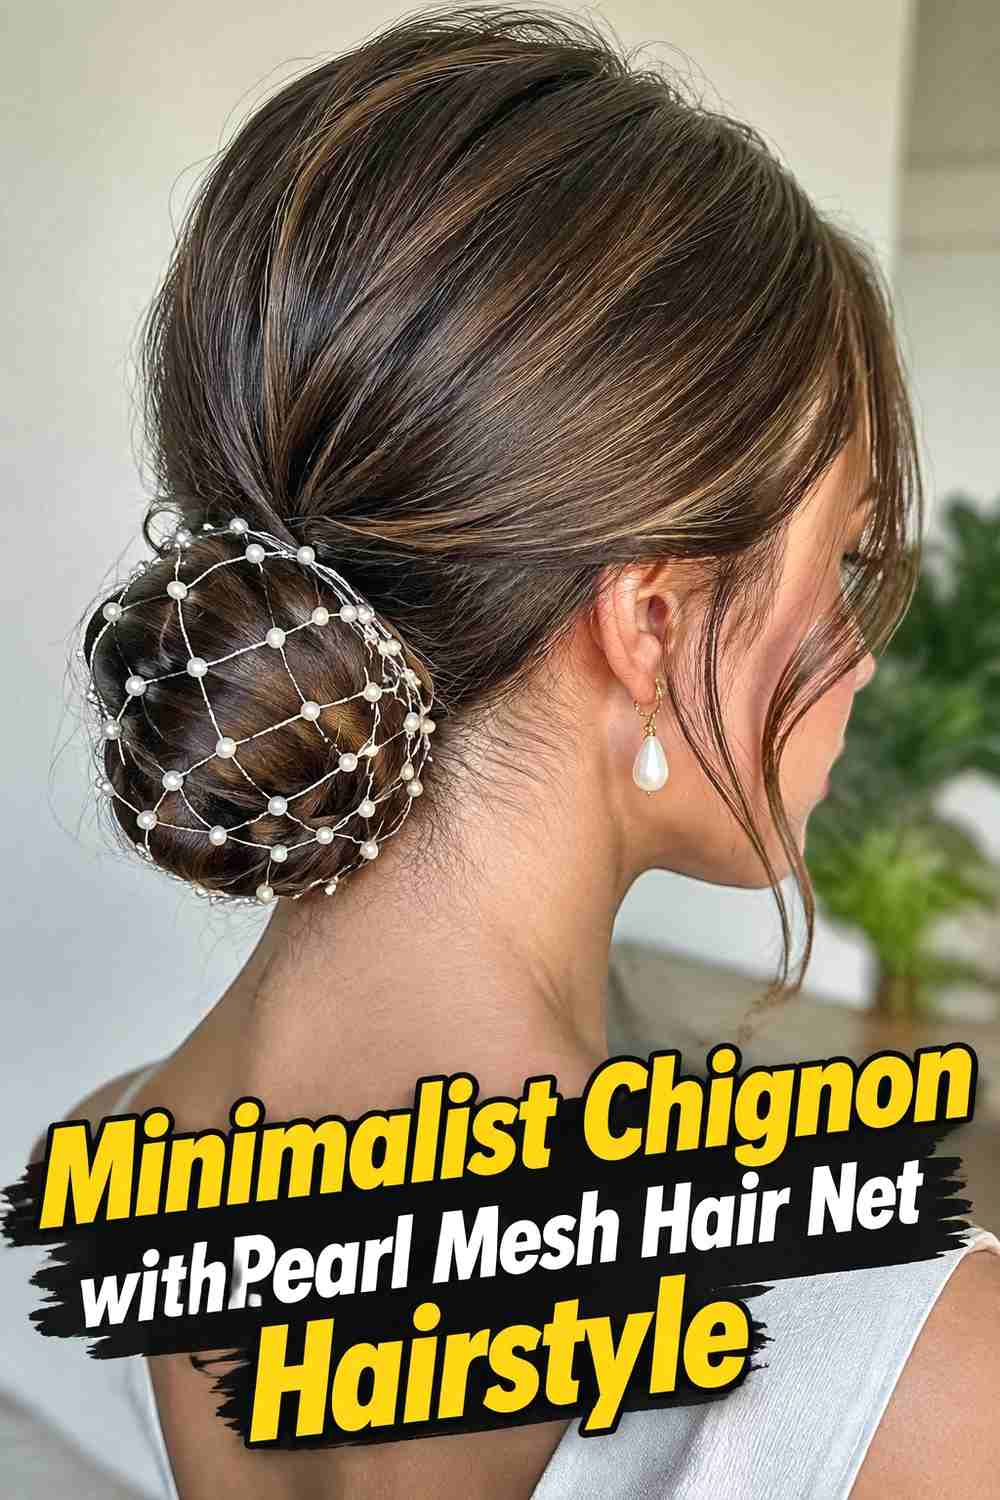
The minimalist chignon strips the updo down to a compact shape and lets the pearl mesh provide nearly all of the ornamentation. Hair is gathered at the nape and folded into a small, smooth chignon with minimal visible twisting or texture. A neatly fitted pearl net is then placed around the bun, creating an elegant grid of decorative detail over the simple foundation. A clean center part, low side part, or brushed-back front can all work depending on the desired finish. Because the bun itself remains restrained, this style pairs beautifully with more detailed dresses or statement earrings. The key is precision: tidy edges and balanced net placement make the simplicity feel deliberate.
Why It Works
A quiet underlying hairstyle prevents the pearl accessory from competing with braids, curls, or extra volume, producing a refined and cohesive result.
Best For
Choose this version when you prefer modern minimalism, understated bridal styling, or a polished event look with one clear decorative feature.
18. Statement Wrapped Bun With Pearl Mesh Hair Net Hairstyle
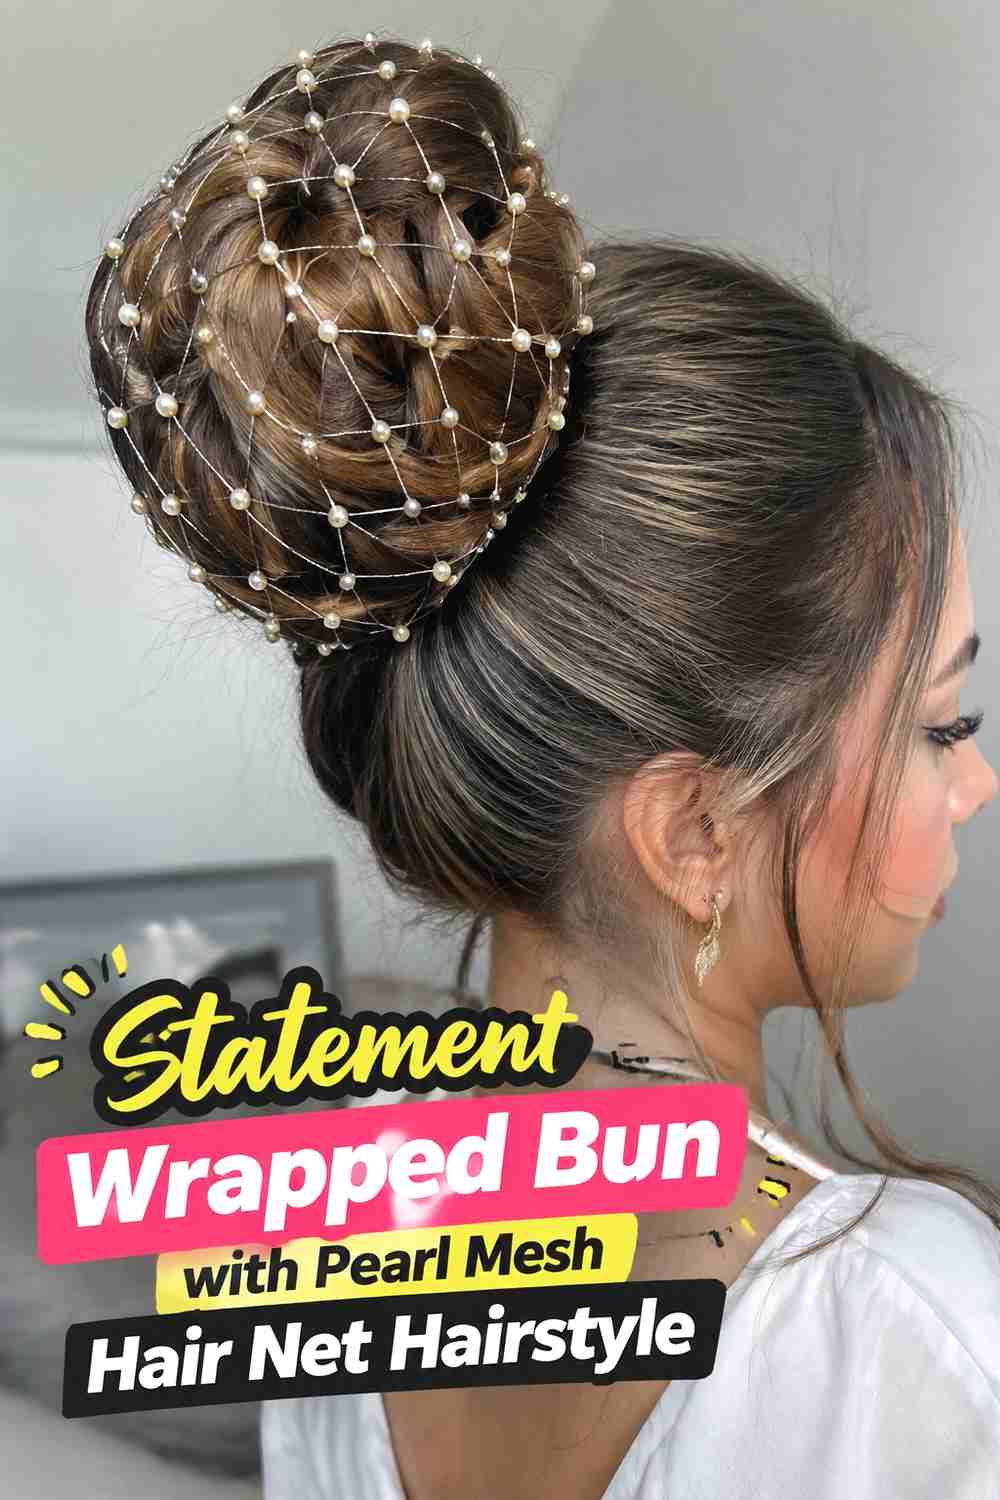
The statement wrapped bun uses the pearl mesh more prominently by allowing it to encircle and visibly frame a full, polished bun. The hair is gathered into a medium or large rounded shape at the back, then the mesh is carefully wrapped or fitted across the entire surface so the pearl pattern becomes a defining part of the silhouette. This works especially well with smooth or softly textured hair because the bun remains substantial enough to support the visual weight of the accessory. The rest of the hairstyle should stay relatively simple, with controlled crown volume and minimal extra decoration. When balanced carefully, the result feels dramatic and luxurious without becoming cluttered.
Styling Notes
Distribute the mesh evenly around the bun and check that pearls are not clustered heavily on one side before securing the final pins.
Best For
This is a strong choice for formal bridal looks, receptions, gala styling, or any occasion where the pearl accessory is meant to become the centerpiece.
How to Choose the Right Look
Start with the shape you want the pearl mesh to decorate. A compact chignon or sleek knot creates a restrained, modern effect, while a larger bridal bun, curly updo, or statement wrapped bun makes the pearls more noticeable. If you prefer a taller silhouette, the French twist offers vertical structure, whereas rolled nape styles create a softer horizontal line.
Hair texture also changes the effect. Smooth hair makes the pearl pattern appear crisp and graphic, while curls, twists, and braided sections add texture underneath the mesh. If your hair is naturally curly or wavy, consider preserving some of that movement rather than smoothing everything away.
Comfort and security matter as much as appearance. Build the updo so it can hold independently before positioning the pearl net. This reduces tension on the accessory and makes adjustments easier. The mesh should sit securely without pulling at individual strands or pressing uncomfortably against the scalp.
For weddings and long events, consider how the hair net interacts with veils, combs, earrings, or dress details. A heavily decorated outfit may pair best with a minimalist pearl-covered chignon, while a simpler look can support a larger statement bun.
Final Thoughts
A pearl mesh hair net can transform a familiar bun, twist, or chignon by adding delicate detail without requiring dozens of individual accessories. The effect can be sleek and modern, softly bridal, vintage-inspired, or dramatic depending on the underlying updo.
Choose a shape that works with your hair’s length and density first, then treat the pearl mesh as the finishing layer. When the hairstyle is secure and the accessory is positioned carefully, the pearls can highlight the structure rather than overpowering it.
FAQs
1. What hairstyles work best with a pearl mesh hair net?
Low buns, chignons, French twists, rolled updos, braided buns, and compact high buns all provide clear shapes that can support a pearl mesh accessory.
2. Should the pearl mesh hair net hold the updo together?
Ideally, no. Secure the hairstyle with elastics and pins first, then add the pearl mesh as a decorative layer. This usually improves comfort and stability.
3. Can pearl mesh work with curly hair?
Yes. A mesh net can look especially dimensional over curls because the texture remains visible between the pearls. Avoid compressing the curls too tightly when positioning it.
4. How do I keep a pearl hair net from slipping?
Anchor the edges with discreet hairpins at several points around the bun or twist. The exact number will depend on the accessory’s size, weight, and construction.
5. Can I wear a pearl mesh hair net with a veil?
Yes, but plan the placement of both accessories in advance. The veil comb and mesh pins should have separate anchor points so adjusting one does not disturb the other.
Save your favorite pearl mesh hair net updo hairstyle ideas for your next wedding, formal event, or elegant styling inspiration board.