14 Chunky Flat Twist Bun Hairstyle Ideas
Chunky flat twist buns combine bold scalp definition with sculpted volume, giving natural hair an elegant shape that can feel polished, creative, or comfortably relaxed. Flat twists use two sections of hair twisted close to the scalp, and working with larger sections creates the chunky definition that makes these styles stand out. Once the twists reach their destination, the remaining lengths can be wrapped, coiled, pinned, or arranged into a bun. Changing the direction of the parts and the location of the bun creates dramatically different results without abandoning the core technique. When choosing a style, pay attention to hair length, density, tension, bun placement, and the amount of scalp detail you want visible. Larger flat twists create a strong graphic pattern, while fewer twists often mean a quicker, cleaner-looking design. Comfort matters too: the twists should feel secure without placing unnecessary tension along the hairline or scalp.
Quick List
- High Crown Chunky Flat Twist Bun Hairstyle
- Low Nape Chunky Flat Twist Bun Hairstyle
- Side Bun Chunky Flat Twist Hairstyle
- Center Part Chunky Flat Twist Bun Hairstyle
- Chunky Flat Twist Halo Bun Hairstyle
- Spiral Chunky Flat Twist Bun Hairstyle
- Crisscross Chunky Flat Twist Bun Hairstyle
- Half Up Chunky Flat Twist Bun Hairstyle
- Double Chunky Flat Twist Bun Hairstyle
- Asymmetrical Chunky Flat Twist Bun Hairstyle
- Oversized Top Knot Chunky Flat Twist Hairstyle
- Curly Tip Chunky Flat Twist Bun Hairstyle
- Tapered Side Feed Chunky Flat Twist Bun Hairstyle
- Wrapped Base Chunky Flat Twist Bun Hairstyle
1. High Crown Chunky Flat Twist Bun Hairstyle
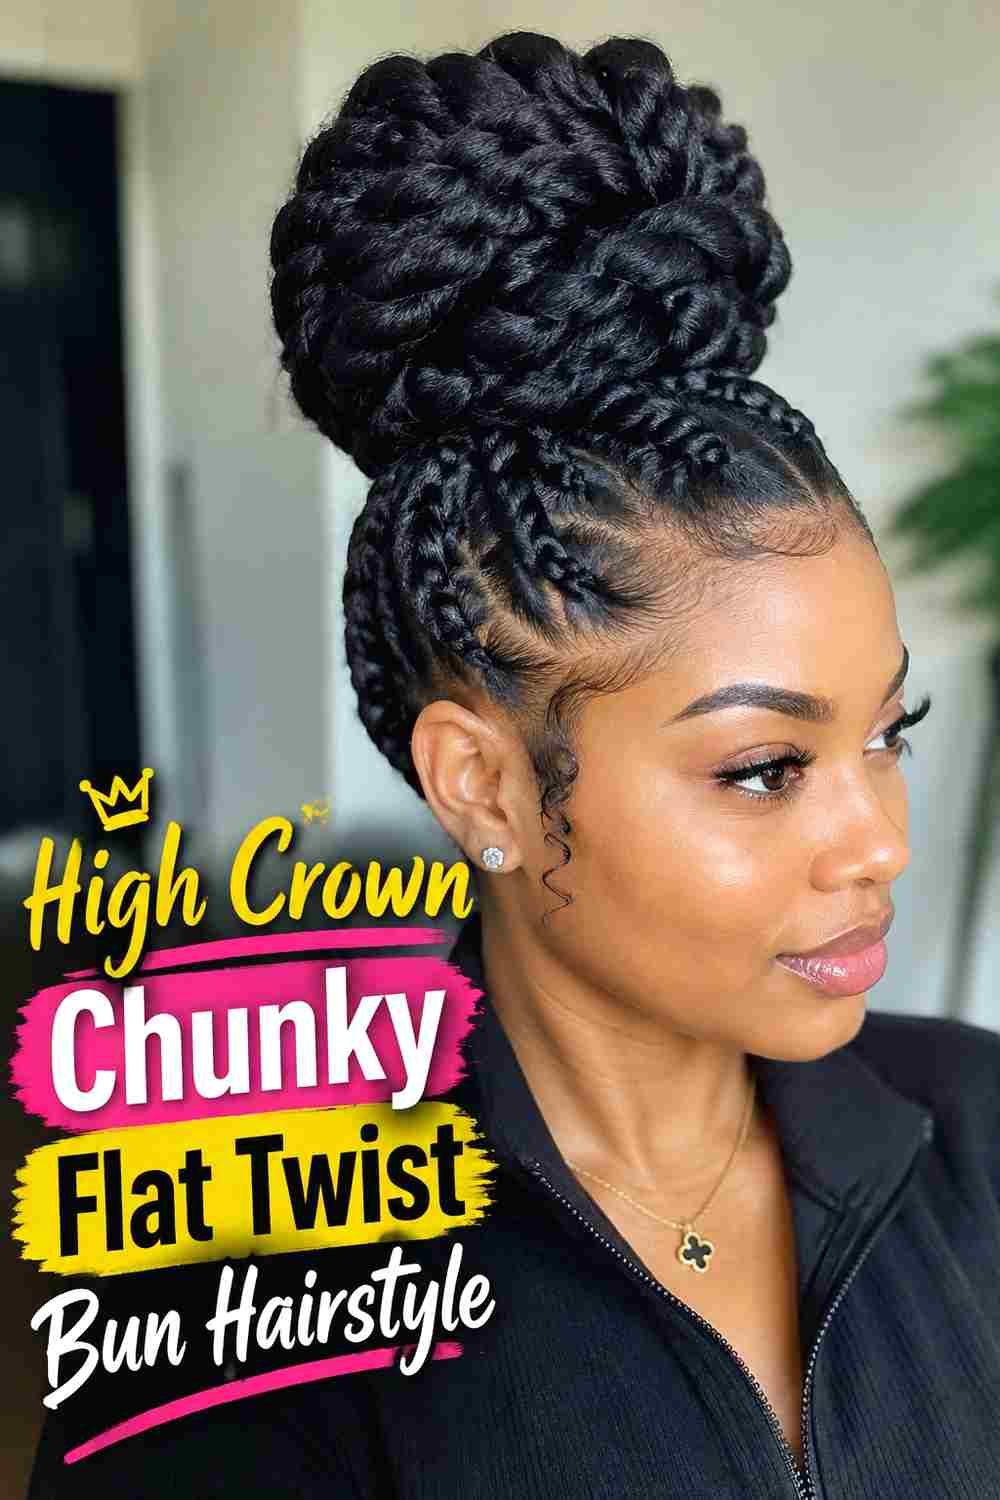
This high-crown style directs several substantial flat twists upward into a rounded bun near the top of the head. The upward pattern makes the twist definition visible from multiple angles while keeping the lengths neatly contained. Chunky sections give the scalp design a bold, clean appearance without requiring a large number of individual twists. The bun can be kept compact for a refined silhouette or gently expanded for more height and presence. This look is particularly effective on textured hair with enough length to wrap comfortably after the flat twists reach the crown. Keep the front sections smooth but not excessively tight so the hairline remains comfortable throughout wear.
Styling Notes
Part the hair into broad sections that travel toward one central crown point. Secure the gathered ends before shaping the bun so the flat twists do not loosen while you pin and arrange the lengths.
Best For
This elevated shape works well for formal events, workdays, dinners, celebrations, and occasions where you want the hair completely lifted from the neck.
2. Low Nape Chunky Flat Twist Bun Hairstyle
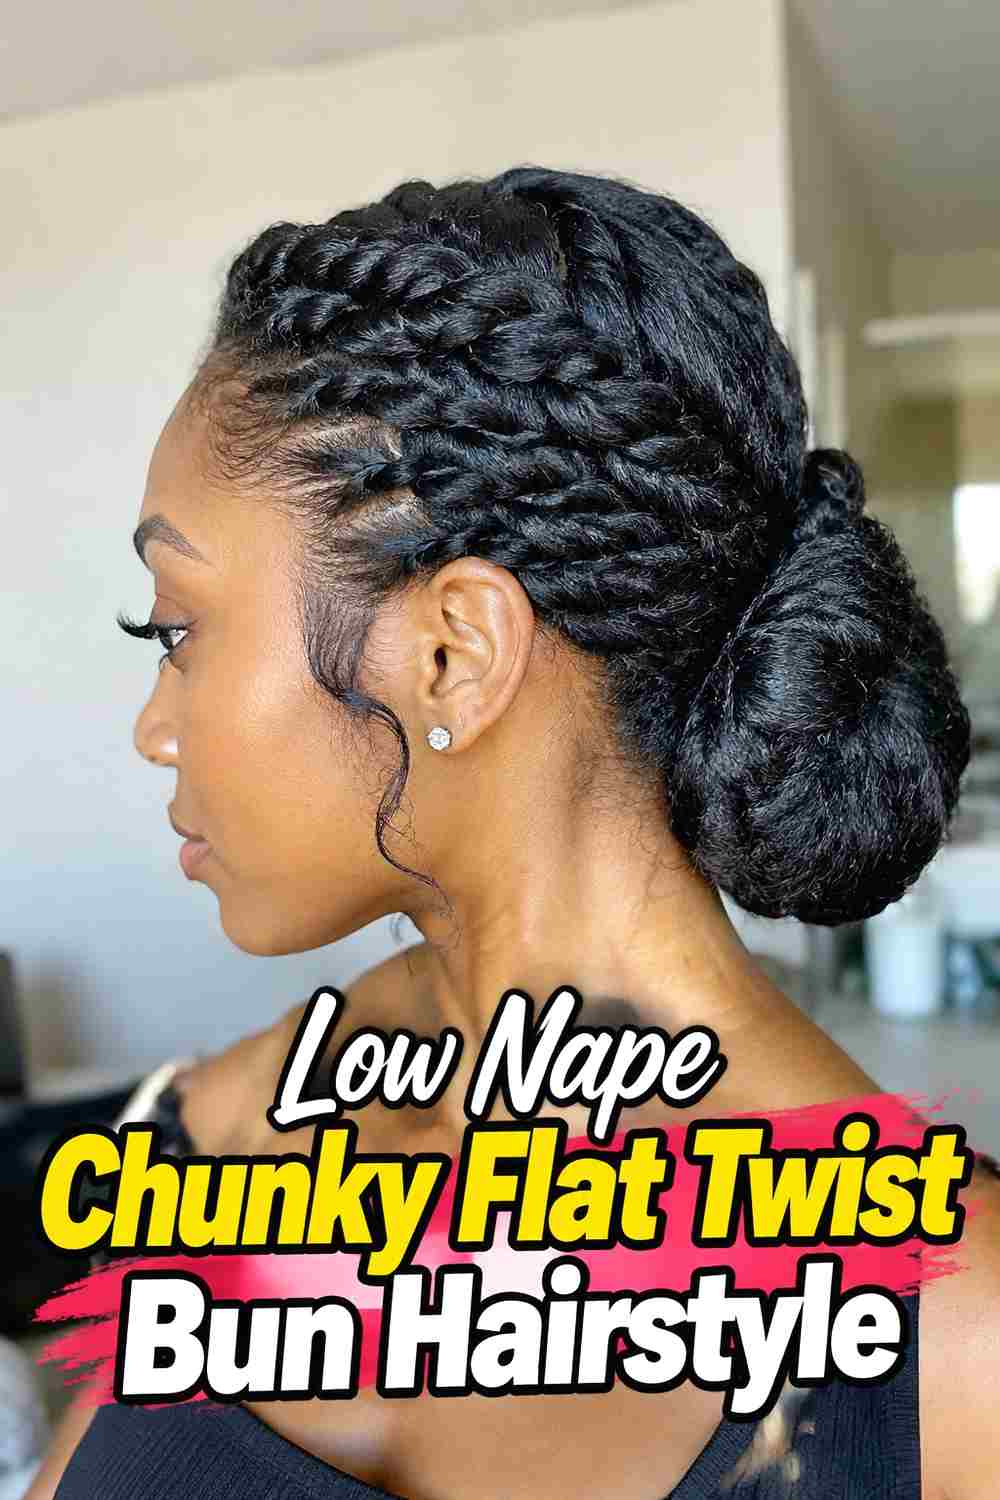
A low nape bun gives chunky flat twists a softer and more understated finish. Instead of directing the sections upward, create broad twists that travel backward and slightly downward until they meet close to the neckline. The remaining hair can then be wrapped into a smooth round bun or a more textured coil. This placement keeps the overall profile sleek and works especially well when you want the scalp pattern to provide detail without adding height at the crown. A center part, side part, or curved sectioning pattern can all change the mood of the look. Keep the bun secure enough to hold its shape without pinning it so tightly that the nape feels uncomfortable.
Hair Type & Length
Medium to long textured hair is easiest to wrap into the finished bun, although shorter lengths may work with a smaller tucked shape depending on density.
Pro Tip
Direct each flat twist toward the exact point where you want the bun to sit. This keeps the finished shape balanced and reduces unnecessary pulling when gathering the ends.
3. Side Bun Chunky Flat Twist Hairstyle
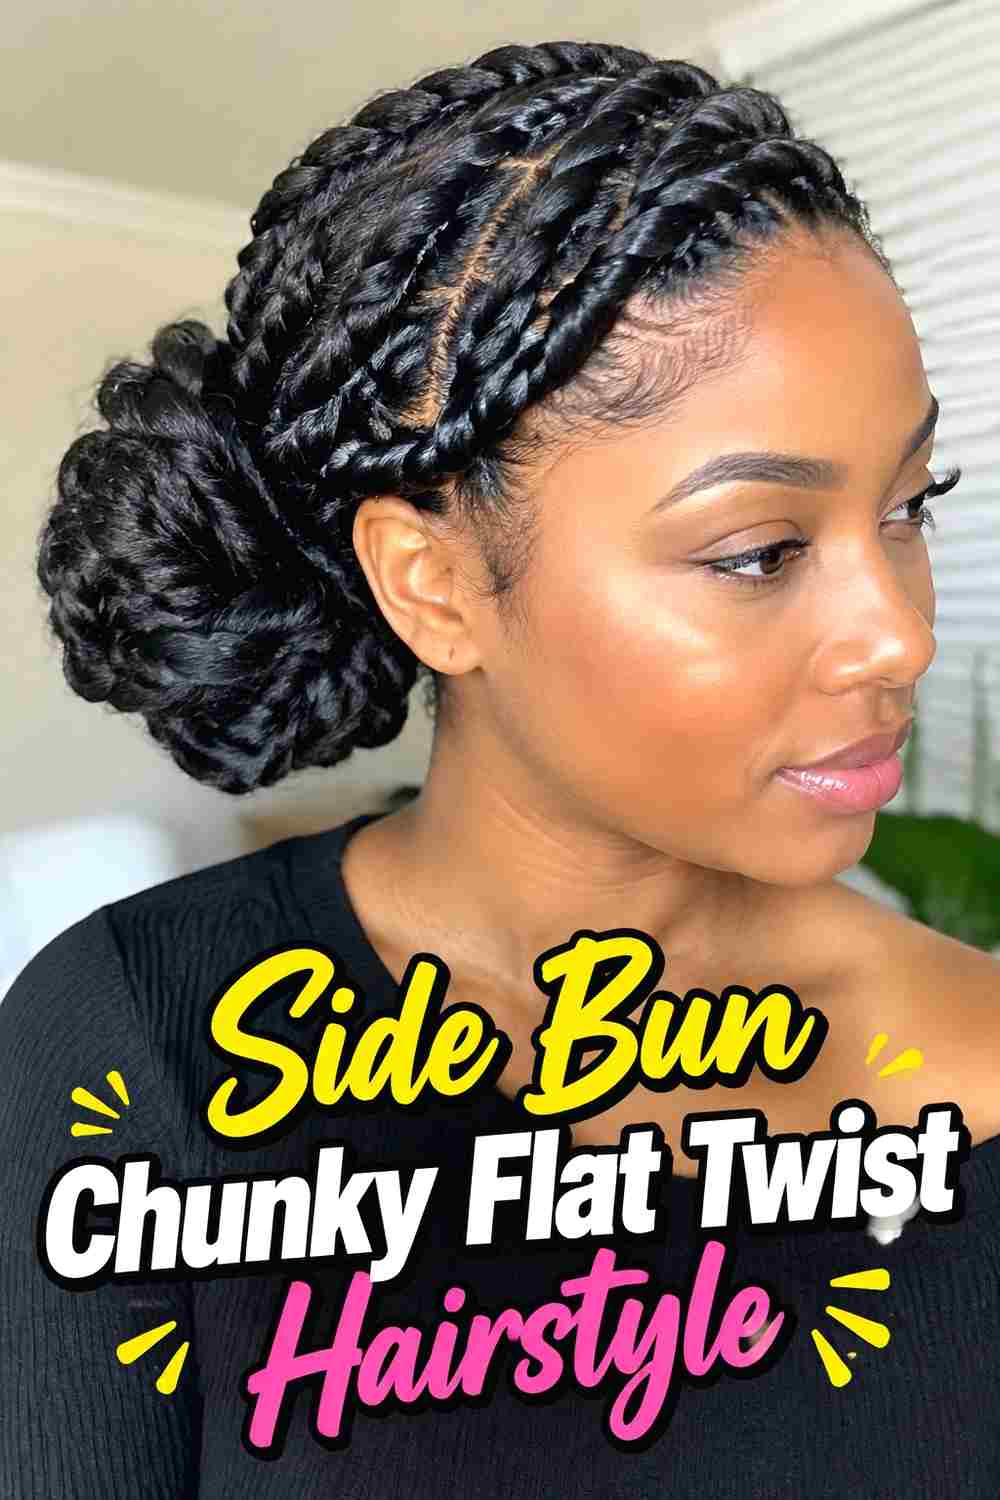
For a more directional look, angle chunky flat twists across the head toward a bun positioned behind one ear or slightly above the side of the nape. The asymmetrical placement creates immediate visual interest because the twist pattern becomes part of the overall silhouette instead of simply leading straight backward. Keep the opposite side relatively smooth so the flowing direction of the parts remains easy to see. The bun can be circular and polished or softly twisted for extra texture. This style works particularly well when photographed from the side because both the scalp pattern and bun are visible together. Make sure the sections travel naturally rather than forcing the hair sharply across the scalp.
Styling Notes
Use diagonal or gently curved partings rather than rigid horizontal lines. They help the flat twists flow toward the side bun and make the finished arrangement look intentional.
Wear & Maintenance
Check that the off-center bun does not feel noticeably heavier on one side. Balanced pin placement can make the style more comfortable for longer wear.
4. Center Part Chunky Flat Twist Bun Hairstyle
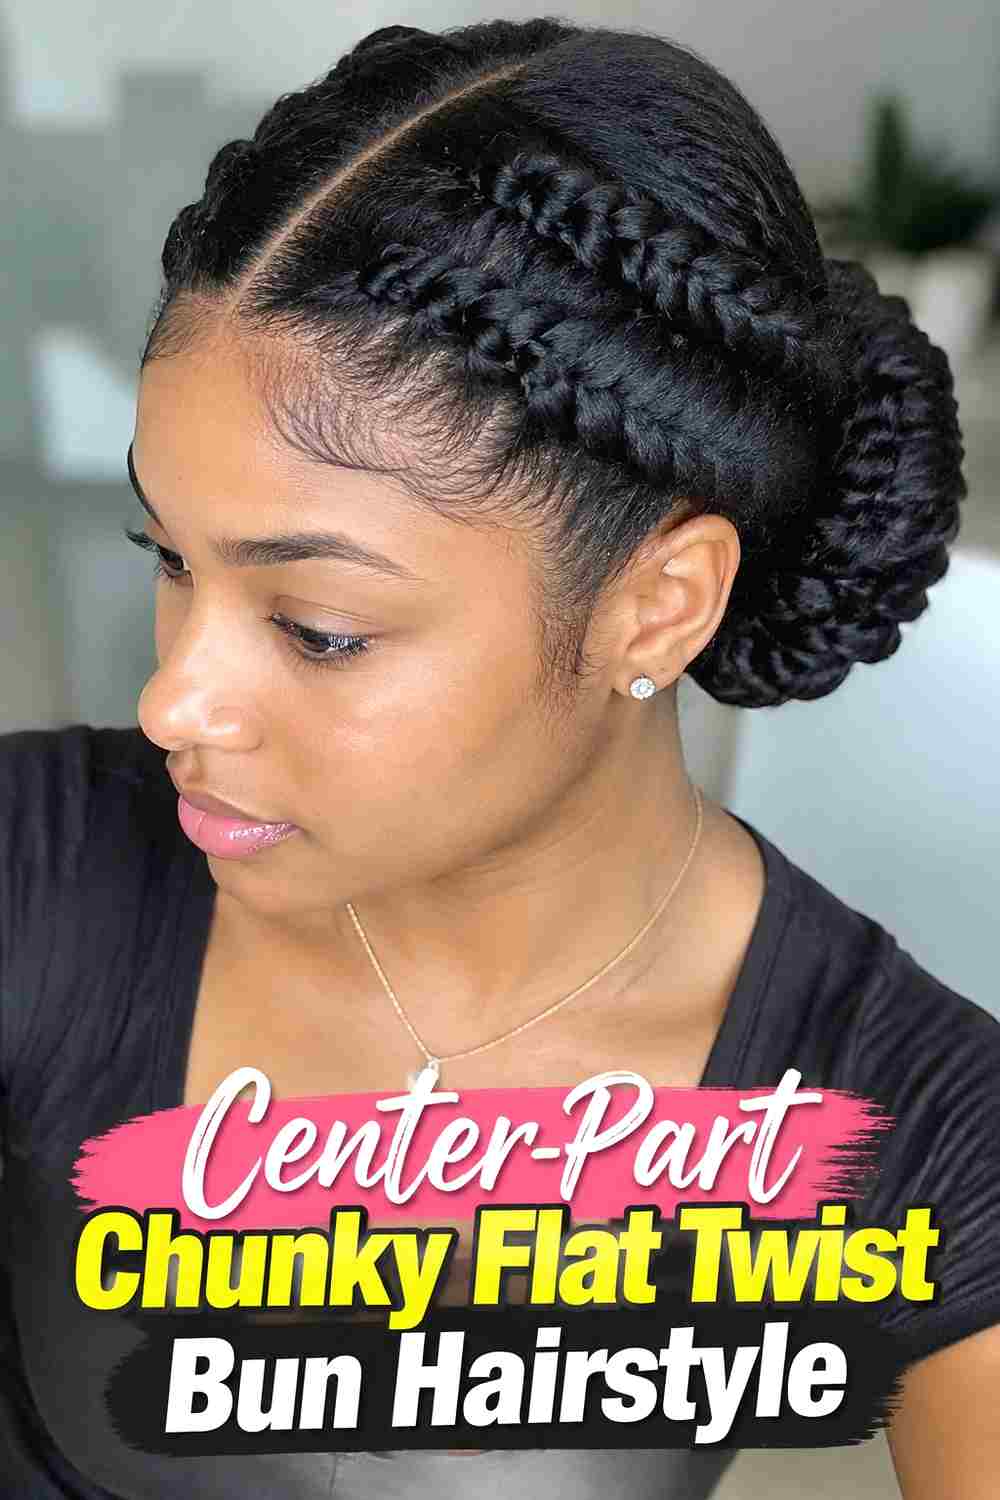
A defined center part creates a symmetrical foundation for chunky flat twists and gives the finished bun a clean, structured appearance. Create several broad twists on each side of the part and direct them toward the back or crown, keeping the number and general size of sections balanced. Once the twists meet, gather the loose ends into a rounded bun that complements the strong central line. This version is especially attractive when you want the scalp pattern to look neat and graphic without adding complicated crisscross sections. Slight variation in twist width can keep the result natural, but the overall direction should remain balanced. Avoid pulling the front twists too tightly just to achieve perfect symmetry.
Why It Works
The center part provides a strong visual anchor, while the chunky twists create enough texture to keep the look from appearing overly severe or flat.
Best For
Choose this style when you want a versatile bun that can transition easily between professional settings, dinners, celebrations, and everyday wear.
5. Chunky Flat Twist Halo Bun Hairstyle
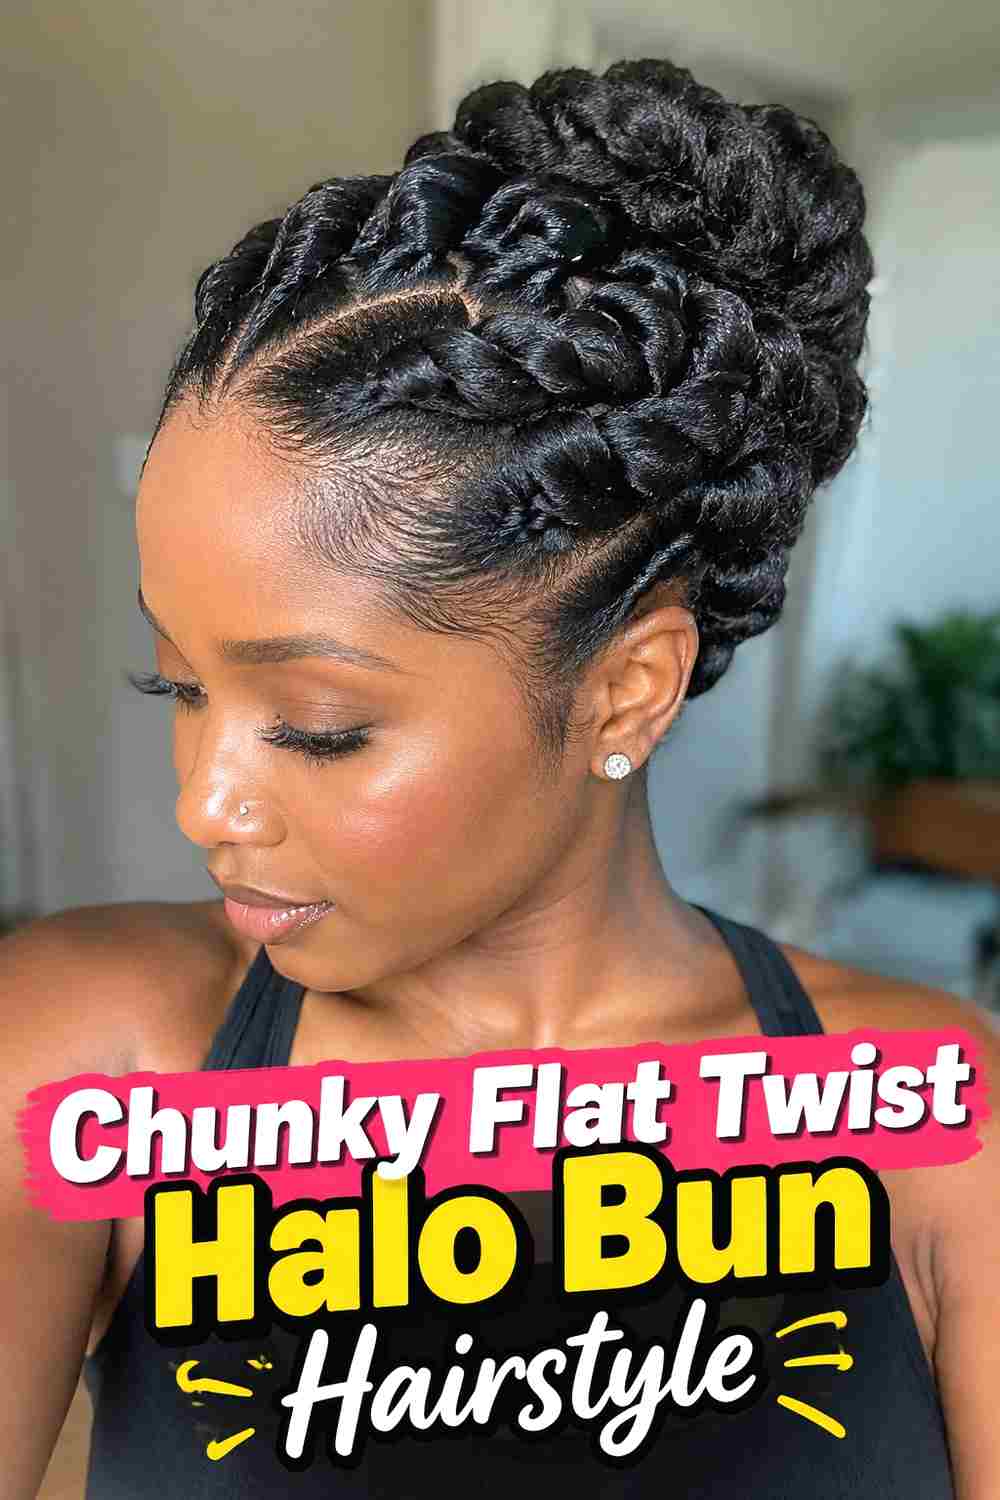
This variation uses chunky flat twists to create a rounded, halo-like direction around the head before the lengths are tucked into a central or slightly elevated bun. Curved partings are important because they allow the twists to follow the natural shape of the head rather than forming straight rows. The result is sculptural but still wearable, with the eye naturally following each twist toward the finished bun. Leaving the twist texture clearly defined helps distinguish the halo effect from a standard crown bun. Depending on your hair length, the final bun can be compact or fuller and more dimensional. Keep the sections broad enough to preserve the chunky appearance without making the scalp pattern feel crowded.
Styling Notes
Map the curved partings before twisting. Establishing the direction first makes it easier to keep the halo pattern consistent as you work around the head.
Pro Tip
Use pins mainly in the bun rather than along every flat twist. Properly formed scalp twists should hold their shape without excessive pinning.
6. Spiral Chunky Flat Twist Bun Hairstyle
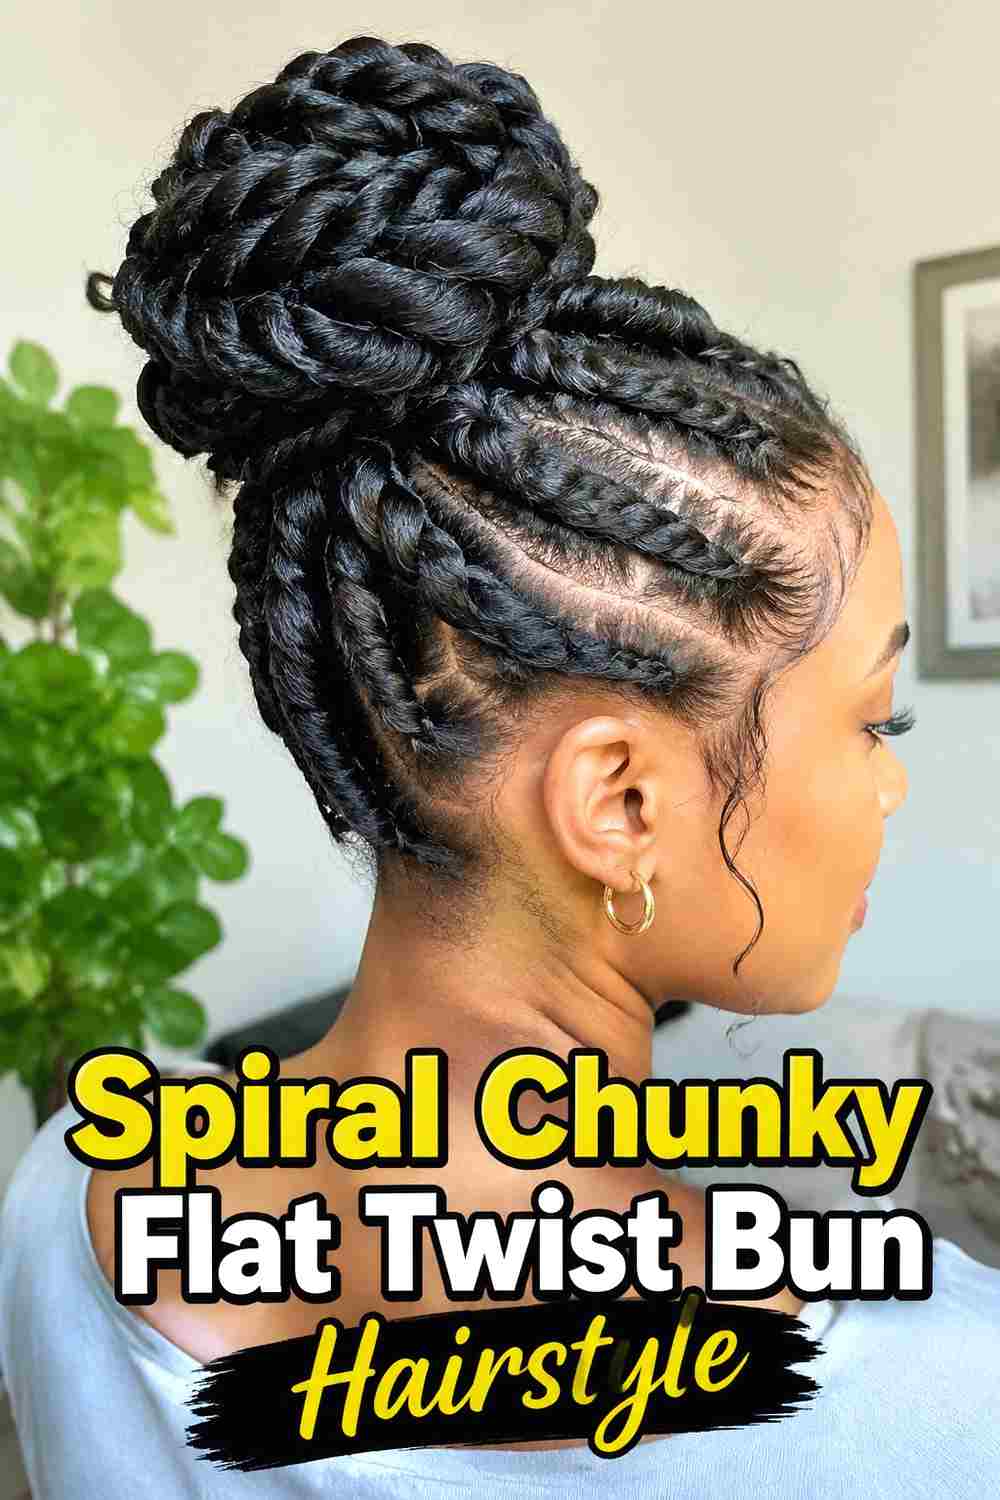
A spiral layout turns chunky flat twists into a dramatic design feature before they ever reach the bun. Begin from an off-center point and create curved sections that sweep around the head in a gentle spiral, keeping the twists broad enough to preserve their substantial texture. The ends can meet in a bun near the crown, back, or side depending on where the spiral naturally finishes. This style requires more planning than straight-back flat twists, but the payoff is a distinctive pattern visible from several angles. Keep the curves smooth and consistent rather than creating too many tiny changes in direction. A simple rounded bun lets the spiral scalp design remain the visual focus.
Best For
This look suits special occasions, creative styling sessions, portrait photography, and events where you want the parting pattern to be as noticeable as the bun itself.
Wear & Maintenance
Protect the scalp pattern from excessive friction while sleeping if you plan to keep the style beyond one day, and avoid constantly reshaping the bun.
7. Crisscross Chunky Flat Twist Bun Hairstyle
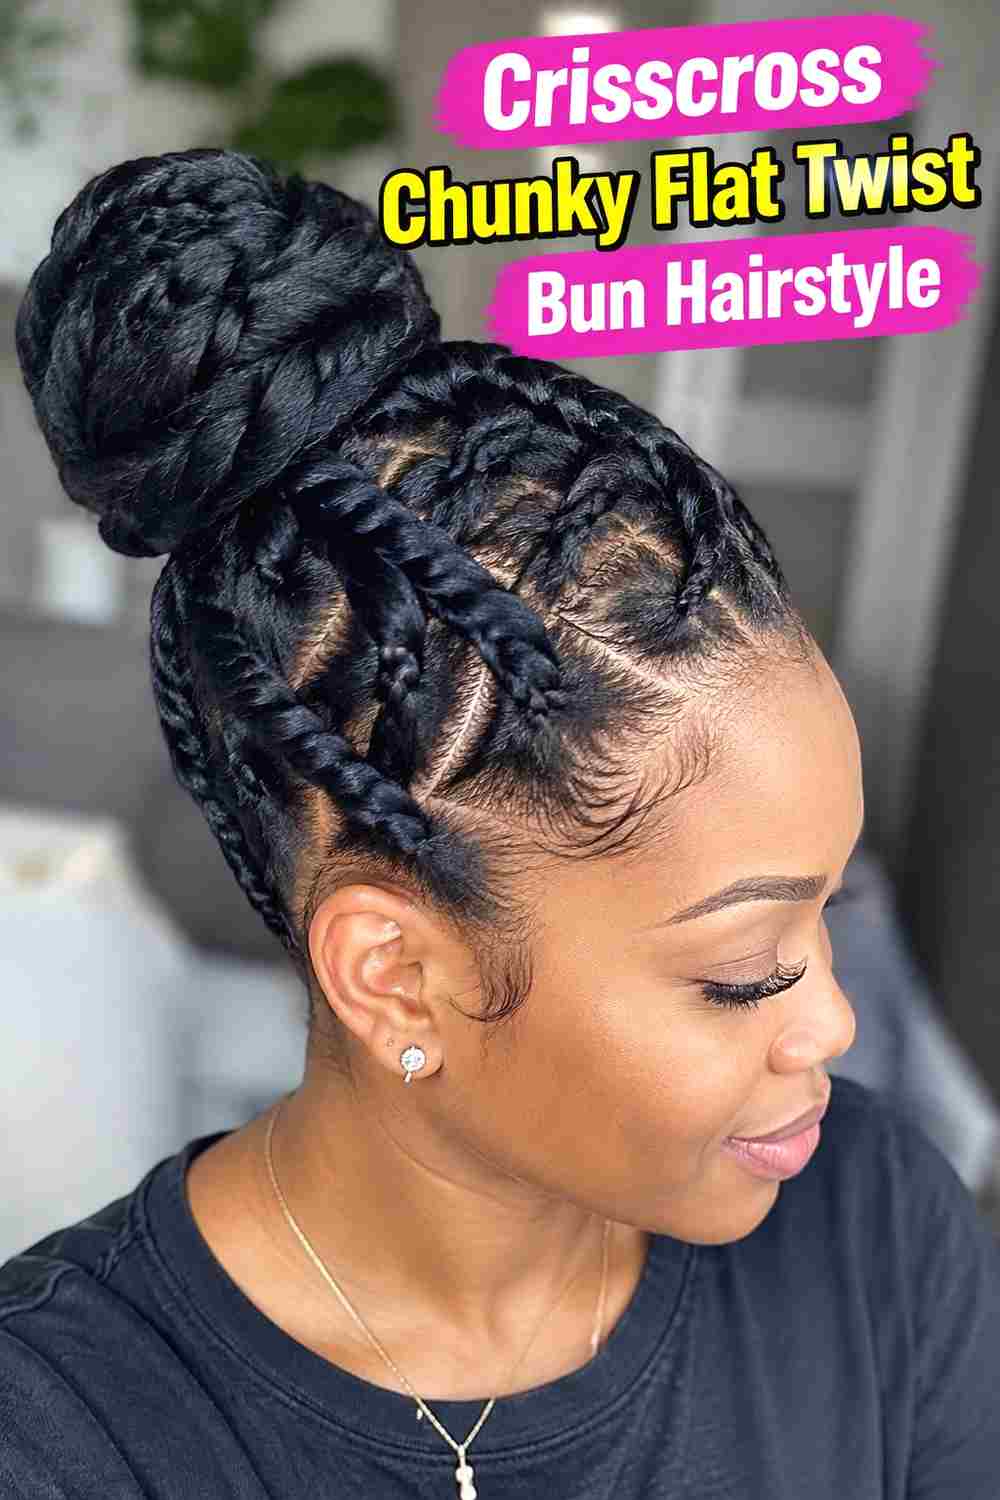
Crisscross parting adds geometric interest to a flat twist bun while keeping the actual twists large and easy to distinguish. Instead of creating parallel sections, allow selected parts to angle toward one another so the finished scalp design appears woven or intersected. The twists themselves should remain independent and physically believable, meeting only as they are gathered toward the bun. Positioning the bun at the back or crown prevents the pattern from becoming visually overloaded. This version works best when the parting lines are clean enough to make the crisscross effect obvious but not so numerous that the style loses its chunky character. Keep the final bun simple to balance the stronger scalp design.
Styling Notes
Plan each section before beginning. A few deliberate crossings usually create more impact than filling the entire head with small, complicated geometric parts.
Hair Type & Length
Textured hair with enough density to form clearly defined chunky twists shows this pattern particularly well, while medium to long lengths provide more flexibility for the bun.
8. Half Up Chunky Flat Twist Bun Hairstyle
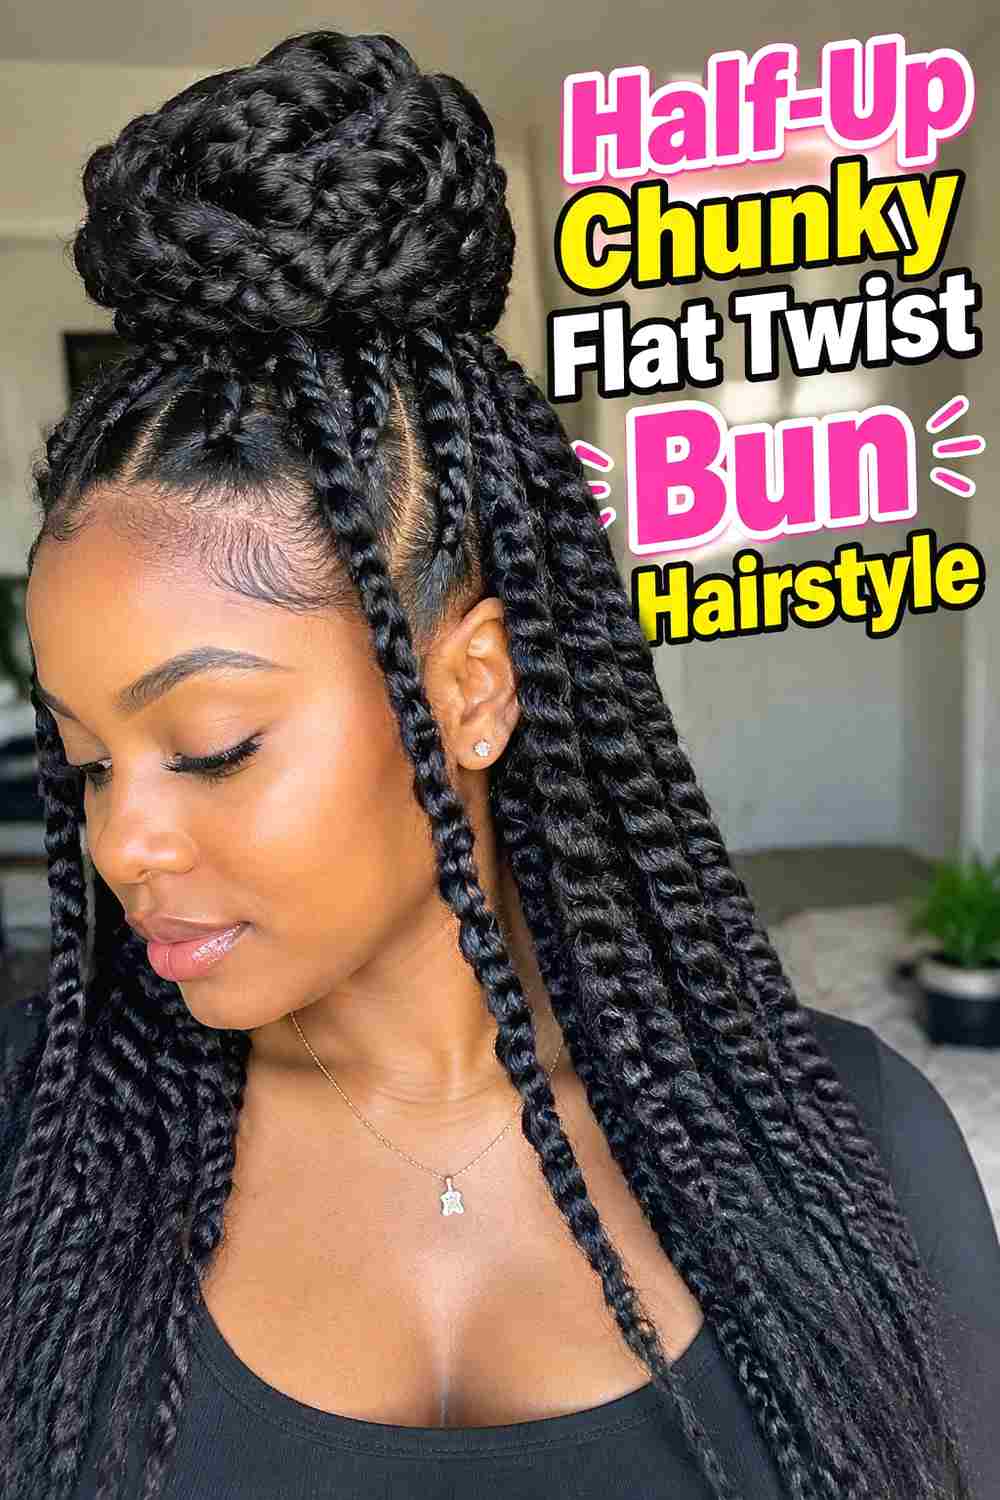
A half-up flat twist bun gives you scalp definition and height while leaving the lower portion of the hair free. Create several chunky flat twists from the front and sides toward the crown, then gather those sections into a compact bun. The remaining hair can stay naturally curly, coily, stretched, or softly defined depending on the finish you prefer. The contrast between structured twists and loose texture makes this style feel especially dynamic. It is also useful when you want hair away from the face without committing to a complete updo. Keep the bun proportionate to the loose hair underneath; an extremely large bun can make the top section feel visually disconnected from the rest of the style.
Best For
This option works well for casual events, weekends, concerts, brunches, and other settings where you want visible styling detail while still showing your natural length and texture.
Pro Tip
Decide how much hair you want loose before parting the flat twists. A clean horizontal or curved division at the crown helps the half-up shape look balanced.
9. Double Chunky Flat Twist Bun Hairstyle
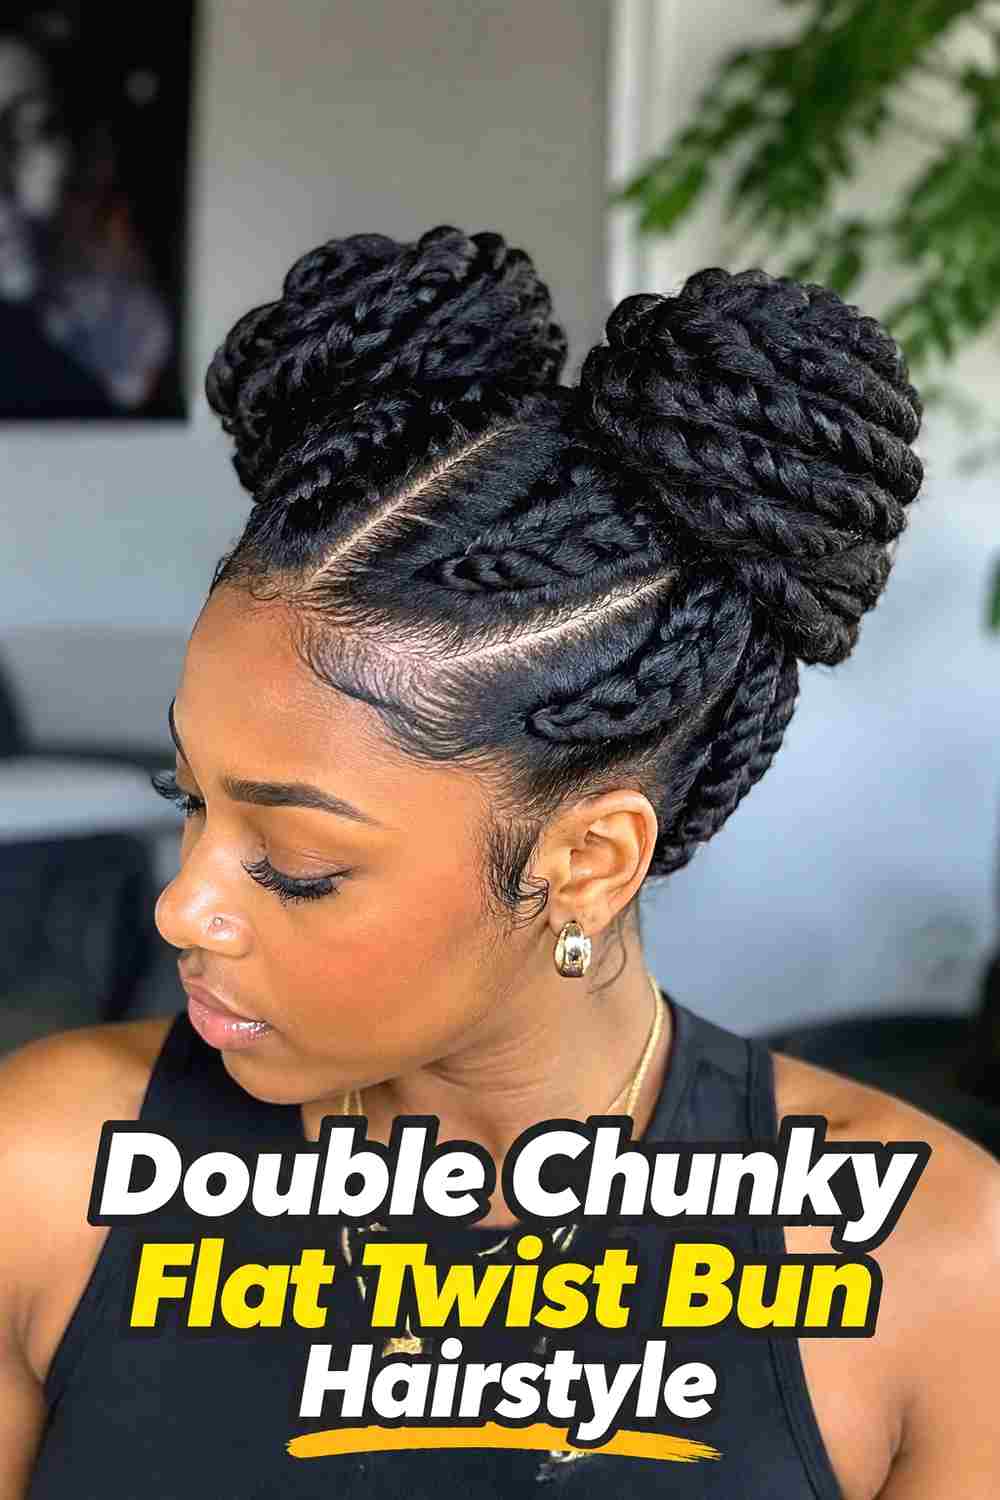
Instead of gathering every twist into one bun, divide the hairstyle into two zones and create a pair of sculpted buns. Chunky flat twists can travel upward into two high buns for a playful silhouette or backward into lower buns for a more understated version. Keeping the twists substantial prevents the scalp from looking overly busy and gives each side enough visual weight to balance the other. The two buns do not have to be perfectly identical, but their placement should feel intentional. This style can showcase natural texture particularly well because each bun has its own shape and volume. Avoid over-tightening the center or perimeter sections while trying to make both sides perfectly symmetrical.
Styling Notes
Part the overall hairstyle into two main areas first, then subdivide each side into broad flat-twist sections that naturally lead toward its corresponding bun.
Wear & Maintenance
Use secure but comfortable elastics or pins at each bun base. Equalizing the weight on both sides can improve comfort during longer wear.
10. Asymmetrical Chunky Flat Twist Bun Hairstyle
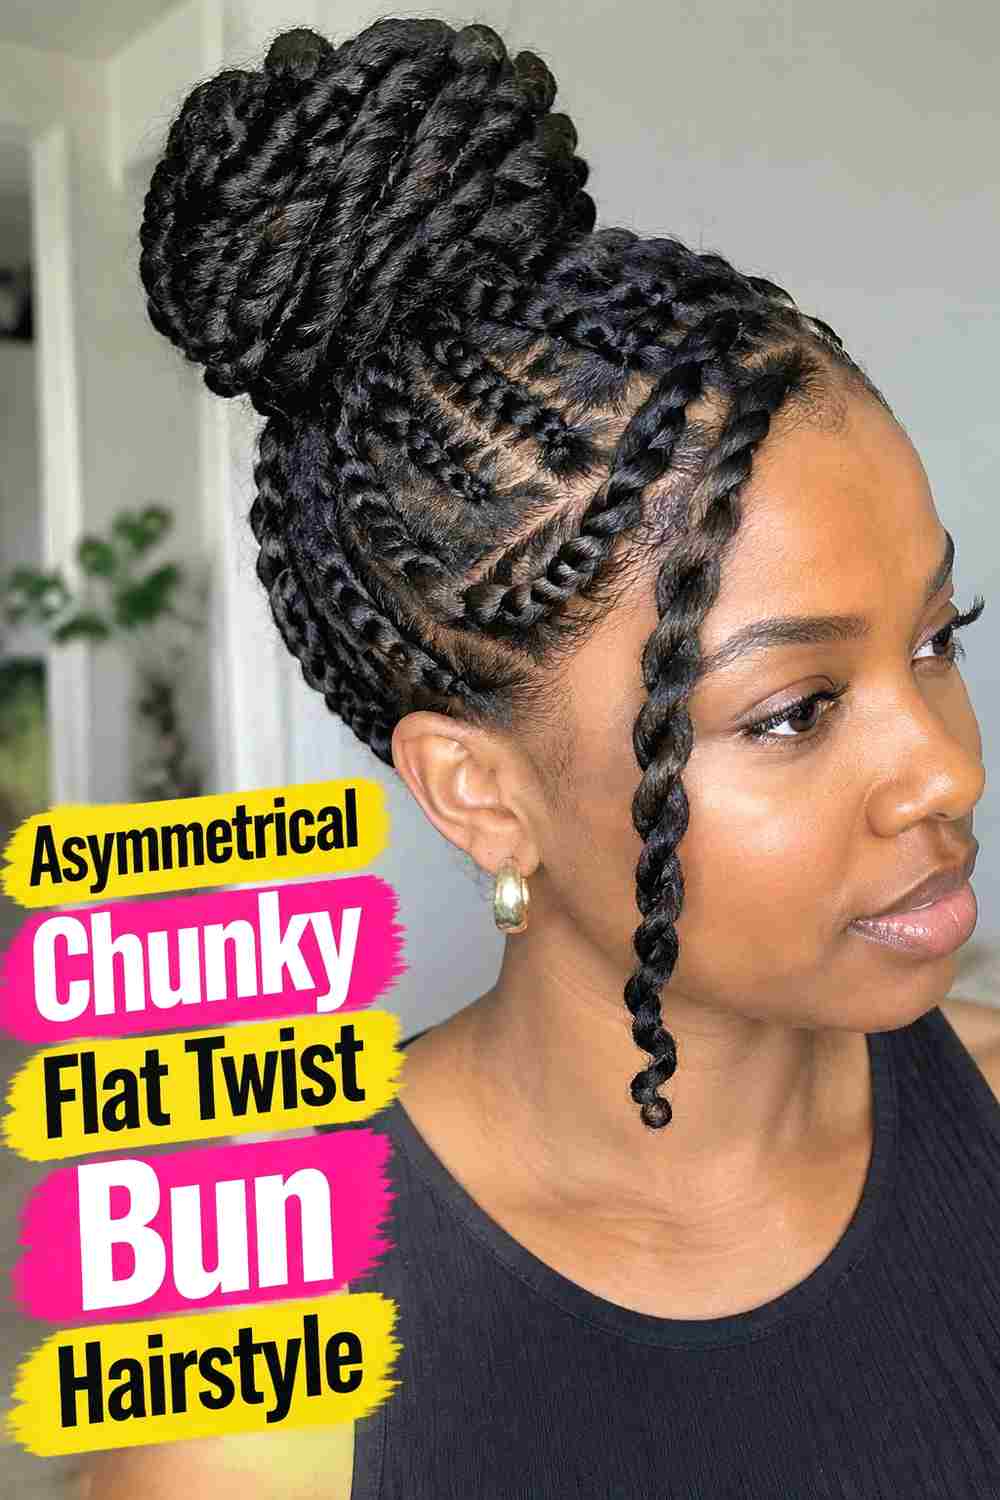
An asymmetrical layout creates movement by varying the direction and size of the flat twists before gathering them into one bun. One side might feature two broad sweeping twists while the other uses several slightly narrower sections, creating deliberate imbalance without looking unfinished. Position the bun off-center or at the back depending on how dramatic you want the silhouette to feel. The most successful version still has a clear visual pathway, so each twist should appear to lead naturally toward the gathering point. This style offers plenty of creative flexibility while maintaining the recognizable flat twist bun structure. Keeping the bun relatively simple allows the directional parting and chunky twist work to receive most of the attention.
Why It Works
The uneven sectioning creates visual movement and makes the style feel customized, while one unified bun keeps the overall design cohesive.
Pro Tip
Choose one dominant direction before parting. Intentional asymmetry looks strongest when the twists share a common flow rather than pointing randomly around the head.
11. Oversized Top Knot Chunky Flat Twist Hairstyle
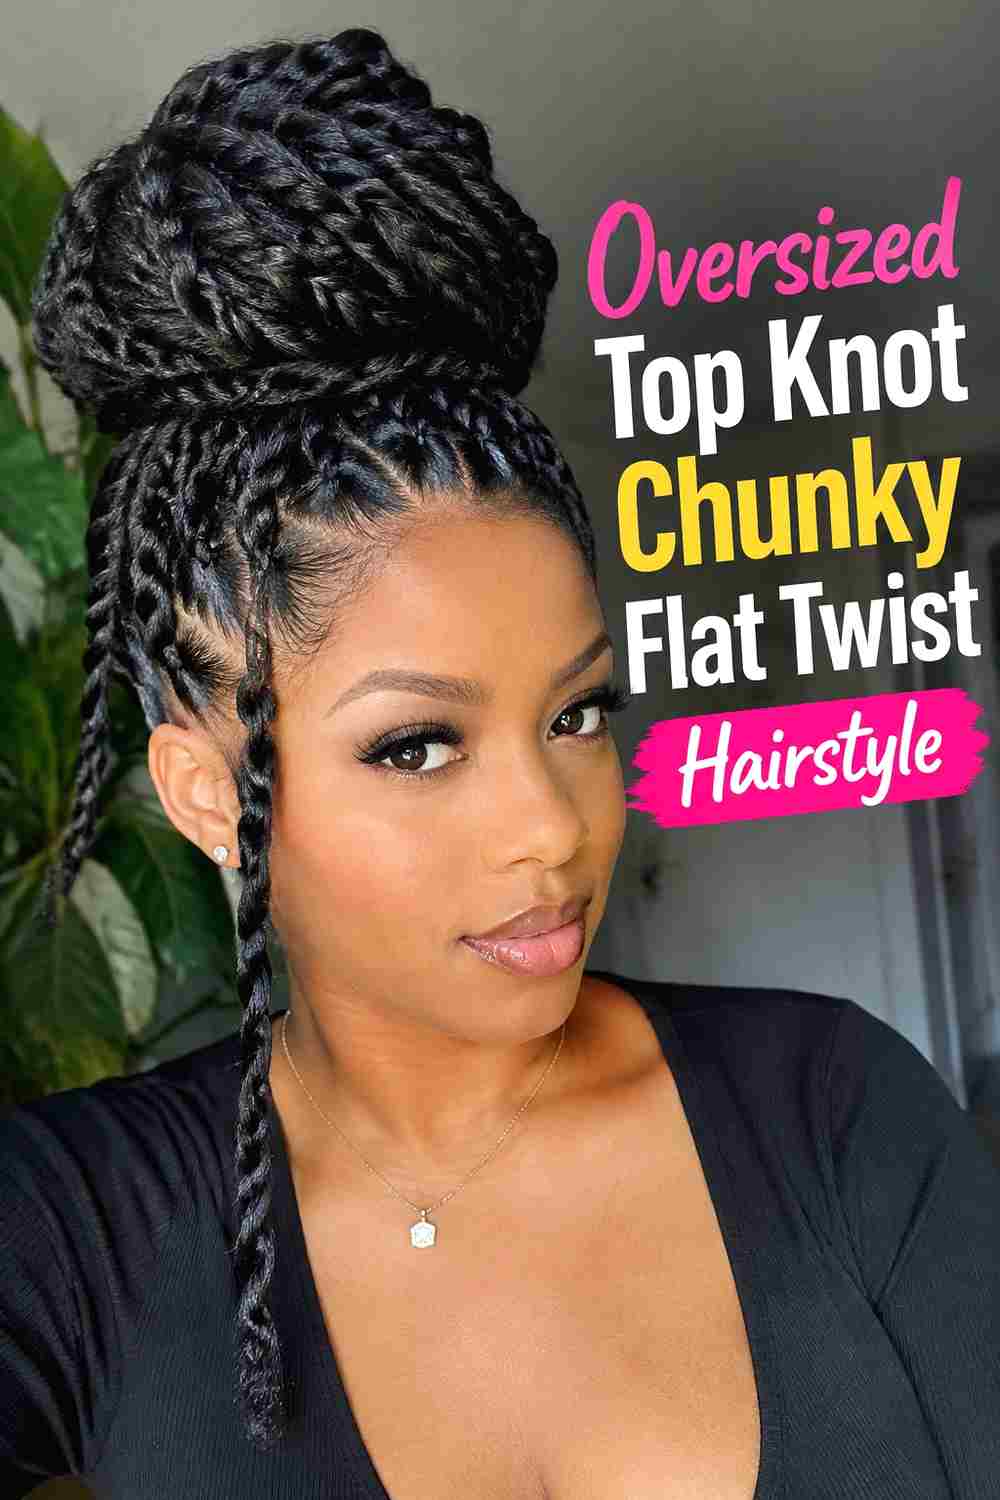
For maximum height, direct chunky flat twists toward the very top of the head and shape the remaining lengths into an oversized top knot. The combination of defined scalp twists and a substantial bun creates a bold silhouette that still keeps the hair neatly gathered. Larger sections are particularly effective here because they visually support the scale of the bun and prevent the base from appearing overly detailed. The top knot can be smooth and rounded or slightly textured depending on the natural finish of the hair. Make sure the gathering point sits where the bun feels balanced rather than pulling backward. If the bun is heavy, additional pins can distribute its weight more comfortably.
Hair Type & Length
Longer or denser hair naturally creates a fuller top knot, while medium lengths can produce a smaller version with the same upward flat-twist structure.
Wear & Maintenance
Avoid using excessive tension to achieve height. The bun should be supported by its gathered base and pins rather than by pulling the front and side twists extremely tight.
12. Curly Tip Chunky Flat Twist Bun Hairstyle
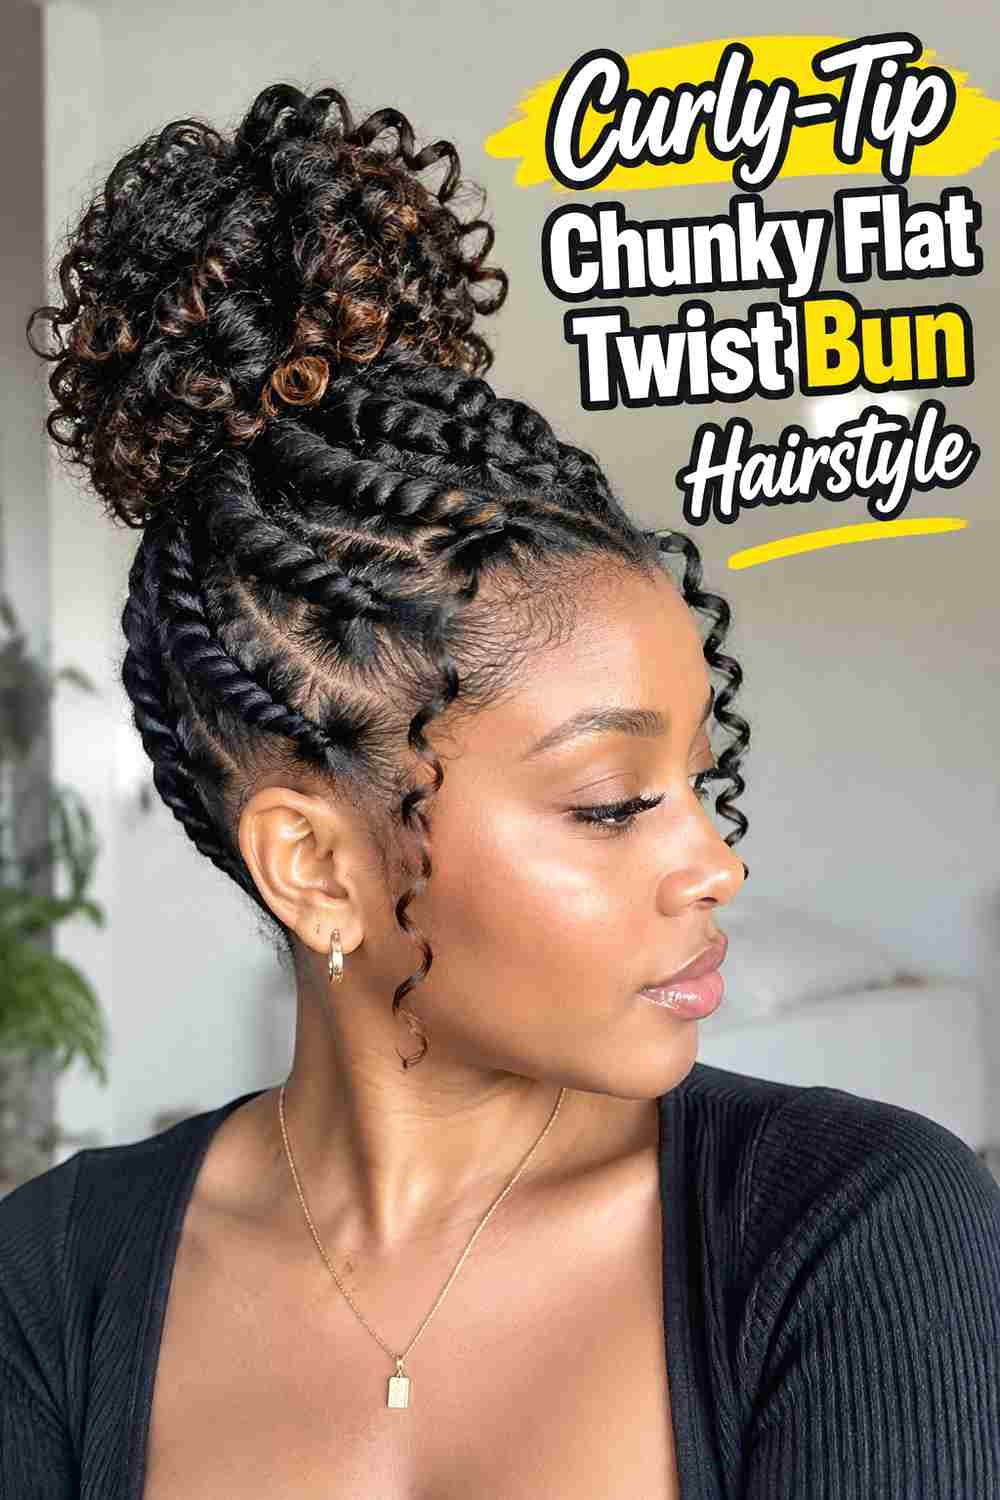
This version softens the traditional flat twist bun by allowing defined curls or coils to remain visible around the finished bun. Create chunky flat twists toward the back or crown, but leave the final few inches of selected twists or loose ends unwrapped. Arrange those textured tips around the bun so they add movement and dimension without obscuring the overall shape. The contrast between close-to-the-scalp twists and springy ends creates an attractive mix of structure and softness. This approach also works well when you want the bun to look less formal. Keep the curly sections intentional and separated rather than leaving every end loose, which can make the final shape feel unfinished.
Styling Notes
Define the loose ends before building the bun so the curl pattern is already set. Then pin the finished curls where they naturally complement the bun’s shape.
Best For
This softer finish works especially well for celebrations, dinners, date nights, weddings, and occasions where a fully sleek bun might feel too formal.
13. Tapered Side Feed Chunky Flat Twist Bun Hairstyle
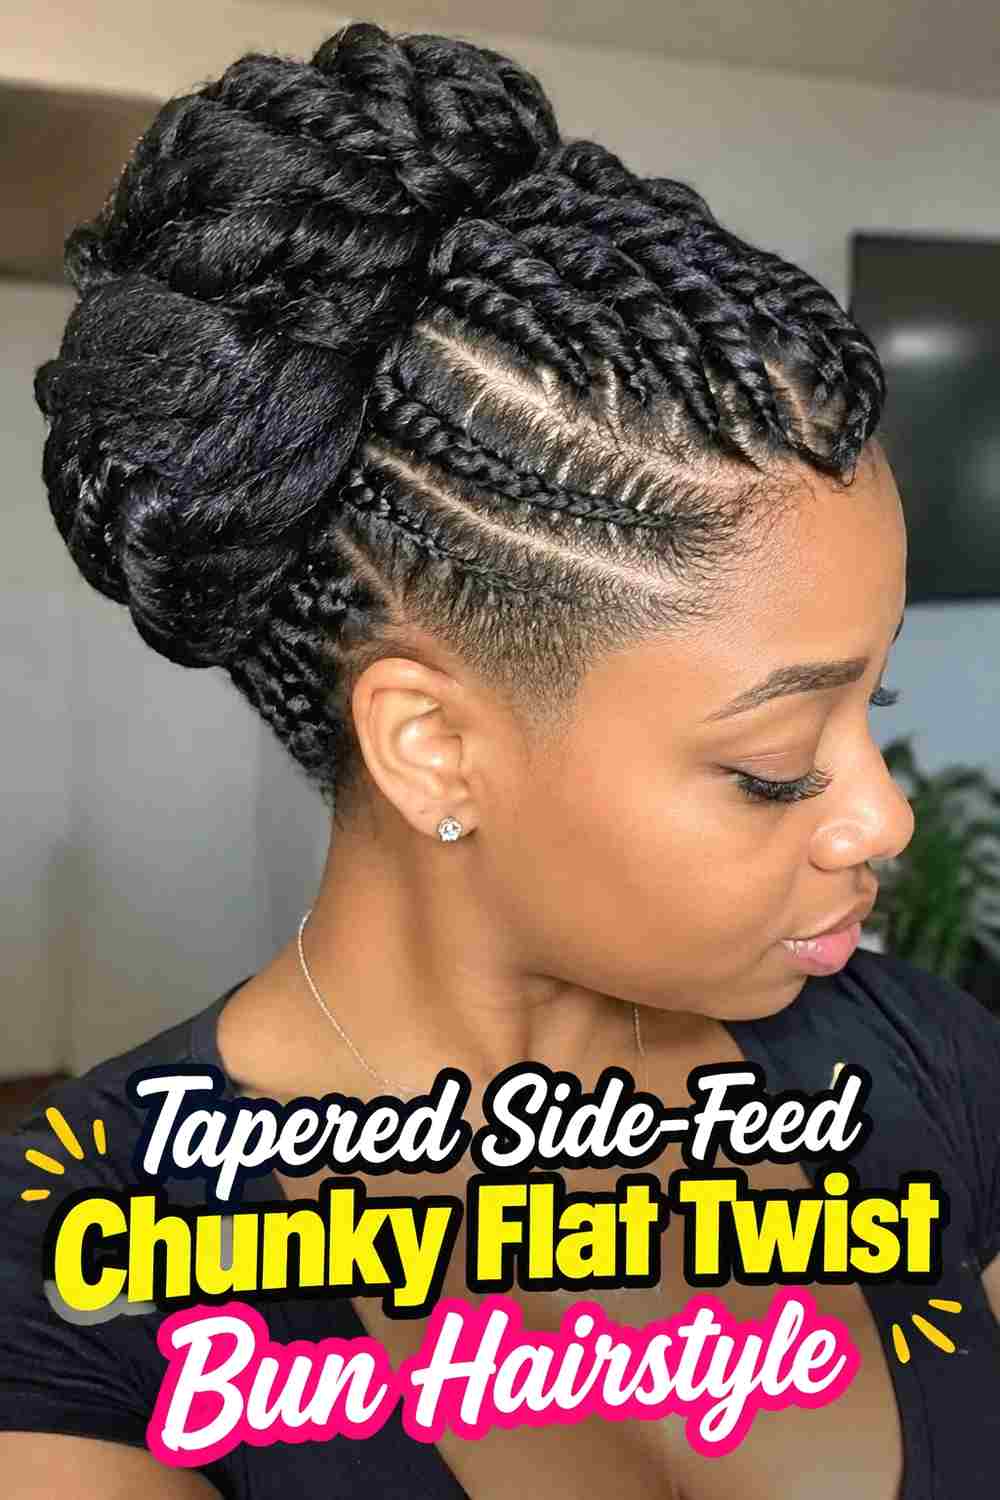
Tapered side-feed twists create a sleek directional pattern by starting near the temples and gradually guiding broad sections toward a bun at the back. The twists can begin slightly narrower near the hairline and become fuller as more hair is incorporated, producing a smooth transition from front to back. This shape keeps the face area neat while allowing the chunky texture to become more visible toward the crown. A medium or low bun usually complements the horizontal movement best. Clean side parting can emphasize the tapered design, but avoid creating sections so narrow at the edges that the style becomes uncomfortable. The finished result feels streamlined while still showing plenty of texture and scalp detail.
Why It Works
The gradual increase in twist size creates a natural visual flow from the perimeter toward the fuller bun, making the style look structured without requiring complicated decorative parts.
Pro Tip
Keep the smallest sections at the hairline comfortably sized. The tapered effect should come from controlled sectioning, not excessive tension on delicate perimeter hair.
14. Wrapped Base Chunky Flat Twist Bun Hairstyle
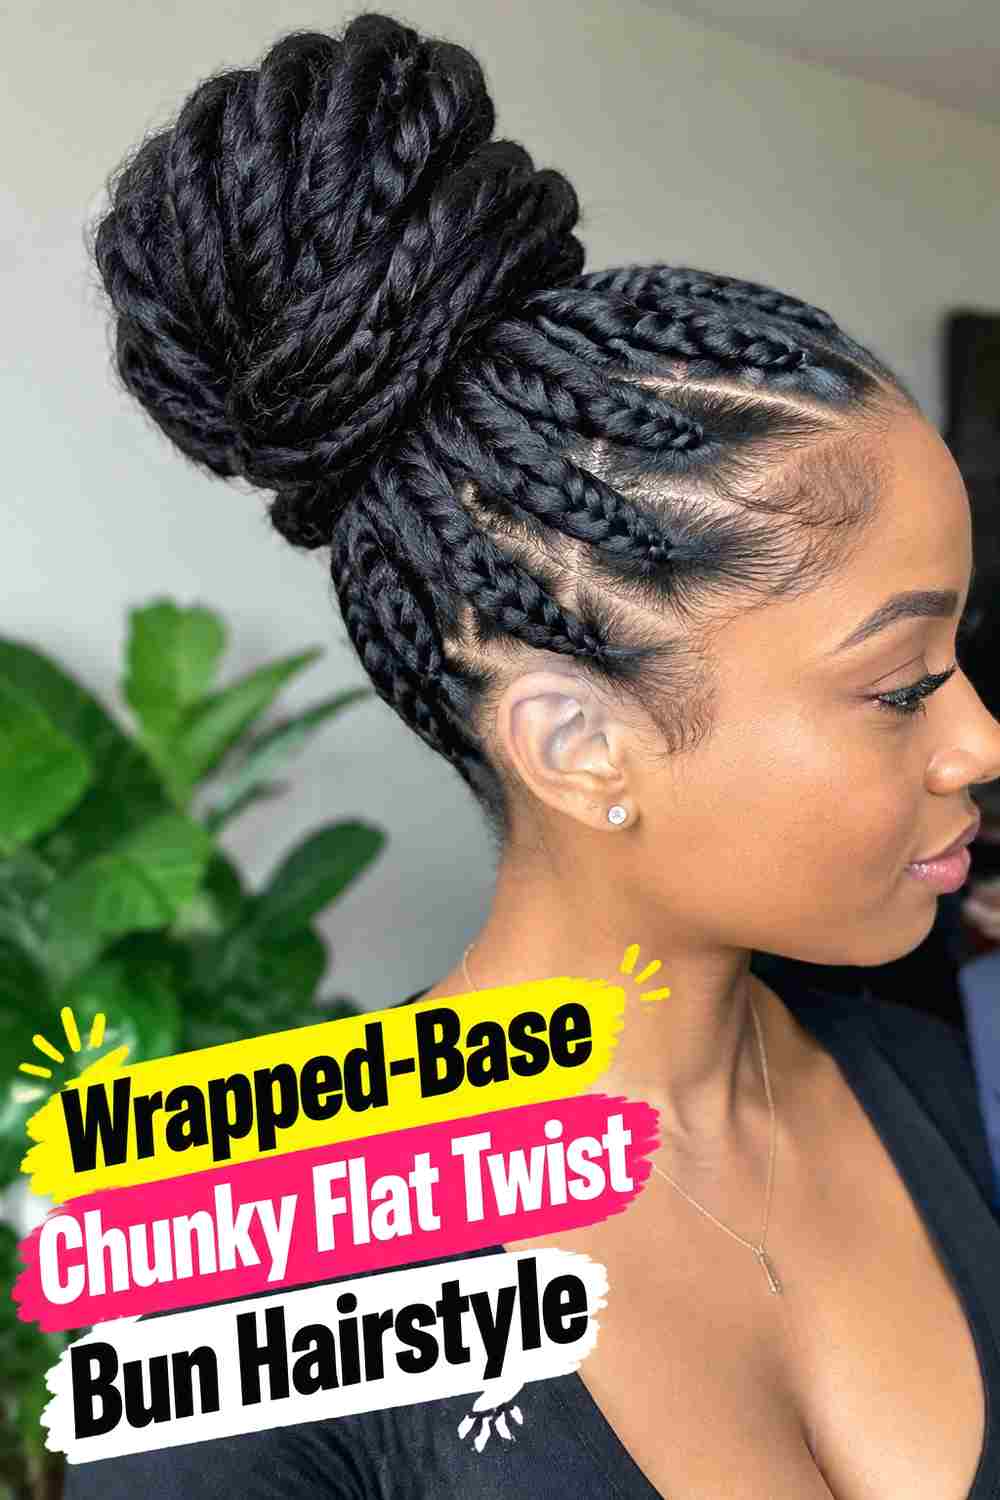
A wrapped base gives the classic chunky flat twist bun a particularly polished finish. Direct broad flat twists toward a central gathering point, secure the lengths, and form the main bun. Then reserve one twisted section to wrap neatly around the bun’s base, concealing the primary elastic or pinning area. This extra detail creates a smooth transition between the scalp twists and the bun while adding another layer of texture. The wrapped section can stay compact for a clean look or be gently loosened to match a fuller bun. Make sure the wrapping twist lies comfortably against the base and is pinned securely underneath so no sharp pins or bulky ends remain visible.
Styling Notes
Set aside the wrapping section before completing the bun. Trying to remove a strand from an already finished bun can disturb the shape and loosen the flat twists.
Best For
This refined finish is well suited to work events, ceremonies, formal dinners, weddings, and other occasions where you want the twist pattern to look especially neat.
How to Choose the Right Look
Start with bun placement. High crown buns and oversized top knots create height and keep hair fully away from the neck, while low nape buns produce a softer, more understated profile. A side or asymmetrical bun adds stronger visual movement, and double buns create a more playful silhouette. Next, consider how much scalp pattern you want to show. Center-part and tapered side-feed styles are relatively clean and structured. Spiral, crisscross, halo, and asymmetrical designs make the parting itself a major feature. If you prefer a simpler styling session, broad twists leading directly into a high or low bun may be easier to manage. Hair length and density influence the bun more than the flat twists. Longer hair offers additional wrapping options and can create a fuller bun without adding extra material. Shorter lengths may produce a compact tucked bun, while dense hair can create substantial volume quickly. Texture also affects the finish. Natural coils and curls can give chunky flat twists clear definition, while gently stretched hair may create smoother parts and longer twists. The curly-tip and half-up styles are useful when you specifically want some natural texture left visible. Finally, prioritize comfort. Chunky flat twists should lie securely against the scalp without causing persistent pulling. Larger sections do not automatically mean higher tension. Let elastics, pins, and the bun structure provide support instead of relying on tightly twisted perimeter hair.
Final Thoughts
Chunky flat twist buns offer plenty of room for variation because changing the direction of just a few large twists can completely alter the final silhouette. A high crown or top knot creates height, a low bun feels understated, and spiral or crisscross parting turns the scalp pattern into the main design feature. Choose a version that suits your hair length, density, styling time, and preferred level of hold. Keeping the sections substantial, the bun balanced, and the tension comfortable will help the finished style look polished without losing the beautiful texture that makes chunky flat twists stand out.
FAQs
1. What is a chunky flat twist bun hairstyle?
It combines larger two-strand flat twists formed close to the scalp with the remaining hair gathered and shaped into a bun. The larger sections create a bold, visible twist pattern.
2. How long does hair need to be for a flat twist bun?
Hair needs enough workable length for the flat twists to reach the gathering point and leave sufficient ends to tuck or wrap. The exact length depends on shrinkage, density, and the size of the desired bun.
3. Can chunky flat twists work on very thick hair?
Yes. Thick or dense hair can create especially full twists and buns. Using fewer, larger sections may also make the overall style easier to organize than creating many small twists.
4. Should flat twists feel tight?
They should feel secure, not painfully tight. Persistent pulling, tenderness, or discomfort is a sign that the section or twist tension should be adjusted, especially around the hairline.
5. Which chunky flat twist bun is easiest to try first?
A simple high-crown or low-nape version with several broad twists traveling directly toward one bun is generally less complicated than spiral, crisscross, or asymmetrical parting patterns. Save your favorite chunky flat twist bun ideas, share the styles that inspire you, and explore more natural hairstyle inspiration for your next look.