18 Renaissance Braided Bun Hairstyles for Romantic, Courtly Looks
Braided crowns, softly coiled buns, ribbons, and pearl details bring romantic Renaissance-inspired character to these elegant updos without sacrificing a wearable modern finish.
Renaissance braided bun hairstyles are especially appealing because they combine visible braid work with the controlled shape of an updo. Some designs feel polished and courtly, while others use loose texture, ribbons, pearls, or softer placement for a garden-inspired finish.
When choosing between these looks, pay attention to braid placement, bun height, available hair length, and the weight of any accessories. A tightly structured crown needs different support from a relaxed low bun, while fine hair may benefit from smaller braids and gentle loosening rather than excessive padding.
Quick List
- Pearl Woven Renaissance Braided Bun Hairstyle
- Low Courtly Crown Braid Bun Hairstyle
- Double Braided Rosette Bun Hairstyle
- Ribbon Laced Renaissance Bun Hairstyle
- Twisted Temple Braids Into Low Bun Hairstyle
- High Regal Braided Coil Bun Hairstyle
- Side Swept Renaissance Braided Bun Hairstyle
- Four Strand Braided Chignon Hairstyle
- Braided Halo With Nape Bun Hairstyle
- Soft Tucked Braid Bun Hairstyle
- Jewel Accented Court Braided Bun Hairstyle
- Center Parted Twin Braid Bun Hairstyle
- Loose Renaissance Garden Bun Hairstyle
- Braided Loop Bun With Ribbon Hairstyle
- Sculpted Crown Braid Bun Hairstyle
- Rope Braid Renaissance Bun Hairstyle
- Crossed Side Braids Into Bun Hairstyle
- Romantic Renaissance Bridal Bun Hairstyle
1. Pearl Woven Renaissance Braided Bun Hairstyle
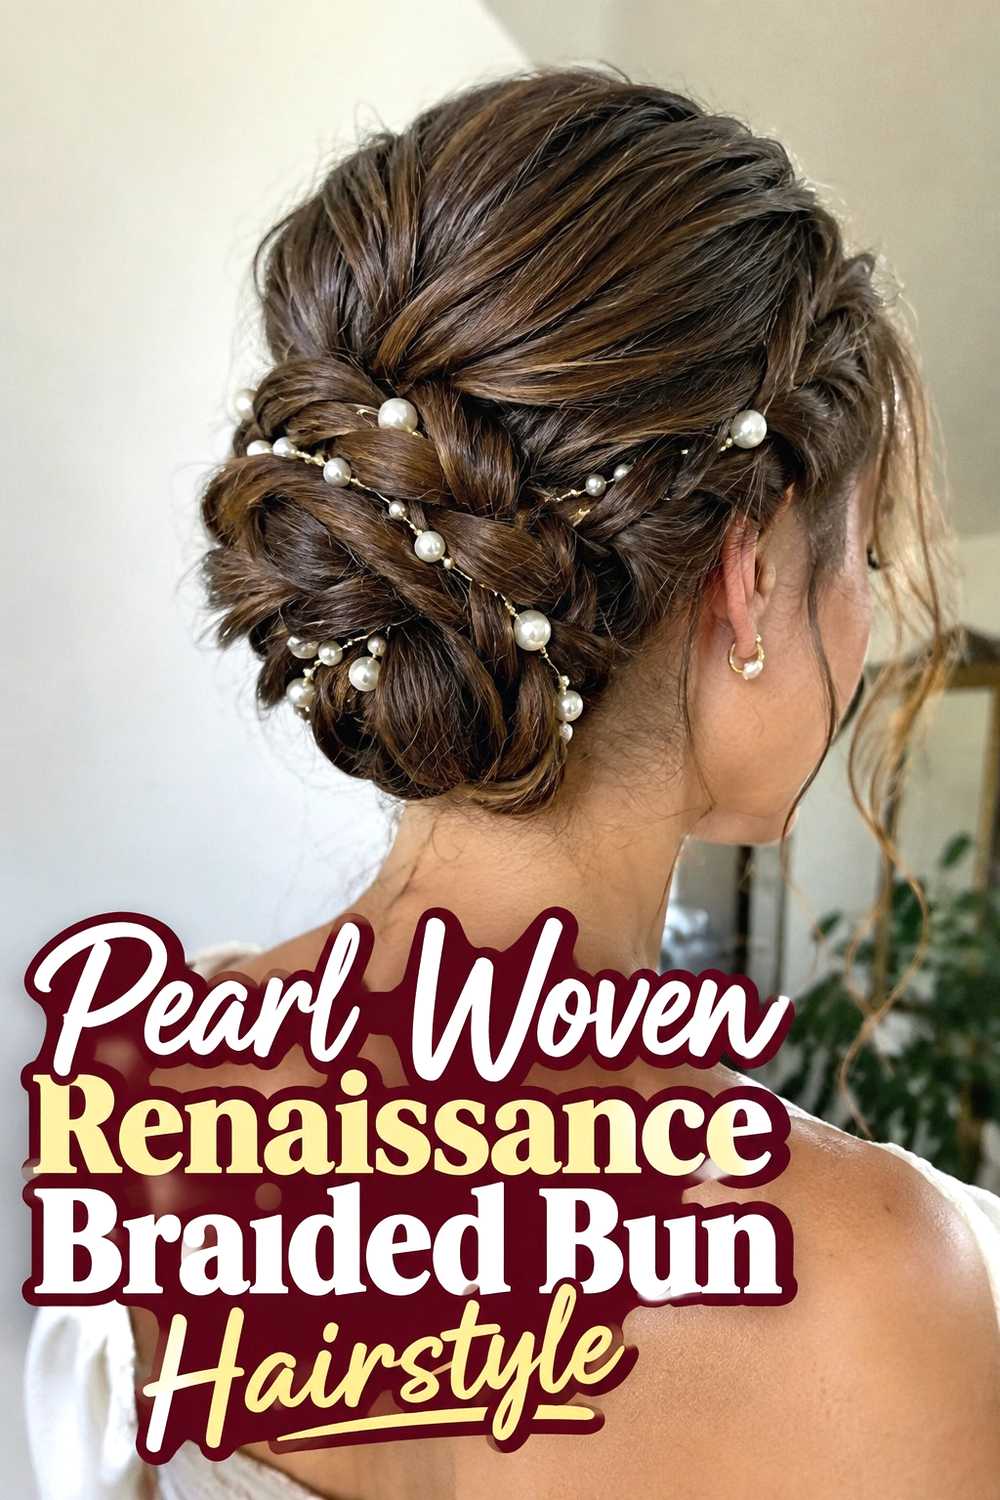
The Pearl-Woven Renaissance Braided Bun Hairstyle combines a softly rounded low bun with narrow braids arranged across its surface and small pearl accents placed between selected sections. Instead of covering the style with jewelry, the pearls work best as restrained highlights that make the braid pattern easier to notice. A clean center or softly defined middle part gives the front a courtly feel, while slight looseness around the temples keeps the look from becoming too severe. Medium-long to long hair provides enough length for both the bun and visible braiding. The style can suit weddings, formal portraits, themed events, or anyone who enjoys an ornate updo with a refined rather than heavily decorated finish.
Styling Notes
Build the bun securely before placing decorative pearls. Hairpins or discreet pearl pins should sit within substantial braided sections instead of relying on loose outer strands for support.
2. Low Courtly Crown Braid Bun Hairstyle
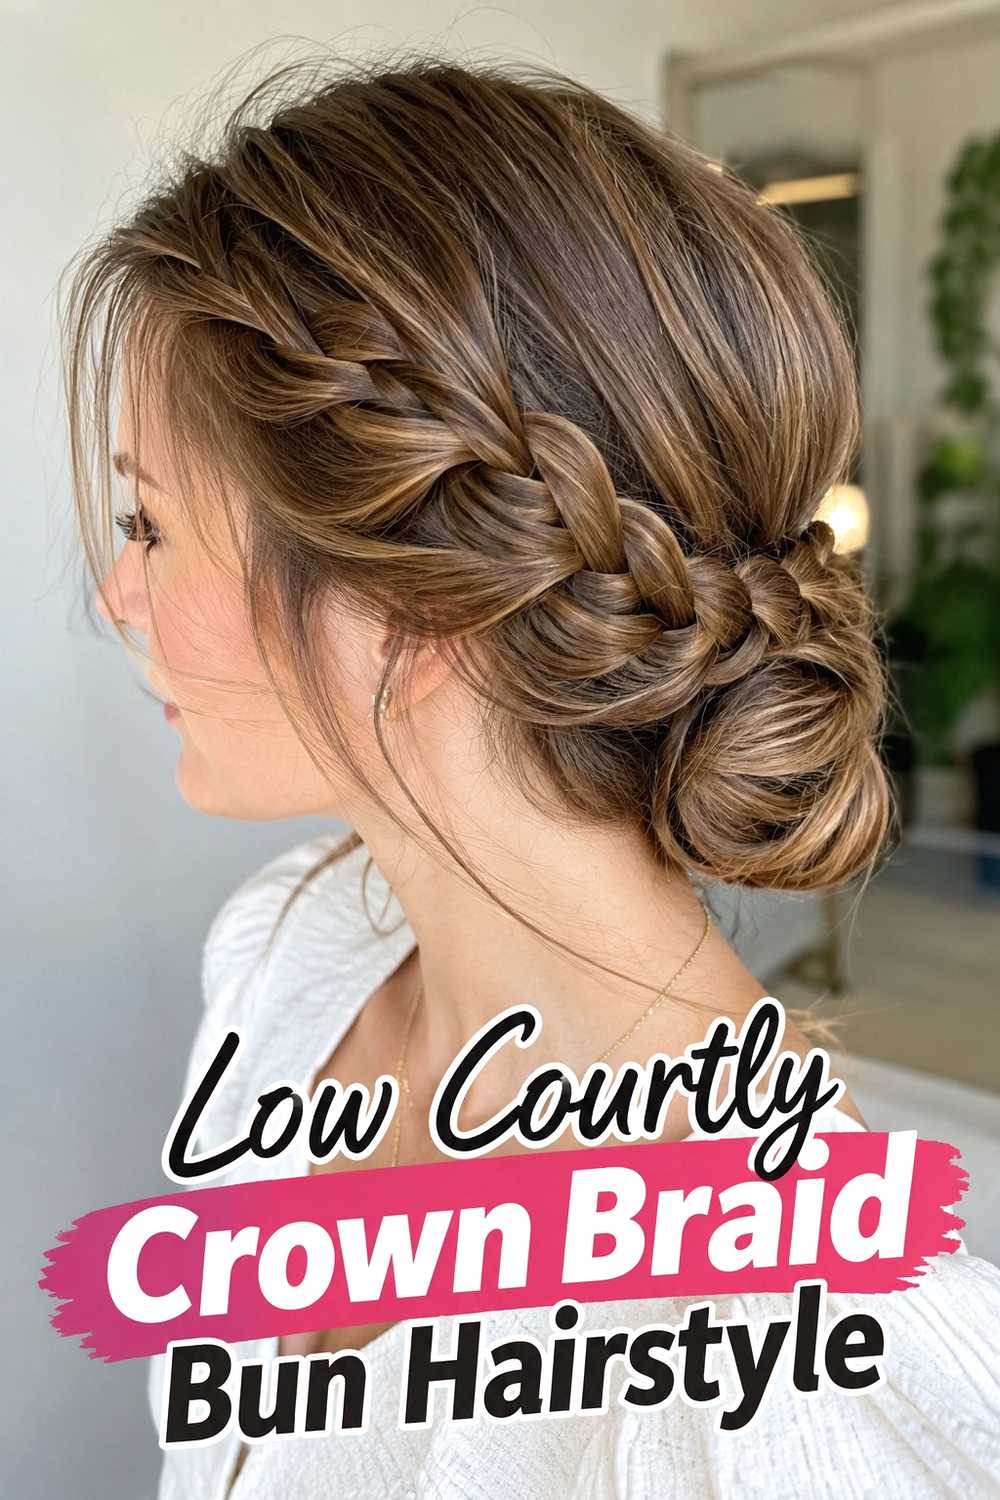
A Low Courtly Crown Braid Bun Hairstyle brings two important elements together: a braided band that frames the head and a compact bun positioned low at the nape. The crown braid gives the hairstyle its Renaissance-inspired structure, while the lower bun keeps long hair controlled and creates a graceful back profile. Slightly widening the braid can make the crown more visible without requiring excessive tension at the scalp. This style works particularly well on medium-long or long hair and can be adapted to straight, wavy, or textured finishes. Keeping the hairline relatively smooth creates a more formal appearance, while a few soft wisps make the same arrangement feel gentler and more romantic.
Best For
Choose this look when you want clear crown detail with dependable hold, especially for ceremonies, formal events, historical-inspired outfits, or occasions where loose lengths would be inconvenient.
3. Double Braided Rosette Bun Hairstyle
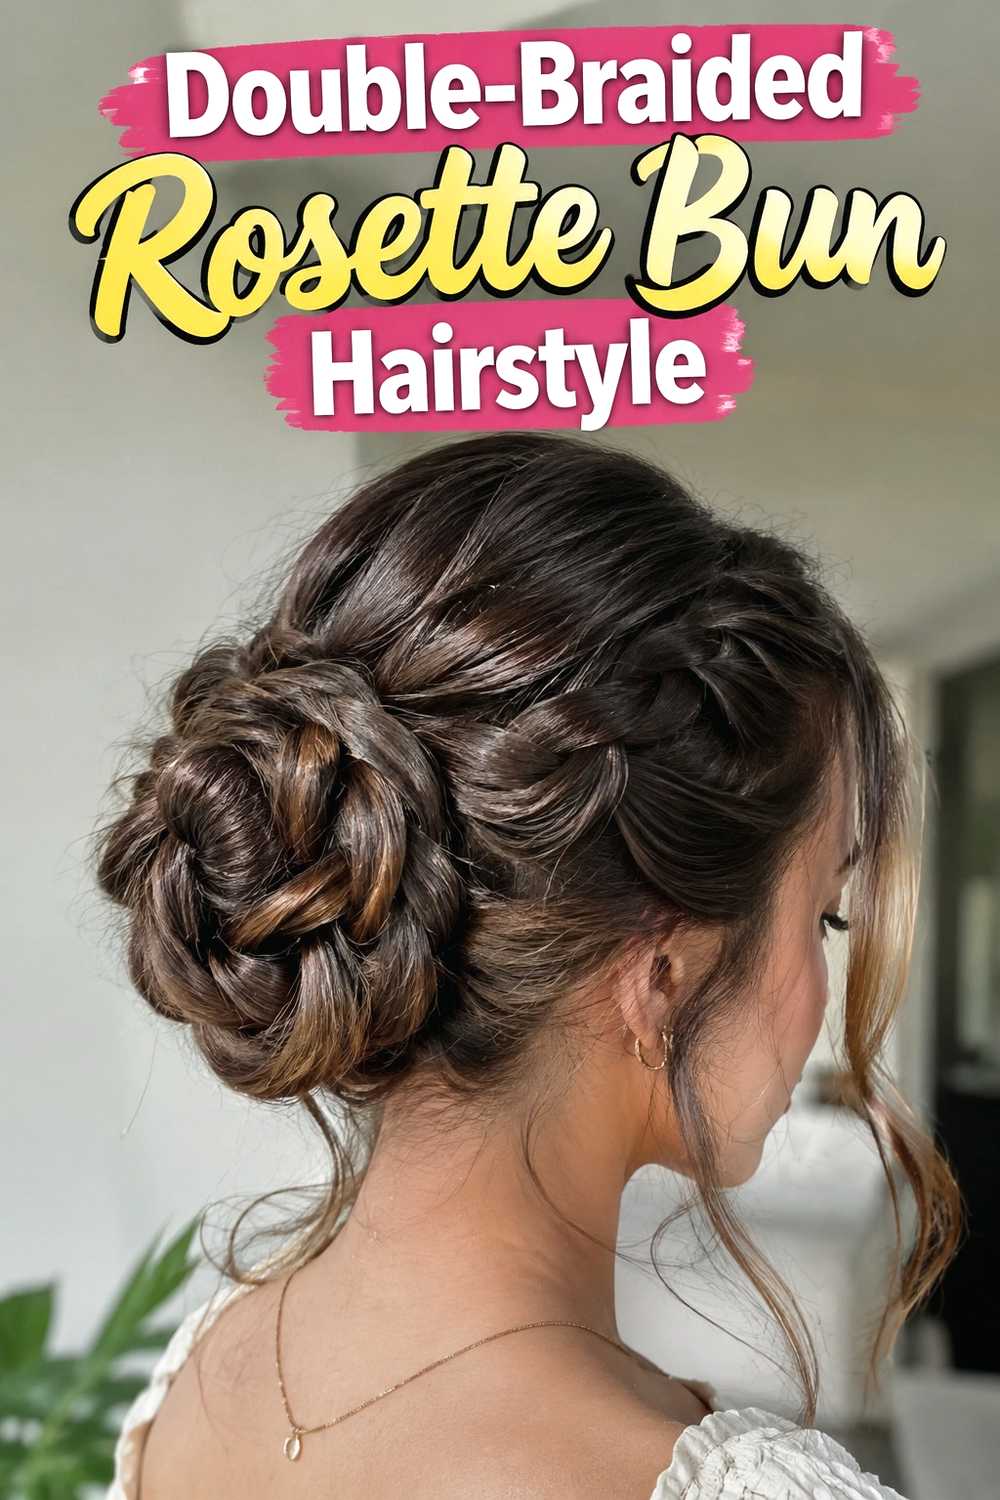
The Double-Braided Rosette Bun Hairstyle uses two separate braids that coil around one another to create a flower-like bun at the back of the head. Because the braid edges remain visible, the finished bun has more dimension than a standard twisted chignon. One braid can form the central spiral while the second wraps around the outside, producing layered detail that looks intricate without requiring many accessories. Long hair gives the rosette more fullness, though medium-long hair can create a smaller version. Gently loosening the outer edges before coiling helps each braided layer remain visible. The key is to keep the center secure so the expanded sections do not lose their rounded silhouette during wear.
Pro Tip
Pancake each braid before forming the rosette rather than after pinning it. This gives you better control over volume and prevents the finished bun from becoming distorted.
4. Ribbon Laced Renaissance Bun Hairstyle
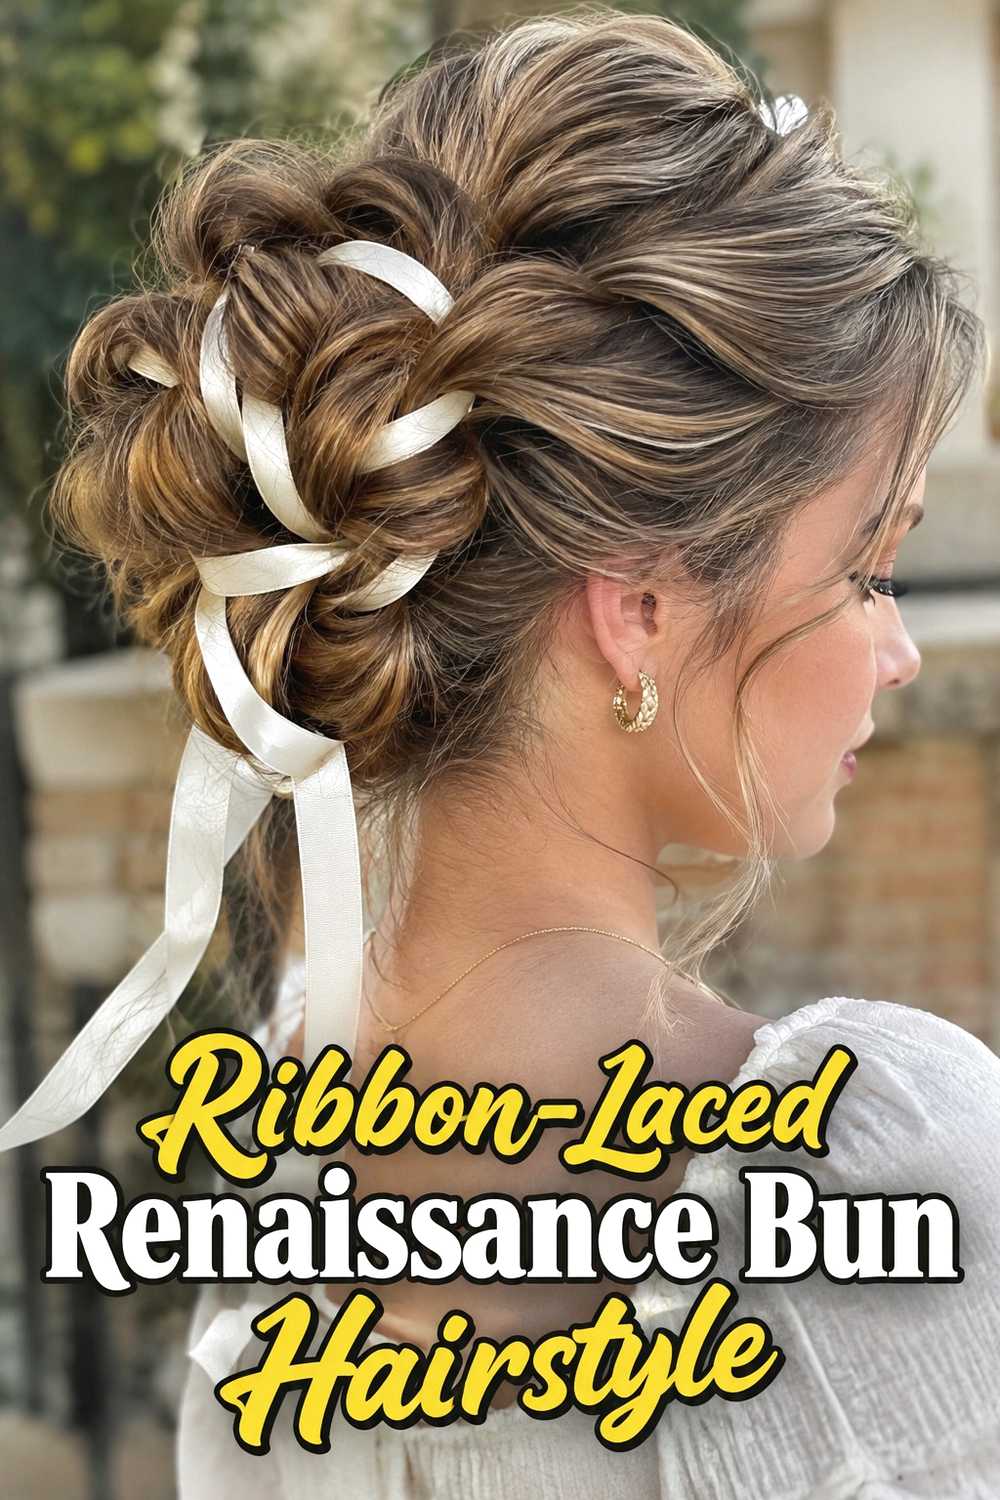
A Ribbon-Laced Renaissance Bun Hairstyle introduces narrow ribbon directly into the braid before the hair is coiled into an updo. This lets small flashes of color appear naturally across the bun instead of looking like a separate accessory placed on top. Deep jewel tones, muted cream, or soft antique-inspired shades can all change the mood while preserving the same basic structure. A low or mid-height bun usually displays the ribbon pattern clearly from the back. Long hair offers more opportunities for repeated lacing, but medium-long hair can still create a compact version. Choose ribbon that is slim enough to follow the braid comfortably without hiding the natural strand detail underneath.
Wear & Maintenance
Anchor the hairstyle with elastics and pins independently of the ribbon. Keeping the fabric decorative rather than load-bearing makes the bun more secure and prevents uncomfortable pulling.
5. Twisted Temple Braids Into Low Bun Hairstyle
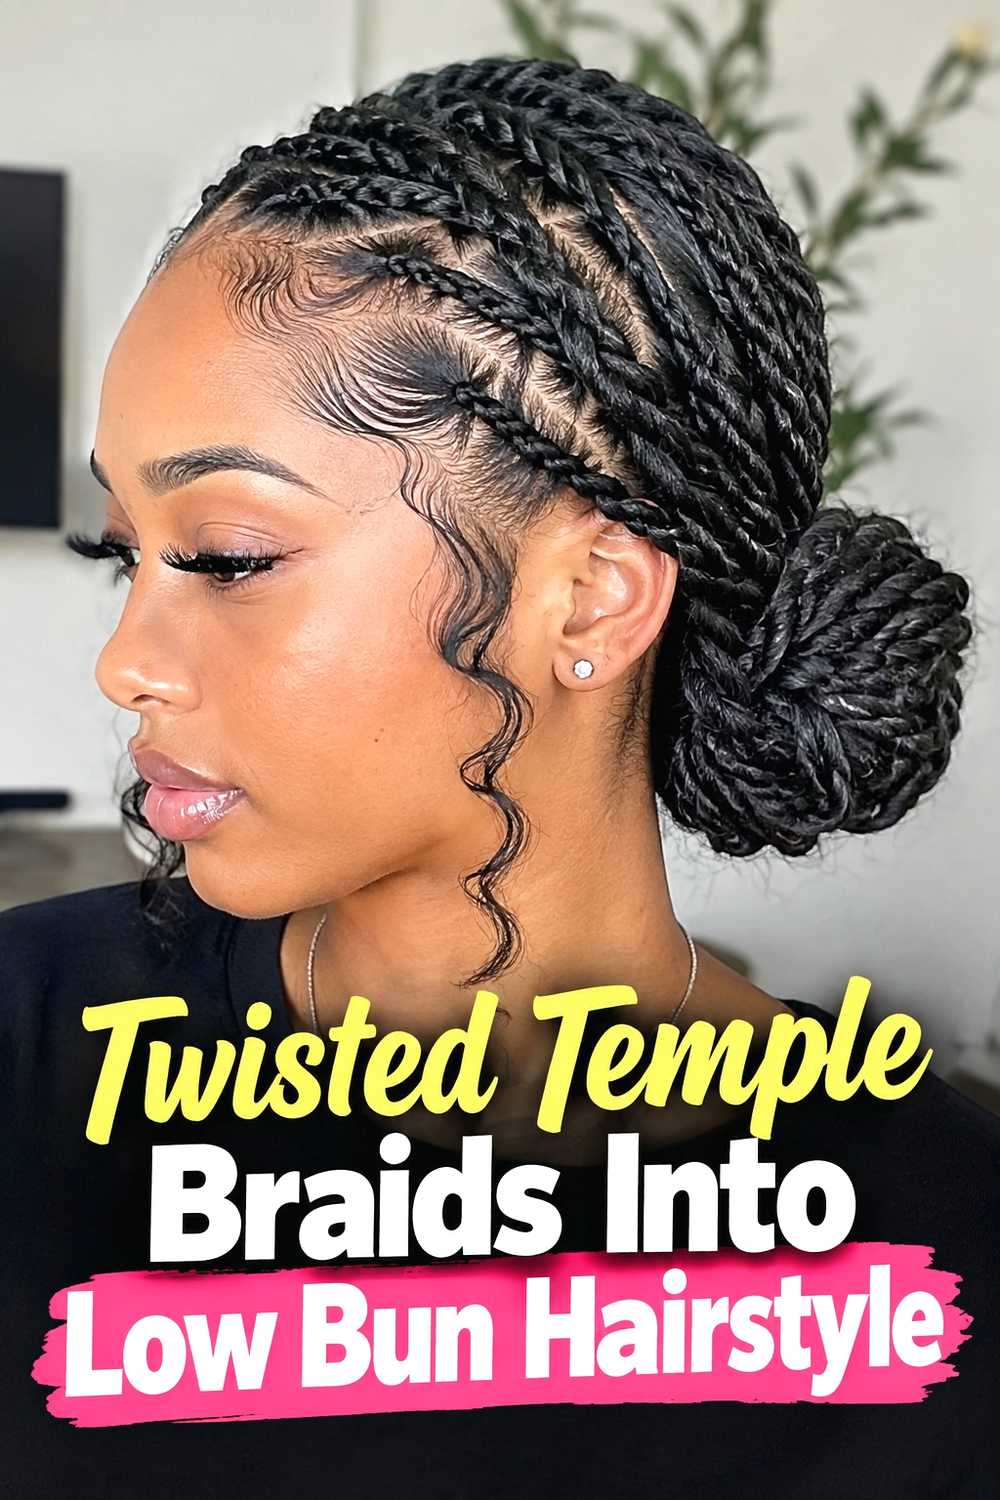
The Twisted Temple Braids Into Low Bun Hairstyle starts with two narrow braided or twisted sections near the temples and directs them backward into a softly coiled bun. This placement creates definition around the sides of the head while leaving the top relatively simple, making the finished style feel graceful rather than overly elaborate. The temple sections can be kept sleek for a courtly finish or lightly loosened for romantic softness. Medium-length hair may be sufficient because only the side sections need dedicated braiding length before joining the bun. The low placement also makes the style comfortable for longer wear and gives decorative pins, ribbons, or small pearls a natural place to sit if extra detail is desired.
Why It Works
The narrow side braids create visual structure without adding heavy volume around the crown, while the low bun keeps the overall silhouette balanced and practical.
6. High Regal Braided Coil Bun Hairstyle
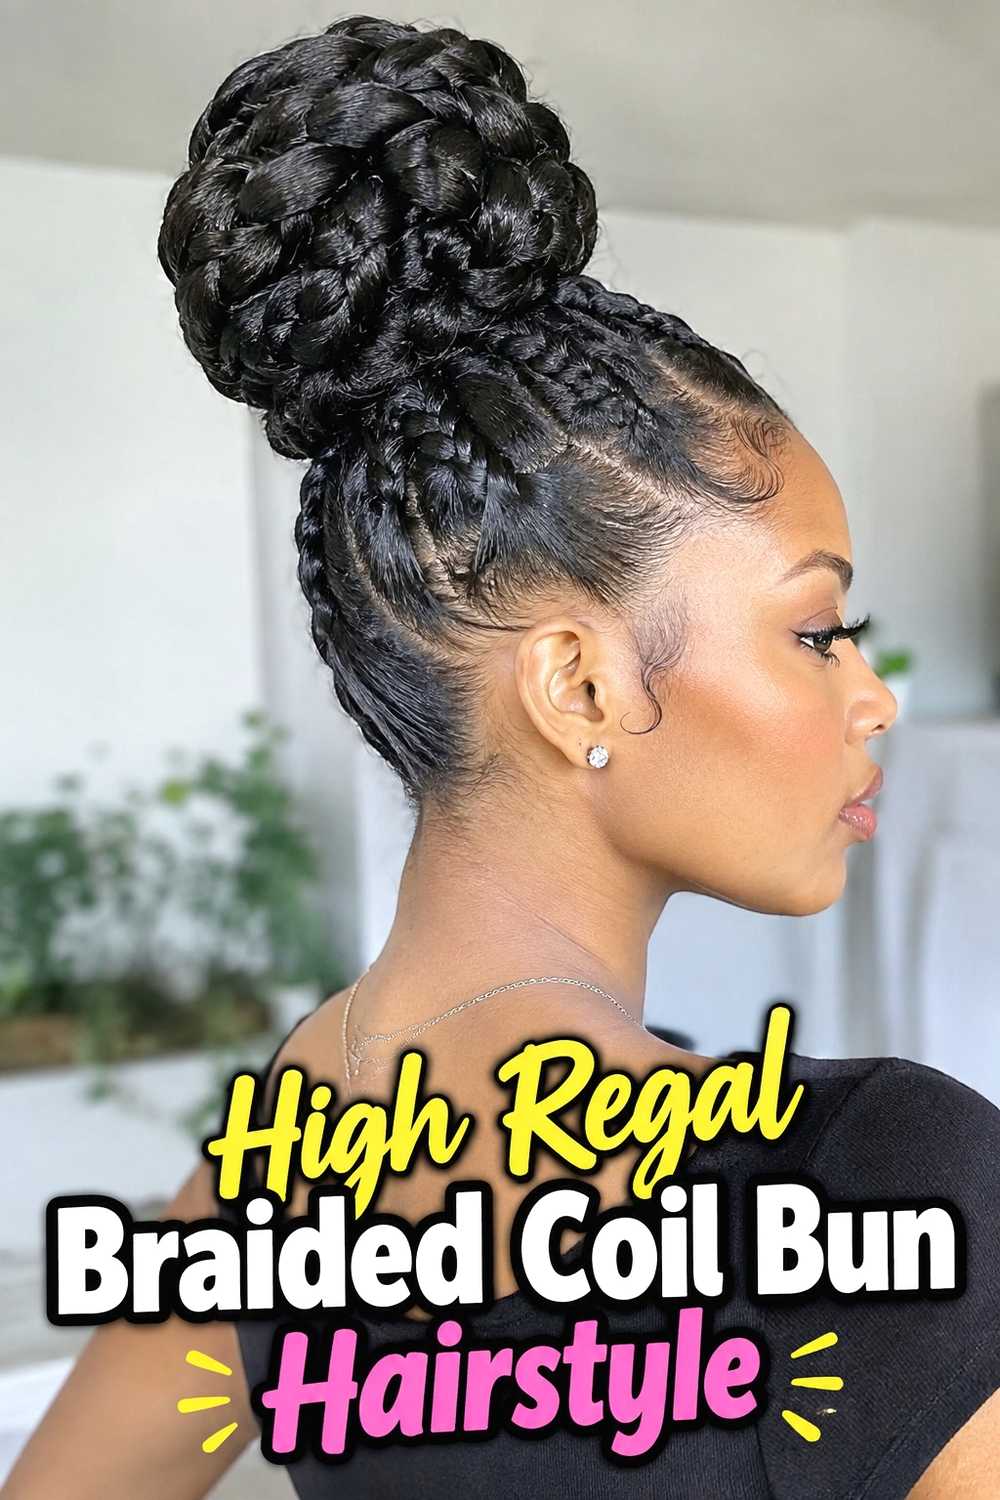
A High Regal Braided Coil Bun Hairstyle places the braided structure above the occipital area for a more elevated and commanding silhouette. Rather than twisting loose hair into a conventional high bun, the length is braided first and then coiled so the woven pattern remains visible around the entire shape. The result feels formal and sculptural while still showing natural strand texture. This style works best with enough length to form a substantial coil without pulling too tightly. Thick hair creates dramatic volume naturally, while finer hair may benefit from a wider, gently expanded braid. Because the weight sits higher on the head, careful pin placement is especially important for comfort during extended wear.
Styling Notes
Distribute pins around several points of the coil instead of concentrating them in one area. Balanced support can keep a high braided bun stable without creating one uncomfortable pressure point.
7. Side Swept Renaissance Braided Bun Hairstyle
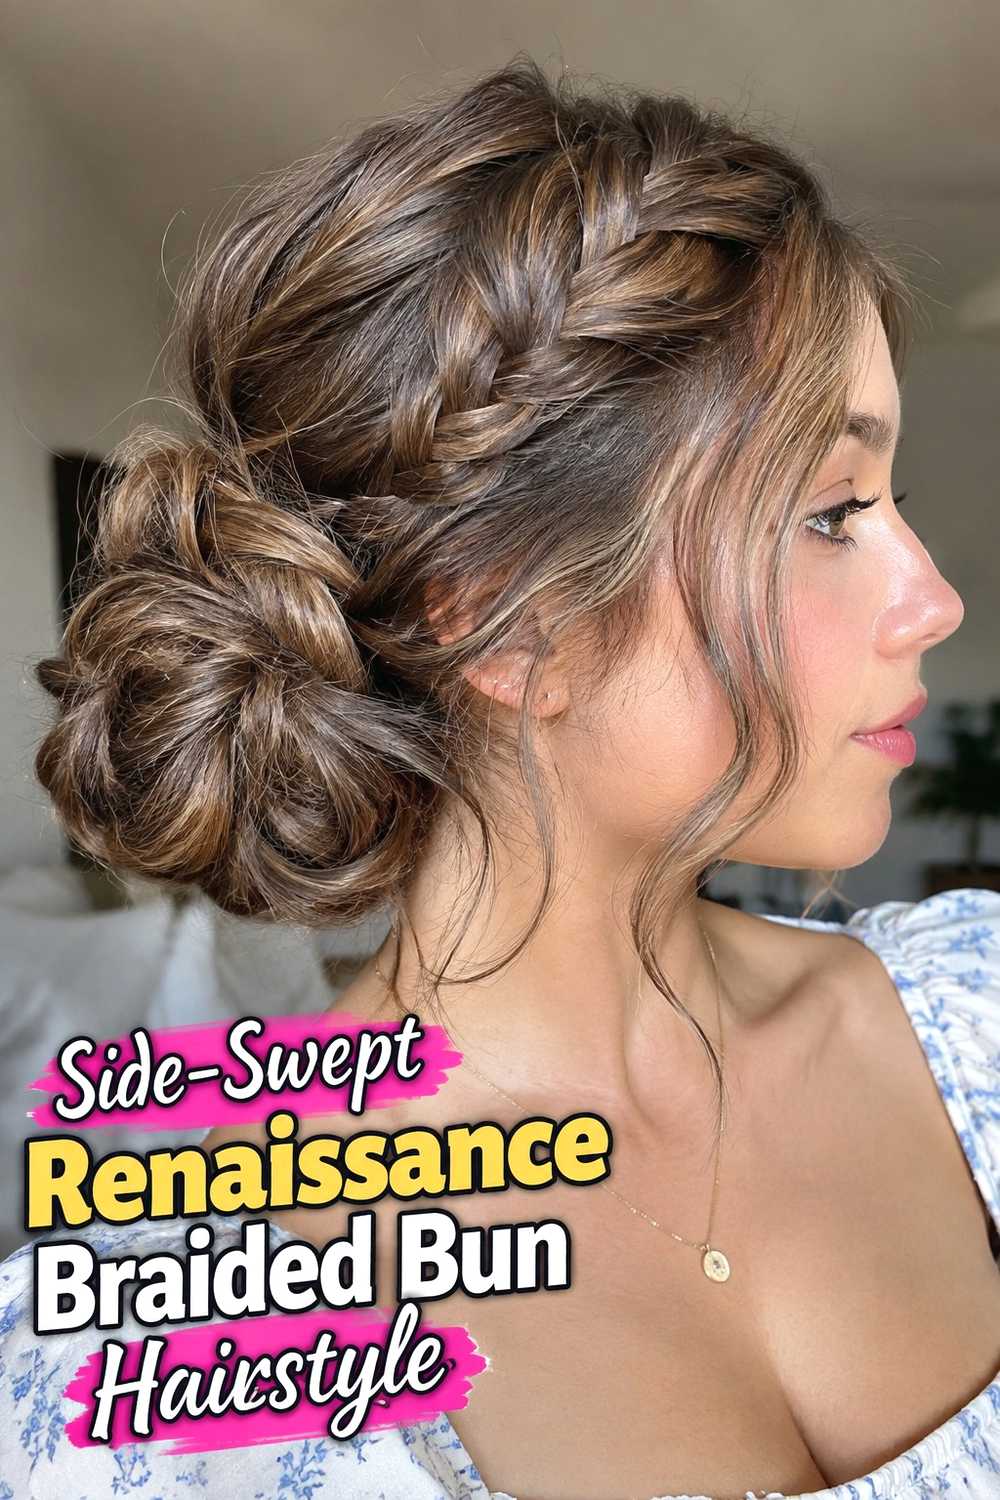
The Side-Swept Renaissance Braided Bun Hairstyle uses asymmetry to give a traditional updo more movement. Hair is directed diagonally from one side of the head toward a braided bun positioned slightly off-center near the nape. A visible side braid can follow the sweep, making the transition into the bun feel intentional rather than simply pinned sideways. This arrangement photographs beautifully because the braid remains visible from both a back view and a three-quarter angle. Medium-long to long hair is easiest to manage, especially when the bun needs enough volume to balance the strong diagonal line. Softening the opposite temple with a small loose strand can keep the asymmetry graceful instead of overly rigid.
Best For
This style is a useful choice for portraits, formal dinners, themed celebrations, or anyone who prefers an off-center updo over a perfectly symmetrical Renaissance-inspired arrangement.
8. Four Strand Braided Chignon Hairstyle
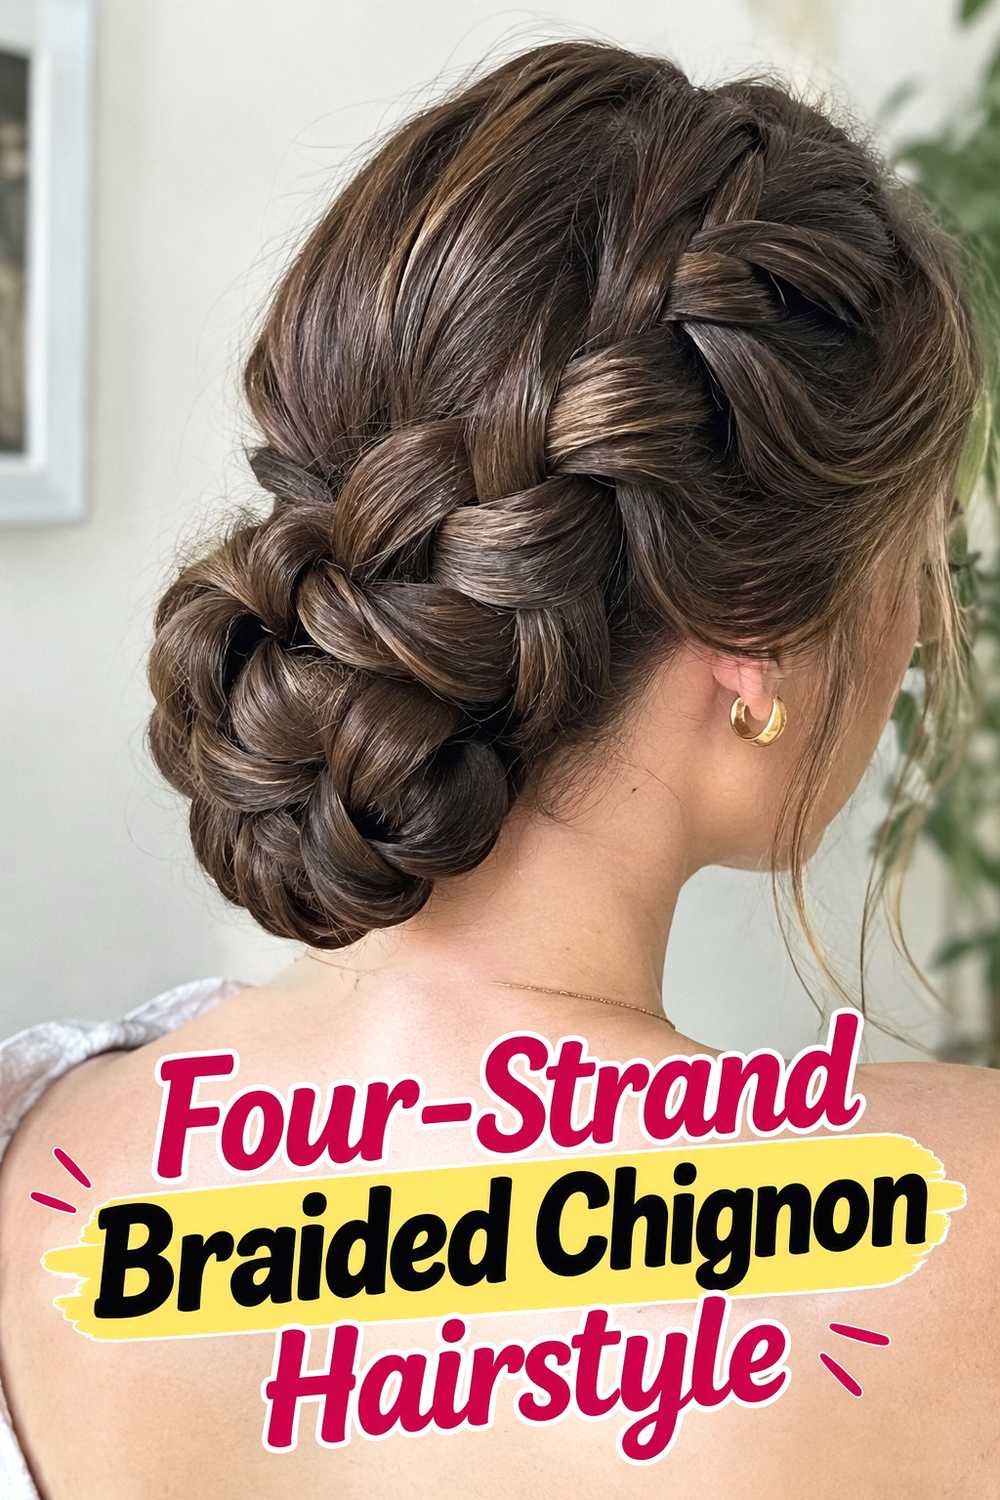
A Four-Strand Braided Chignon Hairstyle creates more visible weaving than a basic three-strand braid, making the braid itself the main decorative feature. Once completed, the wider braid is wrapped into a low chignon so the interlaced pattern remains visible across the outer surface. This works especially well when the hair has subtle highlights or natural tonal variation because each strand becomes easier to distinguish. Long hair provides the most room for repeated weaving, although medium-long hair can create a smaller, compact chignon. The braid should remain controlled while being formed, then gently loosened before coiling if extra width is desired. Too much loosening can blur the four-strand pattern that makes this style distinctive.
Hair Type & Length
Medium-long to long hair is most practical. Straight and softly wavy textures make the intricate weaving easy to see, while textured hair can create a fuller, more dimensional interpretation.
9. Braided Halo With Nape Bun Hairstyle
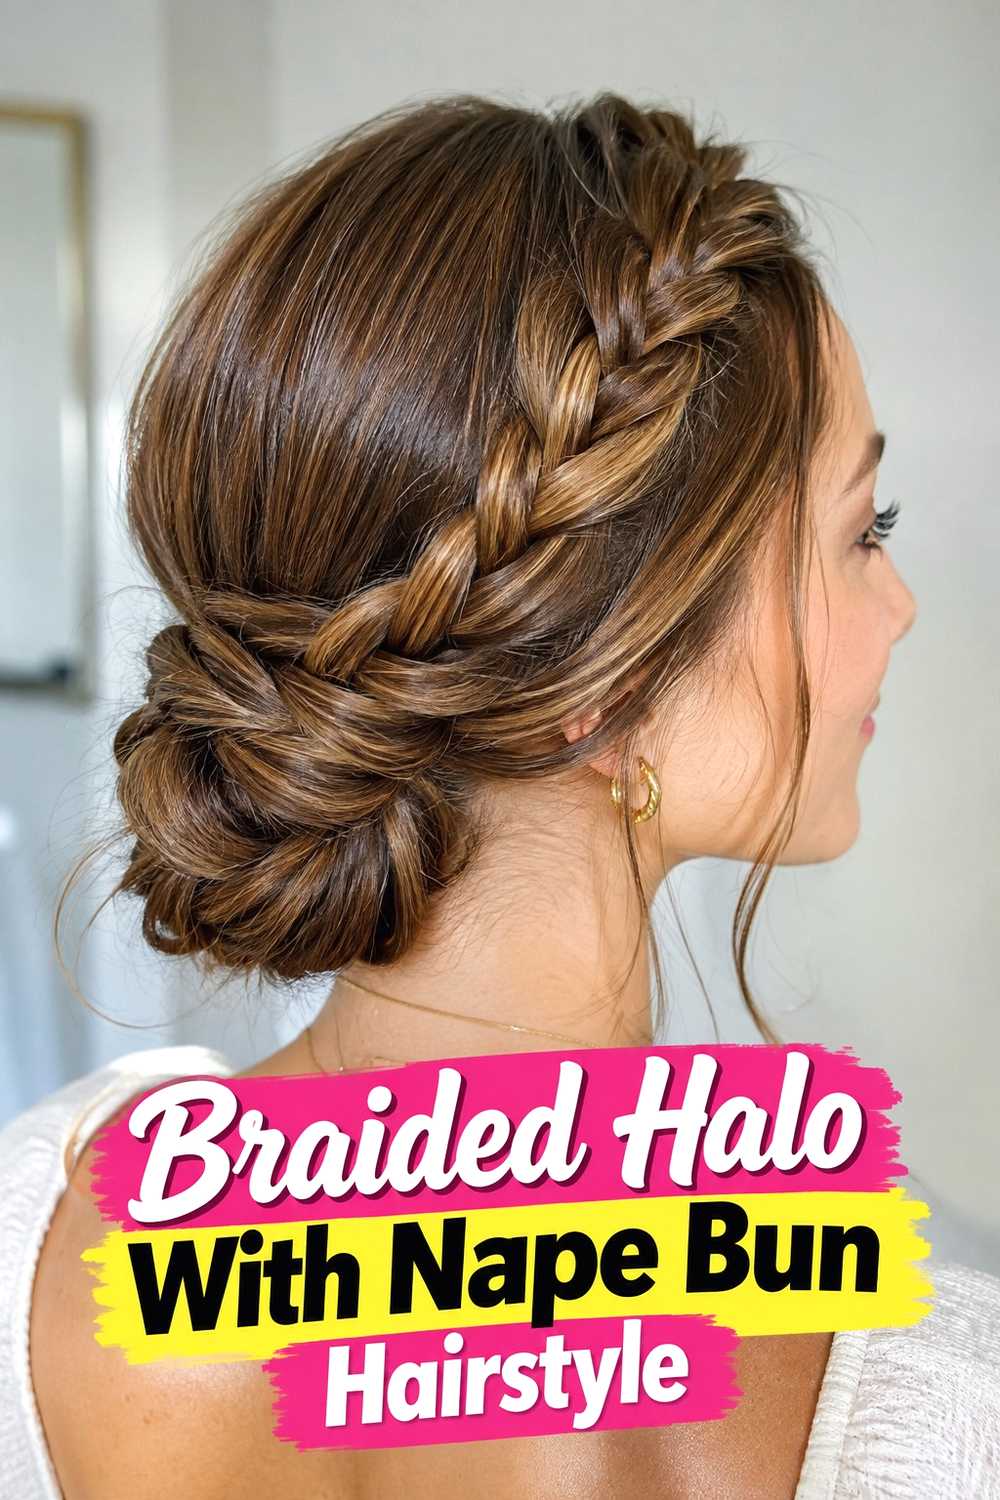
The Braided Halo With Nape Bun Hairstyle surrounds the upper head with a visible braid before the remaining length settles into a rounded bun at the nape. This combination creates a complete, balanced silhouette from front to back: the halo adds interest around the crown while the bun contains the lower hair neatly. The braid can sit close to the hairline for a stronger frame or slightly farther back for a softer effect. Long hair makes the wraparound construction easier, but separate side braids can also be joined to create a similar appearance. Keeping the halo moderately loose prevents the style from feeling tight, while the bun should remain more firmly anchored for dependable hold.
Wear & Maintenance
Use hidden pins beneath the halo at several points and secure the nape bun separately. Dividing the support between the two structures helps the hairstyle remain comfortable and stable.
10. Soft Tucked Braid Bun Hairstyle
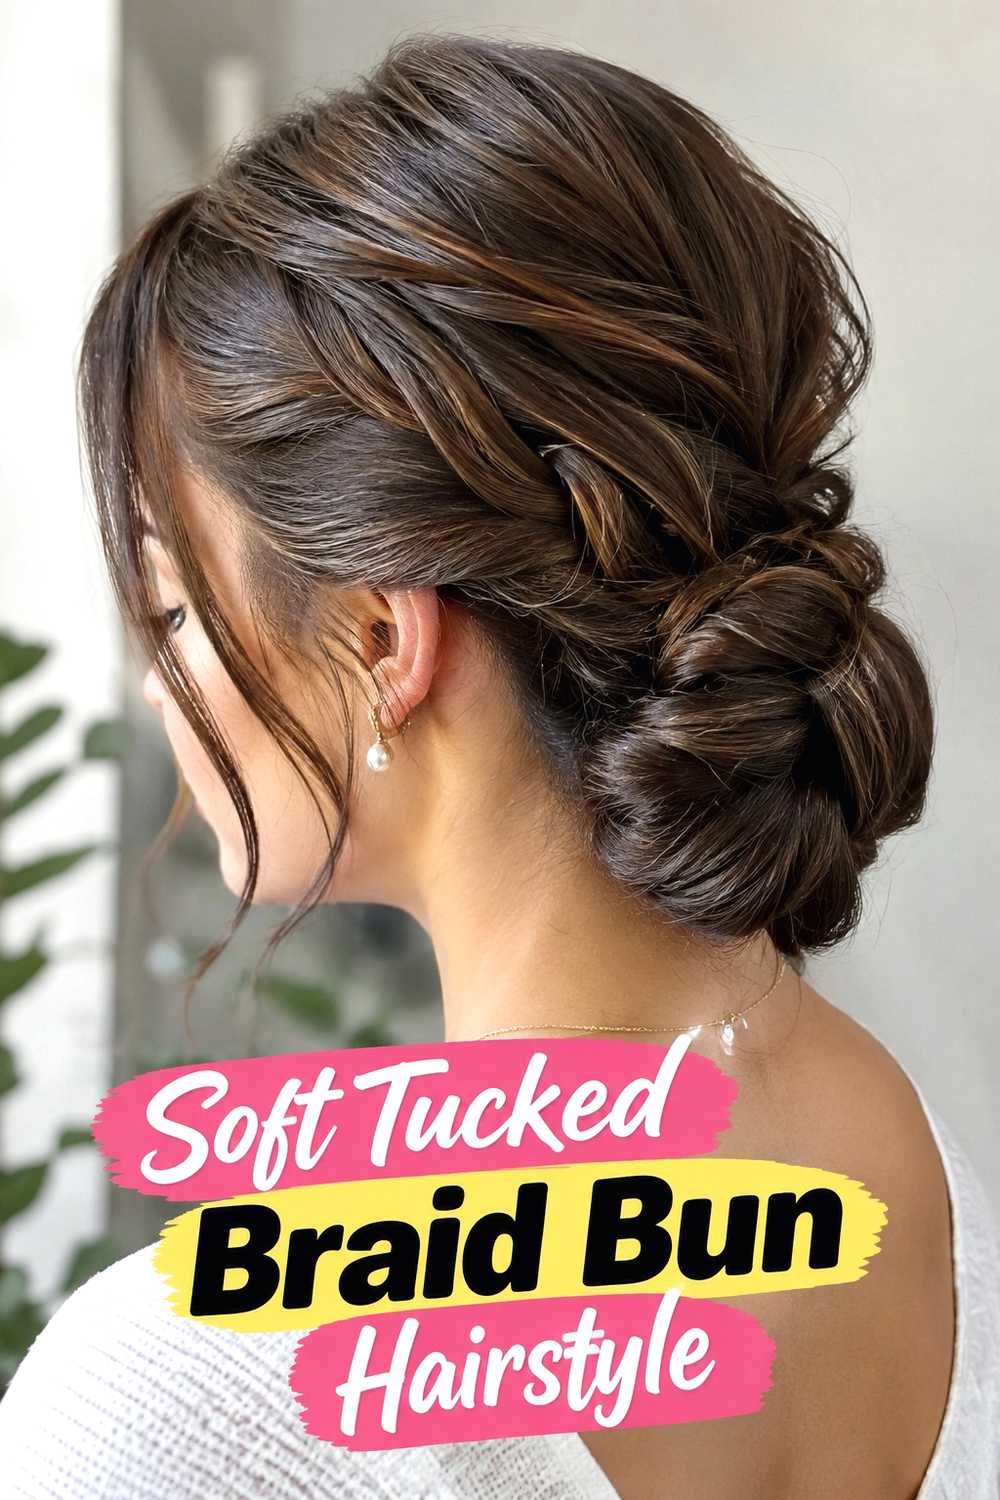
A Soft Tucked Braid Bun Hairstyle is ideal when you want Renaissance-inspired texture without an overly formal shape. The hair is braided low, then folded upward and tucked beneath itself so the braid becomes the visible outer surface of the bun. This creates a broad, softly rounded shape with less rigidity than a tightly coiled chignon. Gently loosened braid edges add fullness, while a few restrained pieces around the hairline keep the finish relaxed. Medium-long hair is usually enough for the tuck, making this one of the more accessible options in the collection. The hairstyle can remain completely unadorned or take a small ribbon, pearl pin, or decorative comb above the fold.
Pro Tip
Secure the folded braid through its denser inner sections. Pinning only the loosened outer loops can flatten the texture and make the tuck less stable.
11. Jewel Accented Court Braided Bun Hairstyle
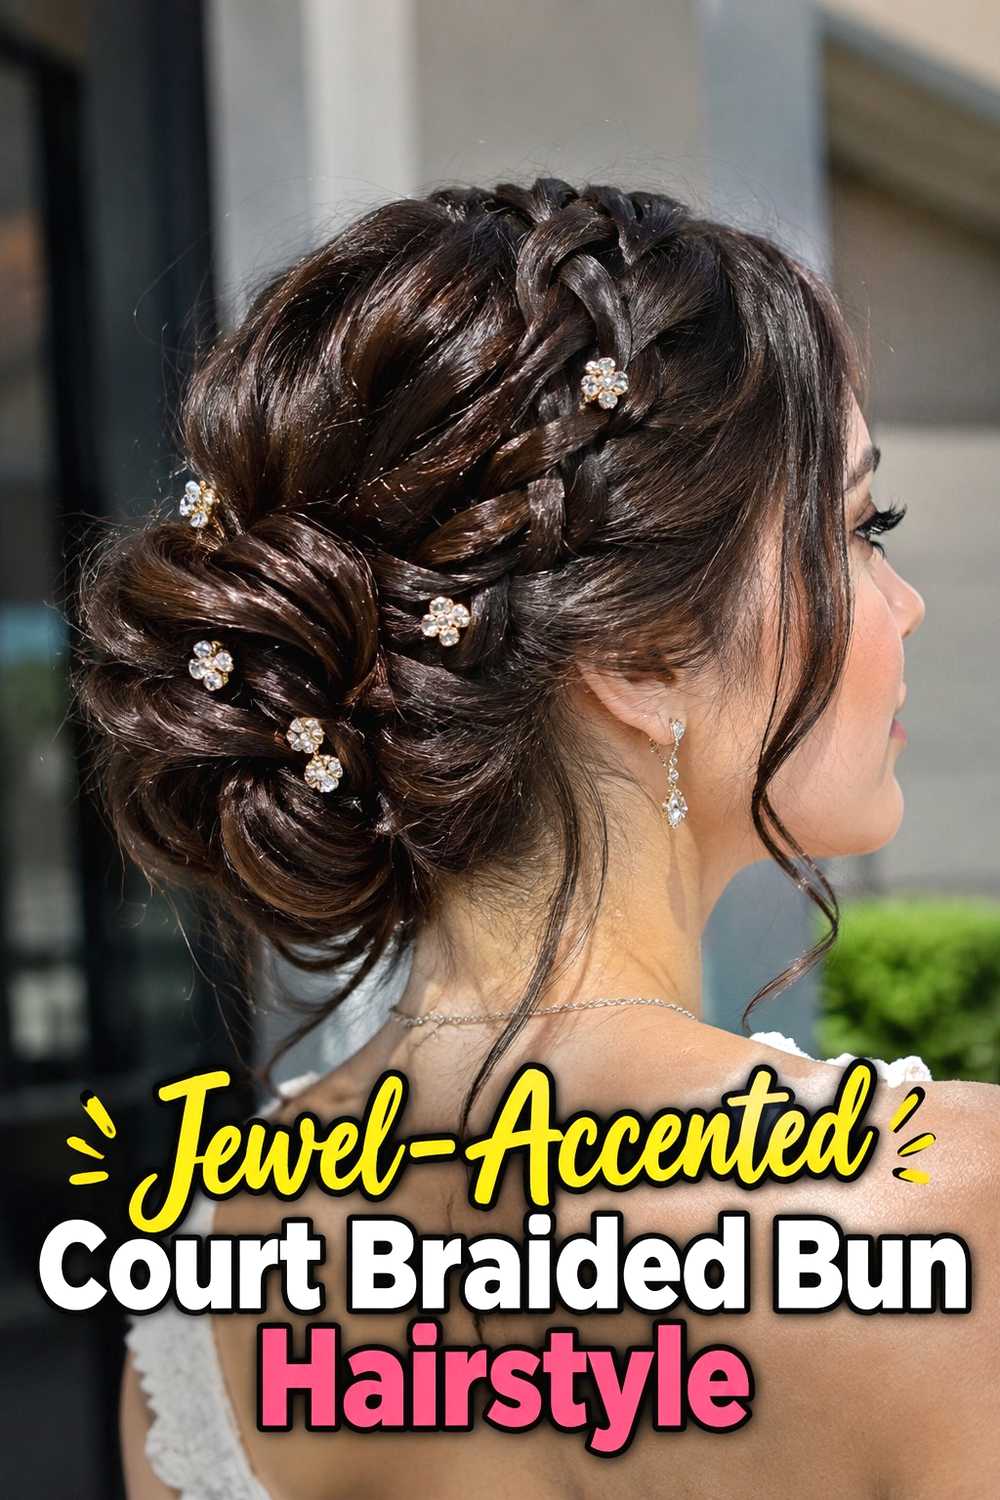
The Jewel-Accented Court Braided Bun Hairstyle combines a polished braided updo with a limited number of decorative hair jewels placed where the braid changes direction. Keeping the accessories selective allows the woven hair to remain the main feature while still creating a ceremonial, court-inspired impression. A smooth upper section can lead into one or two braids that wrap around a mid-low bun, giving the style a clean profile from the front and intricate detail from the back. This arrangement works well with medium-long or long hair and can support richer accessories better than a very loose bun. For a wearable finish, choose lightweight decorative pieces rather than heavily clustered ornaments that add unnecessary weight.
Styling Notes
Add decorative pins only after the hairstyle is fully secured. They should enhance the visible braid pattern rather than function as the primary anchors holding the bun together.
12. Center Parted Twin Braid Bun Hairstyle
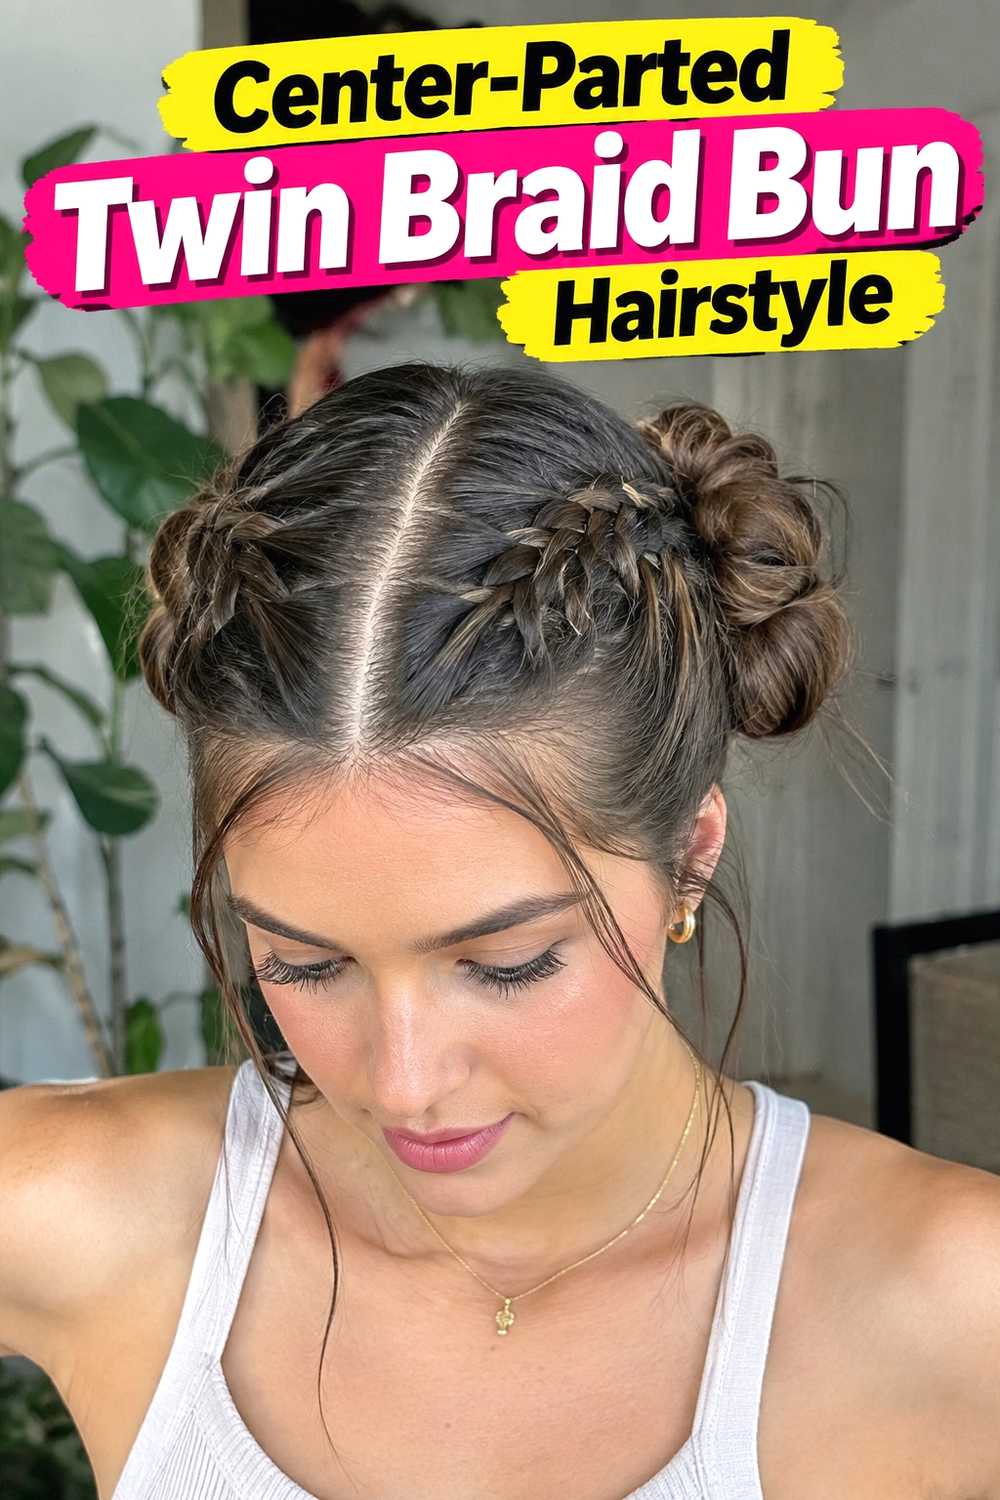
A Center-Parted Twin Braid Bun Hairstyle begins with a defined center part and two balanced braids that travel from either side toward the back. The braids eventually meet and wrap into a single low bun, creating a symmetrical shape that feels orderly and distinctly court-inspired. Keeping the front smooth emphasizes the geometry, while light softness near the ears can make the look less strict. This design is useful for thick hair because dividing the length into two braids distributes bulk before the bun is formed. On finer hair, gently widening each braid can produce a fuller result without adding excessive tension. The bun itself should remain compact enough that the twin braid paths stay visible above it.
Why It Works
Strong symmetry gives the hairstyle a formal Renaissance-inspired character, while the two-braid construction helps manage dense or very long hair more evenly than one large braid.
13. Loose Renaissance Garden Bun Hairstyle
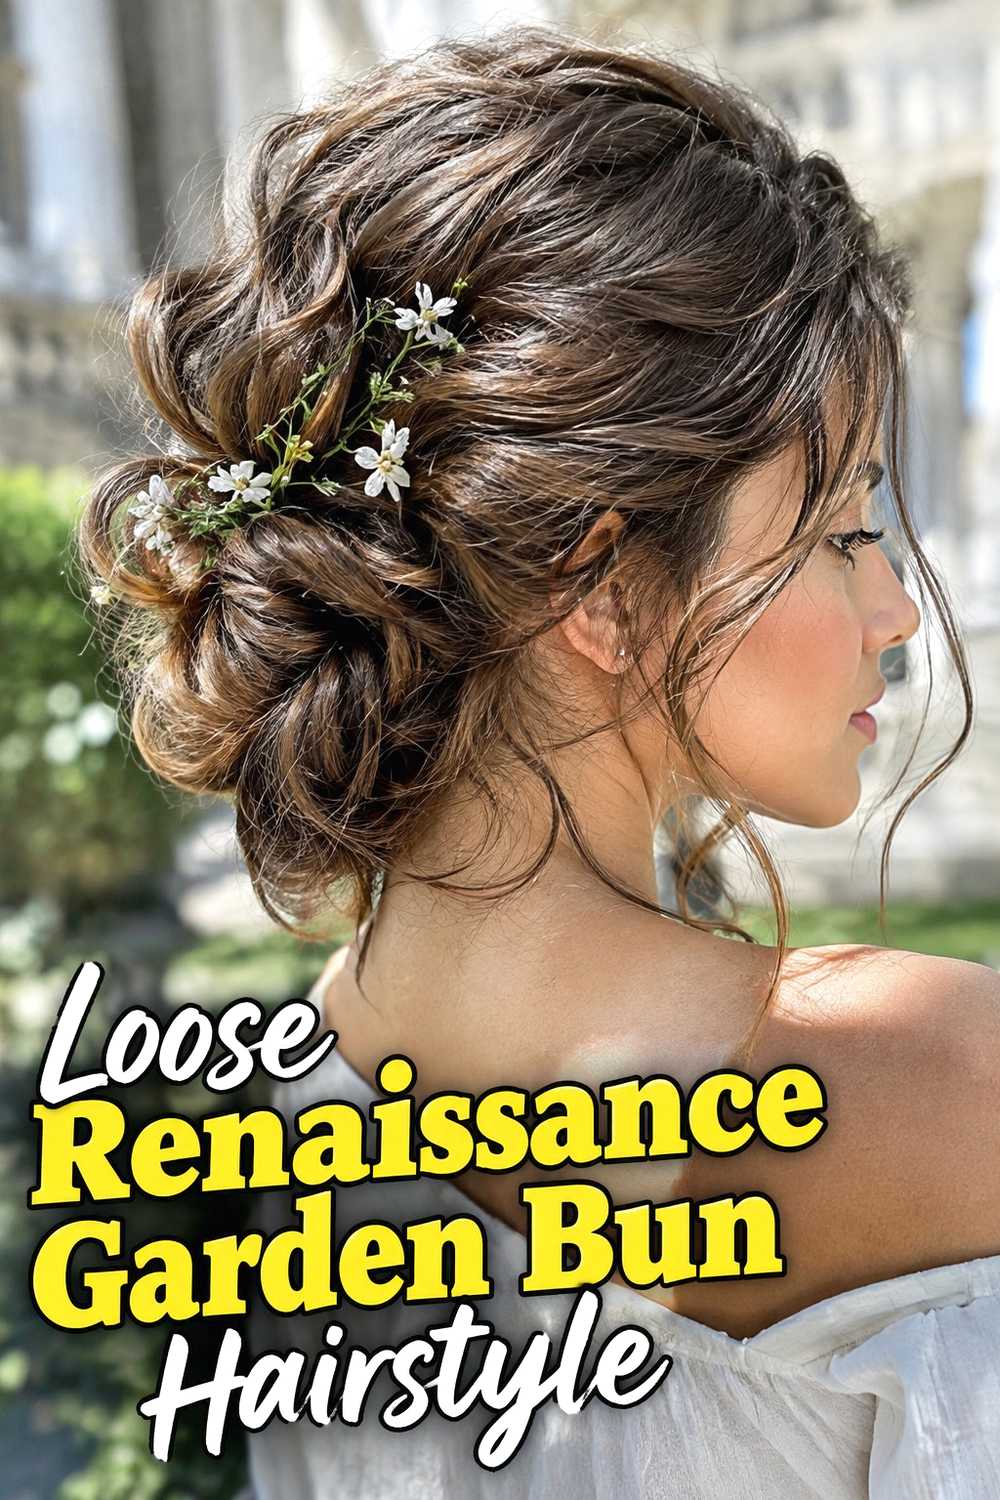
The Loose Renaissance Garden Bun Hairstyle has a softer, more relaxed mood than highly structured court updos. Several gently braided sections are gathered into a low, airy bun with visible curves, slight flyaways, and natural movement rather than a perfectly smooth surface. The goal is controlled softness, not messiness: the main structure should still be anchored securely even if the outer layers look relaxed. Wavy hair complements this style especially well because the texture blends naturally with loosened braids, though straight hair can be softly waved beforehand. Small botanical-inspired pins or a narrow ribbon can enhance the garden feeling, but the hairstyle also works beautifully with no accessories at all.
Best For
Choose this version for outdoor weddings, garden events, Renaissance-inspired photography, festivals, or occasions where a softer romantic finish feels more natural than a polished ceremonial bun.
14. Braided Loop Bun With Ribbon Hairstyle
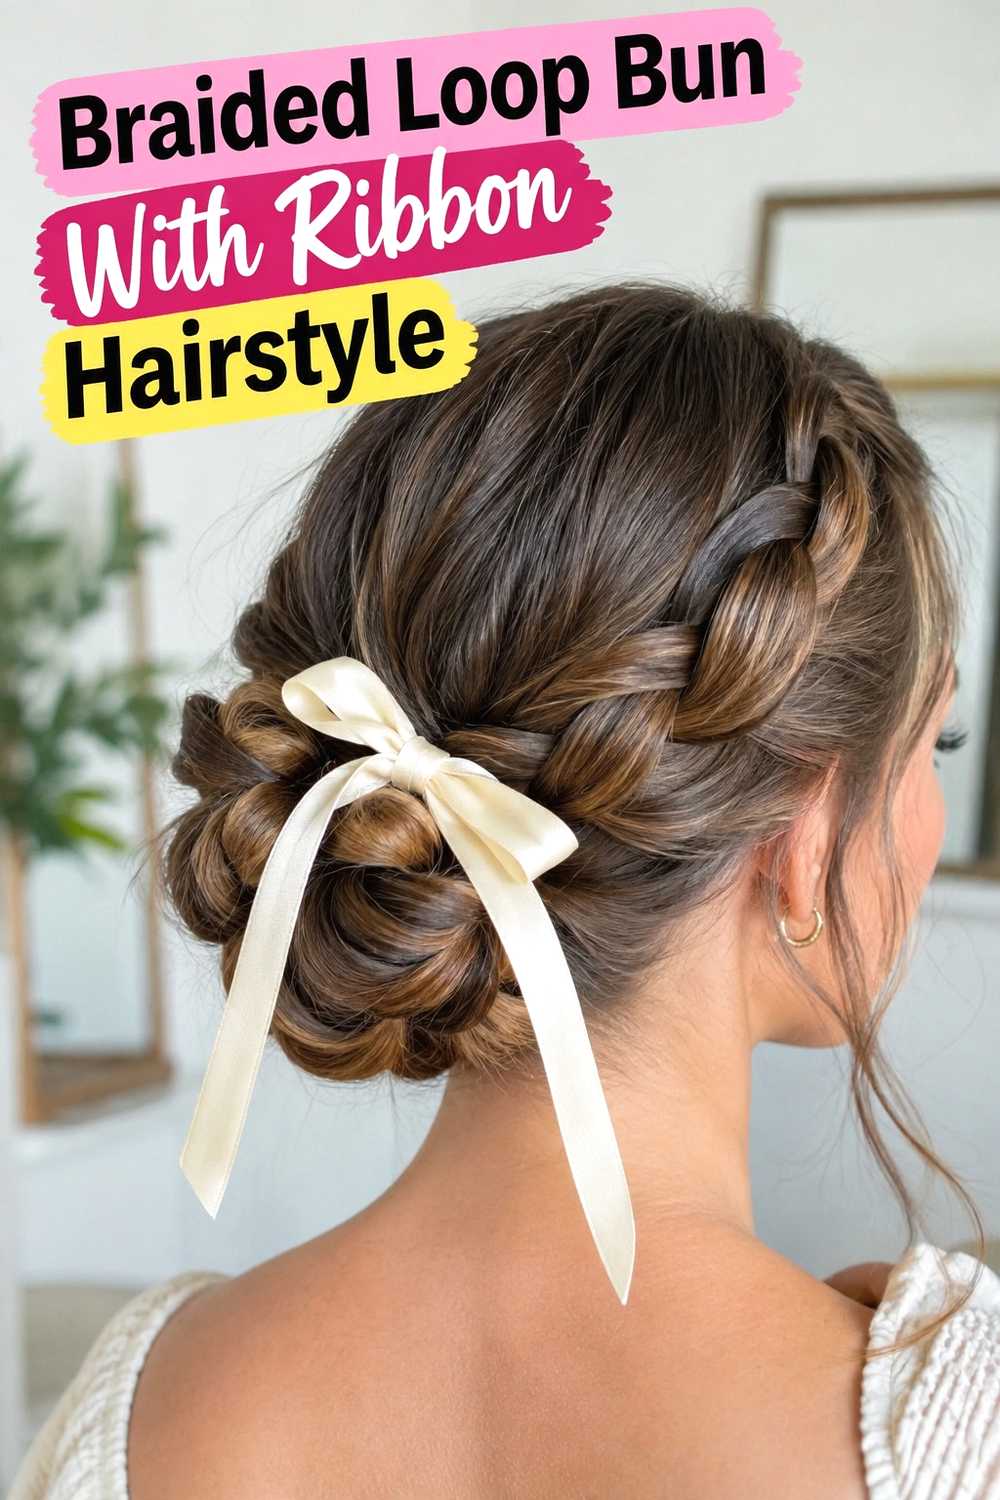
A Braided Loop Bun With Ribbon Hairstyle folds a decorated braid into an elongated loop rather than wrapping it into a perfectly round coil. Ribbon is woven through the braid before the loop is formed, allowing the color to follow the curve of the finished updo. The tucked ends disappear beneath the upper section, creating a neat shape while keeping most of the braid pattern visible. This is particularly effective on long hair because the loop shortens the visible length without producing an excessively dense bun. Narrow ribbon generally works best, especially when the braid itself has detailed texture. Keep the loop close enough to the head that its weight does not pull downward during extended wear.
Wear & Maintenance
Use several discreet pins along the inside curve of the loop. Supporting the shape at multiple points prevents the folded braid from sagging while preserving its smooth outer outline.
15. Sculpted Crown Braid Bun Hairstyle
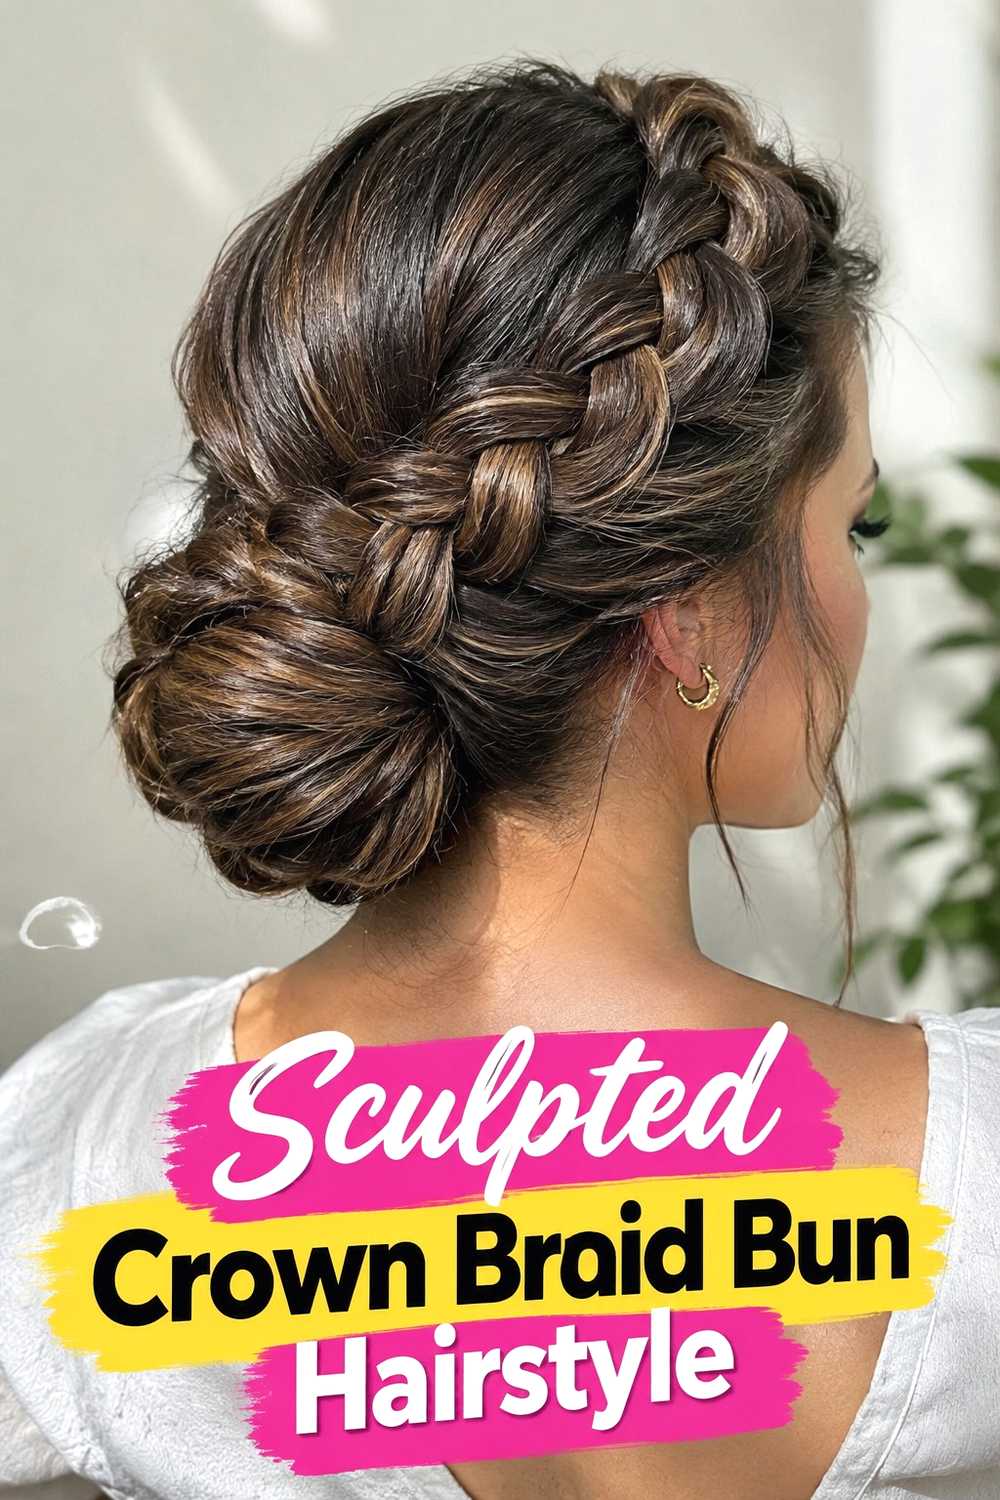
The Sculpted Crown Braid Bun Hairstyle creates a more architectural Renaissance-inspired look by pairing a substantial crown braid with a precisely shaped bun beneath it. The braid follows the contour of the head and remains clearly defined, while the bun is kept smooth and rounded to provide contrast. This approach feels more ceremonial than deliberately loose styles and works particularly well when the hair has enough density to support visible structure. Long hair offers the greatest flexibility, though separate braid sections can help create the crown without consuming all the length needed for the bun. A minimal accessory, such as one pearl pin or a narrow metallic accent, is usually enough because the sculpted silhouette already provides strong visual detail.
Hair Type & Length
Long, medium-dense to thick hair creates the easiest foundation. Finer hair can achieve a similar effect with smaller braids and careful loosening instead of trying to imitate oversized volume.
16. Rope Braid Renaissance Bun Hairstyle
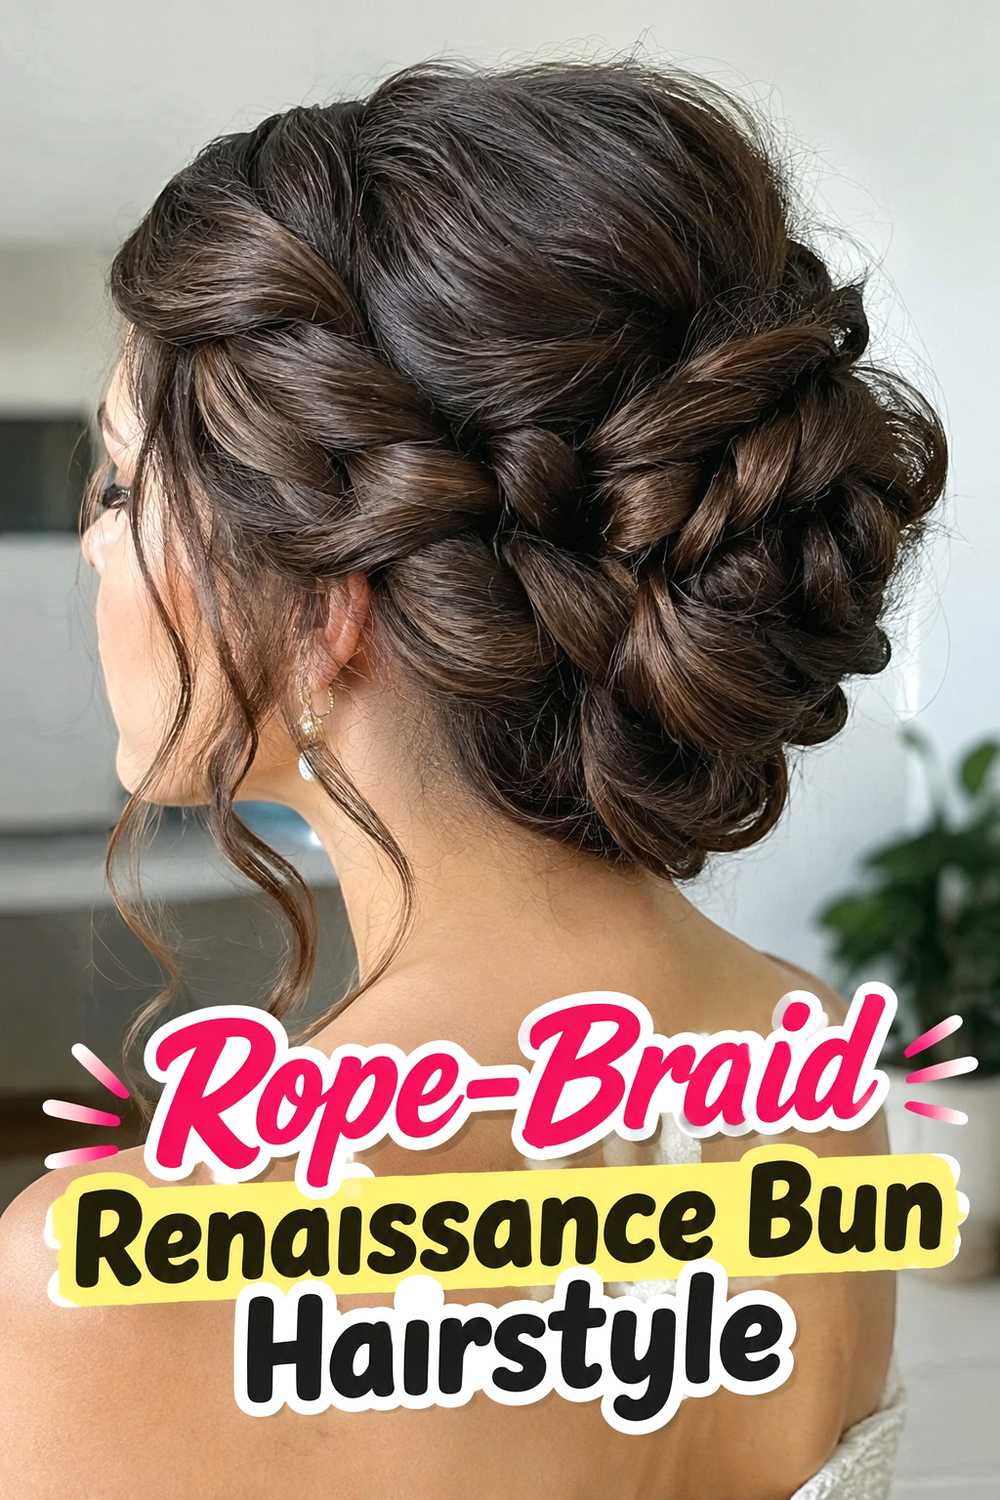
A Rope-Braid Renaissance Bun Hairstyle replaces traditional three-strand braids with twisted rope sections, giving the updo a cleaner spiral texture. Two rope braids can travel from the sides toward the back before being wrapped together into a low or mid-height bun. Because rope twists create strong directional lines, the finished hairstyle looks detailed even without ribbons, jewels, or pearls. It works particularly well on hair that has enough length for the twists to remain defined after coiling. Maintaining consistent tension is important because loose rope sections can unravel more easily than conventional braids. A slightly polished front contrasts beautifully with the twisted texture at the back and gives the overall style a refined courtly finish.
Pro Tip
Twist each individual section in one direction, then wrap the two sections together in the opposite direction. This helps the rope braid hold its recognizable spiral form.
17. Crossed Side Braids Into Bun Hairstyle
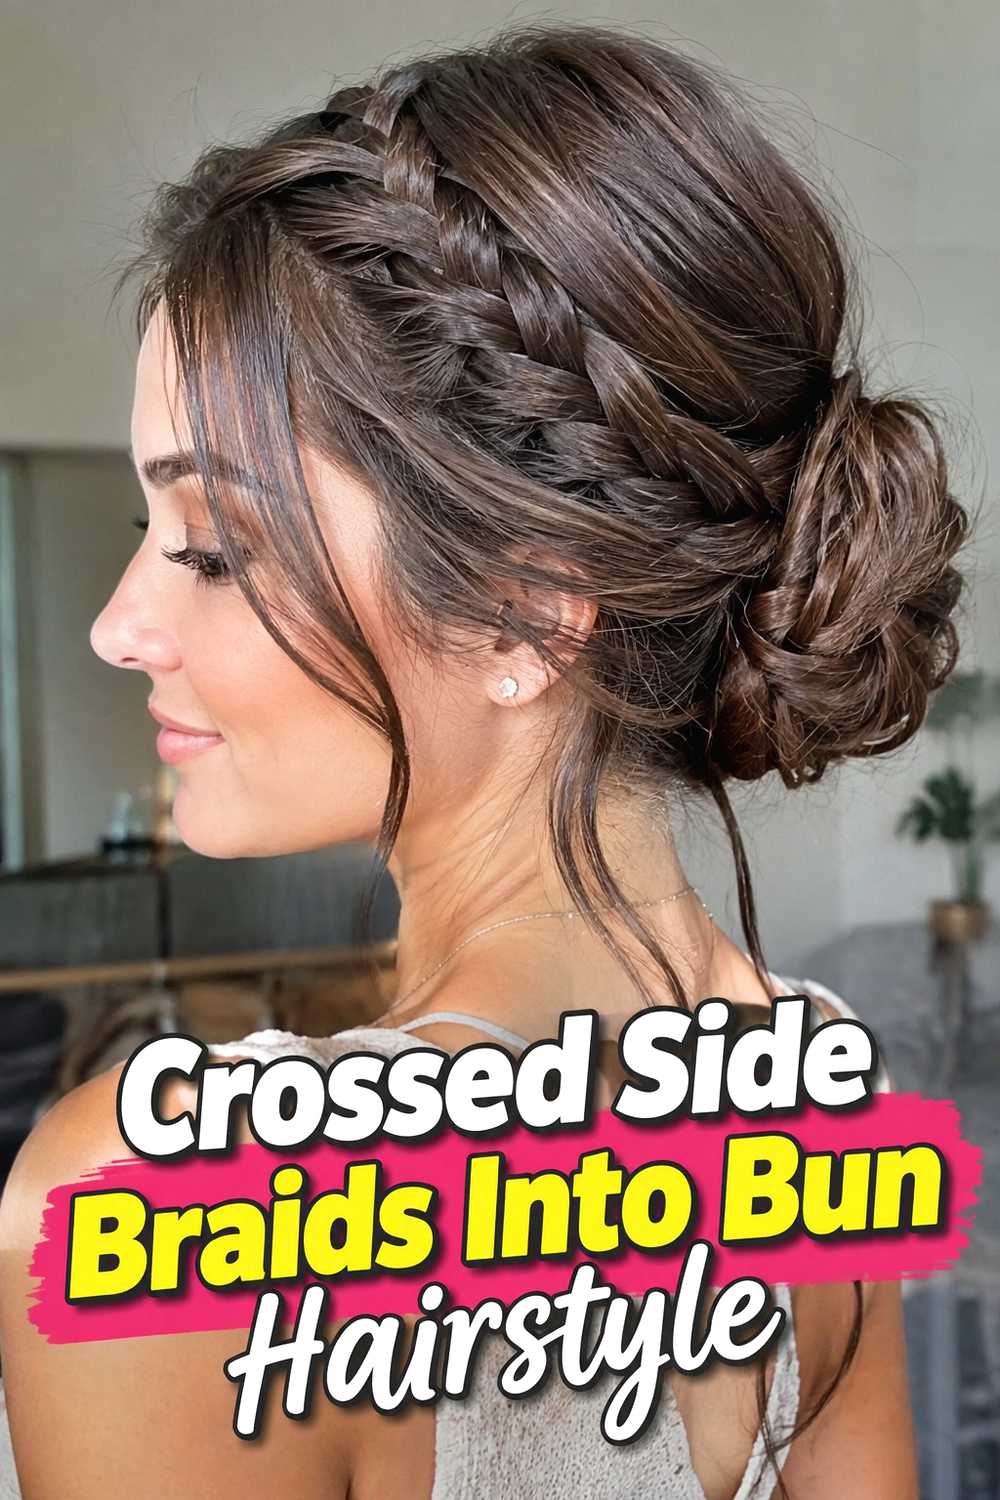
The Crossed Side Braids Into Bun Hairstyle begins with a braid on each side of the head and brings them diagonally across the back before both disappear into a central bun. The crossing point adds visual interest and creates the impression of layered craftsmanship without requiring an extremely complicated braid technique. Keeping the braids broad enough to see their shape makes the design more effective from the back, while the central bun gives the hairstyle a secure finish. This option can work well on medium-long hair because the side braids do not need to wrap fully around the head. Small hidden pins beneath the crossing point help maintain the overlapping pattern before the remaining lengths are incorporated into the bun.
Styling Notes
Secure the crossed braids first and form the bun afterward. Establishing the diagonal placement early makes it easier to keep both sides balanced while hiding the braid ends cleanly.
18. Romantic Renaissance Bridal Bun Hairstyle
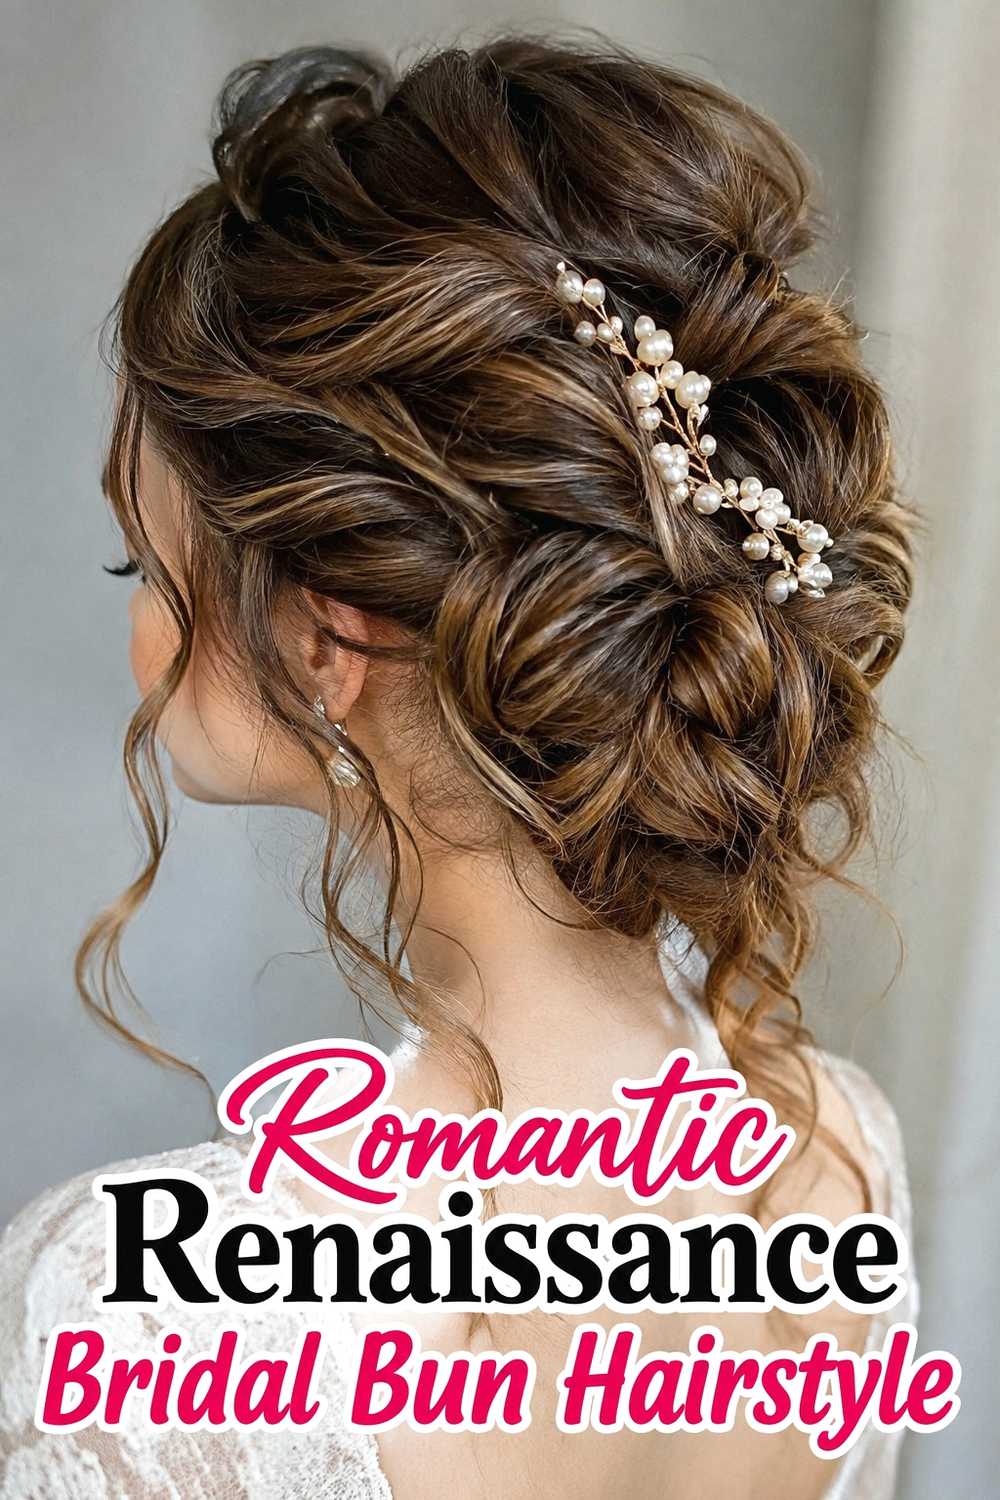
The Romantic Renaissance Bridal Bun Hairstyle combines several softer elements into one formal updo: gently widened braids, a rounded low bun, delicate face-framing pieces, and restrained pearl or ribbon accents. Rather than aiming for strict historical reproduction, the style takes recognizable Renaissance-inspired shapes and adapts them into a wearable bridal finish. Braids can sweep from the temples and overlap above the bun, creating detail that remains visible beneath a veil or decorative comb if one is added. Medium-long to long hair gives the most flexibility, especially when the bun needs substantial volume without feeling overly tight. Keeping some natural texture throughout the braids prevents the finished style from looking overly sprayed or rigid.
Why It Works
The secure low bun supports formal wear, while softer braids and restrained accessories add romance without sacrificing the dimensional hair texture that makes the updo visually interesting.
How to Choose the Right Look
Begin with your hair length and density. Long hair offers the most flexibility for halo braids, large rosette buns, sculpted crowns, and wrapped loops, while medium-long hair can work beautifully for tucked buns, twin side braids, and temple-braid designs. If your hair is fine, smaller structured braids often look more balanced than oversized coils.
Next, consider how formal you want the finish to feel. Smooth center parts, symmetrical crown braids, sculpted coils, and jewel accents create a more courtly appearance. Loose garden buns, softly tucked braids, and side-swept arrangements feel more romantic and relaxed.
Comfort matters too. Large high buns can place more weight on the crown, while low chignons and nape buns distribute the hairstyle closer to the head. For long events, build the hairstyle with elastics and well-distributed pins before adding decorative pieces.
Accessories should support the visual direction rather than overwhelm it. Thin ribbon works beautifully inside braids, pearls add delicate points of light, and lightweight jeweled pins suit more ceremonial looks. If the braid pattern is already complex, minimal decoration often gives the cleanest result.
Finally, think about texture. Straight hair emphasizes precise braiding, while waves and curls naturally add softness and volume. The most believable result usually works with your hair’s natural characteristics instead of forcing every strand into a perfectly uniform finish.
Final Thoughts
Renaissance braided bun hairstyles can range from restrained low coils to elaborate crown braids, ribbon-woven buns, and pearl-accented bridal updos. The key is choosing a structure that suits your hair length, density, comfort needs, and occasion. A secure foundation, visible braid detail, and carefully chosen accessories can create an elegant Renaissance-inspired look without making the hairstyle feel overloaded.
FAQs
1. What makes a braided bun look Renaissance-inspired?
Crown placement, side braids, low coiled buns, center parts, ribbons, pearls, and layered braided structures can all create a Renaissance-inspired effect. Combining two or three of these details usually looks more balanced than using every element at once.
2. Are Renaissance braided buns suitable for medium-length hair?
Yes. Temple braids, tucked braid buns, crossed side braids, and smaller low chignons can work well on medium-long hair. Very elaborate halos and large braided coils generally require more length.
3. What accessories work best with these hairstyles?
Narrow ribbons, lightweight pearl pins, discreet jeweled accents, and decorative combs pair well with Renaissance-inspired braided buns. Keep heavier accessories firmly anchored into secure sections.
4. How can I make a braided bun look fuller?
Gently widen the braid before forming the bun, work with natural texture, and arrange the coil so the braid covers more surface area. Avoid excessive pulling that weakens the structure.
5. Can Renaissance braided bun hairstyles work for weddings?
Yes. Low braided buns, halo-and-bun combinations, pearl-woven styles, and softer garden-inspired versions can all adapt beautifully to bridal styling, especially when accessories remain balanced and comfortable.
Save your favorite Renaissance braided bun hairstyles, share the ideas you love, and explore more romantic braid inspiration for your next special look.