15 Glossy ’90s Chignon Hairstyles for a Polished Throwback Look
Glossy ’90s chignons pair sleek roots, sculpted knots, and understated details for an elegant throwback finish that still feels beautifully current.
The chignon was made for the clean, polished mood associated with ’90s beauty: controlled silhouettes, luminous shine, deliberate partings, and accessories used with restraint. This collection moves from ultra-sleek low buns to twisted, rolled, side-set, and softly framed versions, so the look can feel minimal, romantic, or quietly glamorous.
When choosing between these styles, compare how much tension you enjoy around the hairline, whether you want a crisp or softly textured finish, and how much length you have available for the knot itself. Part placement, chignon size, face-framing pieces, and accessories can dramatically change the overall effect without losing that glossy ’90s character.
Quick List
- Sleek Center-Part Chignon Hairstyle
- Deep Side-Part Chignon Hairstyle
- Sculpted Low Chignon Hairstyle
- Twisted Glossy Chignon Hairstyle
- Side-Swept Chignon Hairstyle
- Pearl-Pin Chignon Hairstyle
- Face-Framing Chignon Hairstyle
- Rolled French-Inspired Chignon Hairstyle
- Polished Knot Chignon Hairstyle
- High-Shine Mini Chignon Hairstyle
- Slicked-Back Chignon Hairstyle
- Curved Side Chignon Hairstyle
- Ribbon-Wrapped Chignon Hairstyle
- Crisscross Chignon Hairstyle
- Soft Tendril Chignon Hairstyle
1. Sleek Center Part Chignon Hairstyle
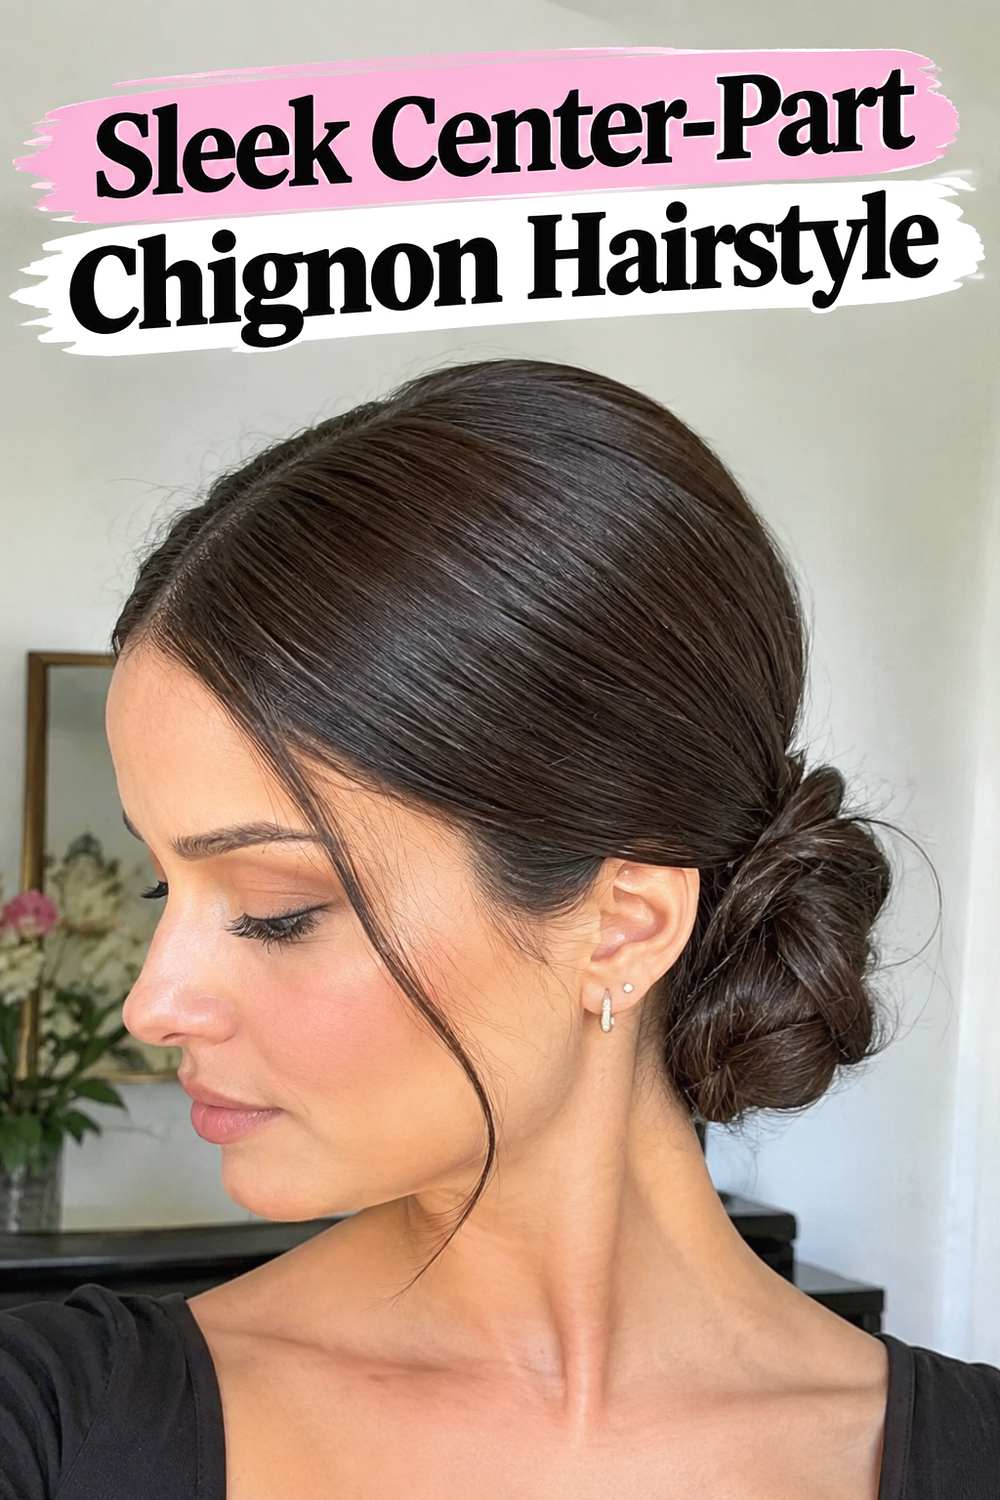
A precise middle part gives this low chignon one of the clearest ’90s signatures. The hair sits close to the head from the forehead through the crown before gathering into a compact knot at the nape, creating a clean silhouette that lets shine and structure do the talking. It looks especially polished when the surface is smooth without appearing stiff, with subtle natural strand detail visible around the part and bun. This style can complement evening dresses, tailored outfits, bridal looks, or minimalist formalwear. Because the part is so defined, take time to make it straight before securing the hair; small irregularities become more noticeable once the sides are slicked flat.
Styling Notes
Work with a controlled amount of smoothing product rather than saturating the hair. A fine-tooth comb can refine the part and surface, while discreet pins tucked underneath the chignon keep the finished shape clean.
Best For
This version is especially useful when you want your hairstyle to feel symmetrical, restrained, and elegant. Medium to long hair offers enough length to create the compact knot without excessive pinning.
2. Deep Side Part Chignon Hairstyle
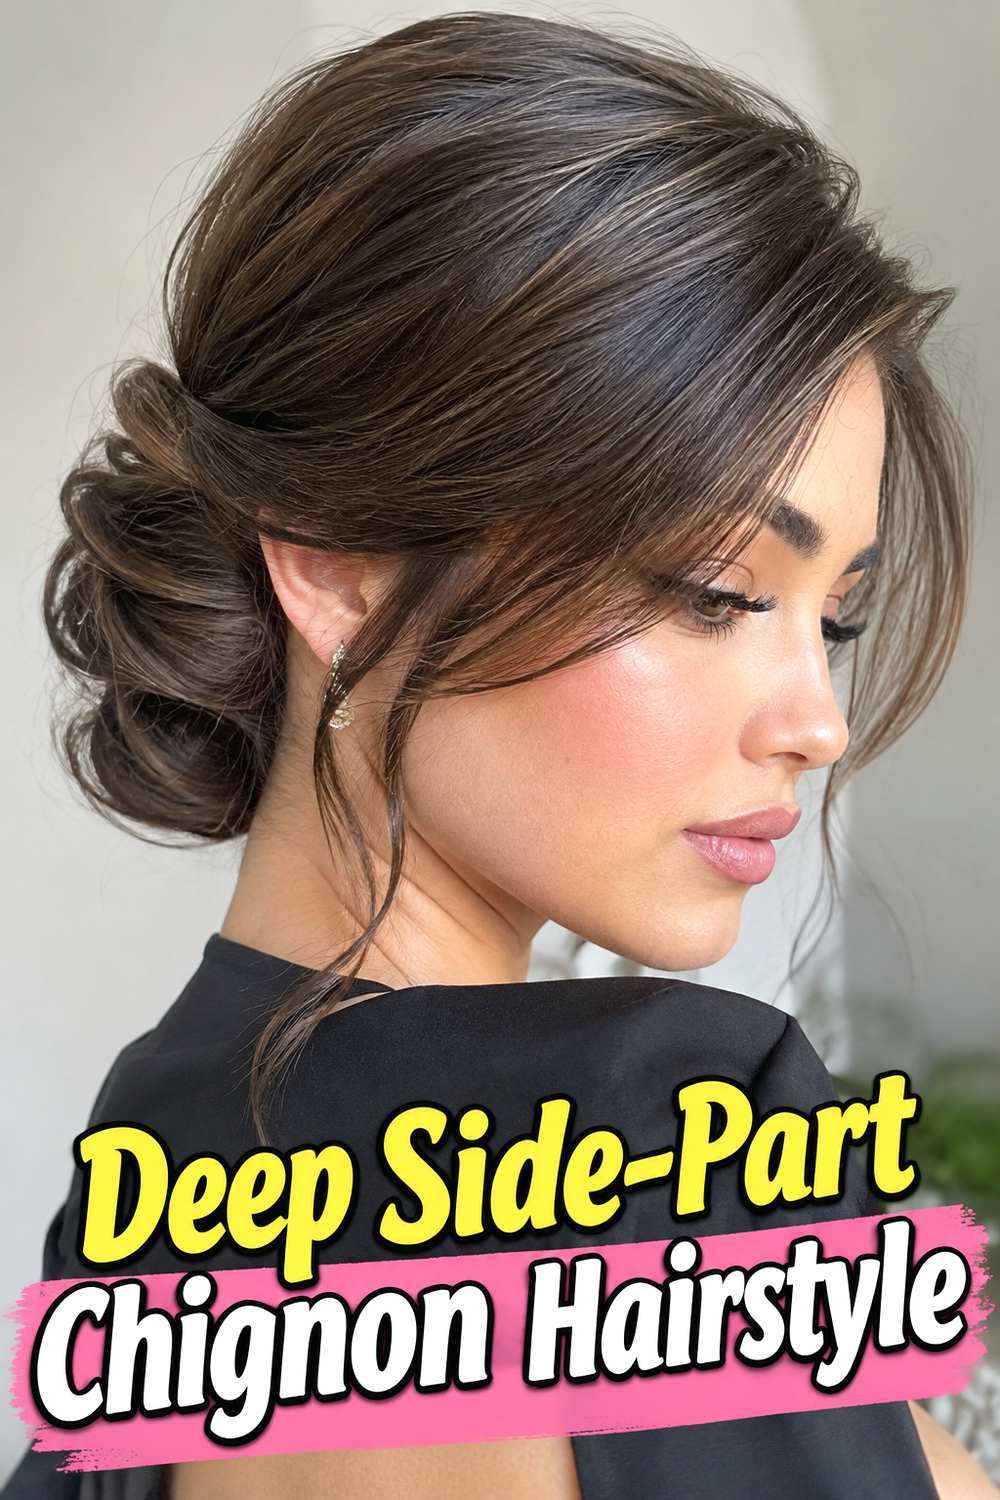
The deep side part brings a slightly more dramatic attitude to the classic glossy chignon. One side sweeps smoothly across the forehead while the opposite side remains tucked close to the head, producing the sculpted asymmetry often seen in polished ’90s evening styling. Keep the chignon low and neat so the front section remains the visual focus rather than competing with an oversized bun. The look works beautifully with statement earrings because the sleek sides leave the ears and jawline exposed. If your hair naturally resists a deep part, establish the direction while it is slightly damp or during blow-drying; the finished sweep will usually lie more naturally and require less heavy product.
Why It Works
Moving the part away from the center changes the balance of the entire updo. It adds visual movement while preserving the smooth, minimal finish that makes a glossy chignon feel unmistakably refined.
Wear & Maintenance
Carry a few small pins if you plan to wear the style for many hours. The swept front section should stay polished, but avoid repeatedly combing it once the shape has been set.
3. Sculpted Low Chignon Hairstyle
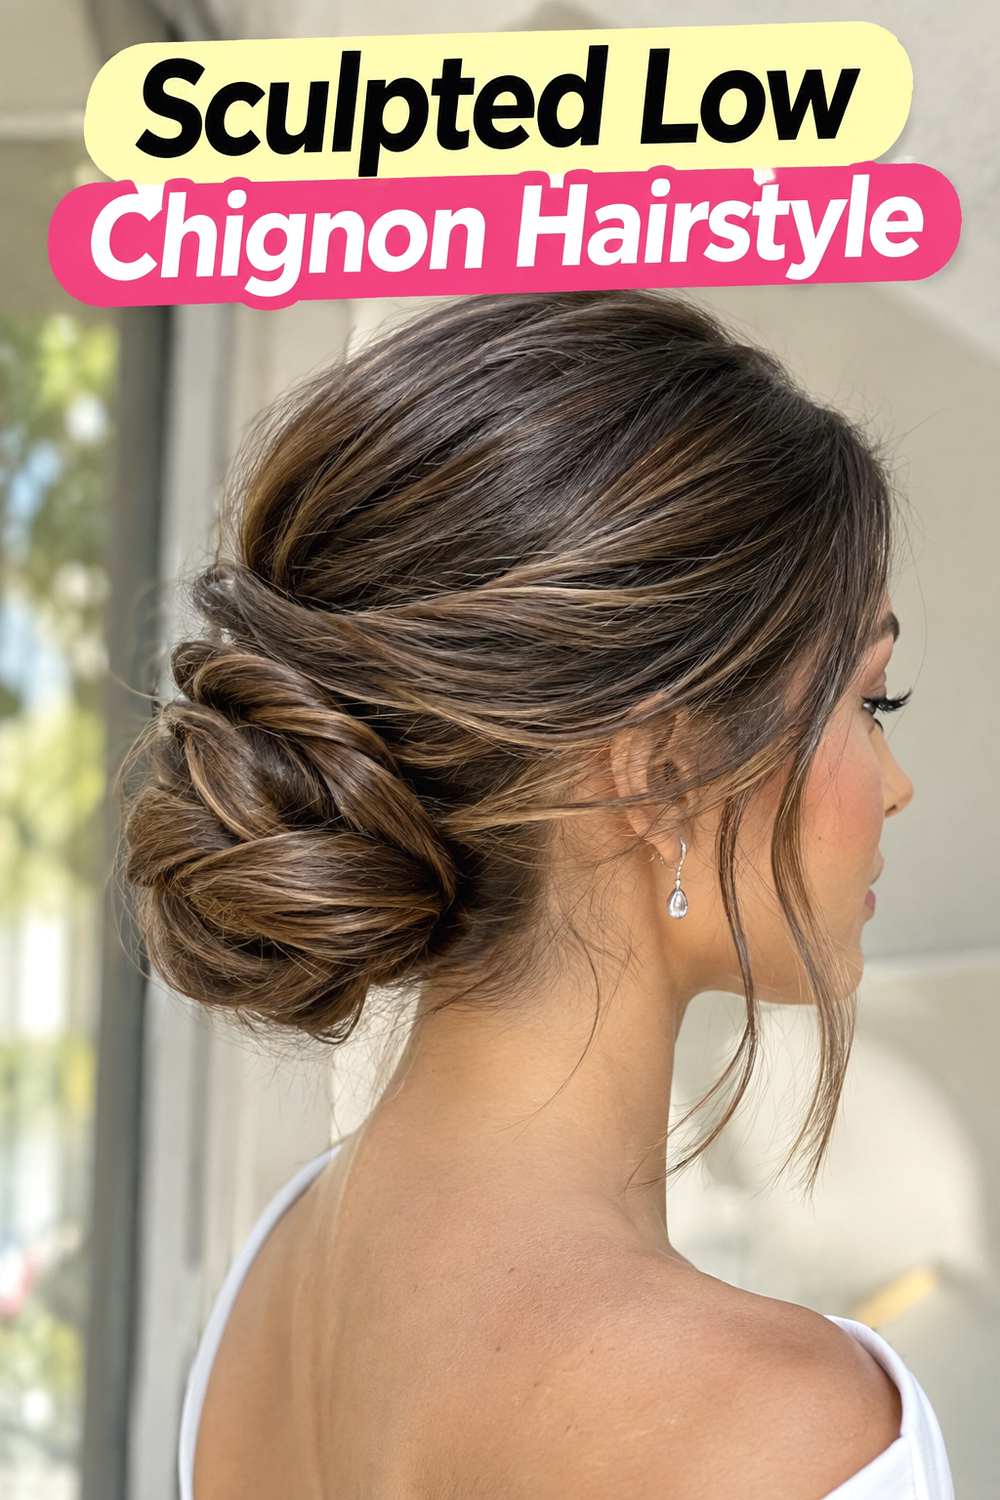
This version emphasizes the actual shape of the bun, turning the chignon into a smooth, deliberate curve at the nape. Rather than wrapping the hair into a casual coil, the lengths are folded and pinned to create a rounded silhouette with clearly controlled edges. The roots remain sleek and glossy, allowing the sculptural back detail to stand out when viewed from the side or behind. It suits formal occasions particularly well because the finish looks composed from every angle. Thicker hair can create the rounded volume naturally, while finer hair may benefit from gentle backcombing inside the section before the outer surface is smoothed over it.
Hair Type & Length
Medium-long and long hair are easiest to fold into a substantial low shape. Dense hair may need several anchor pins, while finer strands often require fewer pins but benefit from added internal grip.
Pro Tip
Build the shape before applying your final shine product. That helps prevent the hair from becoming too slippery while you are folding and securing the chignon.
4. Twisted Glossy Chignon Hairstyle
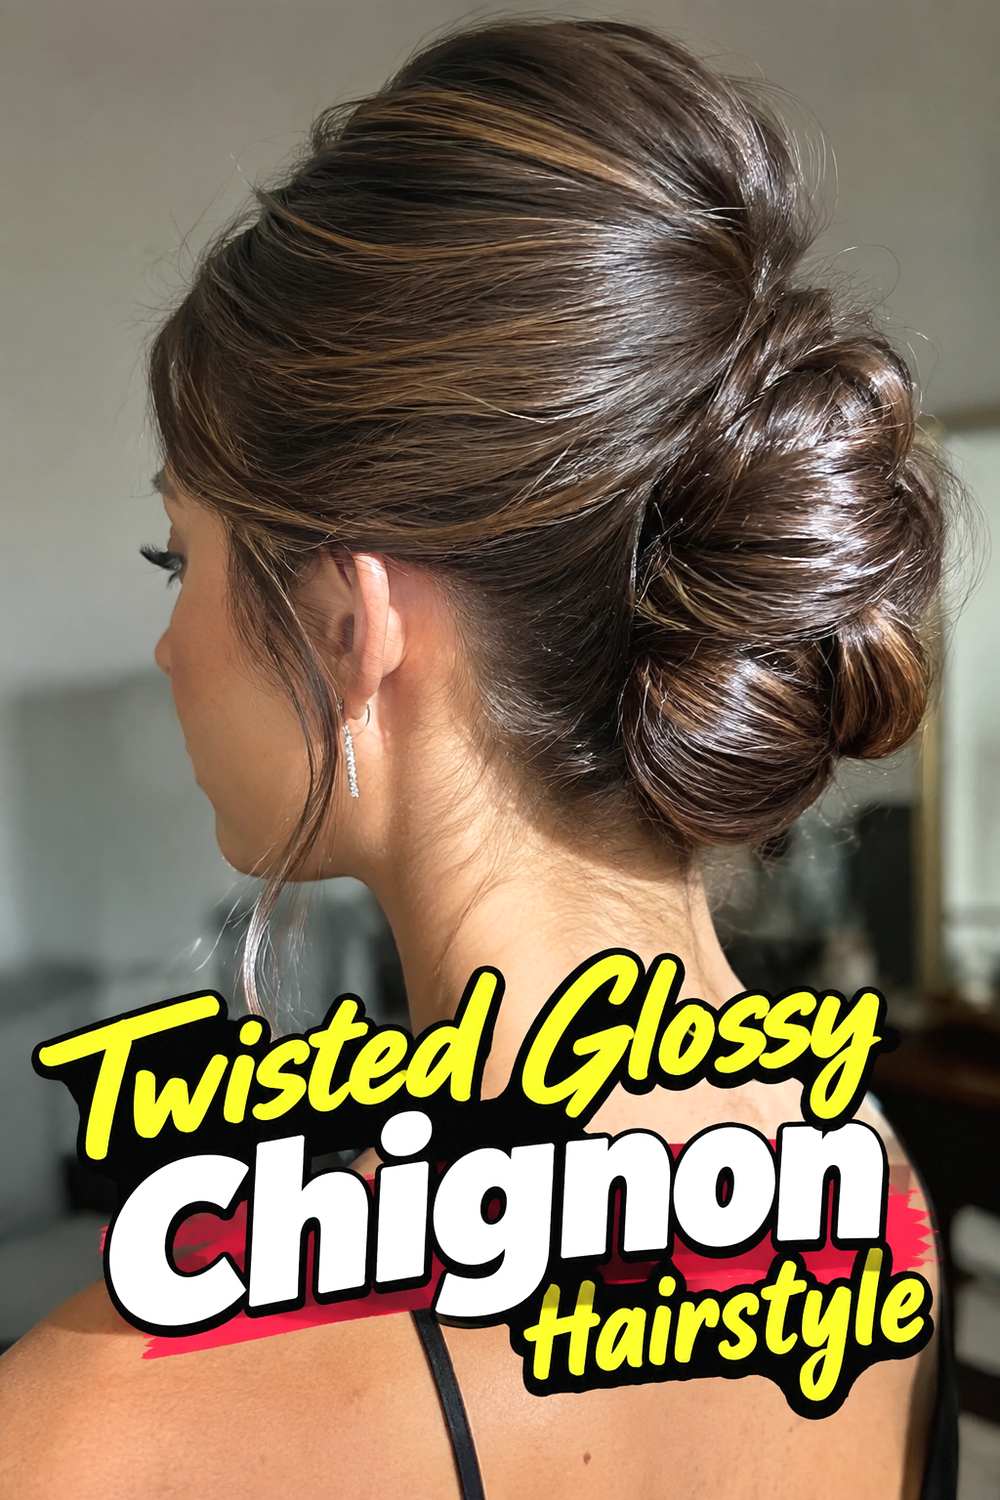
A visible twist gives this glossy chignon more dimension without taking it into overly intricate updo territory. The hair can be gathered low, divided or rolled into a single controlled twist, then wrapped back toward the base so the directional movement remains visible. Smooth roots maintain the sophisticated ’90s mood, while the twist catches natural light and shows off variations in hair tone. The finished look feels especially flattering when you want more interest than a plain bun but still prefer a neat, compact silhouette. Use enough tension to define the twist, but not so much that the section becomes rope-like or separates awkwardly around the bun.
Styling Notes
A light smoothing cream can help keep smaller strands integrated into the twist. Pin from underneath whenever possible so the hardware disappears and the curved surface remains uninterrupted.
5. Side Swept Chignon Hairstyle
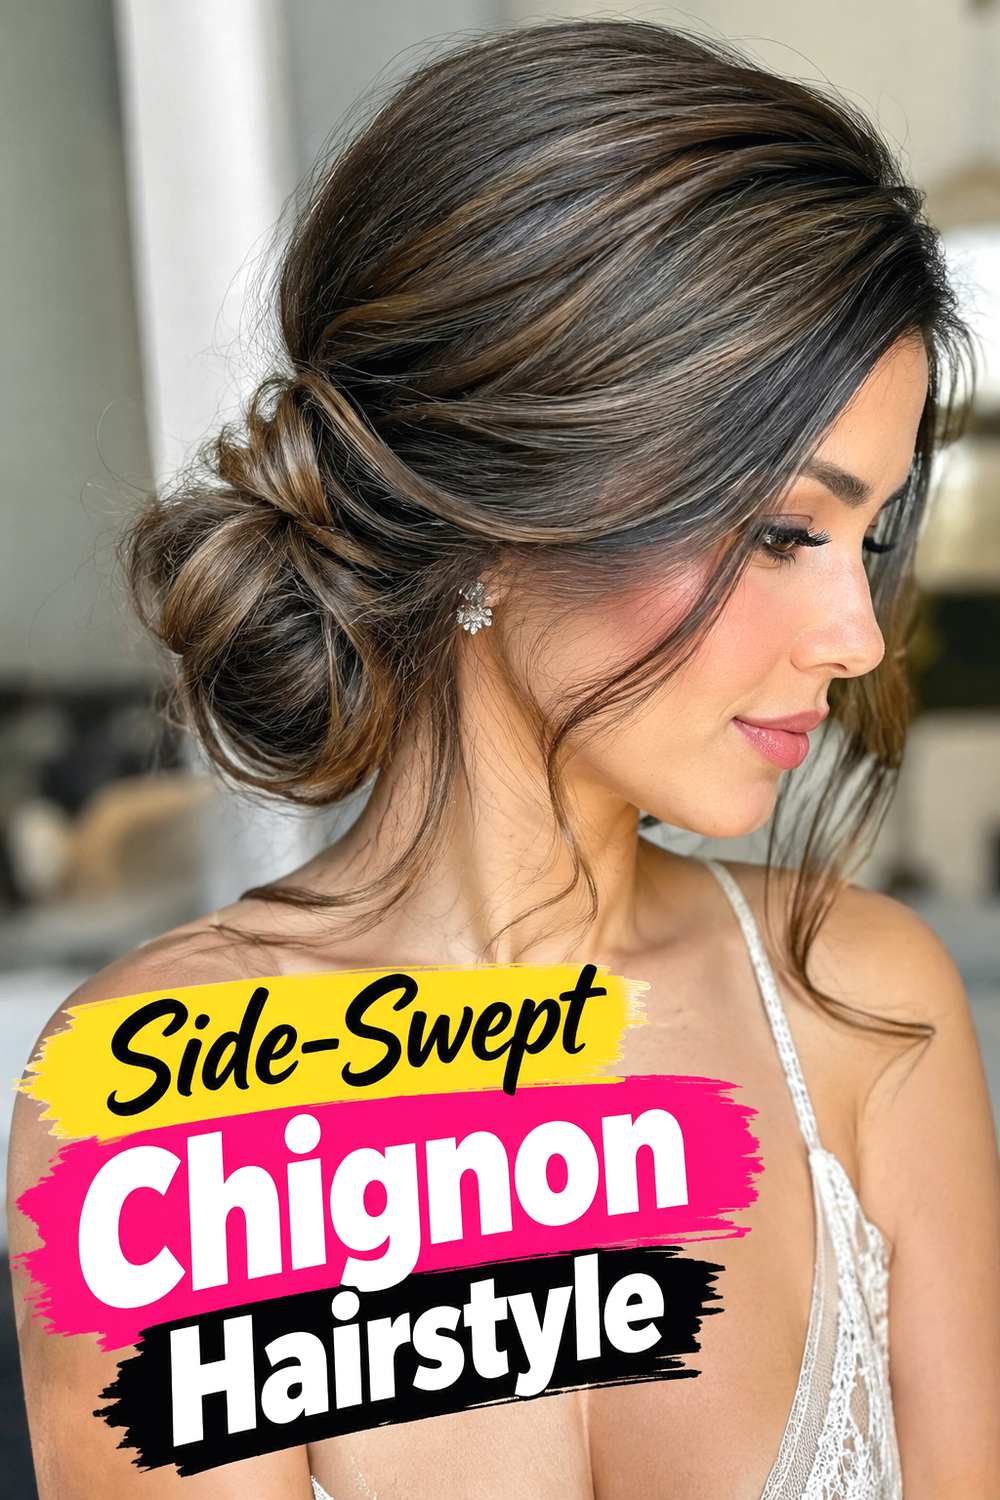
Soft asymmetry makes the side-swept chignon feel glamorous while keeping its overall shape controlled. The front hair follows a broad sweep across the forehead before joining a low chignon positioned close to the nape. Instead of creating obvious volume at the crown, the emphasis stays on the sleek direction of the hair and the glossy curve of the bun. It can be a strong choice for dinners, weddings, or formal events where you want something polished but less severe than a straight center part. Choose the side of the sweep based on your preferred profile or accessory placement, and keep the curve broad enough that it looks intentional rather than like an overgrown fringe pinned away.
Best For
This shape works particularly well with off-the-shoulder necklines, asymmetric dresses, and statement earrings. It also gives you more freedom to adjust the front silhouette around the forehead.
Pro Tip
Set the swept section before building the bun. Once that front shape looks right, gather the remaining lengths carefully so you do not pull the sweep too tight and flatten its curve.
6. Pearl Pin Chignon Hairstyle
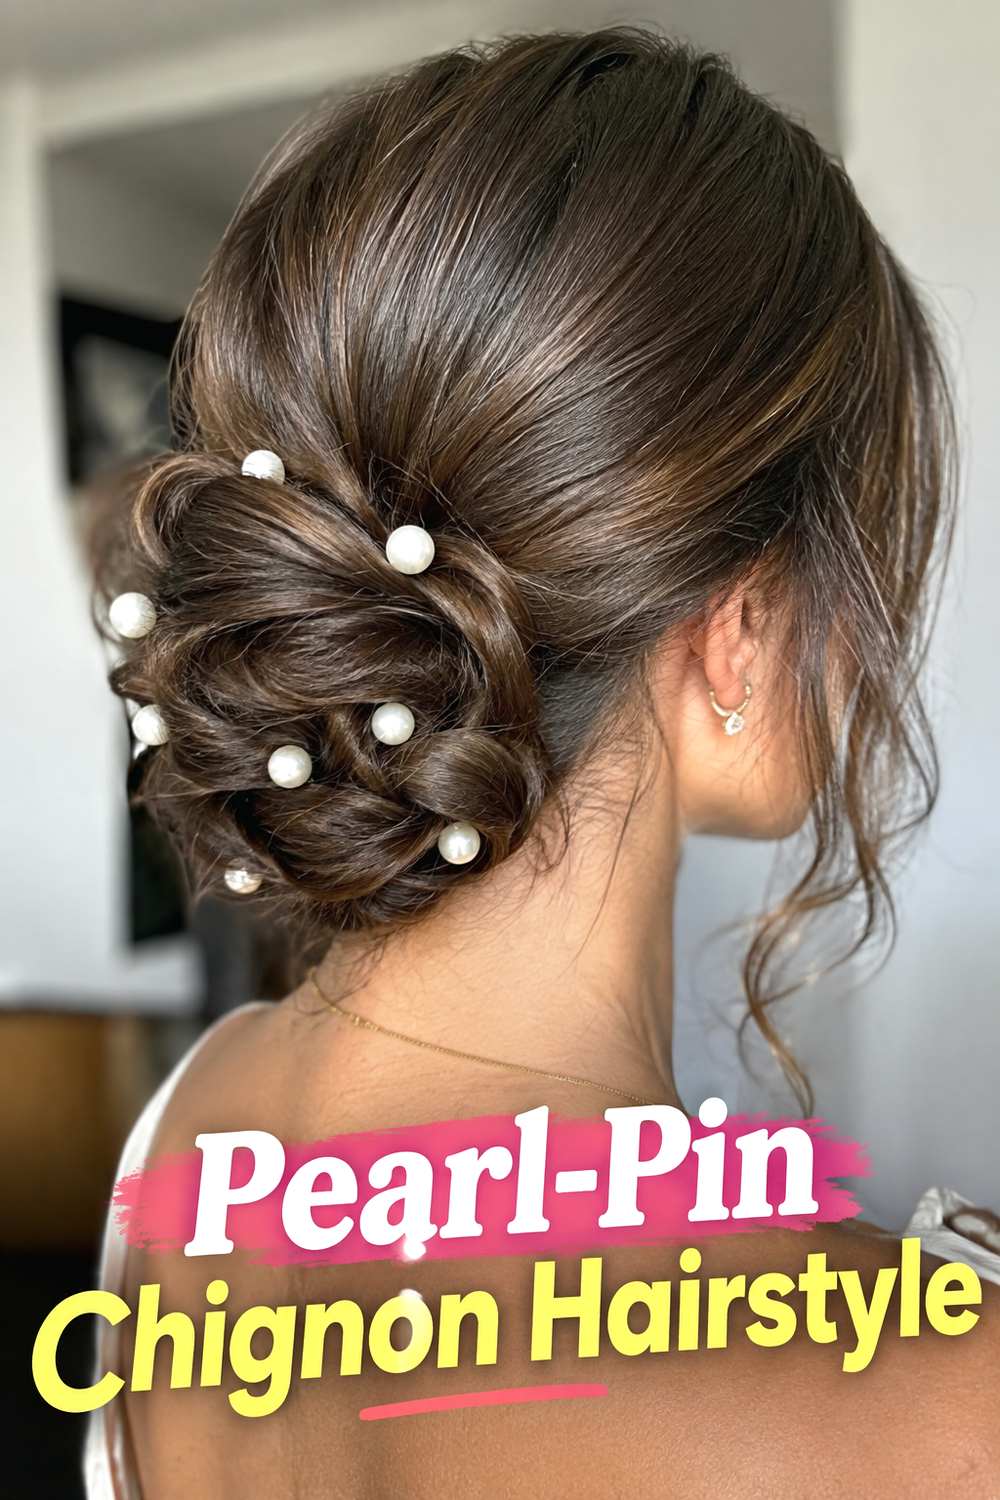
Pearl pins add a dressier finish to a glossy ’90s chignon without requiring elaborate decoration. The strongest version starts with a simple, beautifully smoothed low bun and uses only a few pearls as concentrated accents rather than covering the entire style. Place them along one edge of the knot, through the center of a twist, or in a subtle curved arrangement that follows the chignon’s shape. The contrast between luminous hair and small pearl details creates a refined effect suited to bridal styling, formal dinners, and special occasions. Because accessories can shift as the hair moves, build the bun securely first and treat the pearls as finishing pieces rather than structural pins.
Wear & Maintenance
Check that decorative pins have enough grip to stay anchored without pressing uncomfortably against the scalp. For long events, strategic placement matters more than the number of accessories used.
Why It Works
Pearls reinforce the clean elegance of the hairstyle while adding texture and light. Limiting the embellishment keeps the result closer to polished ’90s minimalism than heavily ornamented modern bridal hair.
7. Face Framing Chignon Hairstyle
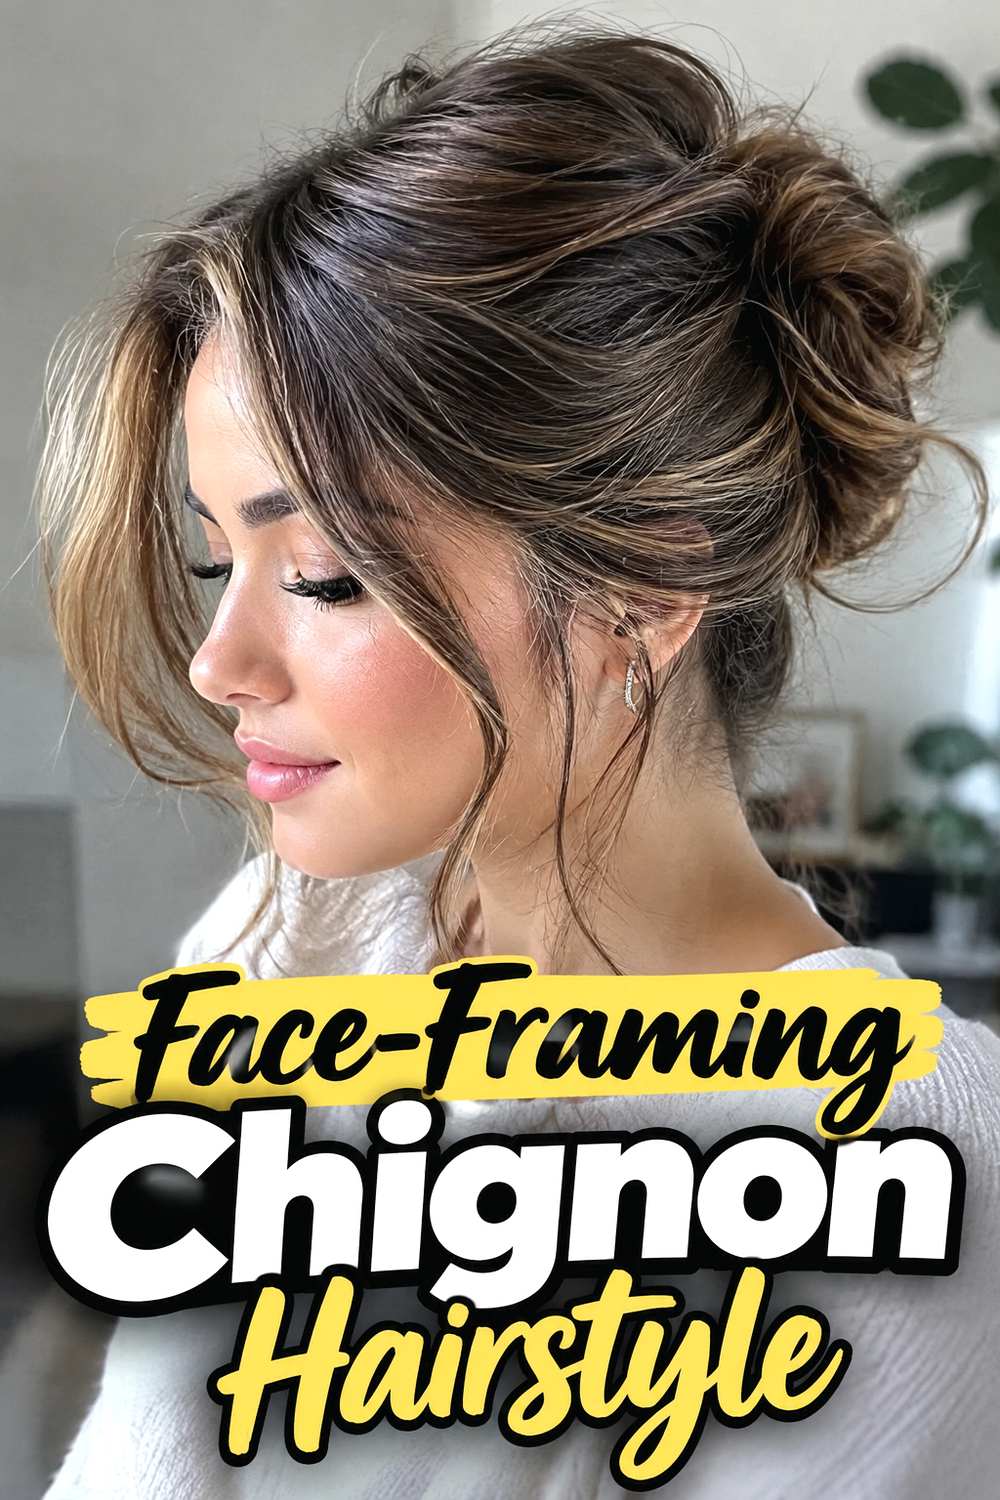
Leaving two slim face-framing pieces loose instantly softens the precision of a glossy chignon. The main body remains sleek and low, but fine sections near the temples create movement around the cheeks and jaw for a more relaxed interpretation of the ’90s updo. The tendrils can stay nearly straight, take on a slight bend, or curve gently inward depending on the rest of the look. Keep them intentionally narrow so they read as part of the hairstyle instead of sections that escaped accidentally. This version can be particularly appealing if fully slicked hair feels too exposed, because the front pieces preserve the polished silhouette while creating a little visual softness around the face.
Styling Notes
Separate the face-framing sections before gathering the ponytail. Trying to pull them out after the bun is finished can loosen the roots and disturb the smooth surface around the temples.
Best For
Choose this variation when you like the elegance of a low chignon but want less severity around the hairline. It works well for romantic evening looks, bridesmaids, and softer formal styling.
8. Rolled French Inspired Chignon Hairstyle
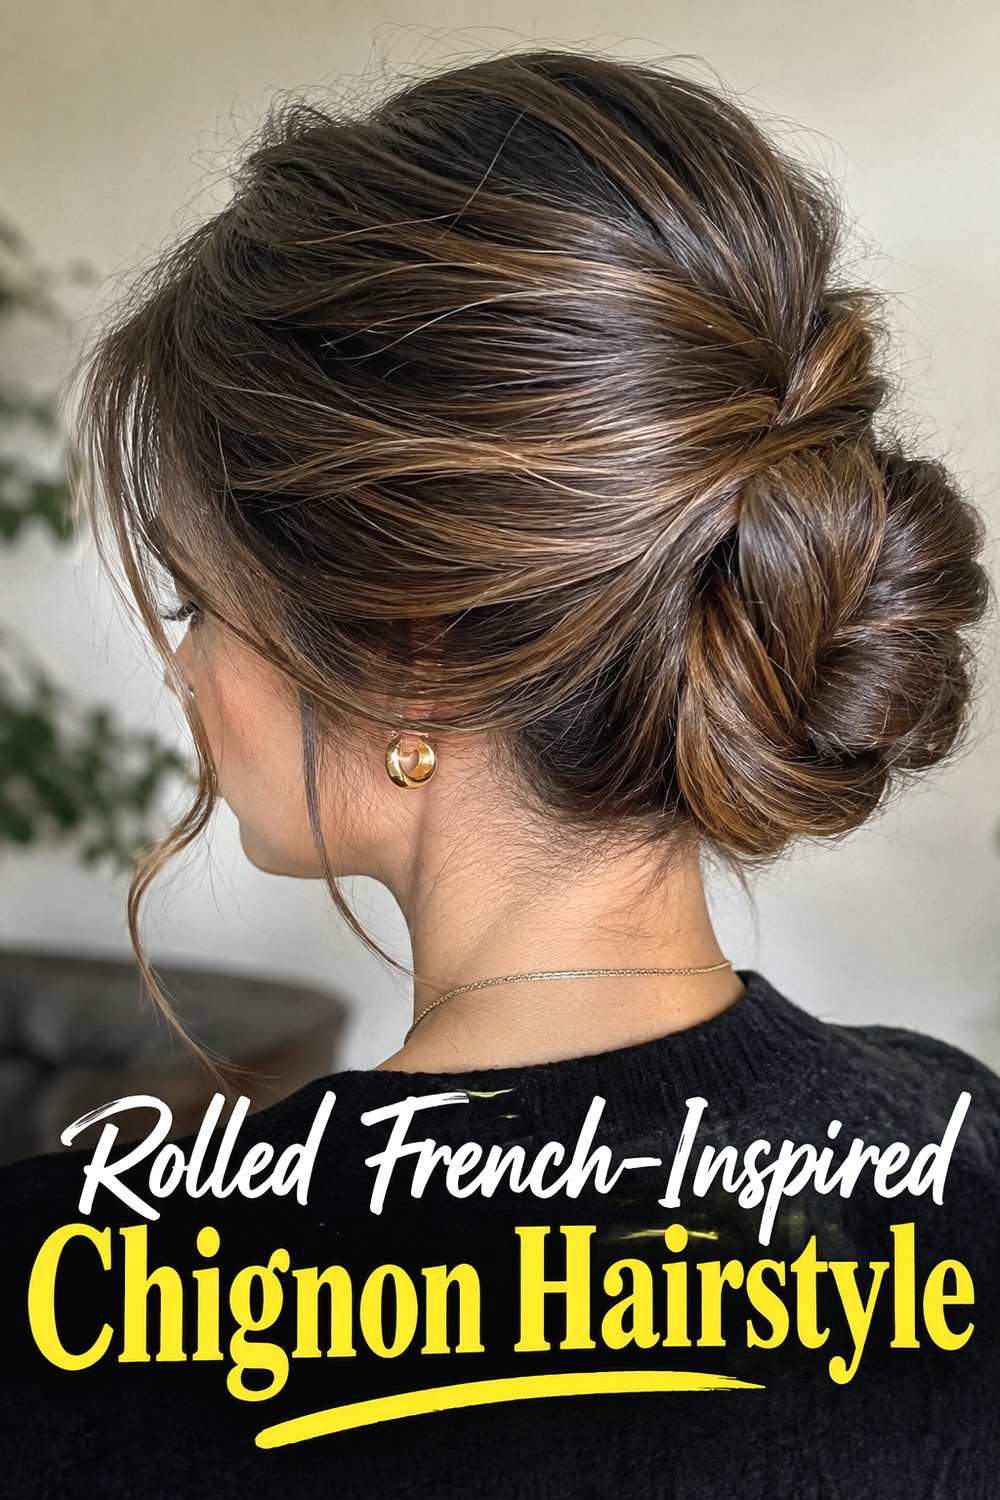
A rolled chignon blends the polished finish of a ’90s updo with the vertical structure of a French-style roll. Instead of forming a circular bun, the hair is drawn back smoothly and folded inward to create a narrow, elongated shape near the lower back of the head. The surface should remain glossy and controlled, while the seam of the roll is neatly concealed with pins. This shape can look especially elegant from the profile because it adds dimension without extending far from the head. Longer hair provides more material to tuck inside, but careful folding matters more than sheer volume. Keep the crown relatively flat if you want the finished style to maintain a true minimalist feel.
Hair Type & Length
Medium-long to long hair offers the easiest foundation for a secure inward roll. Slippery, freshly washed hair may need a little texture spray underneath even when the visible exterior is meant to look glossy.
Pro Tip
Insert pins into the internal fold rather than across the surface. This secures the roll while preserving the uninterrupted, sculpted outer shape.
9. Polished Knot Chignon Hairstyle
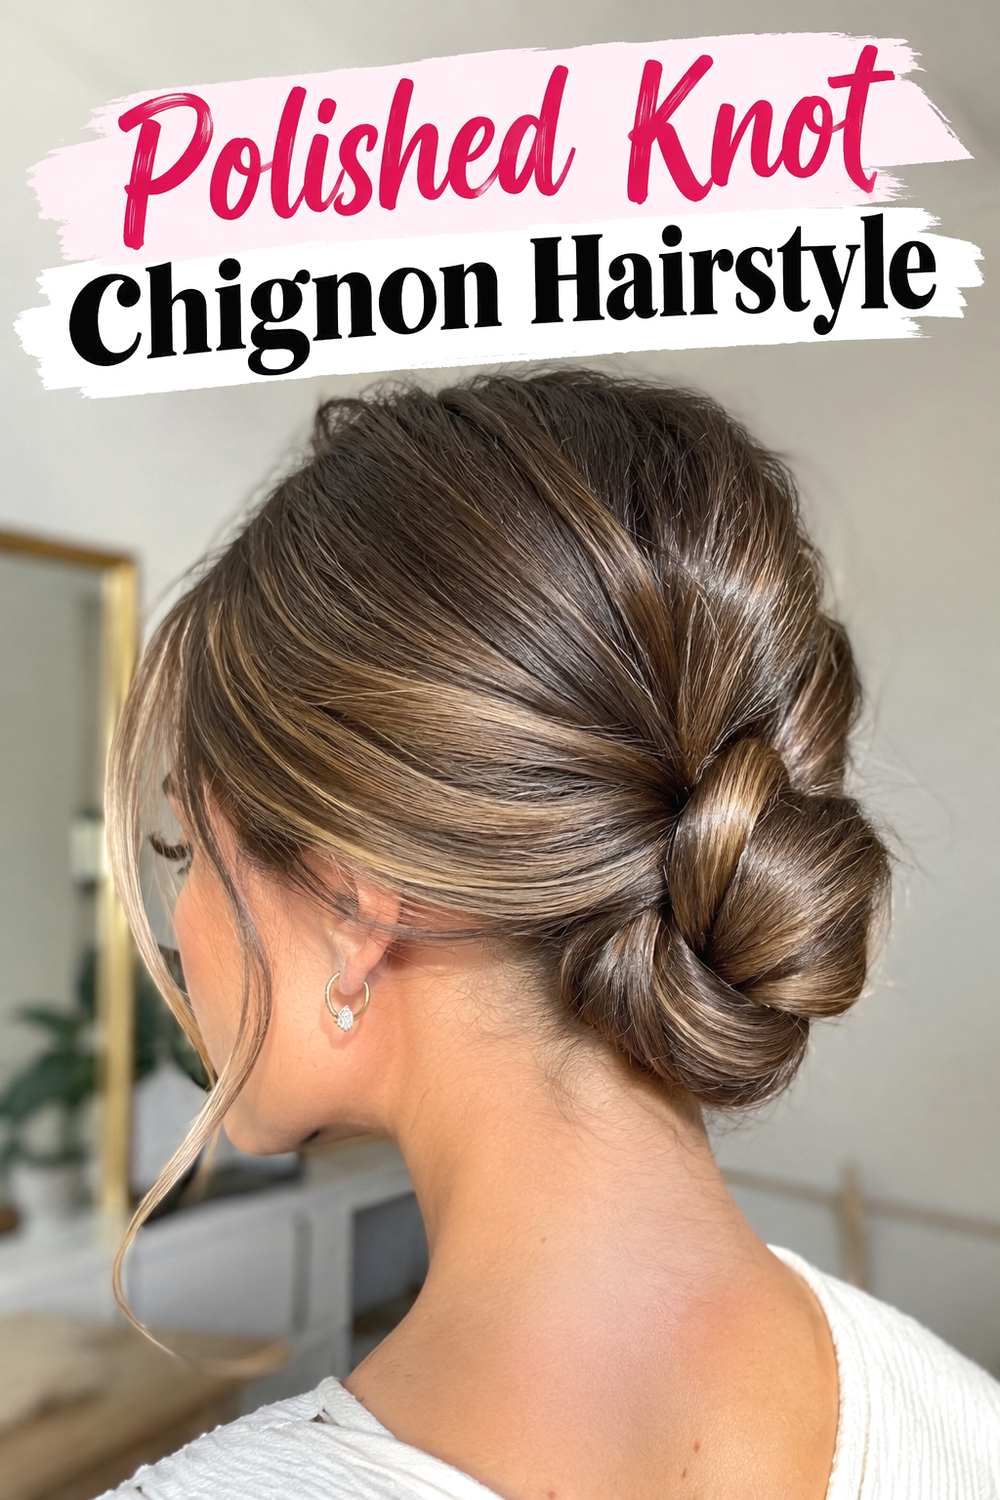
The polished knot chignon turns a simple tie-like movement into a sophisticated low updo. The hair is gathered neatly, crossed or looped into a compact knot, then secured so the ends disappear beneath the finished shape. Unlike a perfectly circular bun, this style can show subtle overlapping sections, which gives the glossy surface extra dimension when it catches the light. It feels refined enough for formal dressing but still has a slightly effortless quality because the construction resembles a natural knot rather than an elaborate arrangement. For the cleanest result, smooth the lengths before creating the knot; once sections overlap, flyaways become harder to correct without flattening the shape.
Why It Works
The knot introduces texture through construction instead of curls or accessories. That makes it a good option when you want visual detail while keeping the overall hairstyle minimal and distinctly polished.
10. High Shine Mini Chignon Hairstyle
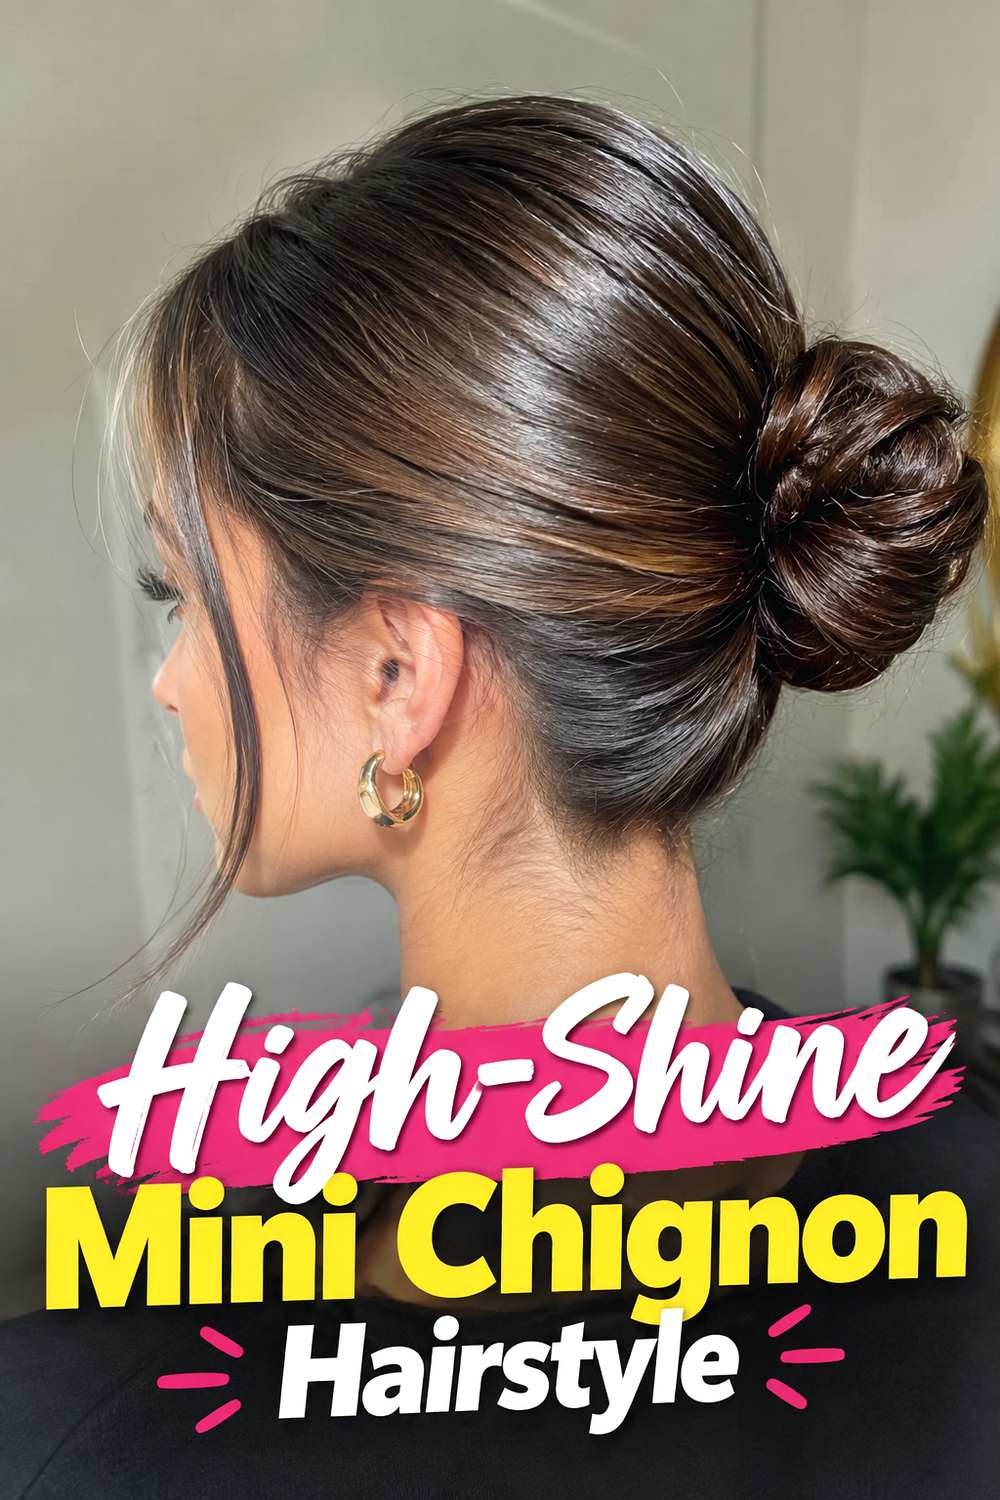
A small, tight chignon is one of the easiest ways to make shorter lengths feel intentionally sleek. The hair is drawn back close to the head and wrapped into a compact mini bun at the nape, with the glossy finish becoming the main styling statement. Because the bun itself is understated, a precise hairline, smooth sides, and controlled ends are especially important to the final effect. This version works well with minimalist clothing and clean makeup because it creates a sharp, uncomplicated frame around the face. If the shortest pieces cannot reach the bun, secure them discreetly rather than forcing excessive tension, which can make the style uncomfortable and distort the natural hairline.
Best For
This chignon is particularly practical for shorter medium lengths that can form a ponytail but do not have enough excess hair for a large bun. It also suits anyone who prefers compact updos.
Styling Notes
Use small pins and a narrow elastic so the hardware does not overwhelm the mini shape. A touch of shine serum on the surface can enhance gloss without making the roots look wet.
11. Slicked Back Chignon Hairstyle
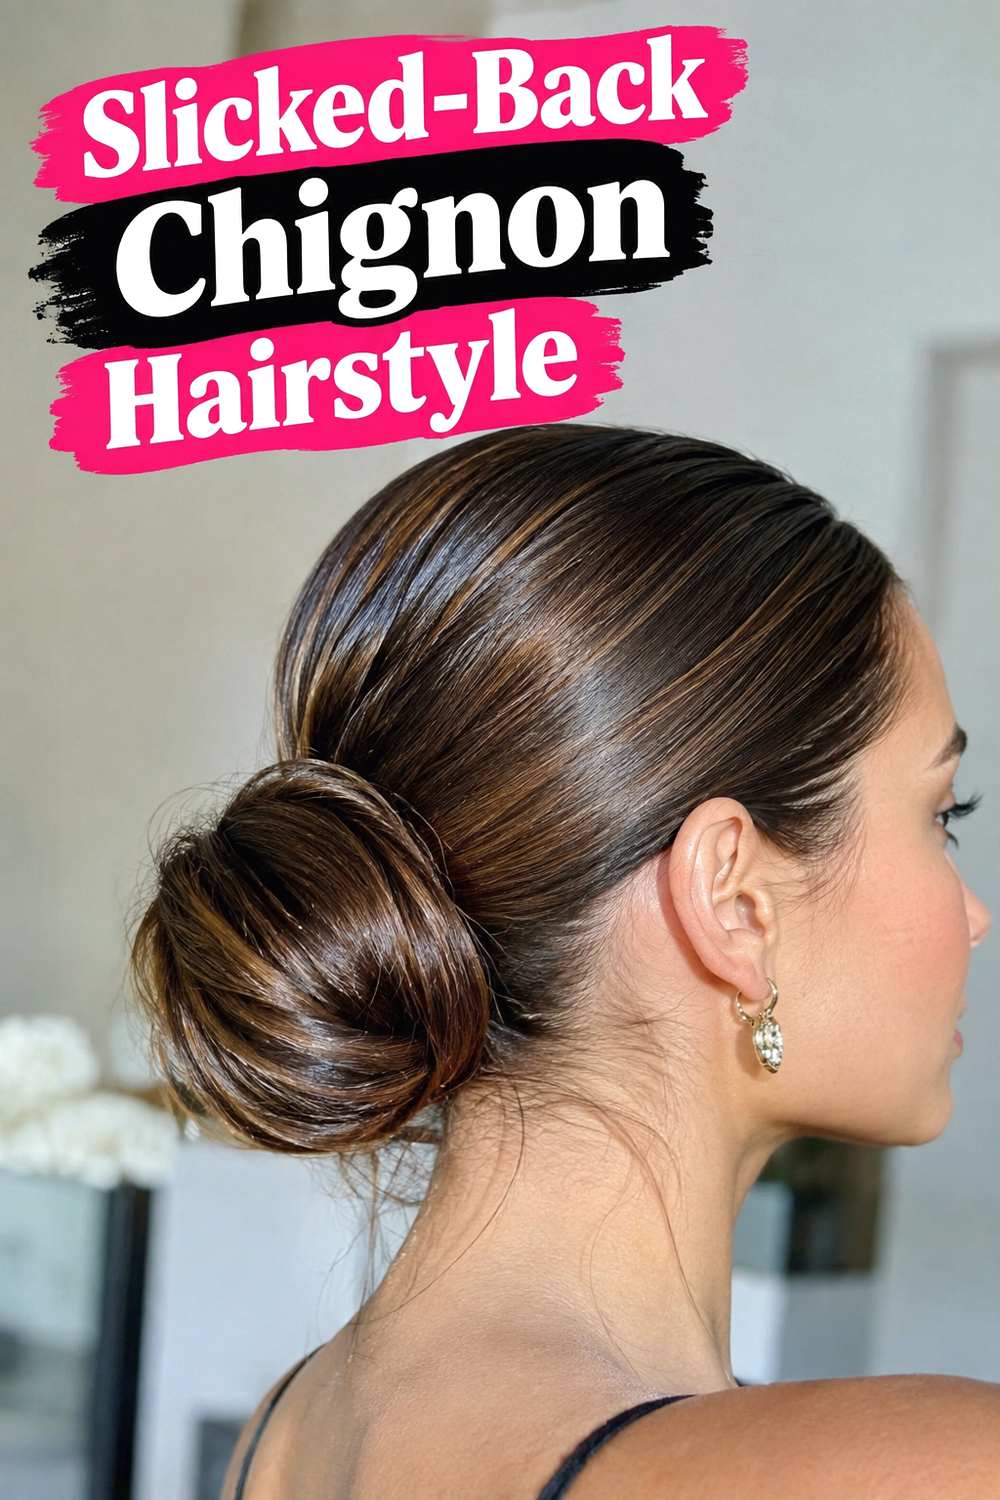
With no visible part, the slicked-back chignon creates one smooth line from the forehead to the low bun. It is a strong, streamlined interpretation of the ’90s aesthetic and works best when the hair follows the shape of the head without unnecessary crown height. The chignon can stay compact and round or be gently flattened for an even cleaner profile. Because every front section is swept backward, the style naturally highlights the face, ears, and neckline, making earrings or a sculptural collar stand out. The key is maintaining even distribution as you brush the hair back; areas with too much tension can create ridges, while overly loose sections interrupt the polished surface.
Wear & Maintenance
Aim for firm rather than uncomfortable tension. If you are wearing the style all day, a slightly softer hold at the hairline can feel better while still maintaining the sleek visual effect.
Why It Works
Removing the part makes the hairstyle feel especially minimal. The uninterrupted surface places all attention on shine, head shape, and the clean proportions of the chignon.
12. Curved Side Chignon Hairstyle
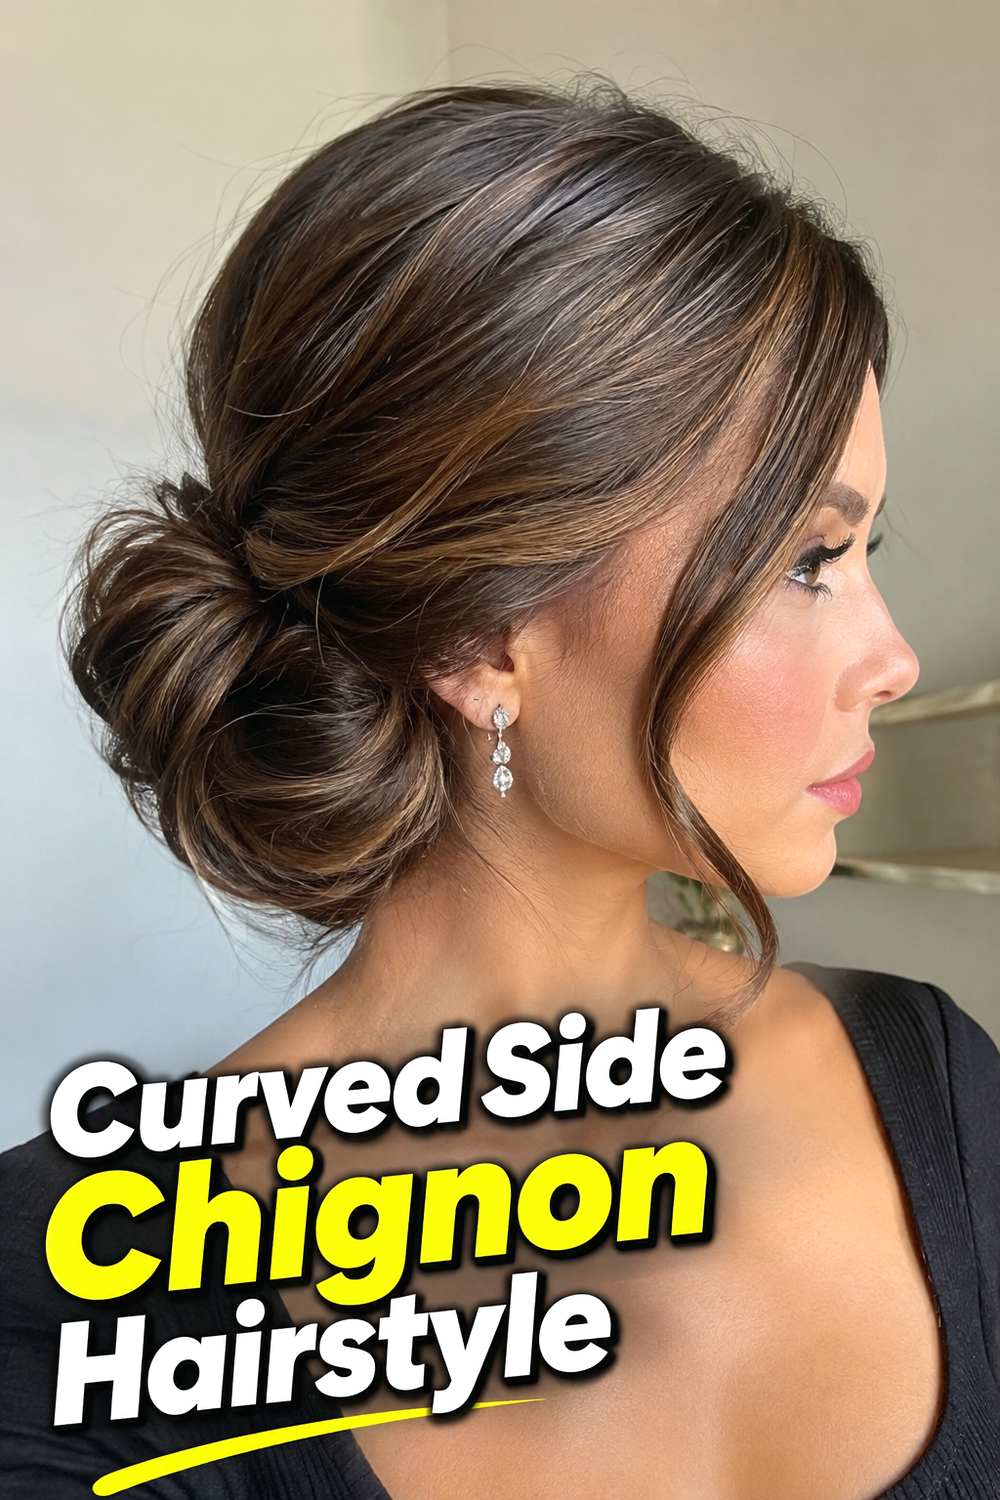
Positioning the chignon slightly to one side creates a graceful curve that becomes visible from both the front and profile. Keep the roots smooth, then guide the lengths toward the lower left or right side of the nape before forming a neat rounded bun. Unlike a dramatically off-center updo, the placement should stay close enough to the neckline to feel elegant and balanced. This subtle shift can make a familiar chignon look more distinctive without requiring complicated braiding or ornamentation. It is also useful when you want the hairstyle to interact with an asymmetric neckline. Make sure the bun is anchored securely, since off-center weight can pull differently than a centrally positioned knot.
Styling Notes
Cross a few pins in the base before wrapping the final lengths if your hair is heavy. A strong internal foundation prevents the side placement from gradually dropping during wear.
Best For
This variation works beautifully for profile photographs, one-shoulder dresses, and occasions where a small asymmetrical detail feels more interesting than a perfectly centered updo.
13. Ribbon Wrapped Chignon Hairstyle
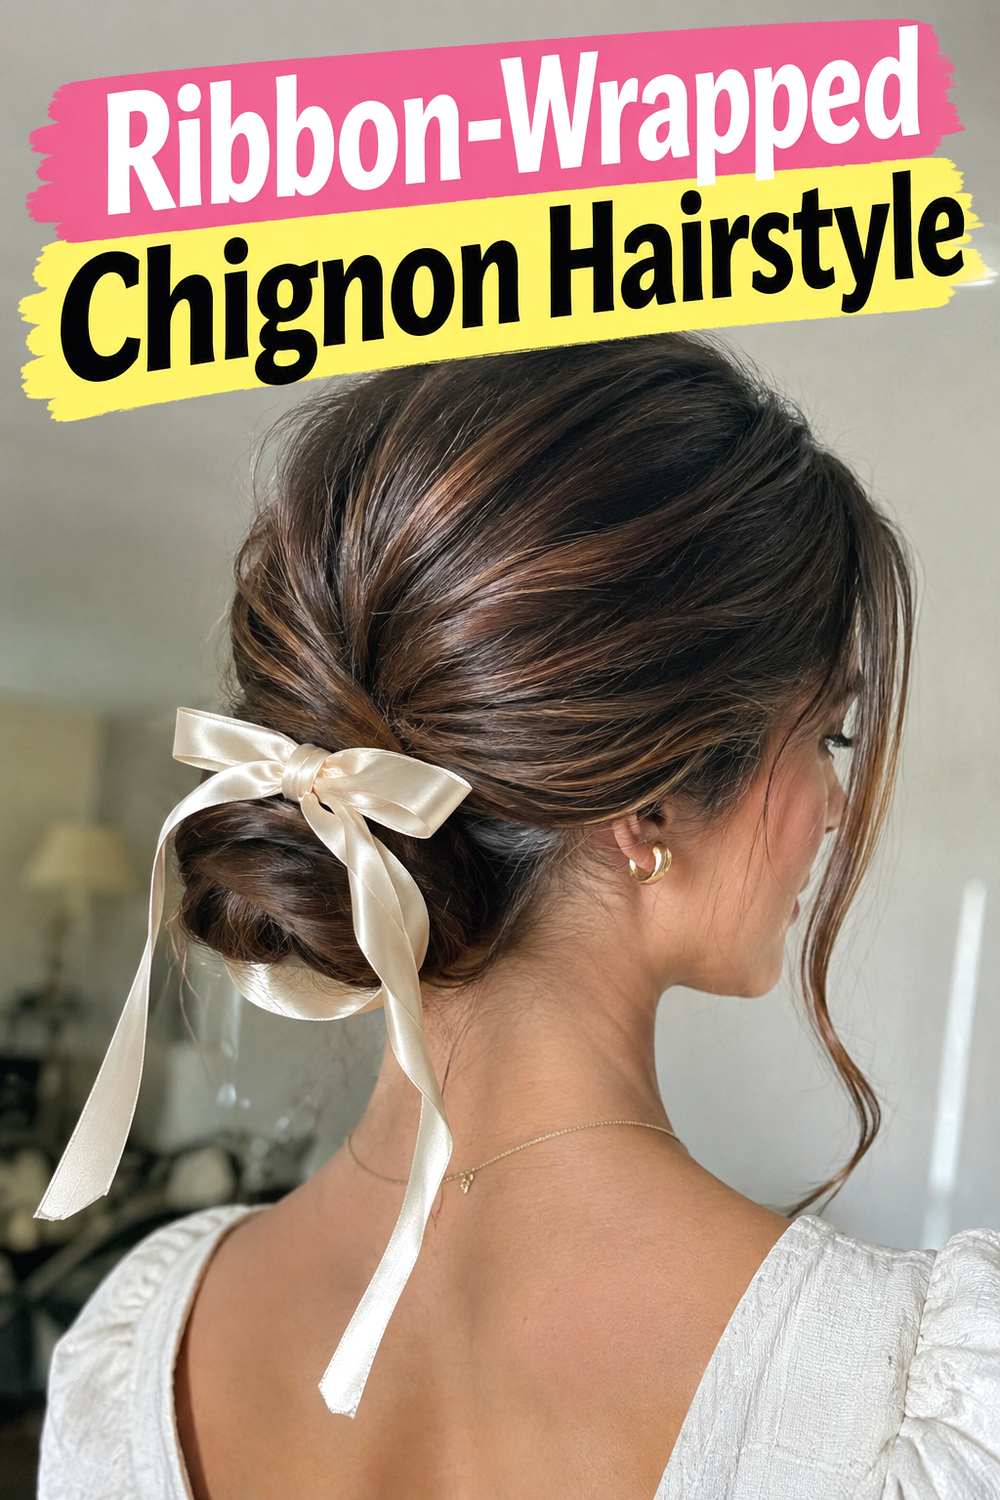
A narrow ribbon around a glossy chignon adds a refined accessory detail while preserving the hairstyle’s clean silhouette. Start with a sleek low bun, then wrap the ribbon once around the base or integrate it into the final coil so only a controlled amount remains visible. Black satin creates a particularly classic ’90s mood, although velvet, ivory, or a tone close to the hair can produce softer variations. Avoid oversized bows if you want the finished look to remain sleek and understated. The ribbon should enhance the outline of the bun rather than hide it. Secure it separately from the structural pins so adjusting or removing the accessory does not loosen the entire chignon.
Pro Tip
Choose a ribbon with enough texture to stay in place against glossy hair. Very slippery satin may need a hidden pin underneath the bun to prevent gradual movement.
14. Crisscross Chignon Hairstyle
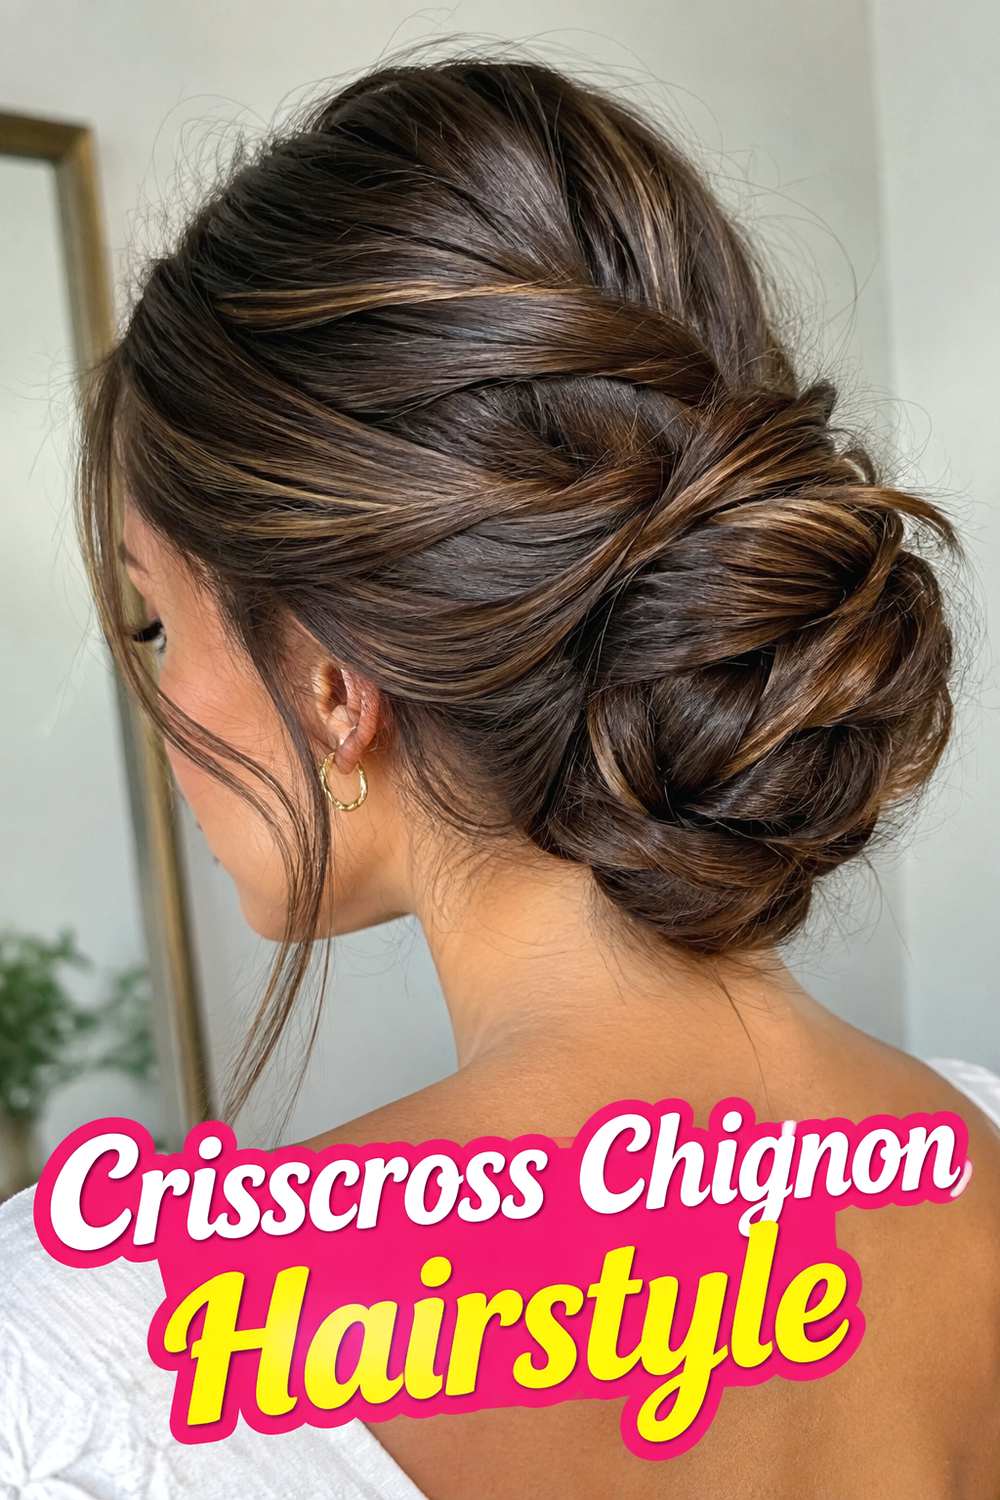
Overlapping sections create a clean crisscross detail that makes this chignon look intricate without relying on curls or braids. Divide the lengths after forming a low ponytail, guide the sections across one another, and tuck the ends beneath the opposite side to create a smooth woven effect over the bun. The roots should remain sleek so the construction at the back becomes the main feature. This style is especially effective on highlighted or dimensional hair because the crossing sections reveal subtle tonal changes while maintaining a glossy overall finish. Keep the overlaps broad and smooth; very thin sections can make the back look busy and move the result away from the simple sophistication associated with ’90s styling.
Hair Type & Length
Longer hair gives you more room to cross and tuck the sections neatly. Medium hair can still work when the overlaps are smaller and the ends are secured close to the center.
Styling Notes
Smooth each section individually before crossing it. Once the layers are pinned together, correcting bumps without disturbing the rest of the chignon becomes much more difficult.
15. Soft Tendril Chignon Hairstyle
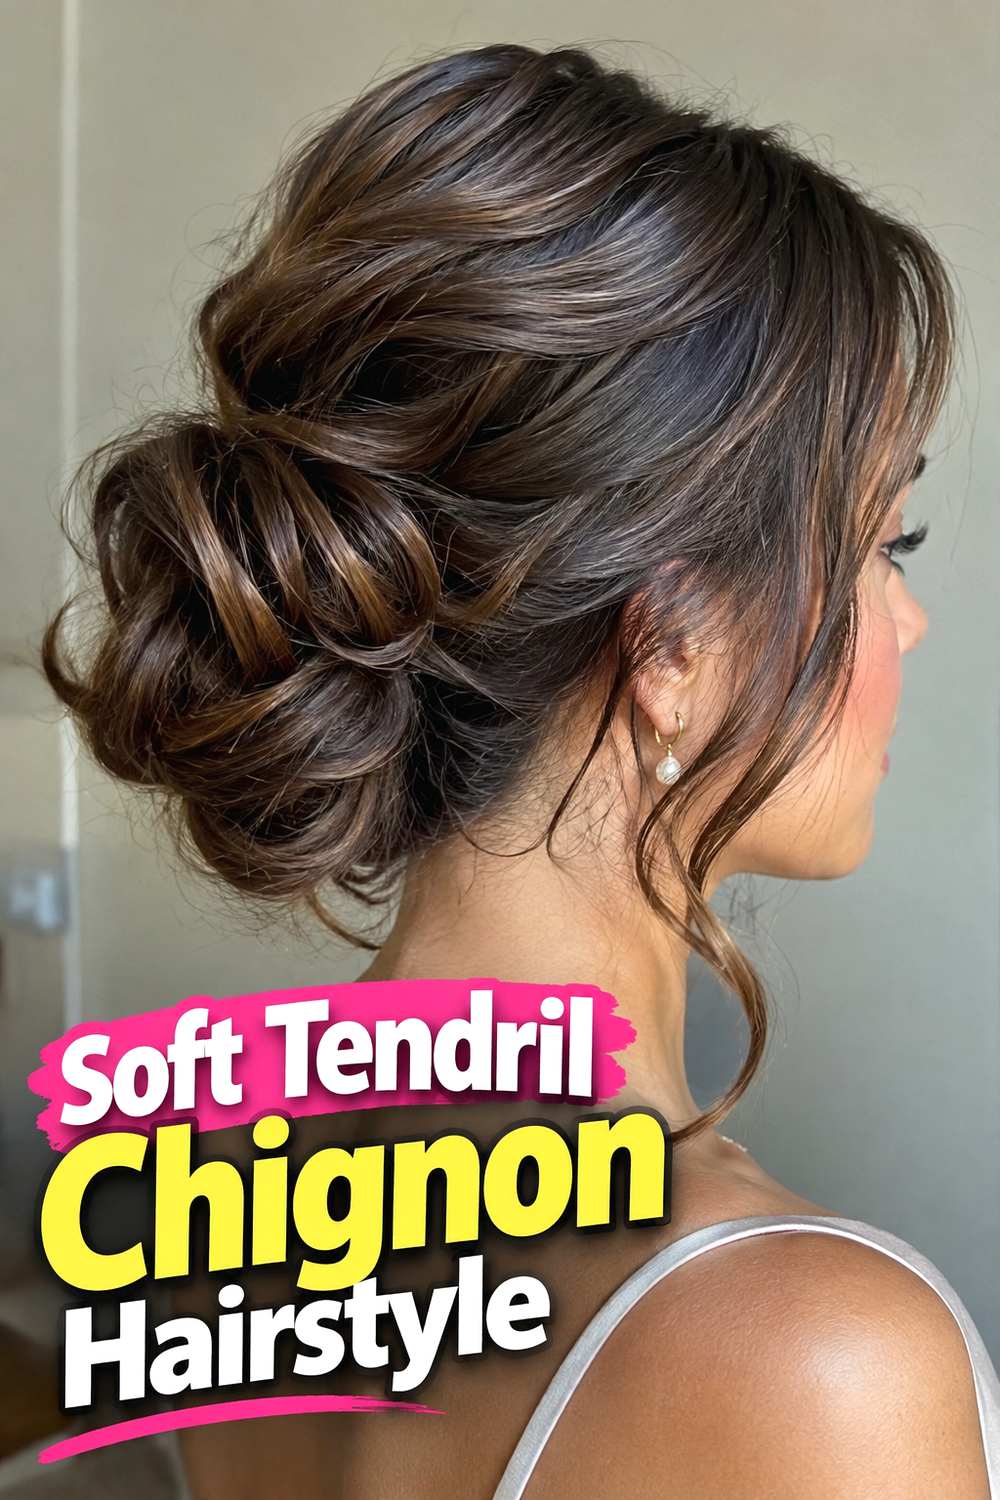
The soft tendril chignon balances a glossy, structured updo with delicate strands around the face. Unlike the straighter face-framing version, these pieces have a gentle curve or loose bend that introduces a romantic finish while the main chignon stays polished and compact. Keep the crown smooth and avoid adding too much texture through the bun; the contrast between the sleek base and softly shaped tendrils is what makes the style visually interesting. It is an easy choice for weddings, date nights, dinners, and formal occasions where you want elegance without an overly strict finish. Shape the tendrils lightly so they retain natural movement instead of becoming stiff ringlets disconnected from the rest of the hair.
Best For
This style suits anyone who wants a polished chignon with a softer outline around the face. It also pairs naturally with delicate jewelry, romantic necklines, and understated evening makeup.
Wear & Maintenance
Keep a light finishing product on the loose pieces, particularly in humid conditions, but preserve a little natural movement. Overloading the tendrils can make them look separated and overly deliberate.
How to Choose the Right Look
Start with your available length. Medium hair is often easiest in a mini, compact, or simple low chignon, while longer lengths give you more freedom for twists, crisscross sections, rolls, and sculpted knots. If your hair is very thick, prioritize a secure internal foundation and avoid concentrating too much weight on one pin. Finer hair can still create a polished chignon, but gentle internal texture or careful folding may help the bun appear fuller.
Texture also affects preparation. Naturally straight or smooth hair may need only light control around the hairline, whereas wavy, curly, or coily textures can be stretched or smoothed to the degree you prefer rather than automatically flattened completely. The goal is a deliberate finish, not erasing natural character.
Consider styling time and maintenance next. A mini chignon, slicked-back bun, or simple center-part style can be relatively straightforward once the base is smooth. Sculpted, rolled, crisscross, and twisted versions require more careful pinning and are better when you have extra time for construction.
For comfort, pay attention to tension and weight. A hairstyle can look glossy without being pulled painfully tight. If you are wearing the look for many hours, choose a secure low placement and use enough pins to distribute the hold rather than relying on one extremely tight elastic.
Finally, match the finish to the occasion. Center parts and slicked-back shapes feel especially minimal, side parts and tendrils add softness, while pearls and ribbons make the style more decorative. Decide whether you want the chignon itself, the front silhouette, or an accessory to be the main visual detail and keep the remaining elements restrained.
Final Thoughts
Glossy ’90s chignons are most convincing when the silhouette stays intentional and the shine looks healthy rather than overly coated. Start with the version that fits your hair length and preferred level of tension, then personalize it through the part, bun placement, loose pieces, or a restrained accessory. Even small adjustments can move the same basic chignon from minimalist daytime polish to an elegant formal updo.
FAQs
1. How do I make a chignon look glossy without making it greasy?
Use smoothing and shine products sparingly, concentrating them on the mid-lengths and surface rather than repeatedly layering oil at the roots. Finish with a small amount only where extra polish is visibly needed.
2. Do glossy ’90s chignons work on curly or textured hair?
Yes. You can smooth the hair fully, stretch it first, or retain more of your natural texture depending on the finish you prefer. The defining elements are the controlled shape, intentional placement, and polished overall appearance.
3. How long does my hair need to be for a chignon?
Hair that can comfortably gather into a low ponytail can often form a small chignon. Longer hair provides more options for sculpted knots, rolls, twists, and overlapping sections.
4. How can I keep a low chignon secure for a formal event?
Create a stable ponytail or pinned foundation first, then anchor the chignon into that base with several well-placed pins. Heavy or very long hair often holds better when the weight is distributed across multiple anchor points.
5. Which ’90s chignon looks softest around the face?
The Face-Framing Chignon Hairstyle and Soft Tendril Chignon Hairstyle provide the most visible softness because they leave intentional pieces around the hairline while keeping the main updo polished.
Save your favorite glossy ’90s chignon hairstyles for your next event, and explore more polished updo inspiration when you are ready to try a new variation.