18 Finger Coil Halo Hairstyle Ideas for Sculpted Natural Texture
Defined spirals arranged into a rounded halo create a sculptural natural-hair look that can feel soft, bold, elegant, or beautifully understated.
Finger coils are formed by smoothing small sections and winding them around a finger to encourage a defined spiral. When those coils are shaped into a halo silhouette, the volume is distributed around the head so the hairstyle feels rounded and intentional rather than concentrated in one area.
The right version depends on coil size, shrinkage, density, length, and how much height you enjoy. Smaller coils create intricate definition, while chunkier sections emphasize volume. Parts, accessories, stretched roots, and carefully shaped edges can also change the overall mood without hiding the natural texture.
Quick List
- Classic Finger Coil Halo Hairstyle
- Center Part Finger Coil Halo Hairstyle
- Side Part Finger Coil Halo Hairstyle
- High Crown Finger Coil Halo Hairstyle
- Low Rounded Finger Coil Halo Hairstyle
- Mini Coil Halo Hairstyle
- Chunky Finger Coil Halo Hairstyle
- Face Framing Finger Coil Halo Hairstyle
- Asymmetrical Finger Coil Halo Hairstyle
- Tapered Finger Coil Halo Hairstyle
- Beaded Finger Coil Halo Hairstyle
- Gold Cuff Finger Coil Halo Hairstyle
- Defined Perimeter Finger Coil Halo Hairstyle
- Soft Frizz Finger Coil Halo Hairstyle
- Stretched Finger Coil Halo Hairstyle
- Sculpted Side Halo Finger Coil Hairstyle
- Double Texture Finger Coil Halo Hairstyle
- Statement Oversized Finger Coil Halo Hairstyle
1. Classic Finger Coil Halo Hairstyle
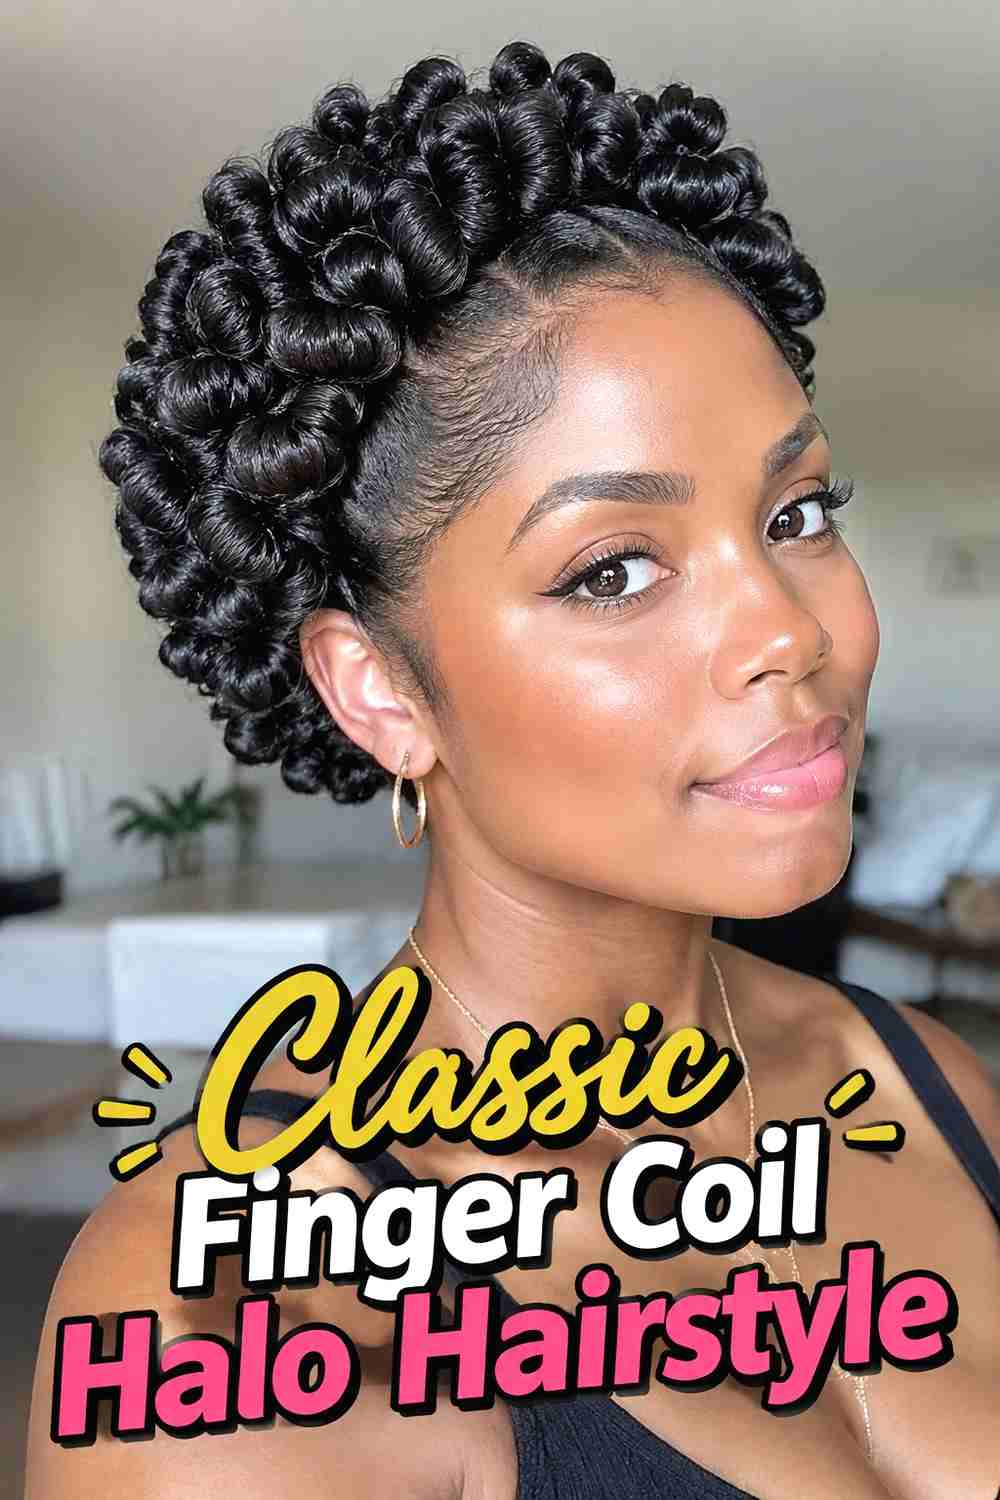
The Classic Finger Coil Halo Hairstyle distributes defined spirals evenly around the head to create a balanced, rounded silhouette. Instead of emphasizing one side or adding dramatic height, the coils frame the forehead, temples, sides, and back with fairly consistent volume. Medium-size coils make the individual spiral pattern easy to see while still combining into a full overall shape. Slight variation between sections keeps the hair believable and prevents the halo from appearing molded. This version works especially well when the ends remain springy and the roots retain enough lift to support the perimeter. The finished look is simple enough for everyday wear but sculptural enough to feel intentional from every angle.
Styling Notes
Shape the halo after the coils are fully set, lifting gently at the roots rather than separating every spiral and losing definition.
Best For
Choose this version when you want an even, classic silhouette that places equal emphasis on coil definition and rounded volume.
2. Center Part Finger Coil Halo Hairstyle
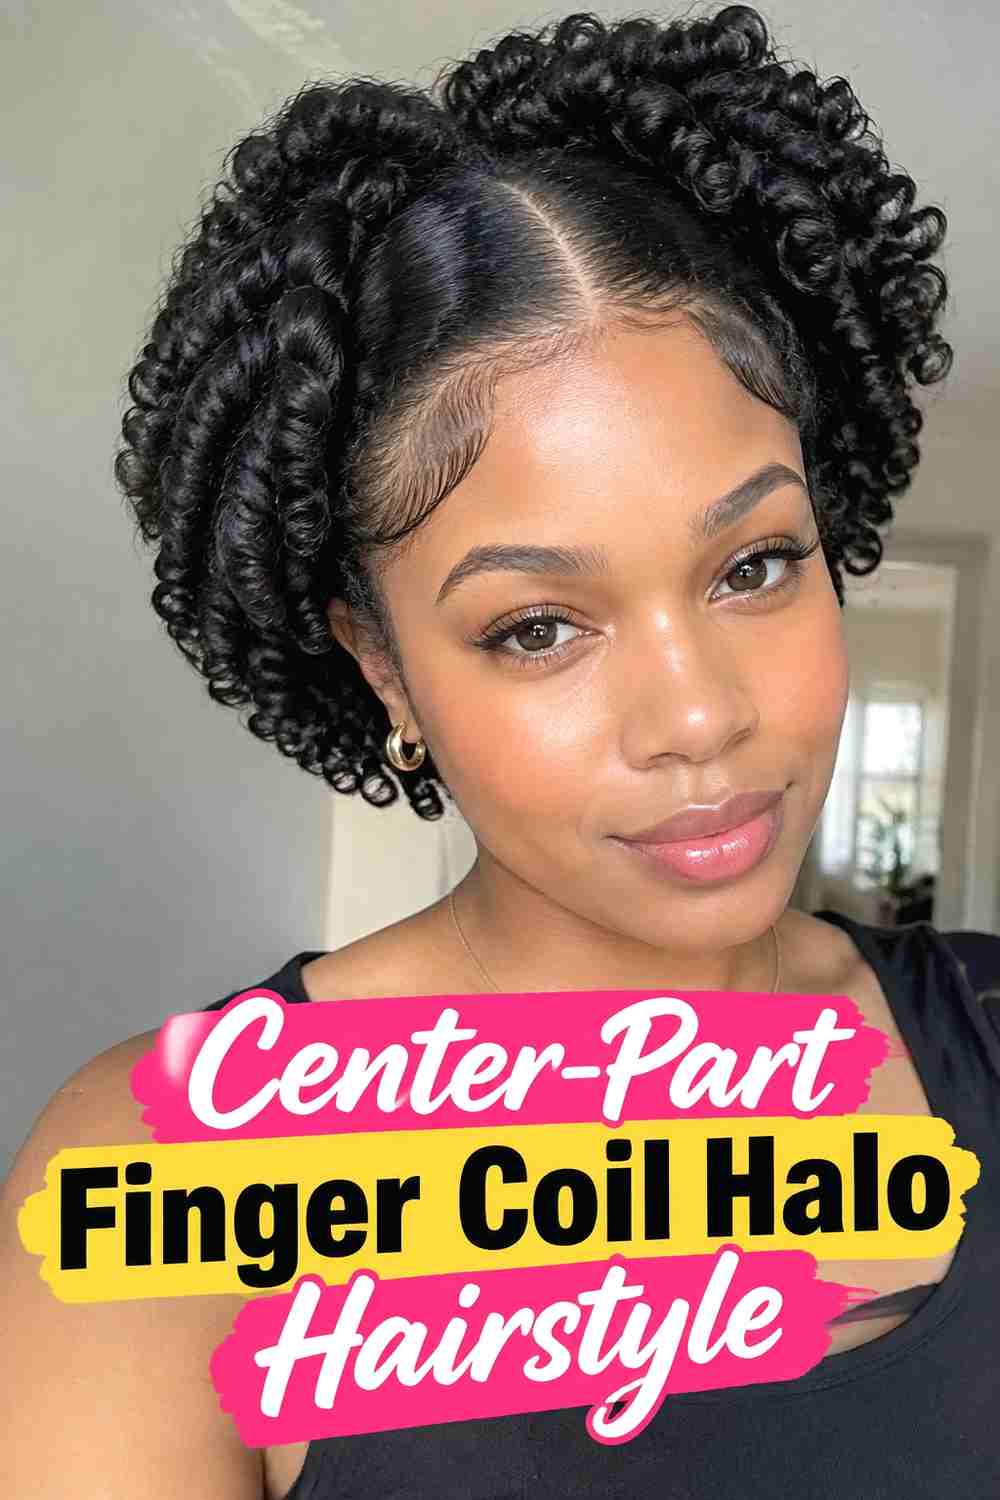
The Center-Part Finger Coil Halo Hairstyle introduces symmetry through the front while allowing the coils to build rounded volume on both sides. A visible middle part separates the first rows of coils, creating a clean frame around the forehead before the texture expands toward the temples and crown. The part does not need to extend deeply through the entire hairstyle; keeping it mostly near the front can preserve fullness through the back. Medium or slightly smaller coils usually work well because they sit neatly around the divided front without becoming too bulky. The result feels organized but still natural, especially when the perimeter maintains a soft halo rather than forming a perfectly geometric circle.
Why It Works
The center part gives the front clear structure while the surrounding coil volume keeps the overall silhouette soft and dimensional.
Pro Tip
Set the part before forming the front coils so you do not need to pull apart finished sections later.
3. Side Part Finger Coil Halo Hairstyle
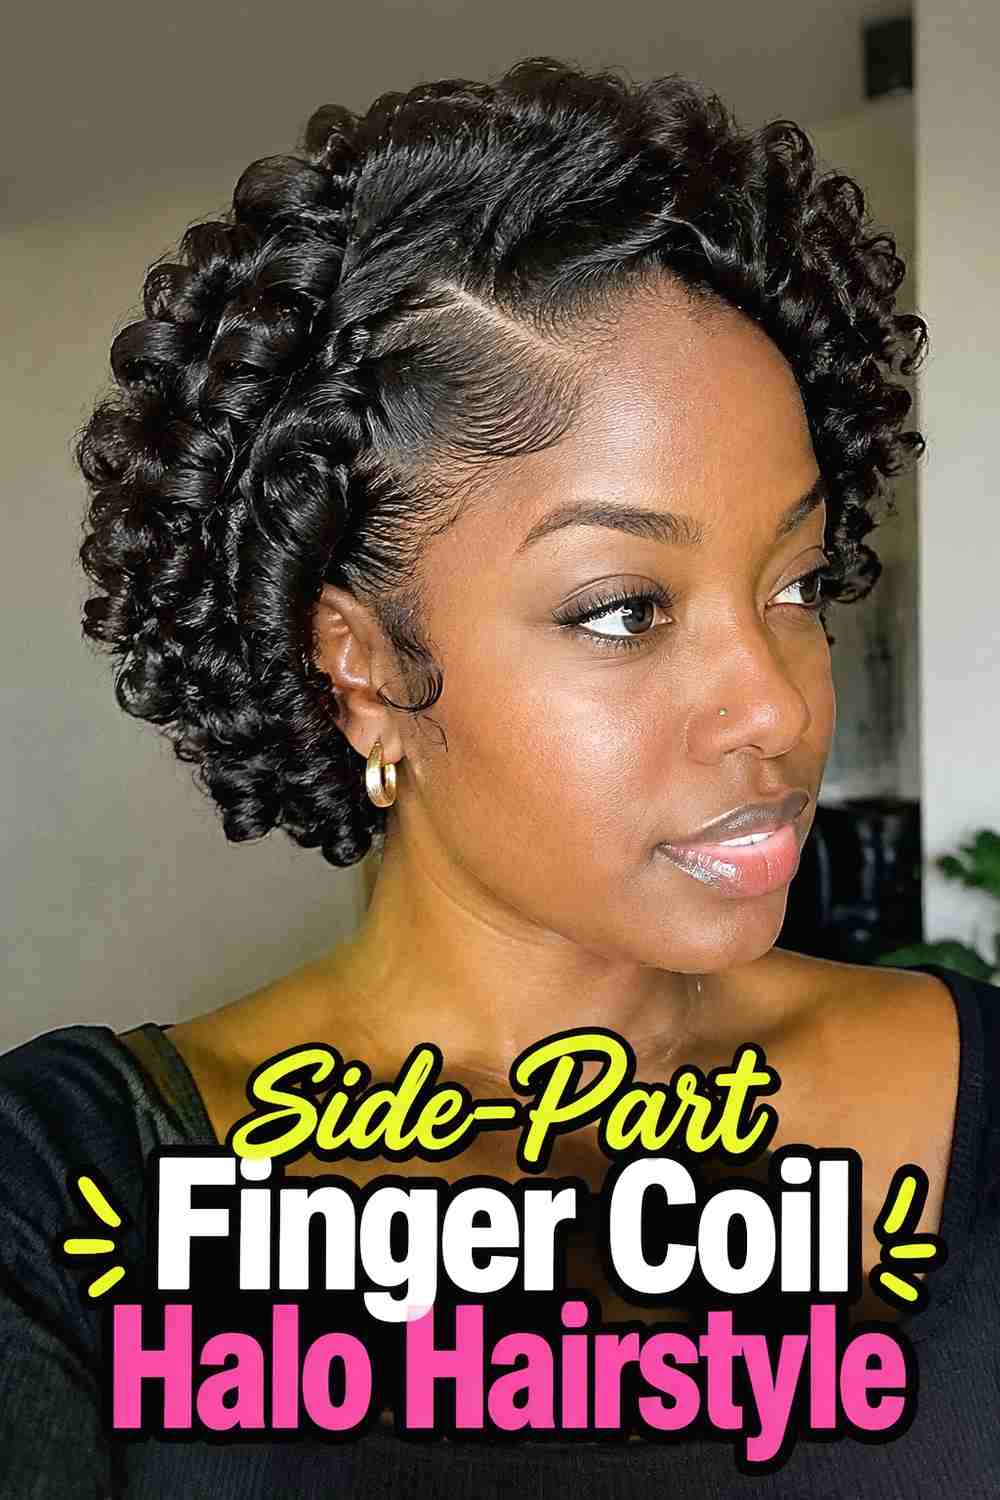
The Side-Part Finger Coil Halo Hairstyle creates asymmetry by allowing more coil volume to sweep toward one side of the face. A defined but natural-looking part gives the fuller side extra movement, while the lighter side can sit closer to the temple or tuck slightly behind the ear. The rest of the hair still forms a rounded halo, so the style retains its sculptural quality from the back. Medium coils show the directional shape clearly without creating too much weight around the part. This variation is useful when you enjoy the volume of a halo but prefer a less symmetrical front. Keeping the roots softly lifted helps the heavier side stay buoyant rather than collapsing toward the face.
Styling Notes
Build the part while the hair is damp, then coil each section in the direction you want it to fall once dry.
Best For
This look suits anyone who prefers an asymmetric frame or likes wearing more volume over one temple.
4. High Crown Finger Coil Halo Hairstyle
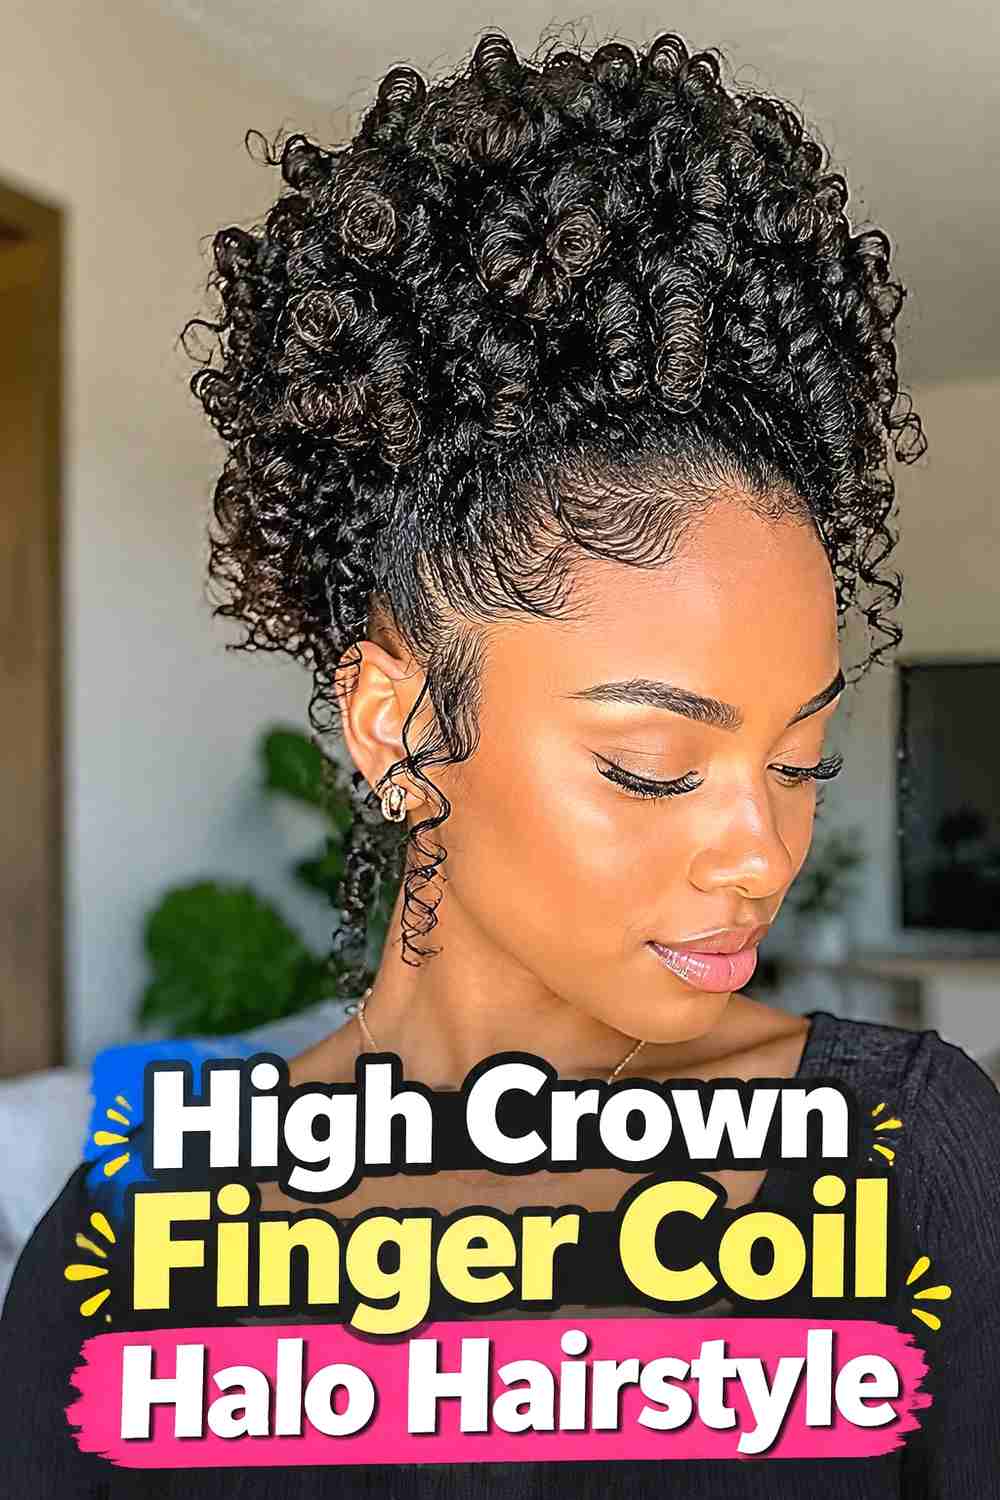
The High Crown Finger Coil Halo Hairstyle concentrates extra lift through the top while maintaining softer volume around the sides. The coils remain individually defined, but the roots near the crown are gently lifted after drying so the silhouette rises noticeably above the head. The lower perimeter can stay closer to the cheeks and nape, creating a tapered transition from height to softness. This approach works especially well on dense hair because there is enough texture to create elevation without relying on extreme manipulation. The finished shape feels bold and photographic while still respecting the natural spring of each coil. A clean front hairline keeps the extra height looking deliberate rather than uncontrolled.
Styling Notes
Lift only the crown roots with fingers or a pick, stopping before the teeth reach the coiled ends.
Wear & Maintenance
Preserve the crown shape overnight with minimal compression and reshape gently rather than repeatedly separating the coils.
5. Low Rounded Finger Coil Halo Hairstyle
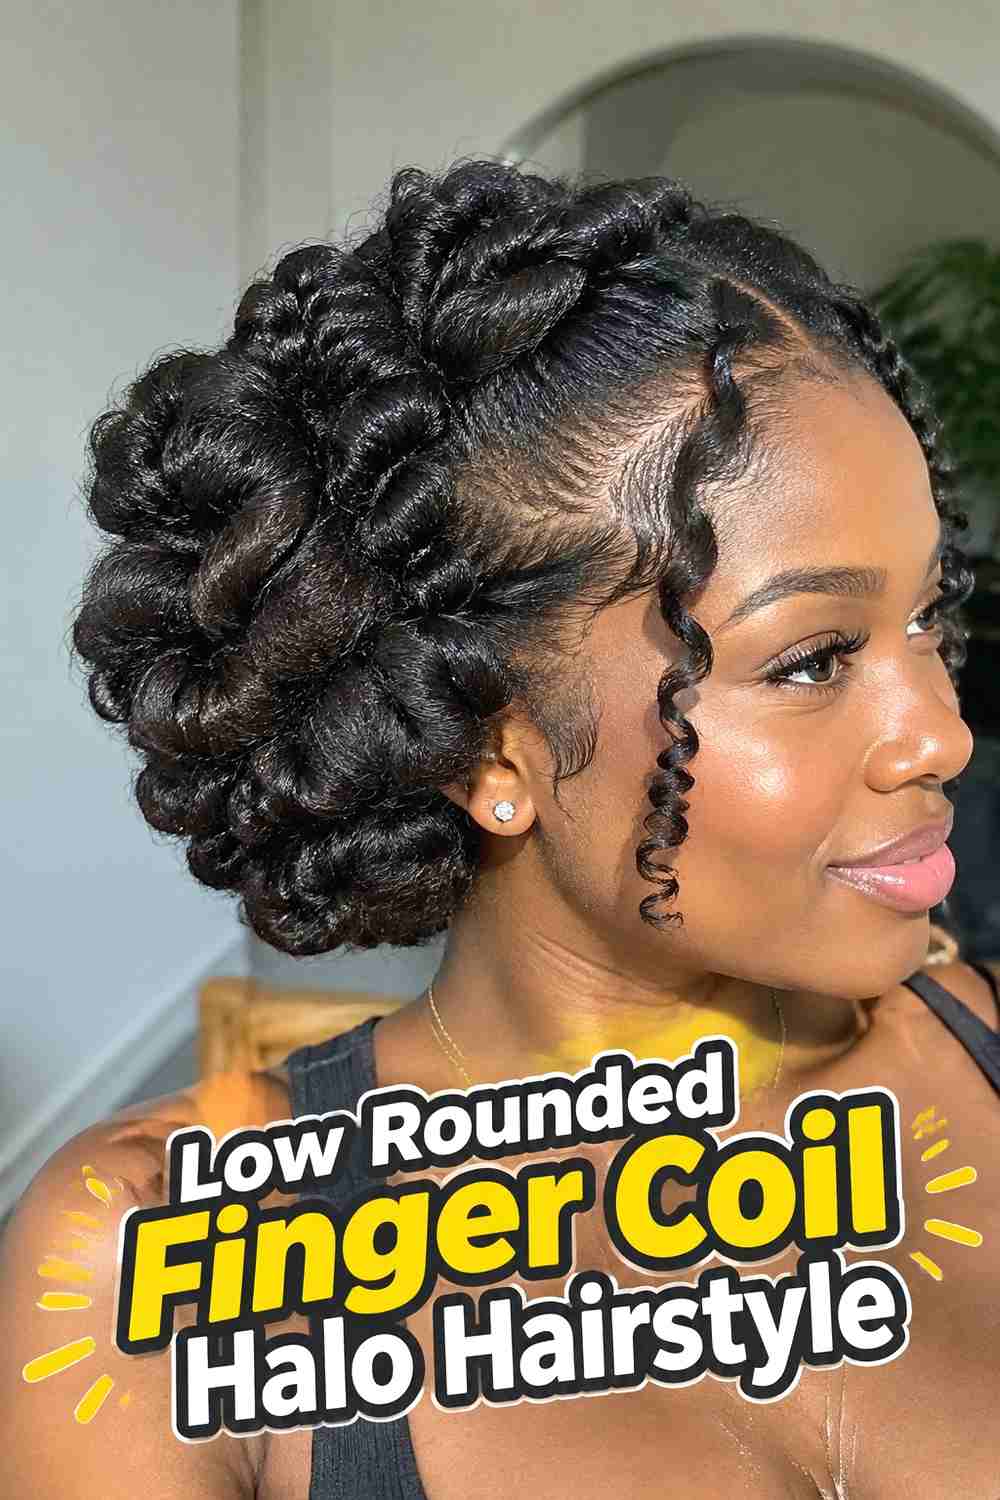
The Low Rounded Finger Coil Halo Hairstyle keeps most of the fullness around the sides, temples, and lower back instead of building significant height at the crown. The result is a compact halo that follows the natural shape of the head while still showing abundant coil texture. Shorter hair and stronger shrinkage can work particularly well with this silhouette because the coils naturally sit closer to the scalp. Keeping the perimeter softly rounded helps the style feel intentional without forcing every section to match perfectly. This variation can also be comfortable for everyday wear because there is less height to preserve. The coils themselves remain the main feature, with minimal parting and decoration.
Hair Type & Length
Short to medium natural hair can create this shape especially well when the coils have enough spring to form a dense rounded perimeter.
Why It Works
The lower volume creates a neat sculptural outline while allowing natural shrinkage to contribute to the finished shape.
6. Mini Coil Halo Hairstyle
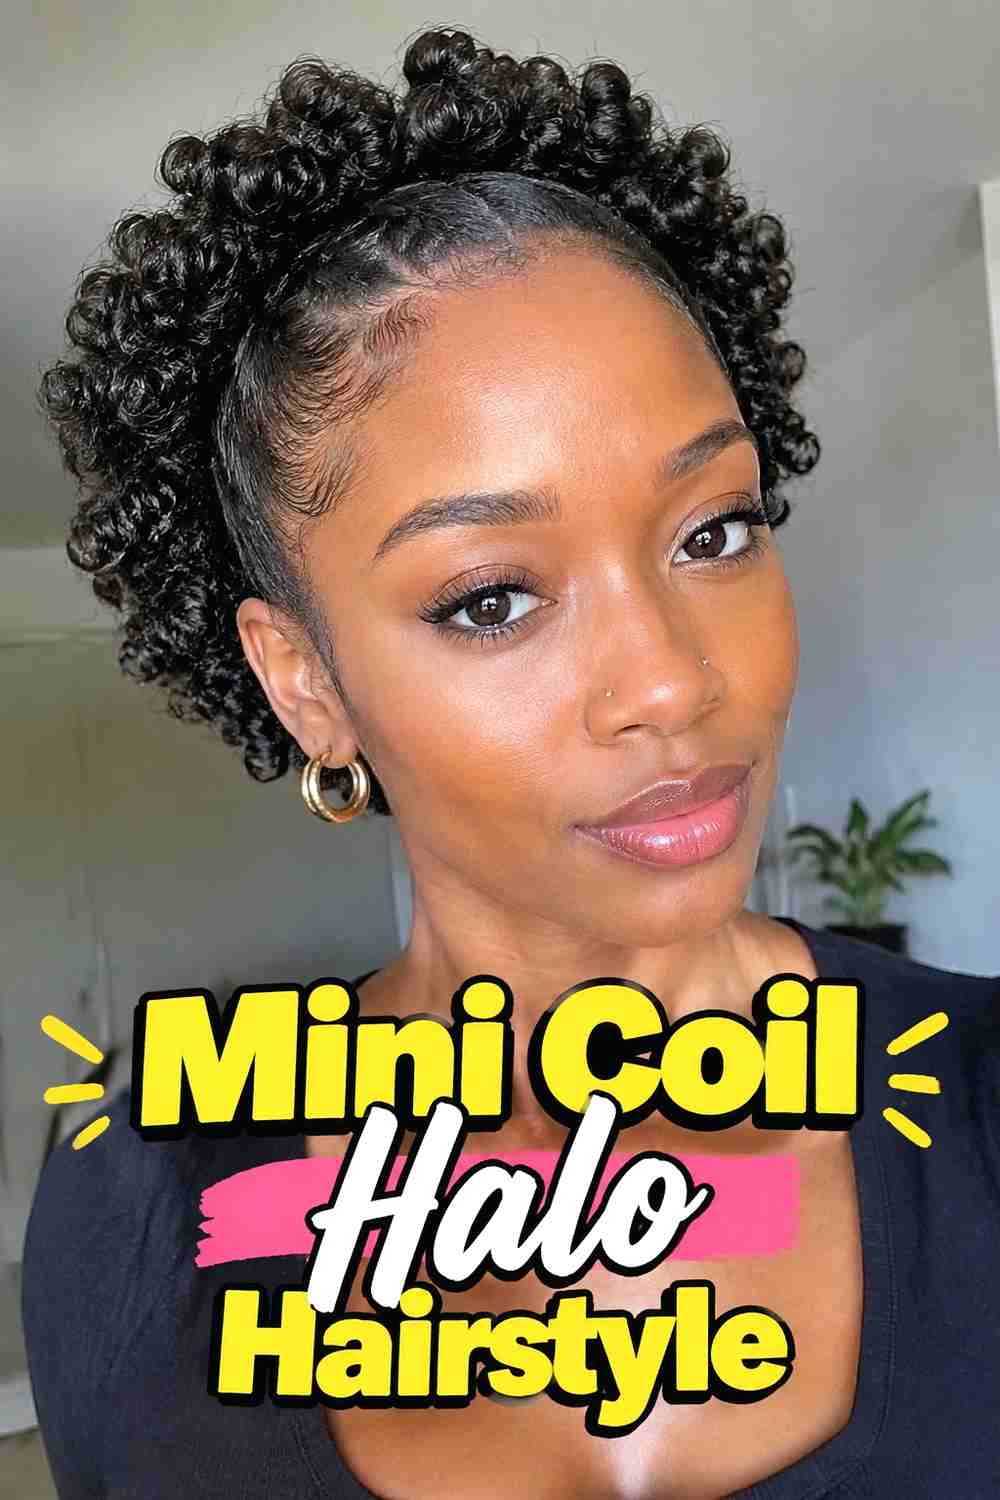
The Mini Coil Halo Hairstyle uses many small sections to produce intricate spiral definition across the entire head. Each coil stays relatively narrow, creating a dense textured surface that looks detailed even when the overall halo remains compact. Because smaller coils can take more time to create, clean sectioning helps keep the installation manageable and ensures the finished pattern feels balanced. Once dry, the roots can be lifted lightly to increase fullness without pulling apart the tiny spirals. This version is especially appealing when definition matters more than dramatic size. Natural variations between individual coils keep the hairstyle lively, while the rounded perimeter ties the many small sections into one cohesive halo.
Styling Notes
Work with consistent small sections and enough slip to form smooth spirals without repeatedly rewinding the same hair.
Wear & Maintenance
Reduce unnecessary handling once the coils are set if you want the fine definition to remain visible for longer.
7. Chunky Finger Coil Halo Hairstyle
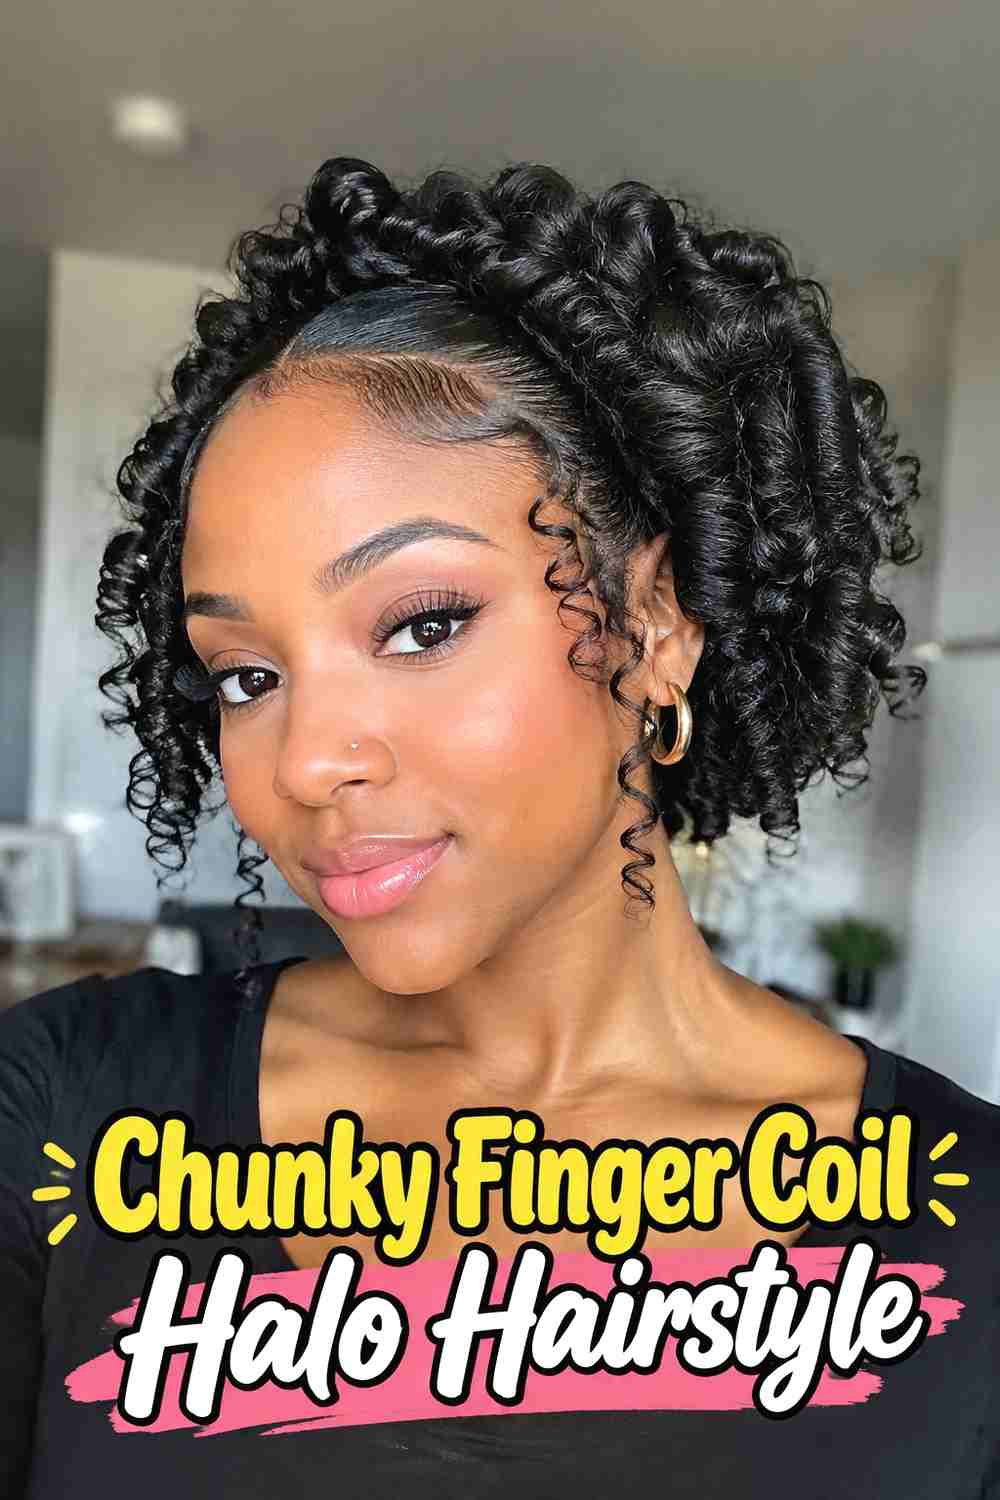
The Chunky Finger Coil Halo Hairstyle uses larger sections to create bold, visible spirals and a fuller-looking perimeter. Instead of dozens of tiny coils, the hair is divided into broader sections that form thicker, springy shapes around the head. The larger pattern gives the style a relaxed, graphic quality and can make the halo appear especially voluminous from the side. Coil size should still suit the hair’s density so the sections do not become too heavy or separate awkwardly at the roots. Slightly fluffing the base after drying helps connect the larger coils into one rounded silhouette. The finished result feels expressive and textured without requiring intricate micro-sectioning.
Best For
Choose this version when you prefer bold coil definition and fewer, more visible spiral sections.
Pro Tip
Keep the root sections proportional to the amount of hair being coiled so the base does not become bulky or unstable.
8. Face Framing Finger Coil Halo Hairstyle
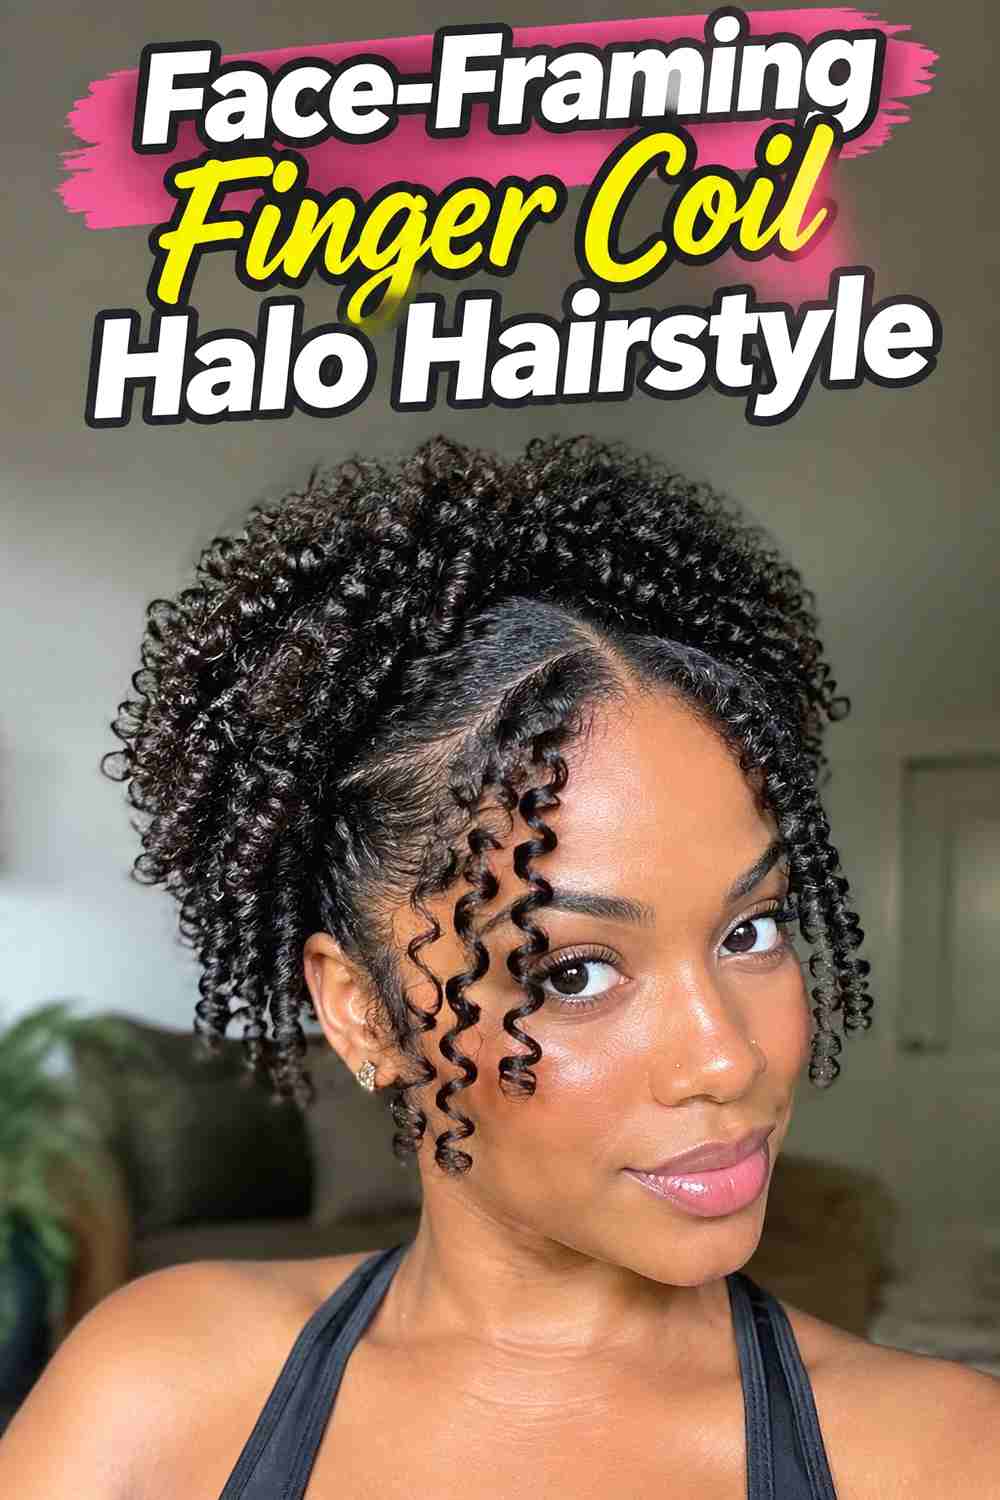
The Face-Framing Finger Coil Halo Hairstyle positions several defined spirals around the forehead, temples, and cheek area while the rest of the hair builds into a rounded crown. Front coils can be slightly longer or more separated so they move naturally near the face instead of blending completely into the halo. This creates softness without needing bangs or straightened tendrils. The surrounding volume should remain balanced enough that the front pieces feel connected to the hairstyle rather than hanging independently. Medium coils are particularly effective because they retain enough structure to frame the face clearly. The result combines sculptural fullness with a gentler, more personalized front silhouette.
Styling Notes
Decide which front sections will frame the face before setting the rest of the halo so their placement remains intentional.
Why It Works
Defined front coils soften the perimeter while the rounded back and sides preserve the strong halo shape.
9. Asymmetrical Finger Coil Halo Hairstyle
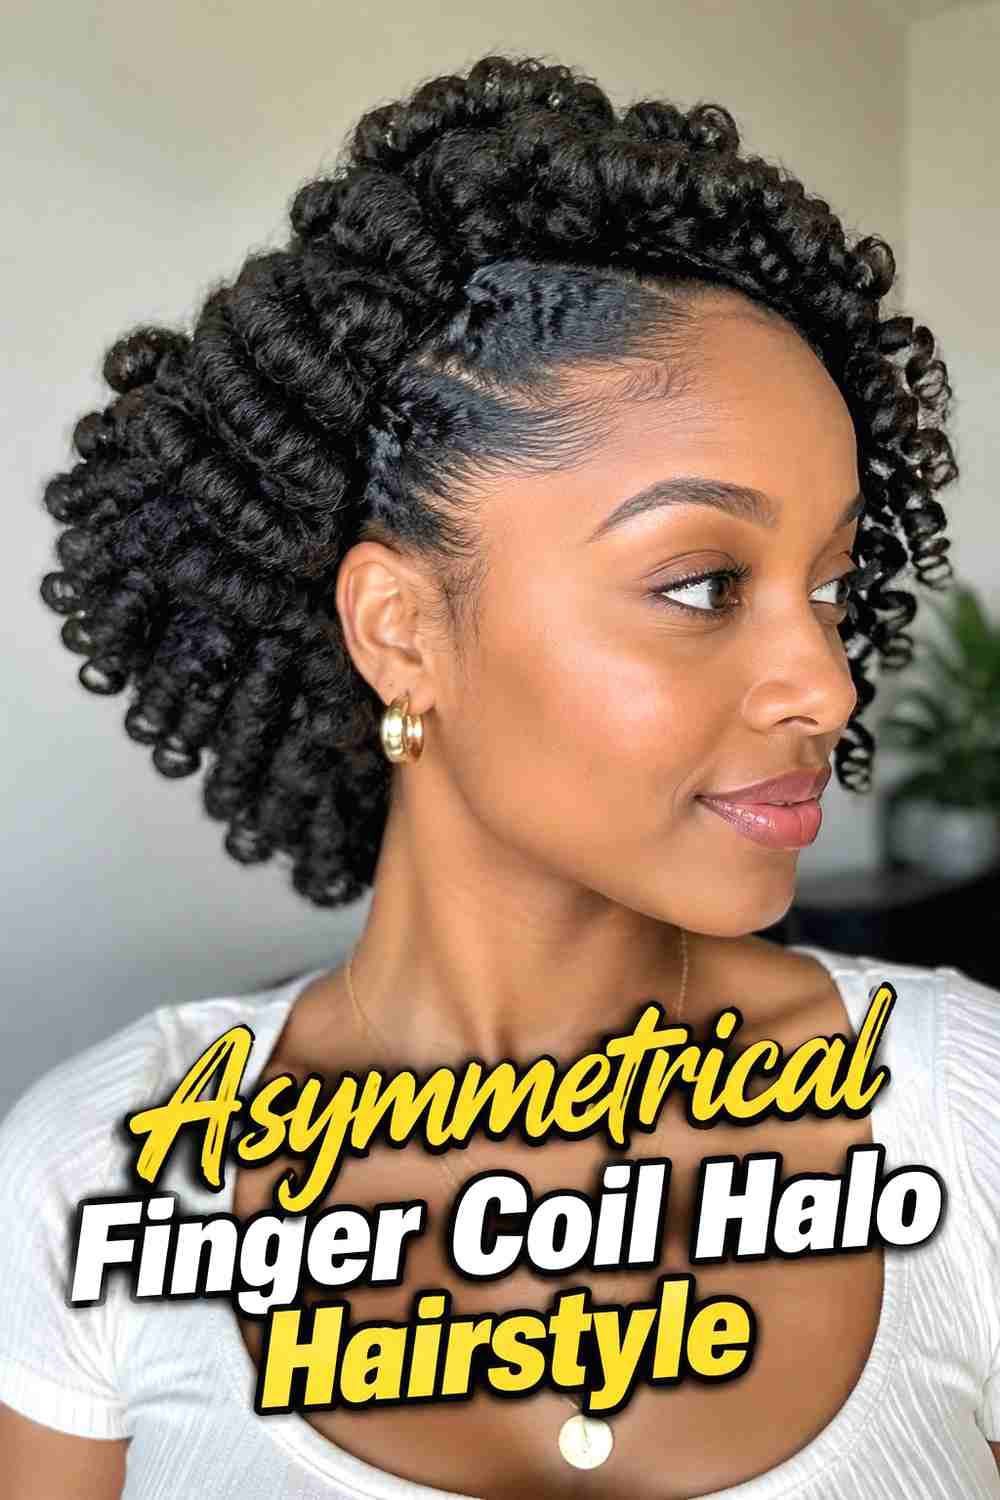
The Asymmetrical Finger Coil Halo Hairstyle intentionally builds more volume on one side, creating an artistic silhouette that differs from a perfectly balanced halo. One temple and side can carry larger or more lifted coils, while the opposite side stays slightly closer to the head. The imbalance should remain controlled so the hairstyle looks sculpted rather than accidentally uneven. A subtle side part can strengthen the direction, although it is not required. This style works especially well when the coils have strong definition, because each spiral helps explain the movement of the shape. Minimal accessories keep the asymmetry as the main focal point and allow the natural texture to provide all the necessary detail.
Styling Notes
Choose the dominant side before shaping so every adjustment supports the same overall direction.
Best For
This variation suits creative events, portraits, and anyone who enjoys sculptural natural-hair silhouettes with a less predictable shape.
10. Tapered Finger Coil Halo Hairstyle
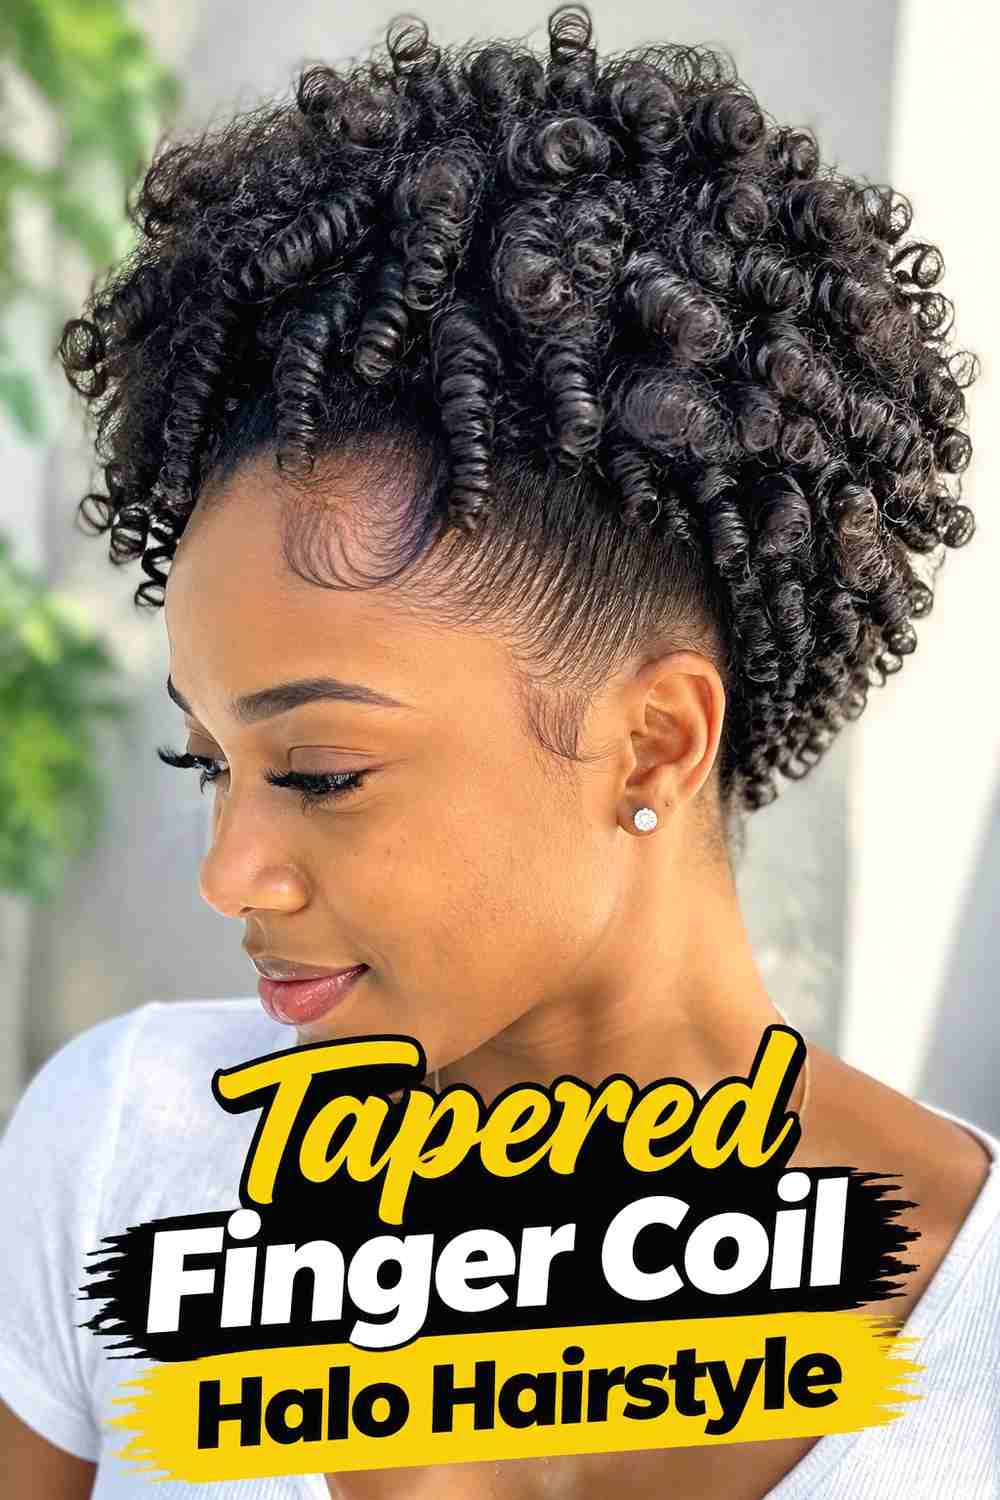
The Tapered Finger Coil Halo Hairstyle creates a gradually changing silhouette, with greater fullness through the crown and upper sides and a closer finish near the nape. The coils remain defined throughout, but their placement and root lift are adjusted so the shape narrows as it moves downward. This can make the halo feel lighter and more architectural without requiring shaved or dramatically shortened sections. Shorter natural hair can support the effect especially well, although medium lengths may also be shaped inward around the lower perimeter. The key is a smooth progression rather than abrupt changes in volume. The finished result feels neat, modern, and easy to appreciate from both side and back views.
Why It Works
The changing volume creates definition in the overall silhouette while preserving consistent finger-coil texture throughout the hairstyle.
Styling Notes
Shape the taper with root placement and gentle lifting rather than aggressively stretching or cutting individual coils after they set.
11. Beaded Finger Coil Halo Hairstyle
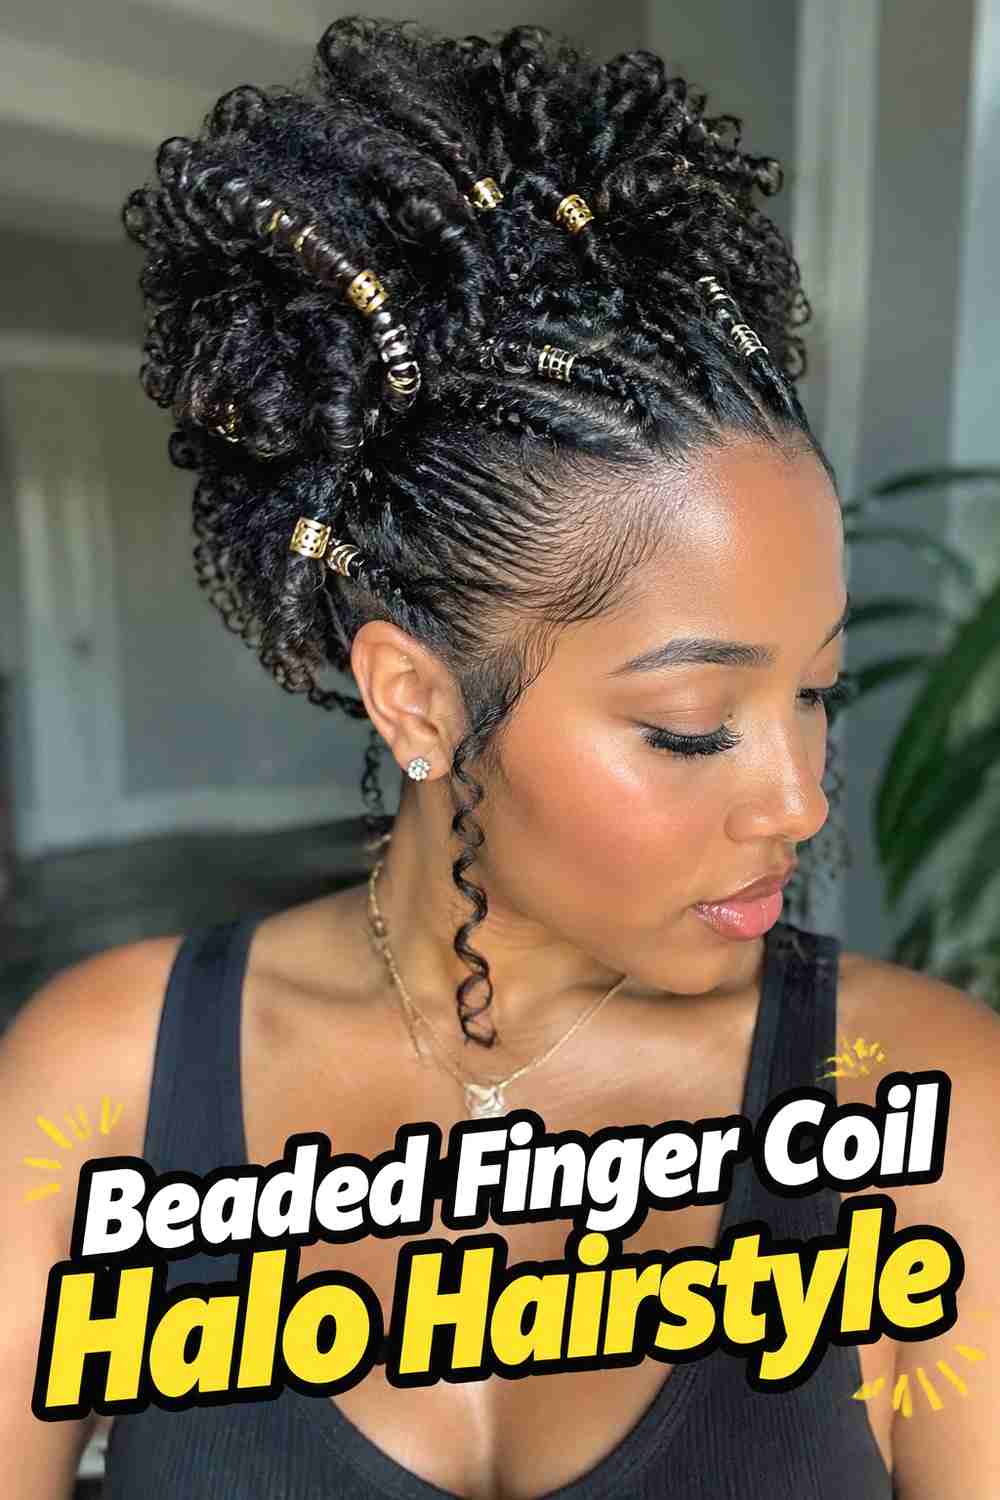
The Beaded Finger Coil Halo Hairstyle introduces small decorative details without hiding the coil pattern. Lightweight beads can be attached to a few selected front or side sections, creating subtle movement and contrast against the rounded texture. Because finger coils are relatively compact, the accessories should remain small and light enough that they do not pull the spirals out of shape. Clear, metallic, wooden, or tonal beads can each create a different mood. A few accents near one temple can emphasize asymmetry, while balanced placement on both sides feels more formal. Keeping most of the halo unadorned allows the natural coil definition to remain the dominant feature.
Styling Notes
Add beads only after the coils are completely dry and secure, using sections strong enough to support the accessory comfortably.
Pro Tip
Use a small number of lightweight beads so the spiral pattern stays visible and the coils retain their spring.
12. Gold Cuff Finger Coil Halo Hairstyle
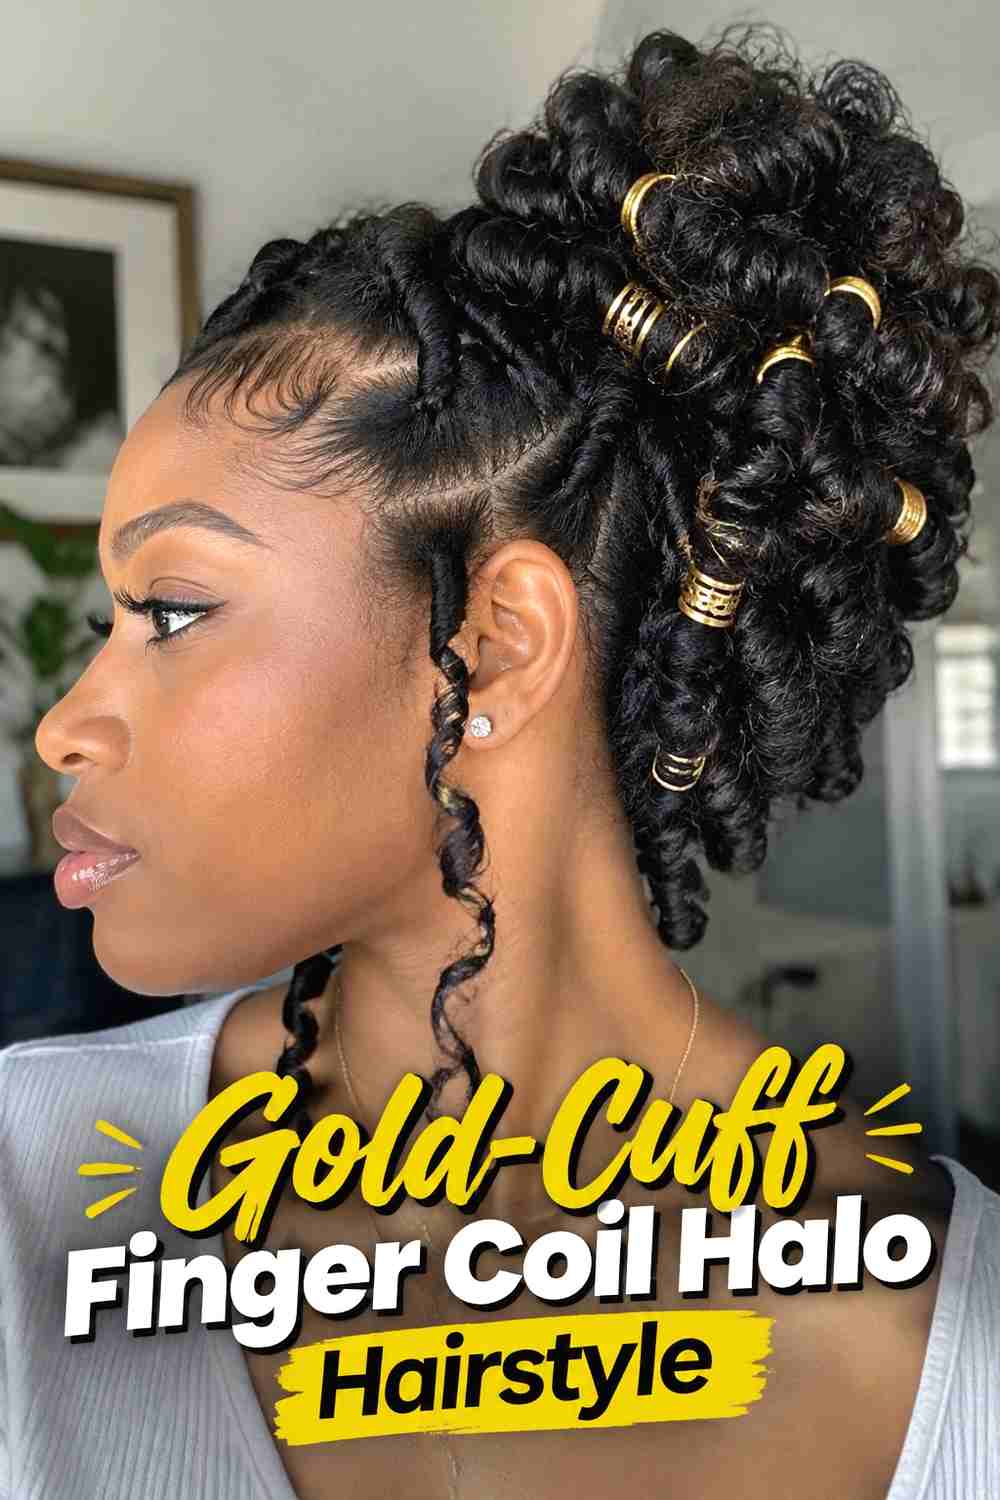
The Gold-Cuff Finger Coil Halo Hairstyle adds warm metallic highlights to selected coils around the perimeter. Small cuffs can sit near the base or middle of several defined sections, catching light against dark natural hair while leaving the majority of the halo untouched. The contrast works especially well with medium or chunky coils, where the accessories have enough surface to sit securely without overwhelming the spiral. Staggering the cuff placement creates a more relaxed finish than placing one on every section. The overall halo can remain symmetrical or lean slightly to one side depending on your preferred silhouette. The key is using the metallic detail as an accent rather than making it responsible for holding the hairstyle together.
Why It Works
Smooth gold accents contrast with the springy coil texture and create small focal points without changing the natural silhouette.
Wear & Maintenance
Make sure every cuff is smooth and lightweight so it does not snag or stretch the coiled section during wear.
13. Defined Perimeter Finger Coil Halo Hairstyle
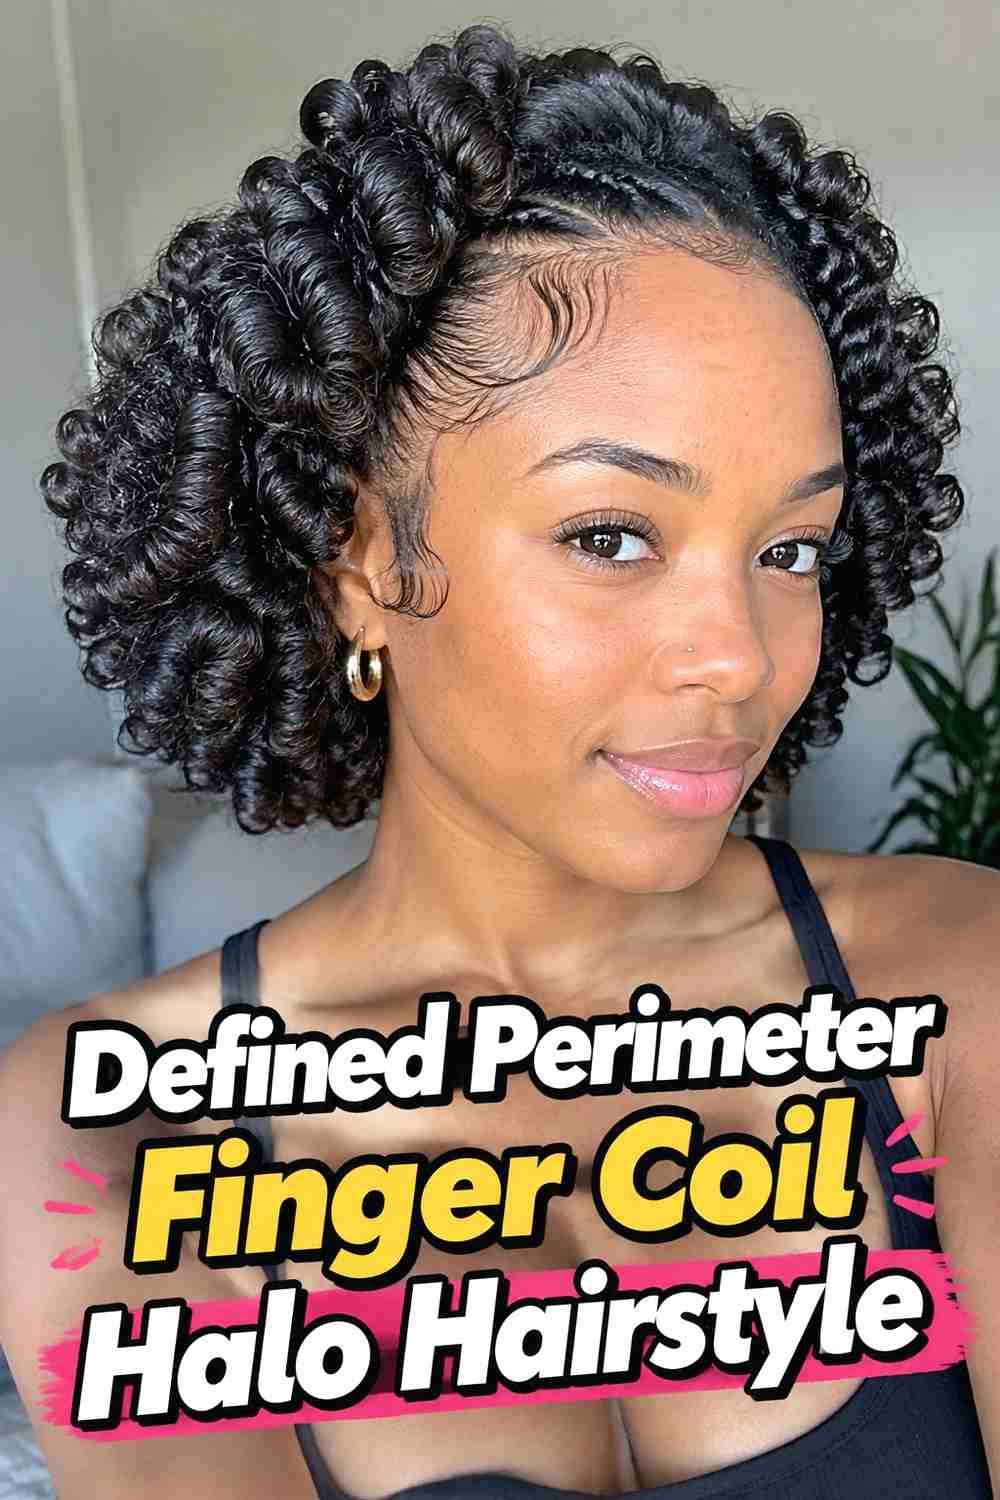
The Defined Perimeter Finger Coil Halo Hairstyle emphasizes the outer outline of the hair, creating a carefully shaped halo with a clear rounded boundary. The coils themselves remain springy and individually visible, but the overall perimeter is gently arranged so the silhouette reads cleanly from the front and sides. This does not require every coil to be identical; natural variation through the interior keeps the texture believable. The emphasis is simply on preventing isolated sections from projecting far beyond the intended shape. A soft hairline and controlled roots can complement the finish without making it look overly slick. The result feels polished while still showcasing the texture and movement of finger coils.
Styling Notes
Shape the outer edge with your hands after the coils are fully dry rather than cutting or forcing damp coils into position.
Best For
Choose this variation when you want a cleaner silhouette for work, events, or photography while retaining natural coil detail.
14. Soft Frizz Finger Coil Halo Hairstyle
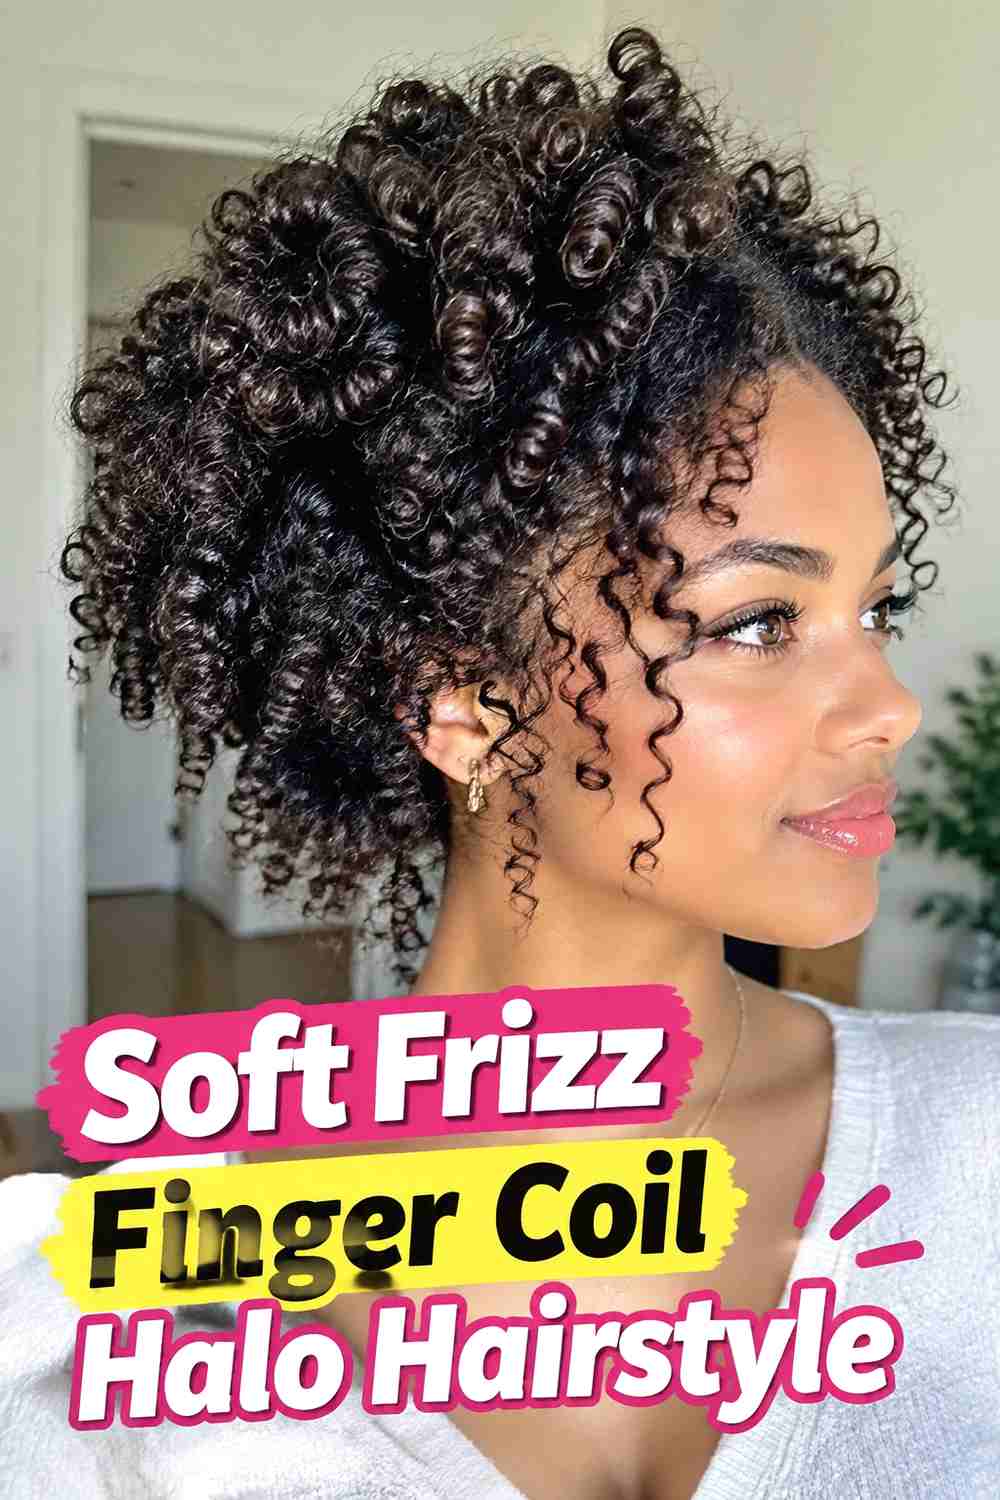
The Soft Frizz Finger Coil Halo Hairstyle embraces a slightly expanded finish in which the coils remain recognizable but are surrounded by a gentle cloud of natural texture. Instead of preserving every spiral with maximum separation, selected roots and outer sections are lightly fluffed to create more fullness. The result feels softer and less freshly set, giving the halo a lived-in character while still retaining the directional spiral pattern. This version can be especially attractive after several days of wear, when natural expansion begins to appear around the coils. The key is balance: too much separation may erase the finger-coil structure, while too little leaves the style closer to a freshly defined set.
Why It Works
The soft halo of frizz adds volume and movement while the remaining defined spirals provide structure within the expanded texture.
Wear & Maintenance
Refresh only selected coils when needed instead of recoiling the entire head, allowing the softer finish to remain part of the look.
15. Stretched Finger Coil Halo Hairstyle
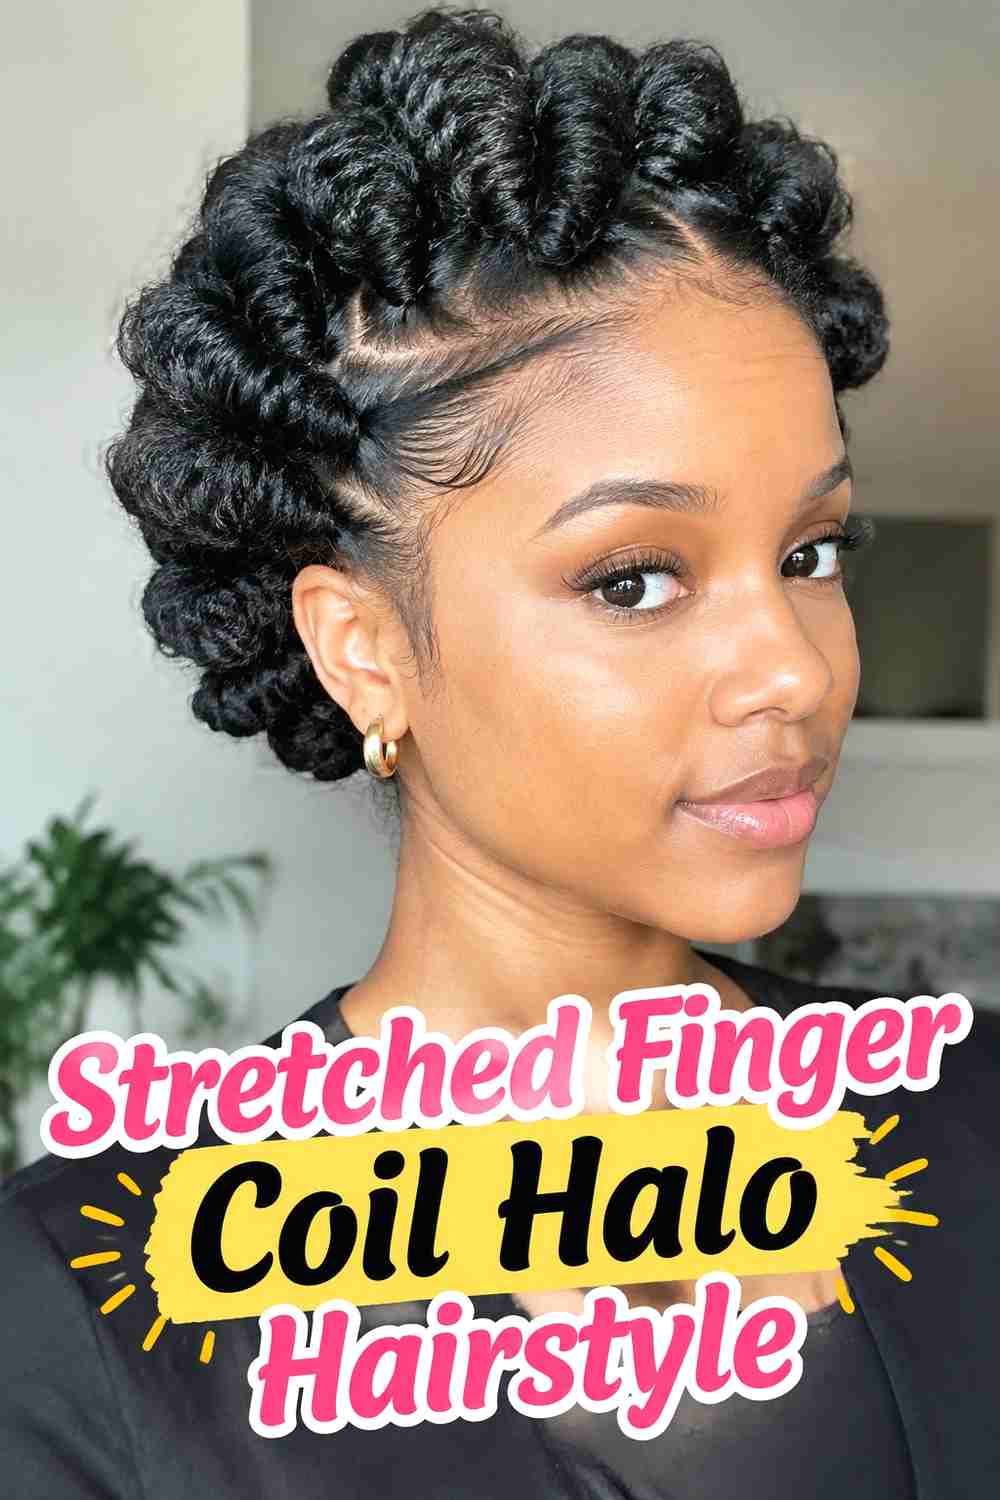
The Stretched Finger Coil Halo Hairstyle creates a larger silhouette by adding gentle root length before or after the coils are set. The spirals remain defined through the ends, but the roots sit farther from the scalp, giving the halo more width and height. This is useful when shrinkage normally creates a very compact shape but you want the coil pattern to appear more elongated. The stretch should remain moderate so the roots still connect naturally to the spiral rather than creating a sharp change in texture. Medium coils work especially well because their shape remains easy to read even with extra length. The finished result feels airy, dimensional, and slightly less compact than a traditional finger-coil set.
Styling Notes
Stretch gradually and focus on the root area, keeping the coiled ends protected from excessive pulling or heat.
Best For
This approach suits anyone who wants more visible length while preserving a strong finger-coil pattern through the lower sections.
16. Sculpted Side Halo Finger Coil Hairstyle
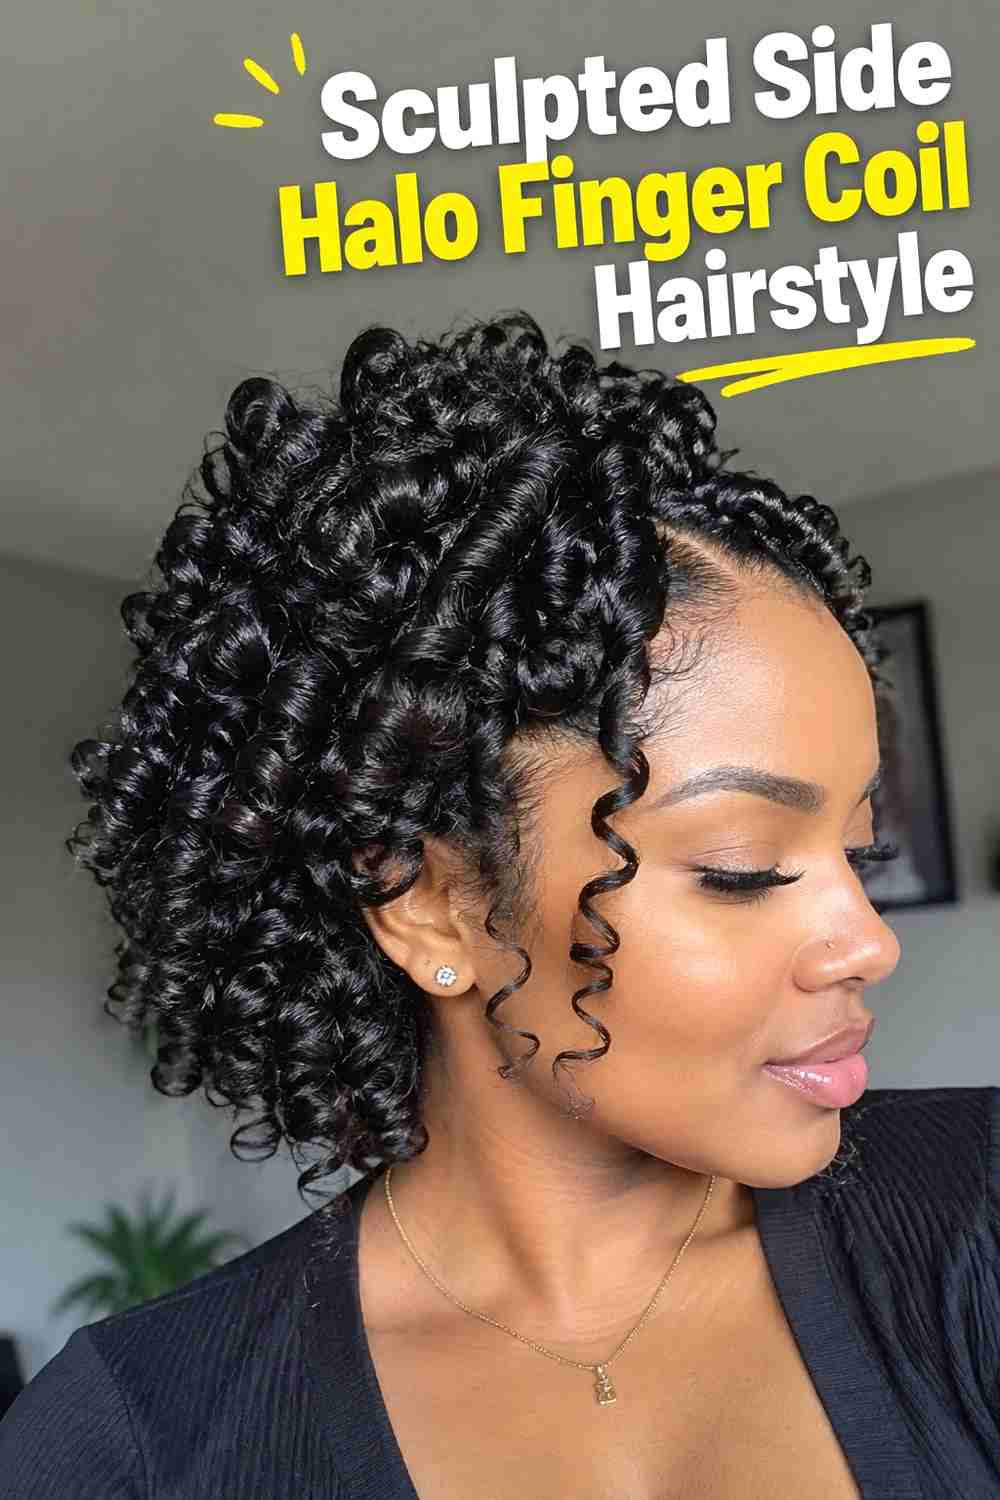
The Sculpted Side Halo Finger Coil Hairstyle concentrates the most defined volume around one temple and upper side, creating a dramatic curved shape that wraps partially around the head. The opposite side stays more compact, making the fuller section feel intentional and almost architectural. Larger or medium coils work best where the volume is strongest because their spirals remain visible within the sculpted shape. A discreet side part or tucked section can reinforce the asymmetry. The style should still feel connected through the back so it reads as a halo variation rather than a single side puff. The finished look is especially effective for portraits and events where a distinctive profile is part of the styling.
Styling Notes
Build the fuller side through root placement and selective lifting rather than pulling coils from the opposite side across the head.
Why It Works
The concentrated curve creates strong visual direction while preserving the spiral texture that defines the hairstyle.
17. Double Texture Finger Coil Halo Hairstyle
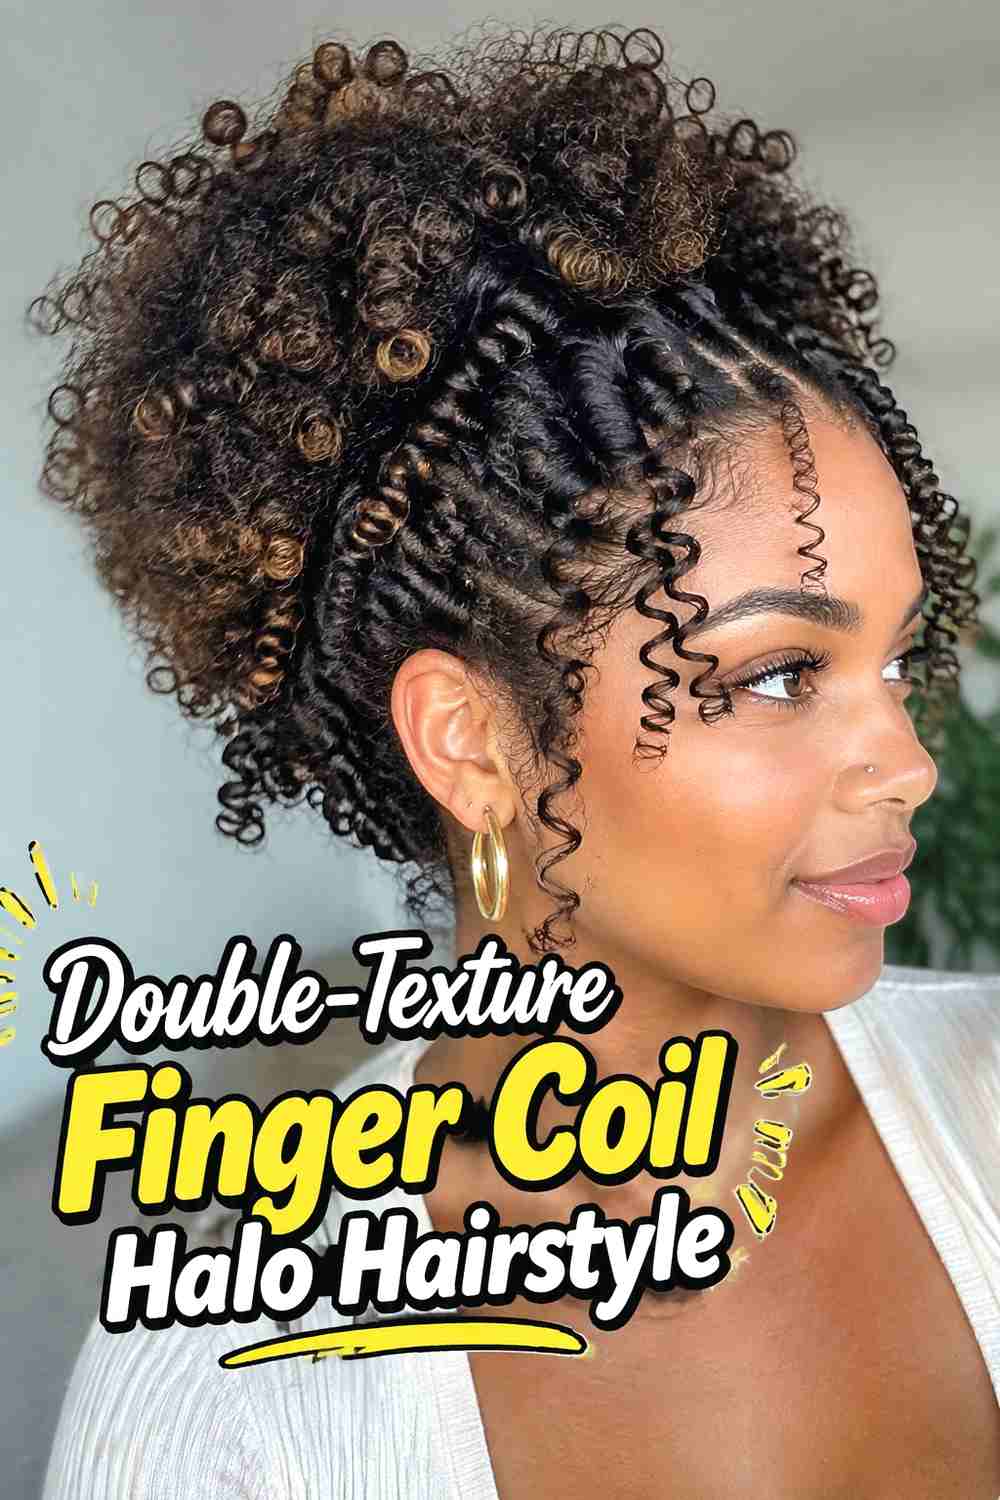
The Double-Texture Finger Coil Halo Hairstyle combines tightly defined coils with a limited area of softer, gently separated texture. The front or upper perimeter can stay highly coiled while the crown and back are fluffed slightly, or the contrast can be reversed depending on the desired silhouette. The key is keeping both textures connected so the style feels deliberate rather than half-finished. This approach adds depth because the eye moves between crisp spirals and softer expansion within the same rounded halo. It also offers a practical way to refresh an older finger-coil set without recreating every section. Keeping the difference moderate produces the most cohesive result.
Why It Works
The contrast between crisp spirals and softer texture adds dimension while maintaining a unified natural-hair silhouette.
Pro Tip
Choose one area for the softer finish instead of separating coils randomly across the entire head.
18. Statement Oversized Finger Coil Halo Hairstyle
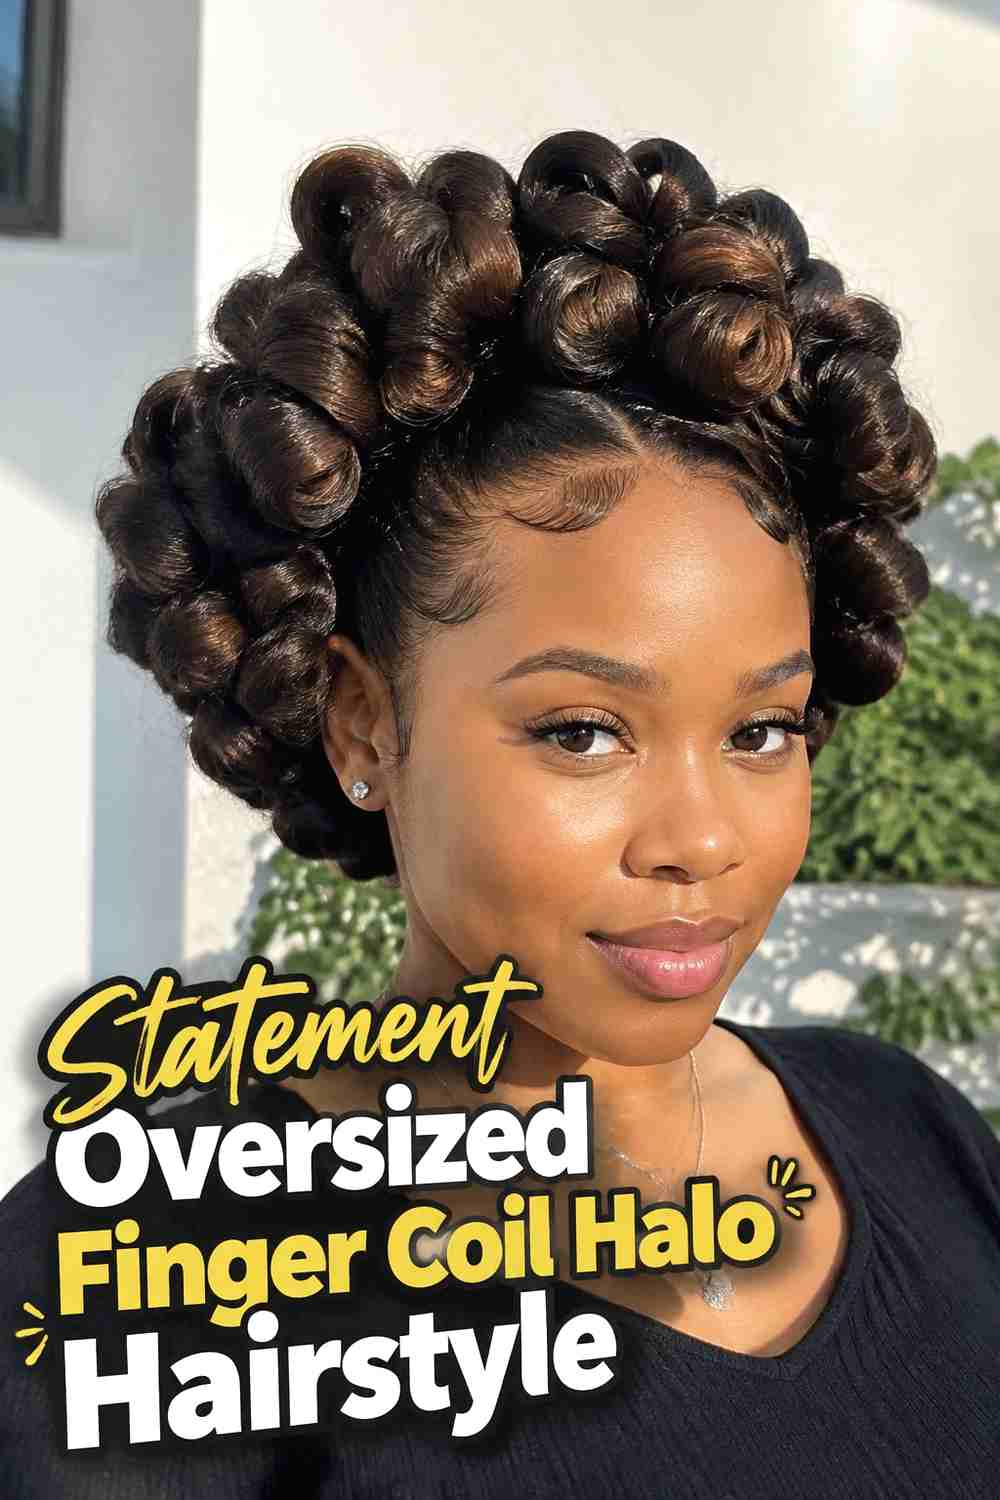
The Statement Oversized Finger Coil Halo Hairstyle maximizes width and height while keeping the spiral pattern visible throughout. Dense hair, larger sections, and carefully lifted roots work together to create a bold rounded silhouette that extends noticeably around the head. The shape should remain balanced enough that the volume appears intentional, with no single section collapsing or projecting awkwardly. Chunkier coils can help the texture read clearly within the larger form, while modest separation at the roots fills gaps between sections. Because the silhouette already has strong impact, extra accessories are rarely necessary. The finished style feels dramatic, sculptural, and ideal when the natural texture itself is meant to become the centerpiece.
Styling Notes
Build volume gradually around the entire head, checking the silhouette from every angle rather than concentrating all the lift at the crown.
Best For
Choose this version for statement portraits, special events, creative styling, or any occasion where bold natural volume fits the mood.
How to Choose the Right Look
Start with your preferred coil size. Mini coils create intricate definition and a denser textured surface, while chunky coils produce larger spirals and a stronger graphic effect. Medium coils offer a useful middle ground and work well for classic, parted, and face-framing halos.
Next, consider volume. A Low Rounded Finger Coil Halo Hairstyle stays compact, while stretched, high-crown, and oversized versions create more height and width. Your natural shrinkage and density will influence how much manipulation is needed to achieve each silhouette.
Parting can also change the mood. Center parts add symmetry, side parts create direction, and asymmetrical shapes shift the volume itself rather than relying only on a scalp part. If you want extra detail, lightweight beads or cuffs can accent selected coils without covering the texture.
Finally, think about maintenance. Highly defined mini coils usually benefit from less handling, while soft-frizz and double-texture versions can accommodate natural expansion more easily. Choose a finish that matches how much reshaping you realistically want to do between wash days.
Final Thoughts
Finger coil halos showcase natural texture by turning individual spirals into one sculptural overall shape. Small changes in coil size, root lift, parting, and perimeter placement can make the style feel classic, soft, dramatic, or highly artistic.
The most practical version is one that works with your shrinkage, density, and preferred level of definition. Let the coils provide the detail, shape the roots gently, and use accessories only when they enhance rather than compete with the texture.
FAQs
1. What is a finger coil halo hairstyle?
It is a finger-coil set shaped so the defined spirals create rounded volume around the head, producing a halo-like silhouette rather than concentrating the fullness in one section.
2. Do finger coil halos work on short natural hair?
Yes. Short and medium natural hair can create beautiful compact halos, especially when the coils have strong shrinkage and enough density to form a rounded perimeter.
3. How can I make a finger coil halo look fuller?
Once the coils are fully dry, gently lift the roots without separating every spiral. A little root stretching or selective fluffing can increase volume while preserving definition.
4. Can I add beads or cuffs to finger coils?
Yes, but lightweight accessories are best. Attach them only to secure sections so they do not stretch the coils or create uncomfortable pulling.
5. How do I keep finger coils defined while sleeping?
Reduce friction and compression as much as practical, then reshape the halo gently in the morning. Avoid repeatedly separating the coils if definition is your priority.
Save your favorite finger coil halo hairstyle ideas for your next natural-hair styling session, special event, or Pinterest inspiration board.