17 Glossy Center-Part Low Bun Hairstyles for a Polished Look
Sleek, reflective, and beautifully balanced, these glossy center-part low buns turn a simple updo into a polished look for everyday wear and special events.
A center part gives the hairstyle clean symmetry, while the low placement keeps the overall shape refined rather than overly formal. Within that basic silhouette, small changes in texture, wrapping, braiding, accessories, and face-framing pieces can make the finished look feel minimalist, romantic, bridal, or editorial.
As you compare these ideas, pay attention to how tightly the front is smoothed, how much natural texture remains visible, the size of the bun, and where it sits against the nape. Shine should enhance believable strand detail rather than make the hair look stiff or artificial, and the bun should connect naturally to the base for a secure, realistic finish.
Quick List
- Classic Glass-Gloss Center-Part Low Bun Hairstyle
- Ultra-Sleek Tucked Center-Part Low Bun Hairstyle
- Soft Face-Framing Center-Part Low Bun Hairstyle
- Twisted Wrap Center-Part Low Bun Hairstyle
- Clean Coiled Center-Part Low Bun Hairstyle
- Knotted Glossy Center-Part Low Bun Hairstyle
- Sculpted Loop Center-Part Low Bun Hairstyle
- Polished Braided Center-Part Low Bun Hairstyle
- Pearl-Pinned Glossy Center-Part Low Bun Hairstyle
- Gold-Cuff Center-Part Low Bun Hairstyle
- Bridal Veil-Ready Center-Part Low Bun Hairstyle
- Wet-Look Center-Part Low Bun Hairstyle
- Soft-Wave Glossy Center-Part Low Bun Hairstyle
- Fine-Hair Polished Center-Part Low Bun Hairstyle
- Thick-Hair Wrapped Center-Part Low Bun Hairstyle
- Curly-Texture Glossy Center-Part Low Bun Hairstyle
- Minimalist Mirror-Shine Center-Part Low Bun Hairstyle
1. Classic Glass Gloss Center Part Low Bun Hairstyle
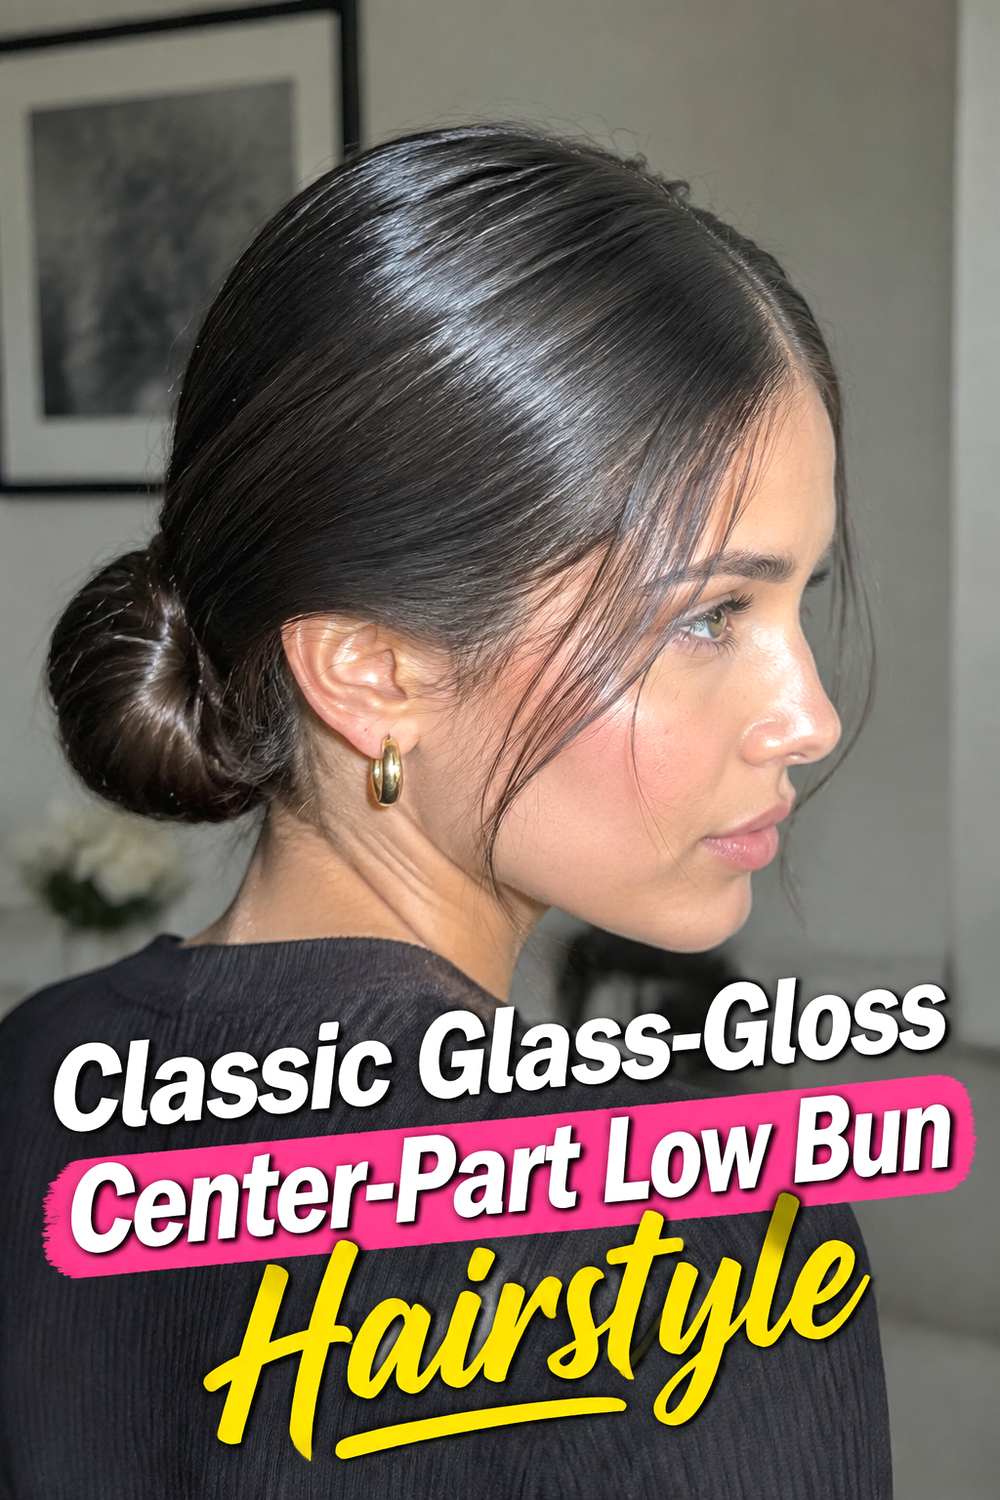
This classic version keeps every element deliberately simple: a precise middle part, smooth sides, and a compact bun resting close to the nape. The glossy finish catches the light without hiding the natural direction of the hair, giving the style its clean “glass hair” effect. It works especially well when you want an updo that feels polished without relying on accessories or complicated shaping. Medium to long hair provides enough length for a neat coil, while shorter lengths may need extra pins around the base. Keep the bun moderately tight rather than pulling aggressively at the hairline so the finished silhouette stays sleek but comfortable.
Styling Notes
Smooth the hair toward the nape in sections so bumps are easier to control. A small amount of lightweight smoothing product through the lengths can add reflection without making the roots look greasy.
Best For
This understated shape works beautifully with tailored outfits, evening dresses, minimalist bridal looks, workwear, and occasions where you want the hairstyle to look refined from every angle.
2. Ultra Sleek Tucked Center Part Low Bun Hairstyle
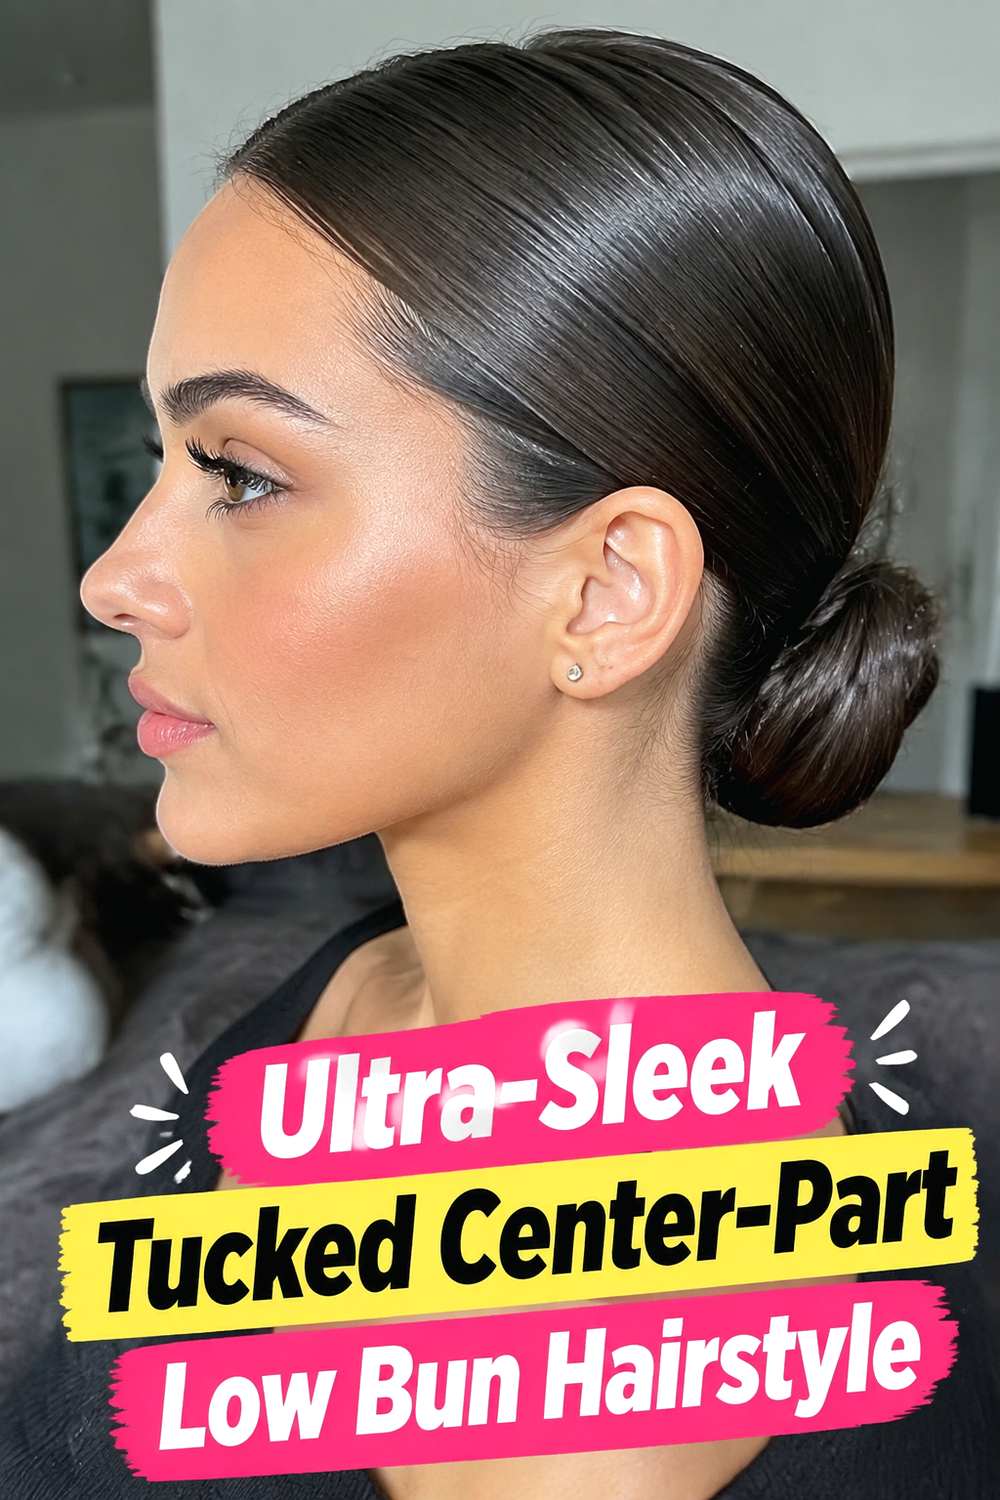
The tucked version gives the low bun an especially clean profile because the ends disappear neatly underneath the shape instead of wrapping visibly around it. A sharply defined center part creates structure at the front, while the sides sit close to the head for a streamlined silhouette. This is a strong choice for straight or stretched hair that can be gathered smoothly without excessive bulk. The tucked construction also makes the bun feel smaller and more architectural than a traditional round coil. Because the finish is intentionally sleek, work gradually when smoothing the surface rather than repeatedly brushing the entire style, which can create unnecessary tension around the temples.
Why It Works
Hiding the ends makes the bun look continuous and carefully finished. That subtle detail gives an otherwise simple hairstyle a more editorial, sophisticated character.
Wear & Maintenance
Use discreet pins underneath the bun rather than across the visible surface. If flyaways appear later, smooth only those areas instead of adding another heavy layer of product.
3. Soft Face Framing Center Part Low Bun Hairstyle
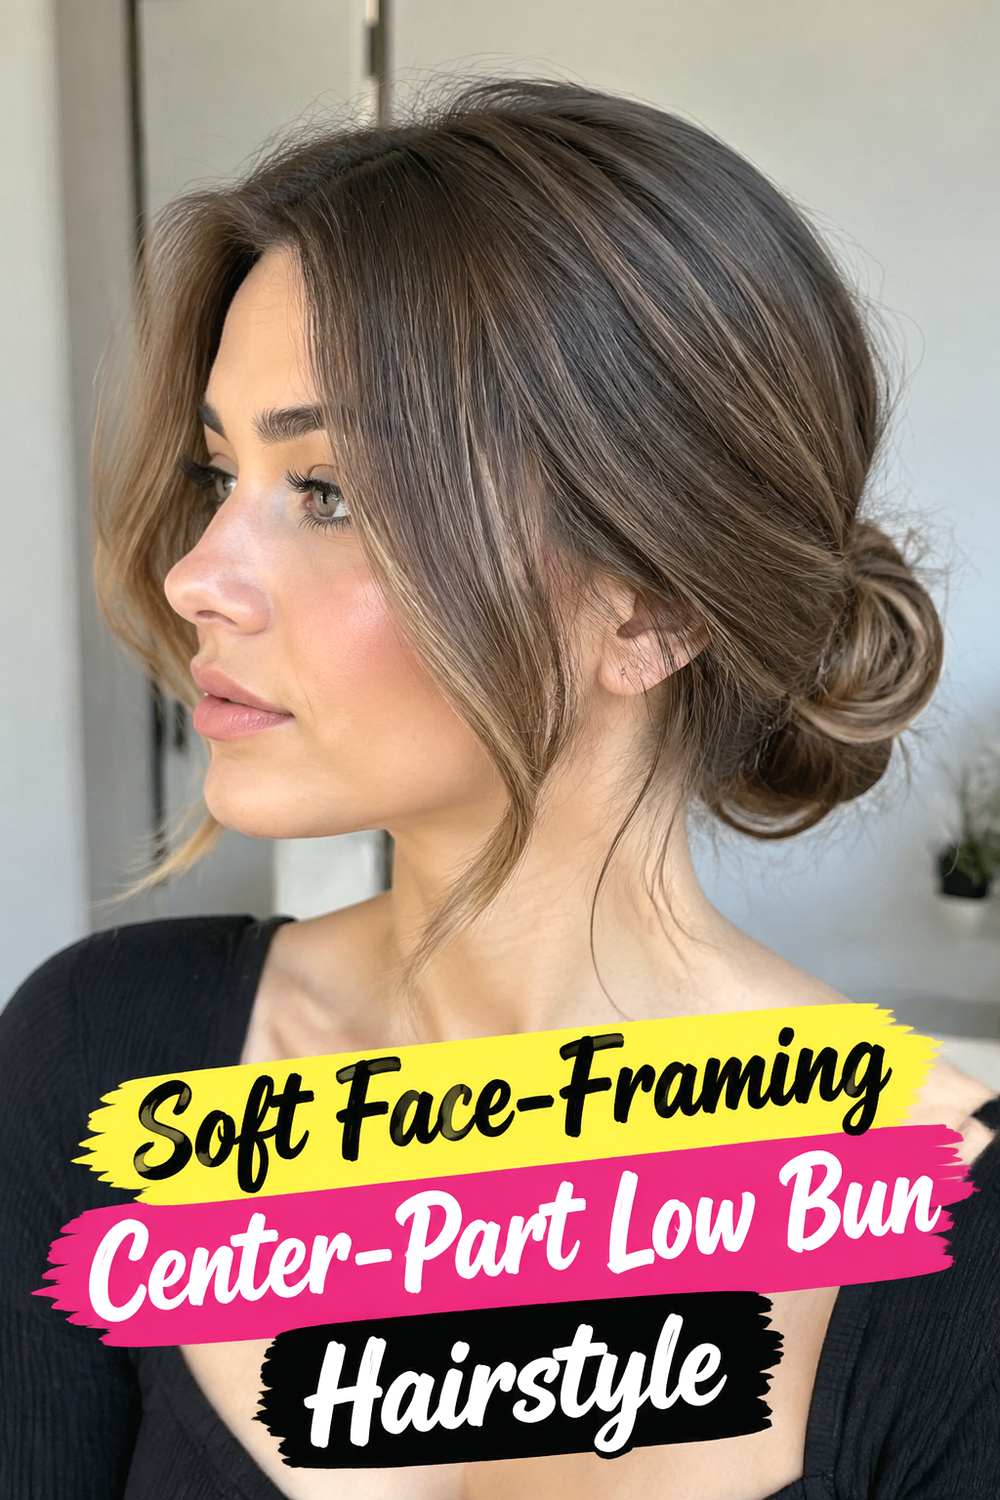
A few deliberately released strands change the mood of a glossy low bun completely. The center part and polished crown still create a neat foundation, but soft pieces around the cheekbones or jaw make the style feel more relaxed and romantic. Keep those strands fine enough that they complement the bun instead of looking accidentally loose. They can remain straight, curve gently inward, or carry a soft bend depending on your natural texture. This look is particularly useful when a completely slicked-back finish feels too severe. The contrast between the shiny, controlled base and the airy front pieces adds softness while preserving the recognizable center-part low-bun silhouette.
Pro Tip
Choose the face-framing pieces before securing the ponytail. Pulling them out afterward can disturb the smooth sides and make the front hairline harder to refine.
Best For
This variation suits dinner dates, weddings, engagement events, parties, and polished everyday outfits where you want sophistication with a less rigid finish.
4. Twisted Wrap Center Part Low Bun Hairstyle
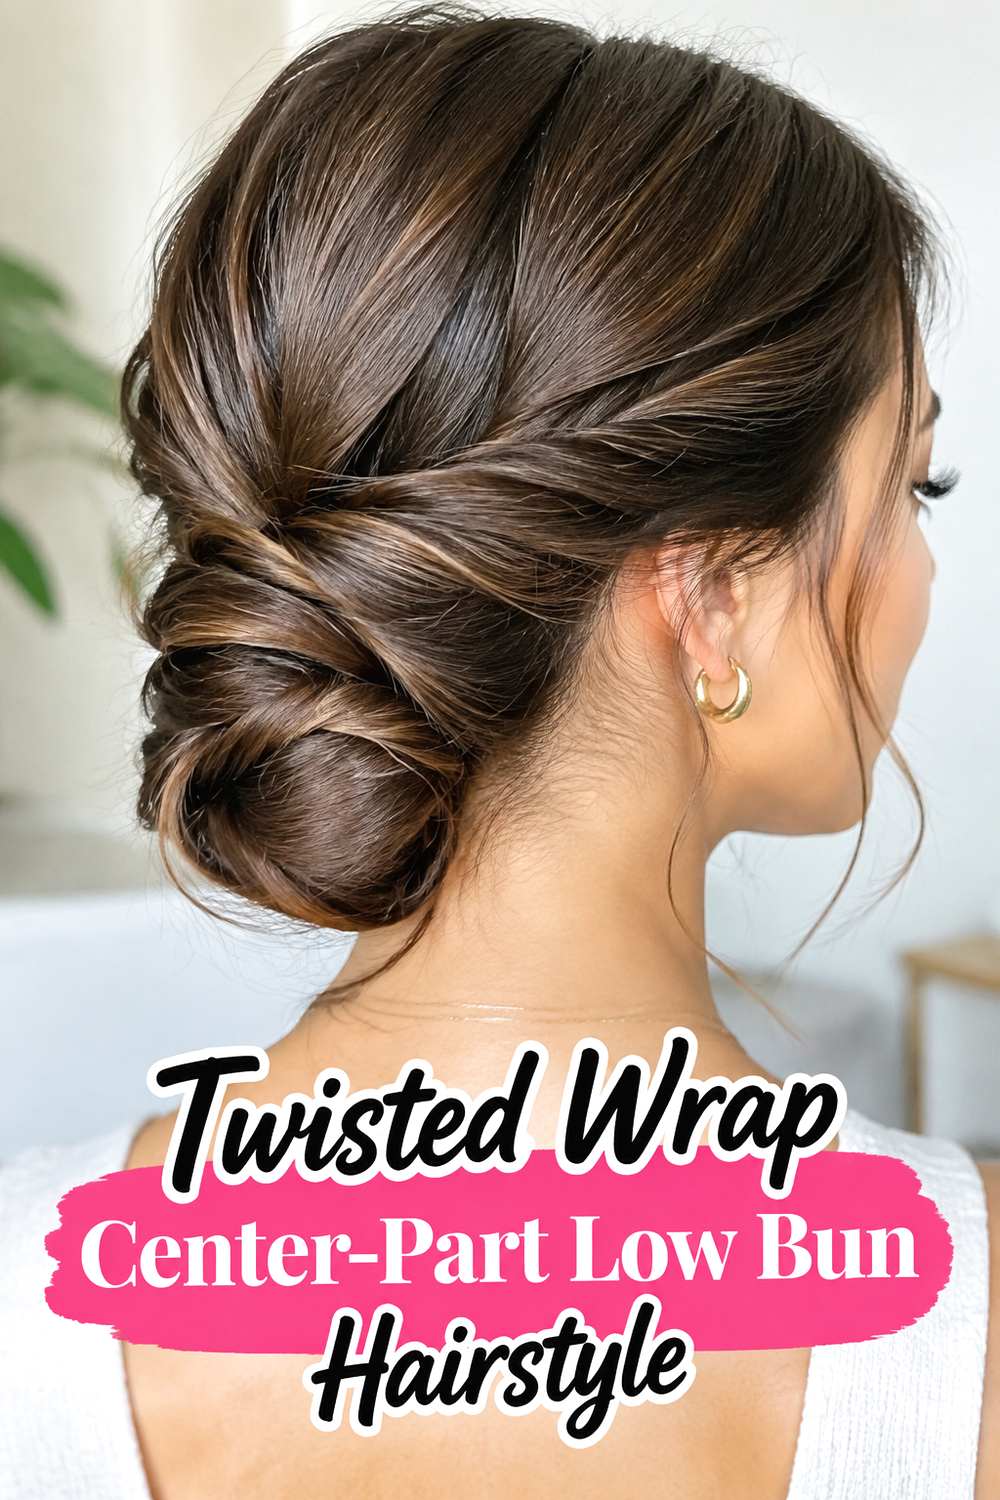
Instead of forming one simple coil, this version uses twisted sections to create visible movement around the bun. The center part stays sharp and glossy, giving the front a controlled appearance, while the twist adds detail at the back without introducing an accessory. Long hair works especially well because the additional length allows the twist to wrap naturally and remain visible. The most attractive result usually comes from keeping the twist smooth enough to reflect light while allowing slight separation between sections so the construction can still be seen. Secure the ends underneath the finished bun so the final shape looks intentional rather than overly pinned.
Hair Type & Length
Medium-long to long hair gives the twist enough length to create a defined wrap. Thick hair may produce a fuller bun, while finer hair can create a slimmer, more delicate shape.
Why It Works
The twisted construction adds dimension without disrupting the clean center-part styling, making this an easy bridge between a minimalist bun and a more detailed formal updo.
5. Clean Coiled Center Part Low Bun Hairstyle
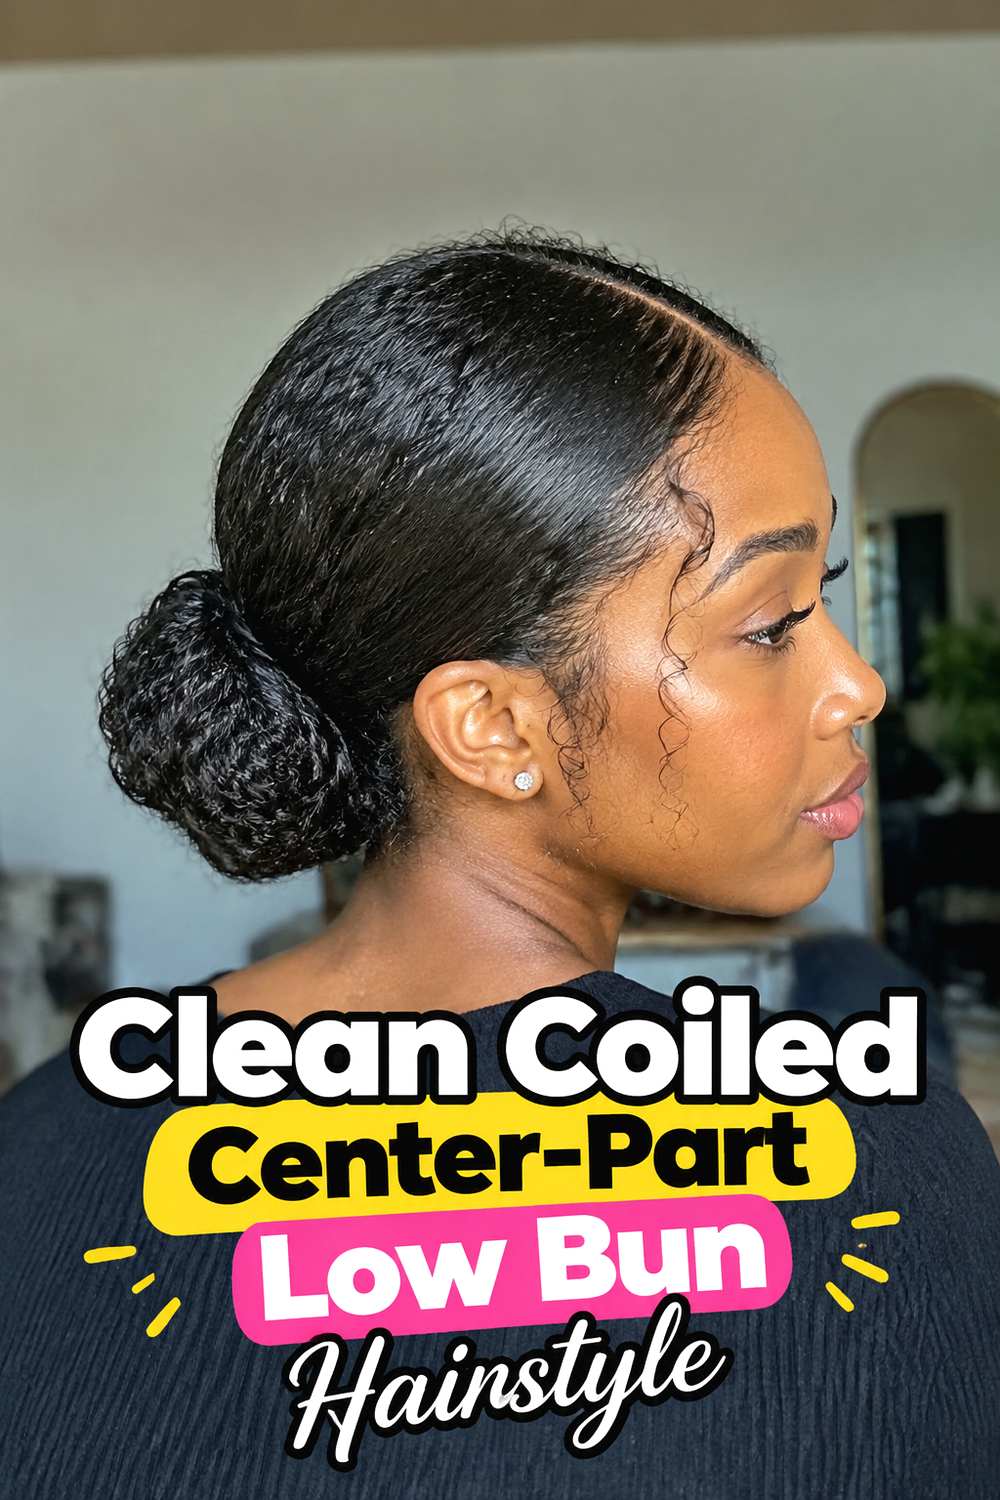
The clean coiled bun emphasizes a rounded, continuous shape at the nape. Hair is gathered into a low ponytail, turned into a controlled coil, and secured so the curve of the bun remains visible instead of being flattened against the head. From the front, a polished center part keeps the style modern and balanced. This option is ideal if you like classic buns but want the shine and precision associated with contemporary slick styling. Avoid overloading the coil with heavy product; too much can cause sections to separate or make the bun appear rigid. A controlled surface with a few realistic strands usually looks more polished than an unnaturally lacquered finish.
Styling Notes
Build the bun from a firmly secured ponytail so the coil has a stable anchor. Insert pins toward the center of the bun to hold the shape without leaving hardware visible.
Wear & Maintenance
The compact coil is practical for longer wear because it keeps the ends contained. Check that pins are comfortable before leaving home, especially at the lower edge near the nape.
6. Knotted Glossy Center Part Low Bun Hairstyle
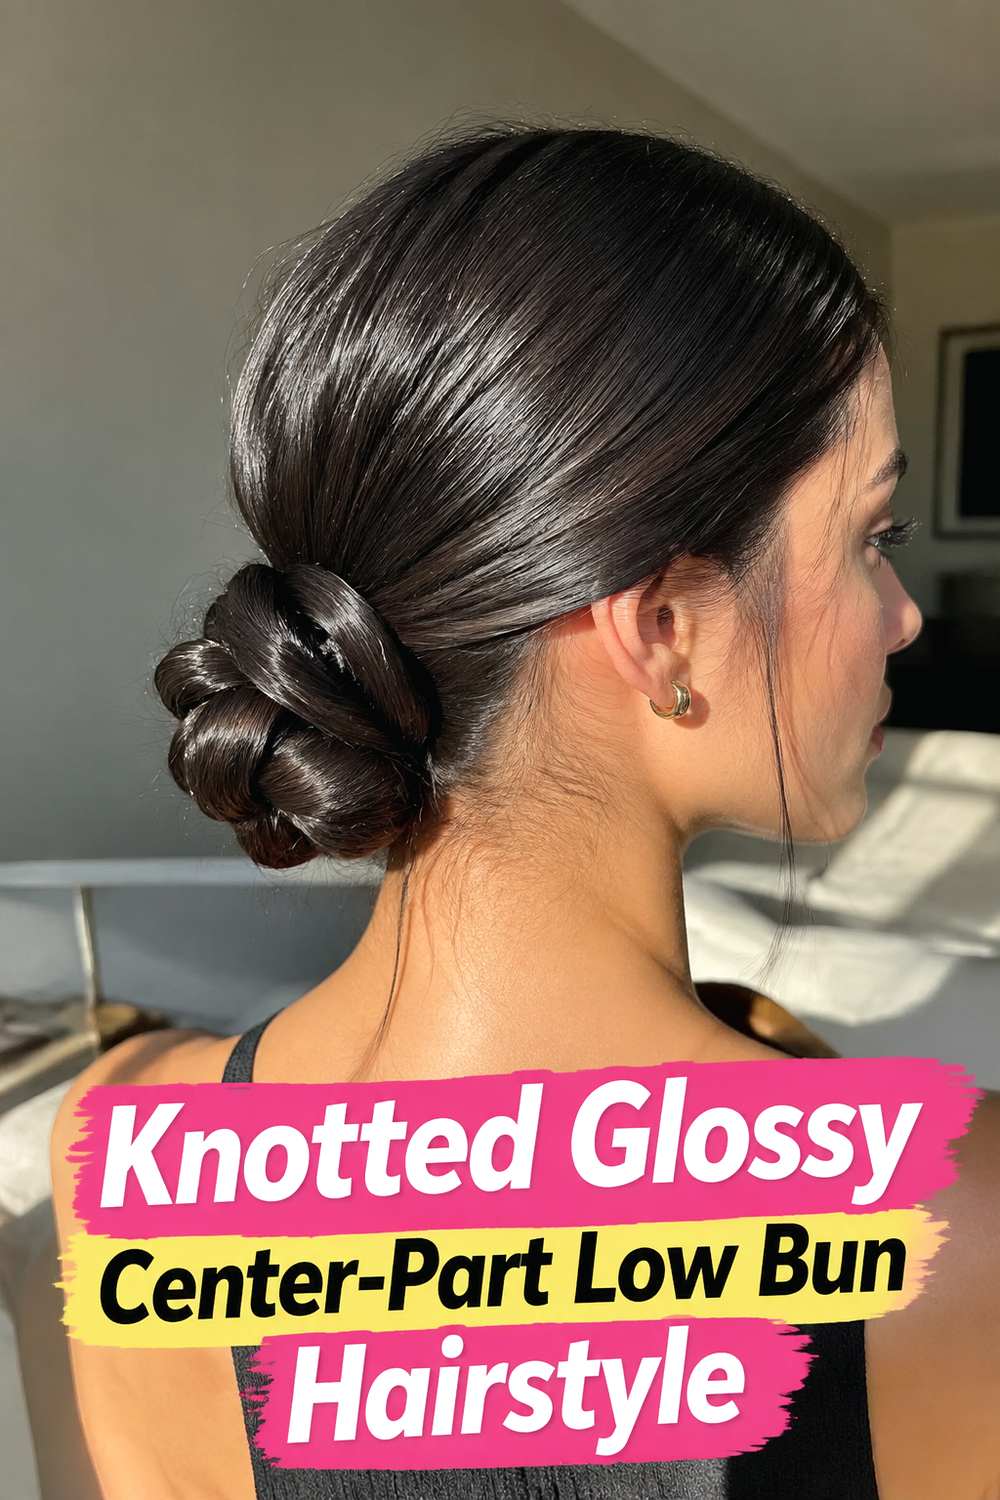
A knotted bun introduces subtle complexity while maintaining the restrained feel of a glossy center-part updo. Rather than wrapping the ponytail into a basic circle, the hair is folded or tied into a soft knot before the remaining length is tucked beneath it. This produces overlapping curves that catch natural light differently and make the bun look more dimensional. The sleek center part prevents those details from feeling too busy. Medium-density hair is especially easy to shape into this style because the knot can remain defined without becoming oversized. Aim for a secure structure, but preserve enough softness in the knot that its shape remains visible.
Why It Works
The knot creates a focal point at the back while leaving the front completely clean. It feels distinctive without depending on decorative clips or elaborate braiding.
Pro Tip
Apply smoothing product before creating the knot rather than afterward. This helps individual sections stay controlled while still allowing the overlapping shape to show clearly.
7. Sculpted Loop Center Part Low Bun Hairstyle
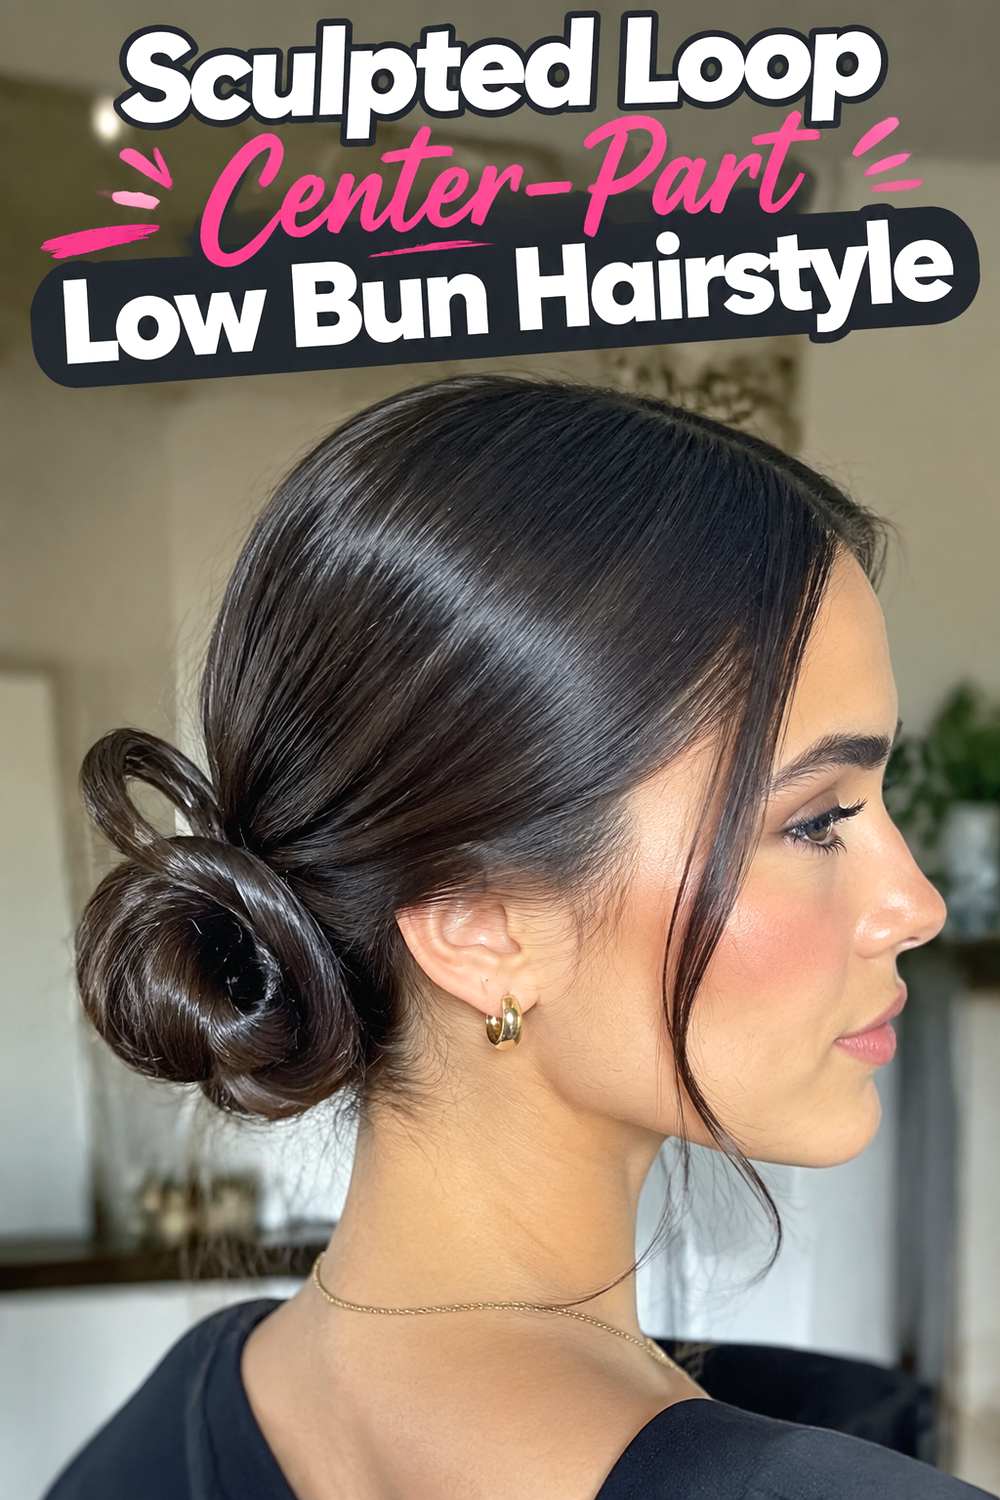
This sculpted option forms the hair into a smooth loop at the nape, creating a sleek shape that feels modern and slightly architectural. The ends are hidden underneath or wrapped discreetly around the base, allowing the curved loop to remain the main feature. A crisp center part and glossy crown reinforce the geometric effect, making the hairstyle especially attractive with clean necklines or structured clothing. Because the loop needs to hold its shape, hair with enough length to fold comfortably works best. Keep the loop proportional to the head rather than making it excessively large; a smaller controlled form usually looks more sophisticated and stays more secure.
Best For
Choose this style for modern weddings, cocktail events, formal dinners, or fashion-forward occasions where a simple round bun feels too traditional.
Styling Notes
Create the loop with even tension and secure it from underneath. The visible surface should remain smooth, so avoid placing pins through the center unless extra support is necessary.
8. Polished Braided Center Part Low Bun Hairstyle
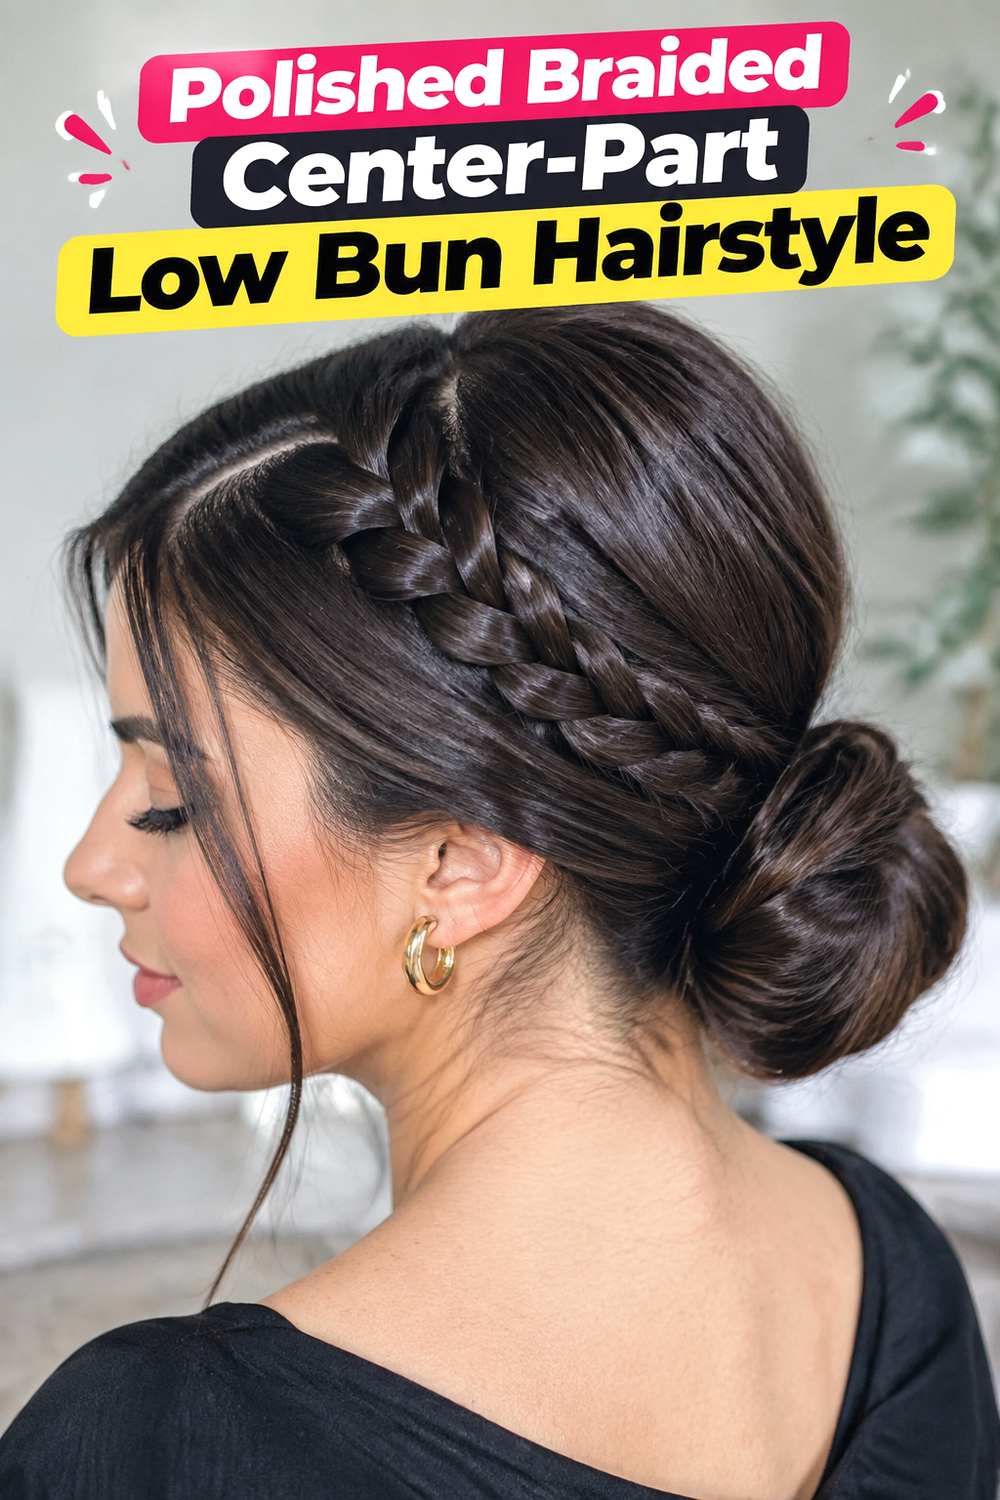
Braiding the ponytail before wrapping it into a bun adds texture while keeping the hairstyle contained and elegant. From the front, the look remains unmistakably sleek: a defined middle part, controlled sides, and a luminous finish. At the back, the braid introduces repeating lines that give the bun more visual depth. A moderately loose braid can show its pattern more clearly, while a tighter braid produces a compact, structured bun. Long or thick hair creates particularly noticeable detail, although medium-length hair can also work with a smaller braid. Keep the braid believable and evenly tensioned so the sections sit naturally rather than appearing overly stiff or exaggerated.
Hair Type & Length
Medium-long and long hair provide the easiest foundation. Straight, wavy, or stretched textured hair can all work, with the braid pattern changing slightly according to density and strand texture.
Wear & Maintenance
Because the braid holds the lengths together, this bun can stay organized for extended wear. Secure both the braid end and the wrapped bun so loosening does not begin from the center.
9. Pearl Pinned Glossy Center Part Low Bun Hairstyle
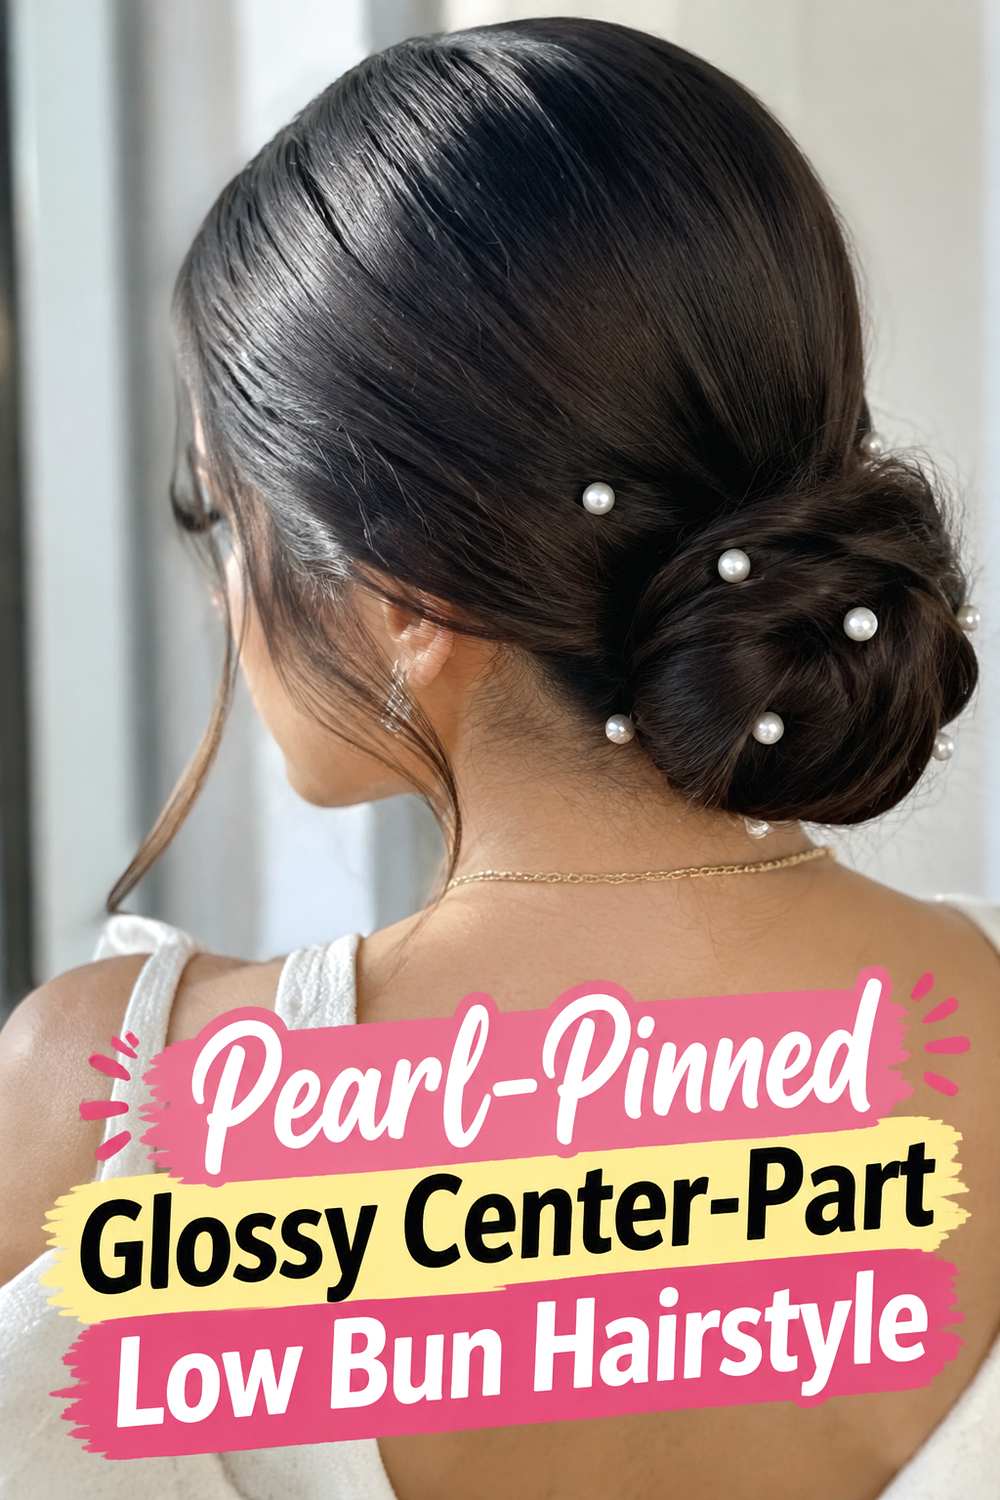
Small pearl pins bring a softer, more decorative finish to the otherwise streamlined center-part bun. The most polished approach is to keep the hairstyle itself simple and use only a few pearls as deliberate accents around one side of the bun or along its upper edge. This preserves the glossy surface and prevents the accessory from overwhelming the shape. The look pairs particularly well with ivory, satin, lace, and other refined fabrics, making it a natural choice for bridal events or formal celebrations. Place each pin into a securely built bun rather than relying on the accessory for structural support, since decorative pins are often better suited to finishing than anchoring.
Styling Notes
Finish the bun first, then add pearls where they remain visible from the intended viewing angle. Uneven but balanced placement can feel more modern than arranging every pin in a perfect row.
Best For
This style suits brides, bridesmaids, engagement celebrations, anniversary dinners, and elegant evening events where a little detail is welcome without losing the sleek aesthetic.
10. Gold Cuff Center Part Low Bun Hairstyle
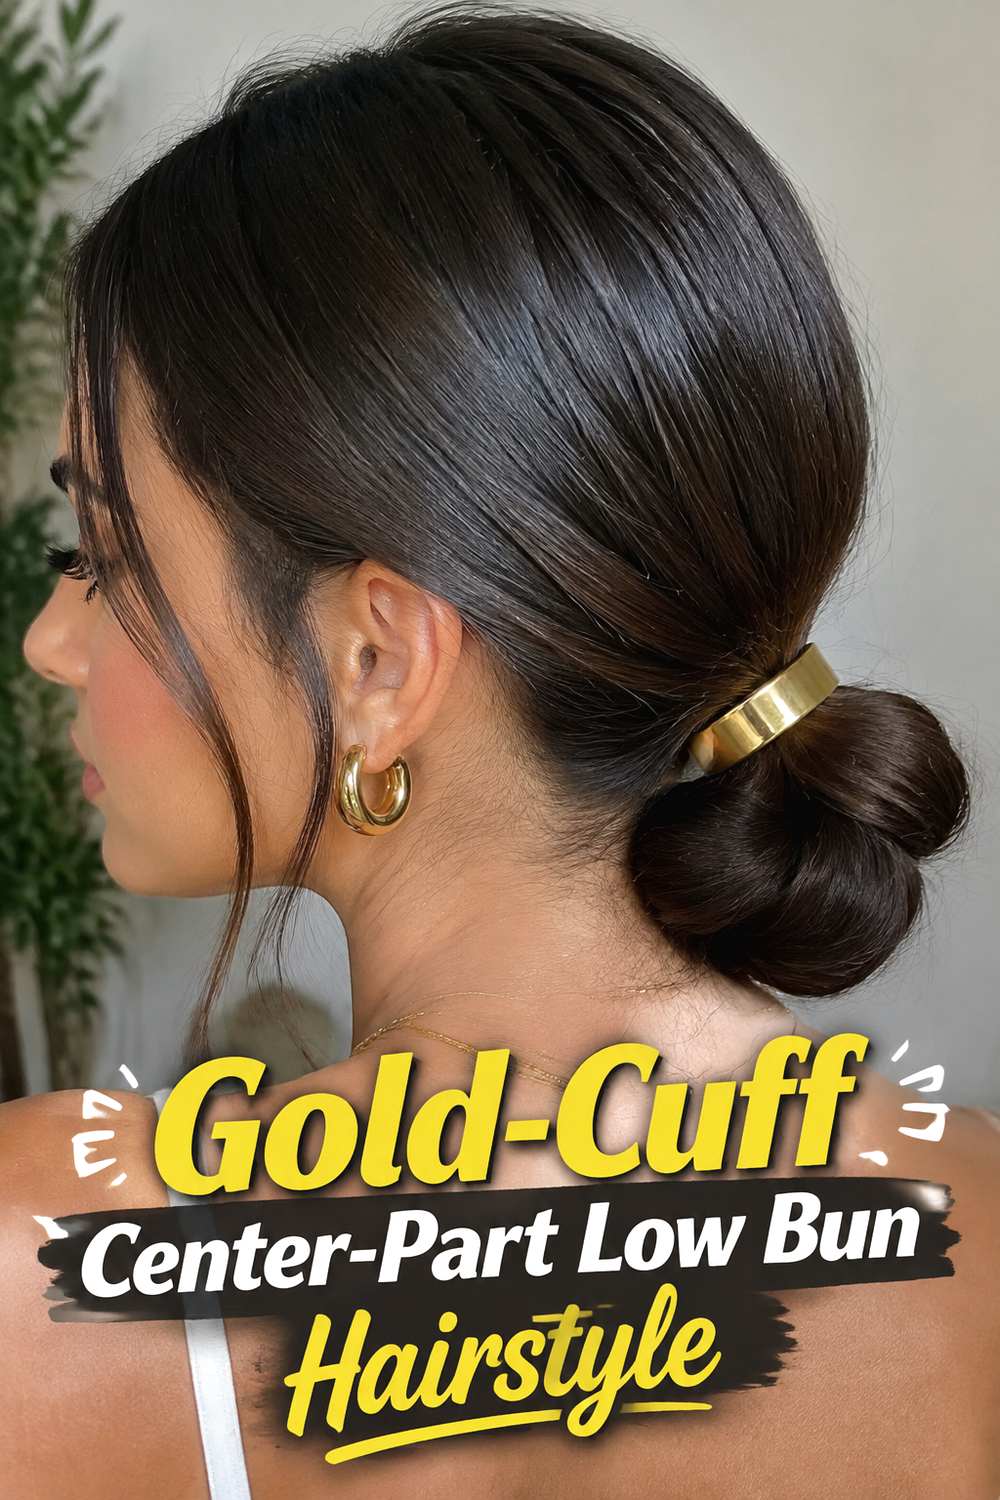
A slim gold cuff or metallic bun accessory gives this glossy low bun a clean statement finish. Because the center part and sides are already sleek, one polished piece around the base can be enough to make the hairstyle feel dressed up. The accessory looks especially striking when the bun itself is compact and smooth, allowing the metal to frame the shape instead of competing with it. Warm gold works beautifully with neutral, black, cream, jewel-toned, or evening outfits. Make sure the bun is fully secured with regular pins first; the cuff should act as a visible finishing element rather than carrying the tension of the hairstyle.
Why It Works
The metallic detail creates contrast against glossy hair and defines the bun’s placement at the nape, making a very simple construction look intentional and event-ready.
Pro Tip
Choose a cuff that fits the actual size of your finished bun. An accessory that is too tight can distort the shape, while one that is too large may shift during wear.
11. Bridal Veil Ready Center Part Low Bun Hairstyle
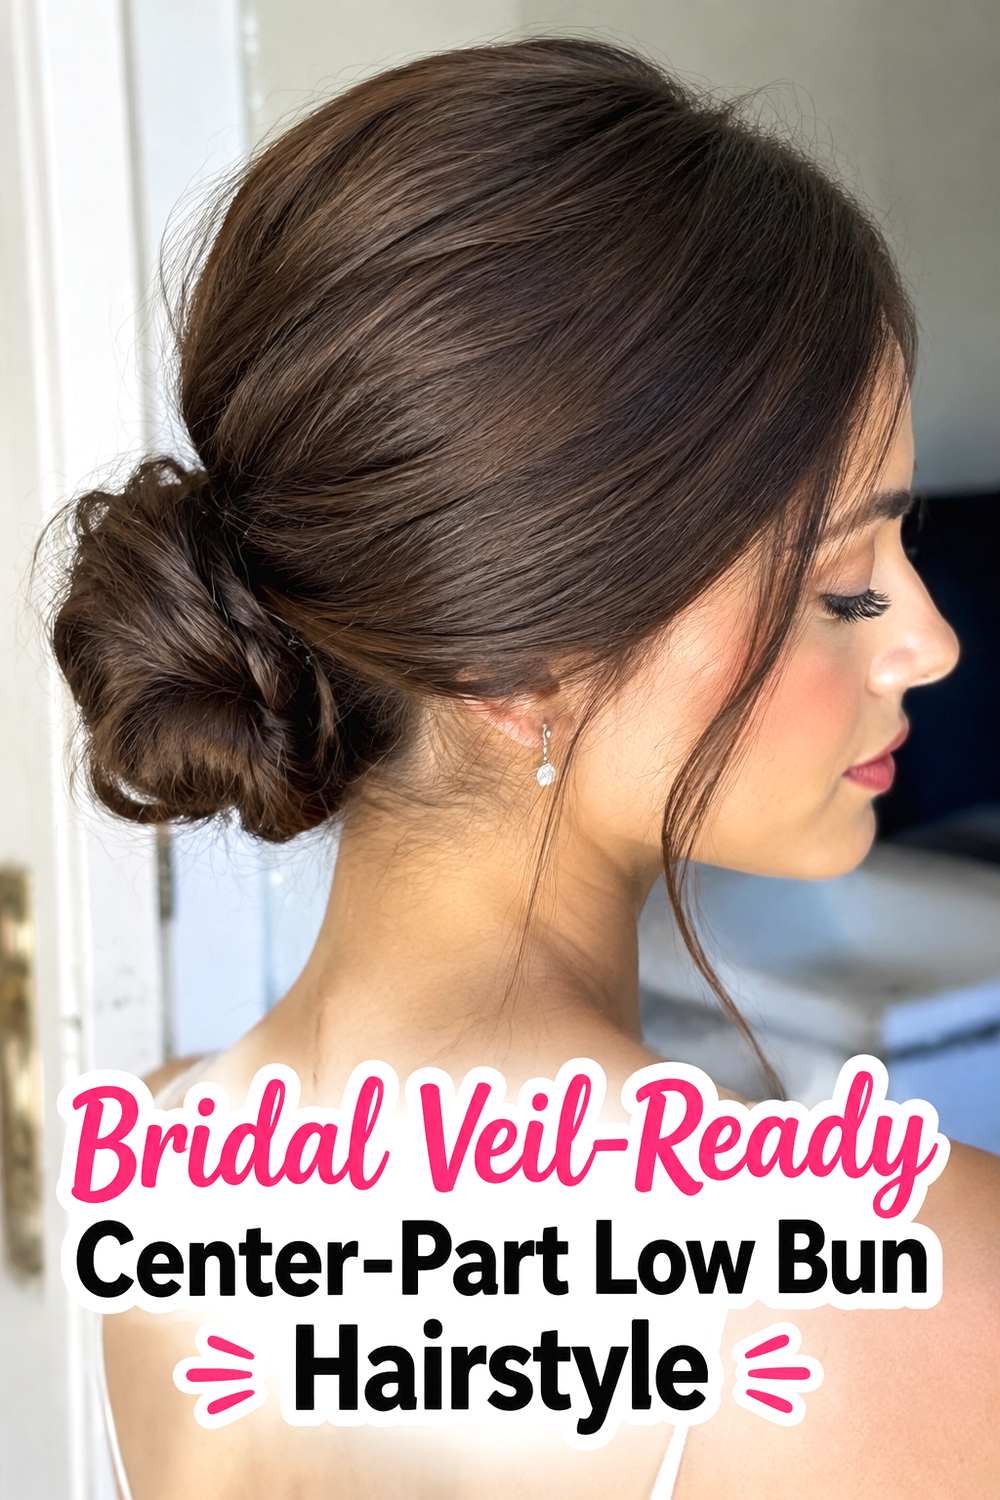
A veil-ready low bun needs more than a beautiful surface—it also needs enough structure to support accessories comfortably. This version keeps the center part precise and the hair glossy while building a stable, rounded bun slightly above the lowest point of the nape. That placement leaves useful space for a veil comb beneath or above the bun, depending on the desired effect. The shape should be secure without looking bulky, particularly if a veil, headpiece, or hair pins will be added later. Brides with longer hair can create the base from their own lengths, while finer hair may benefit from careful shaping to create balanced volume.
Wear & Maintenance
Test the veil placement with the finished hairstyle before the ceremony. The comb should slide into a supported area without loosening the bun or pressing uncomfortably against the scalp.
Styling Notes
Use shine strategically across the crown and sides, but keep the bun touchable enough that pins and veil hardware can grip securely rather than slipping on an overly slick surface.
12. Wet Look Center Part Low Bun Hairstyle
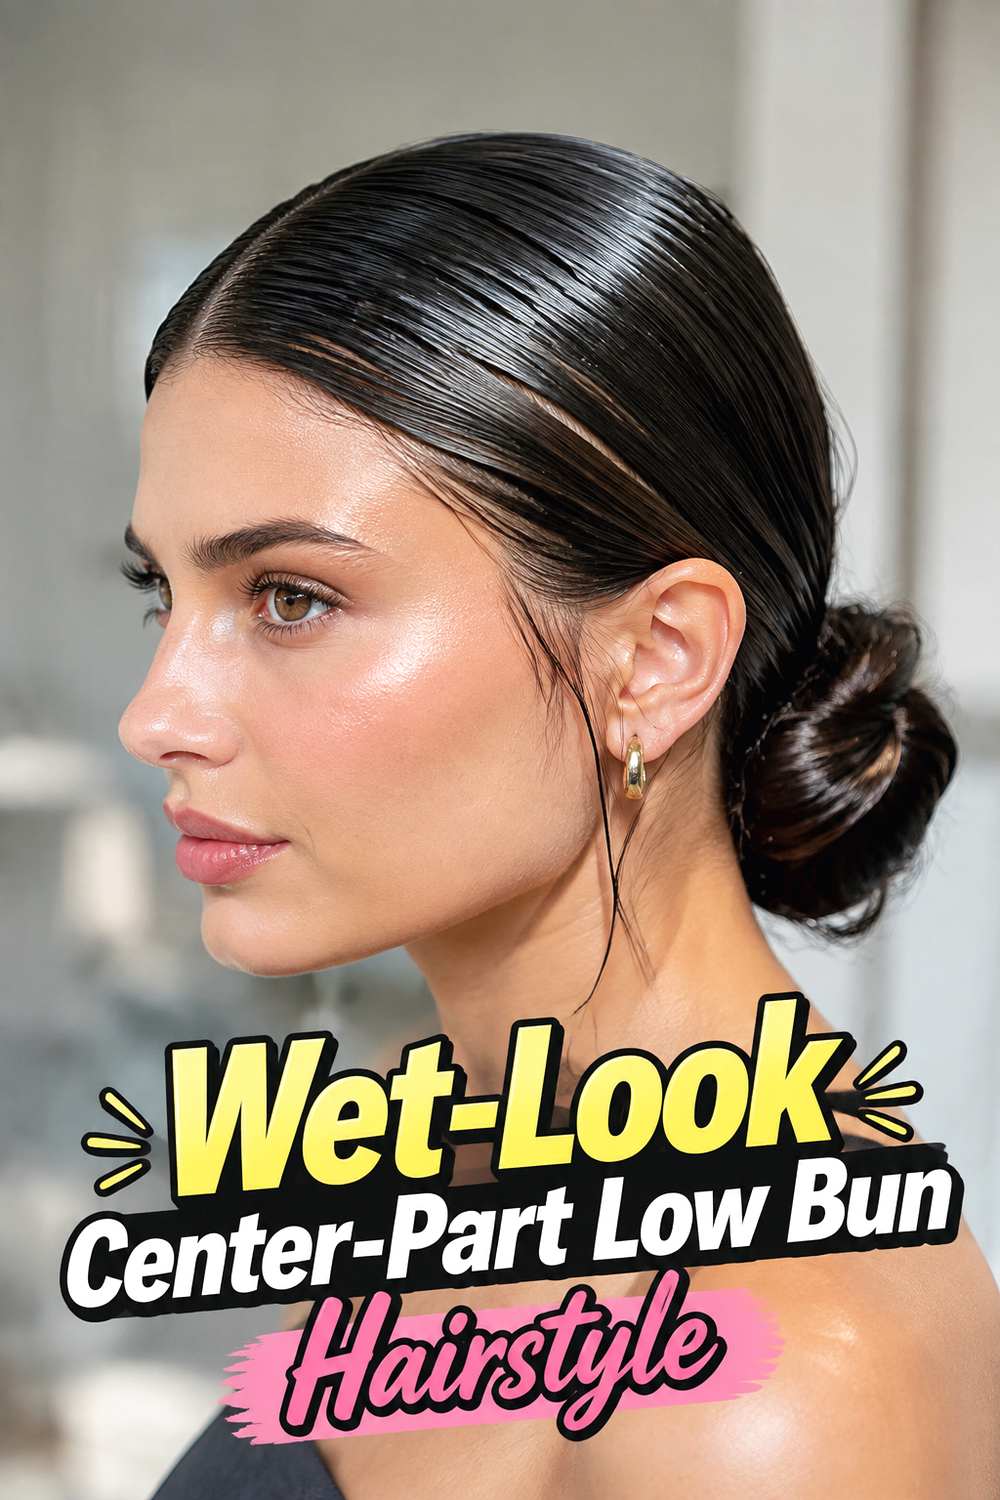
The wet-look variation pushes the glossy finish in a bolder, more editorial direction. Instead of relying on simple shine alone, the front and sides have a deliberately damp-looking definition, with comb lines or controlled strands sometimes remaining visible through the surface. A precise center part keeps everything symmetrical, while the low bun gives the stronger finish a wearable shape. The key is making the hair look intentionally glossy rather than greasy, which means concentrating styling product where you want definition instead of saturating every length. This style can work particularly well for evening events, fashion-forward outfits, or warm-weather occasions when a sleek finish complements the overall look.
Styling Notes
Distribute product in thin layers and comb it through evenly. Keeping the bun slightly less saturated than the crown can preserve strand definition and prevent the entire style from looking flat.
Best For
This option is ideal when you want a more dramatic interpretation of the low bun for parties, evening events, photography, or modern formalwear.
13. Soft Wave Glossy Center Part Low Bun Hairstyle
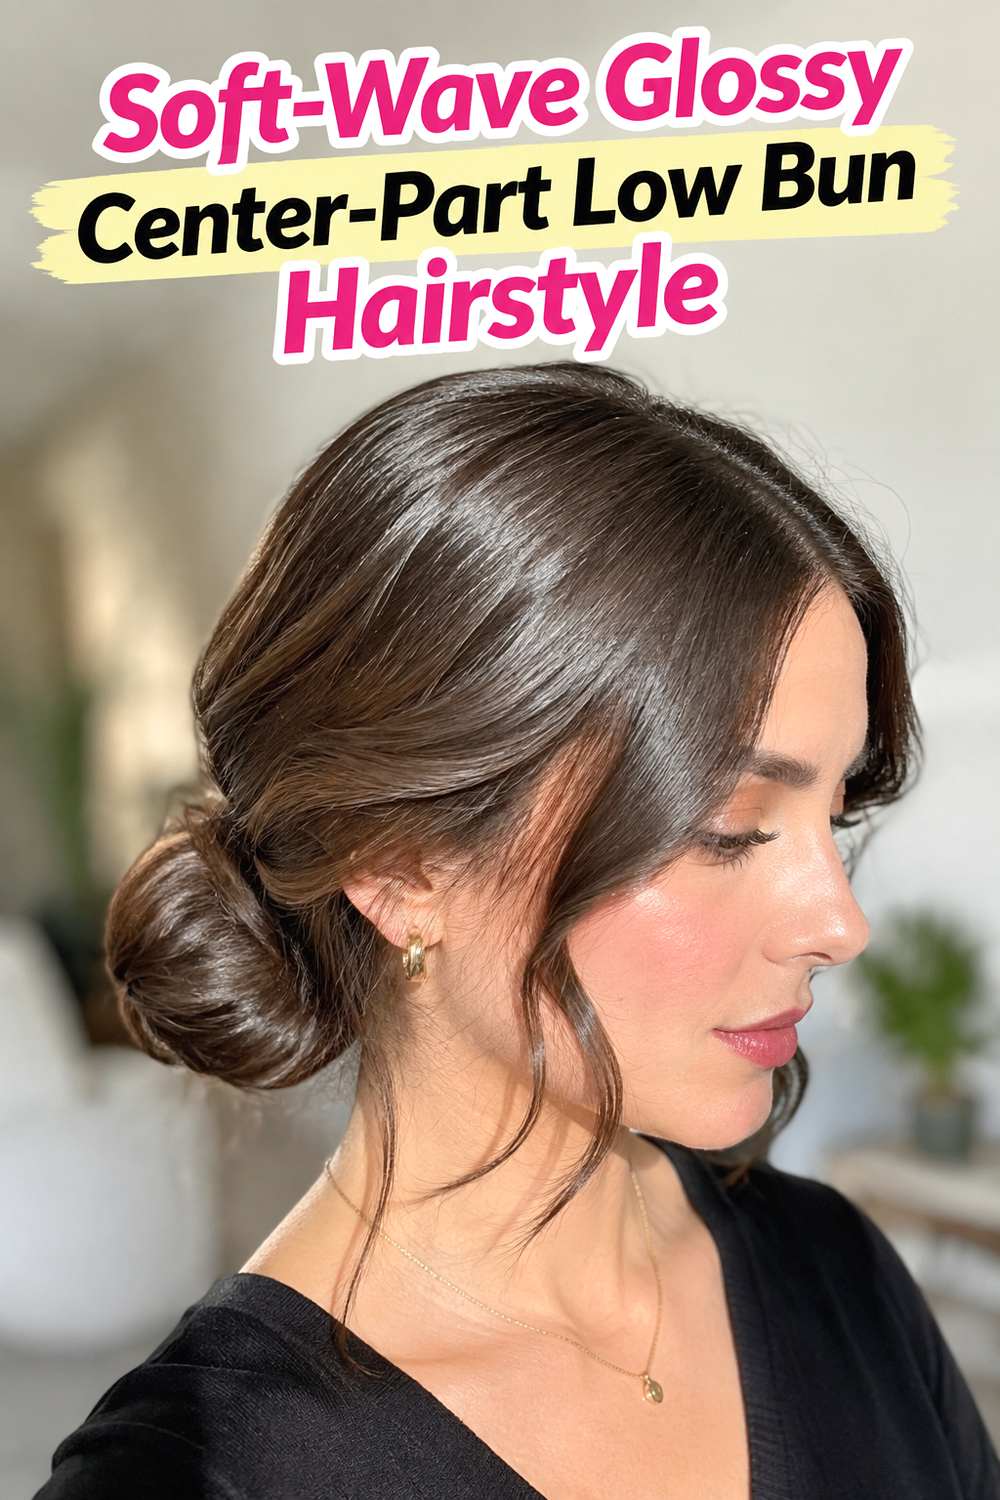
A glossy low bun does not have to erase every trace of texture. In this variation, subtle waves remain visible through the lengths or within the bun while the center part and crown stay polished. The result has more movement than a completely slick style and works especially well when hair naturally holds a soft bend. The bun can be shaped loosely enough to reveal gentle curves without becoming messy, creating a romantic contrast with the cleaner front. Rather than straightening the entire head first, refine only the areas that need smoothness. Preserving some natural wave can give the finished bun dimension and may also reduce unnecessary heat styling.
Why It Works
The mix of sleekness and movement prevents the hairstyle from feeling overly strict. Light reflecting across softly curved sections can also make the bun appear fuller.
Hair Type & Length
Naturally wavy hair is an obvious match, but straight hair can be given a slight bend before styling. Medium to long lengths provide enough material for the wave pattern to remain visible.
14. Fine Hair Polished Center Part Low Bun Hairstyle
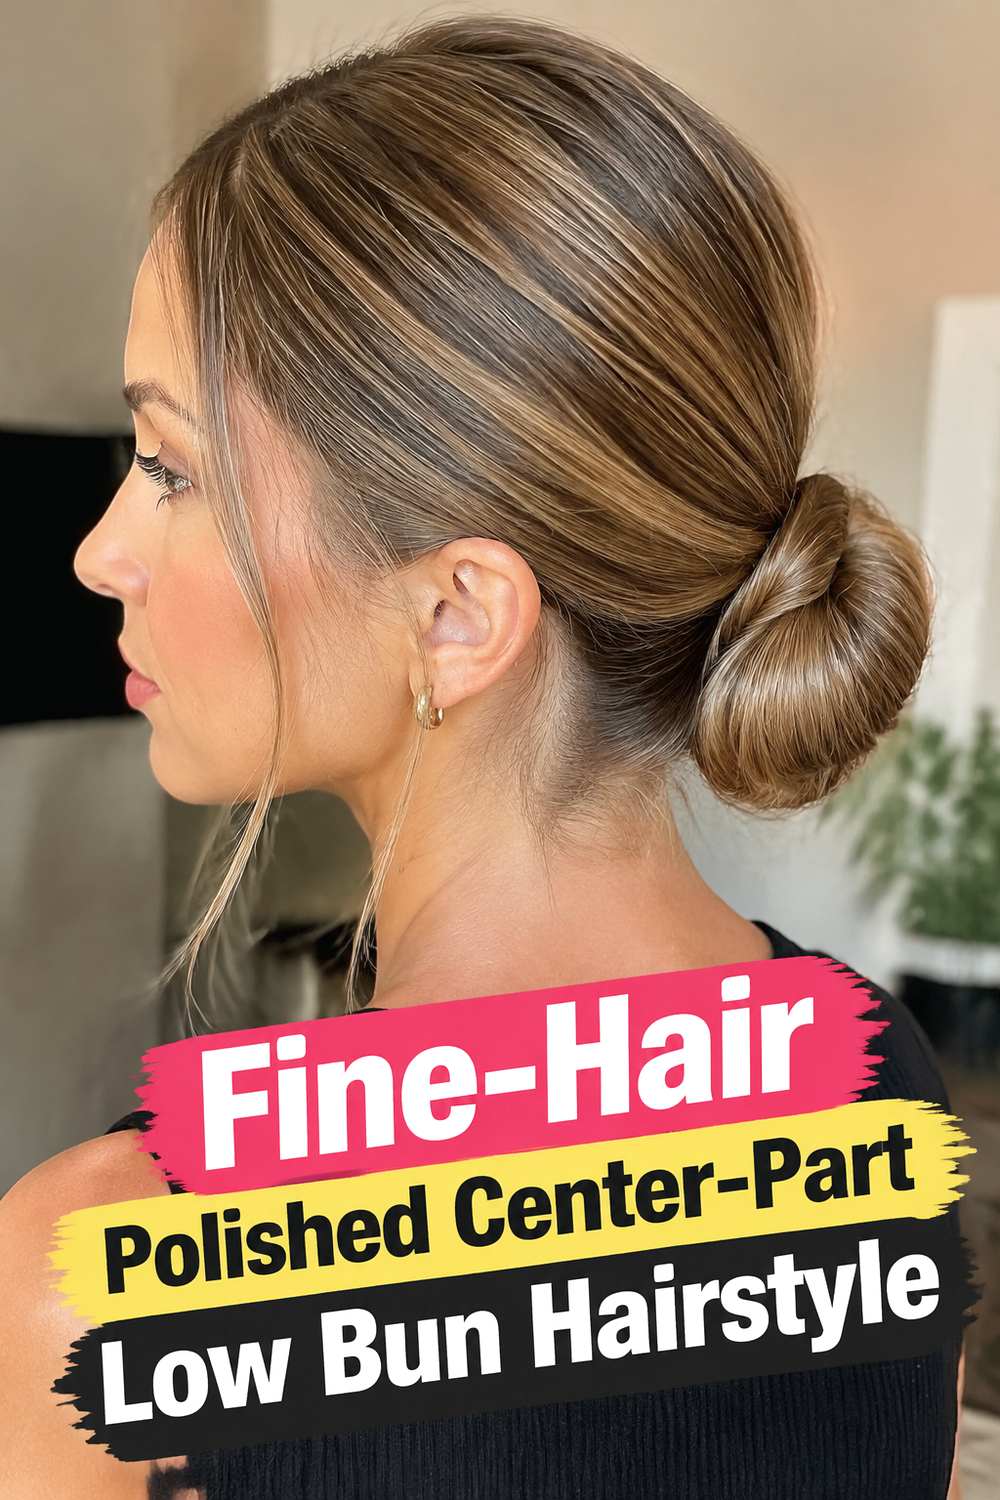
Fine hair can create an exceptionally elegant low bun when the shape is kept proportional instead of forcing excessive volume. A neat center part and smooth sides highlight the natural refinement of the texture, while a carefully wrapped bun keeps the ends organized. Positioning the bun close to the nape can make a smaller shape look intentional rather than sparse. Use lightweight products so the roots retain some life and the lengths do not become stringy. If additional fullness is desired, gently shaping or folding the ponytail before pinning can create more dimension without aggressive teasing. The goal is a polished silhouette that respects the hair’s natural density.
Pro Tip
Avoid using too much oil before styling. A tiny amount through the surface may enhance shine, but excess product can quickly reduce body in fine hair.
Wear & Maintenance
Secure the bun with small pins placed strategically rather than using numerous heavy accessories. Lighter hardware can help the style stay comfortable and prevent the bun from being pulled downward.
15. Thick Hair Wrapped Center Part Low Bun Hairstyle
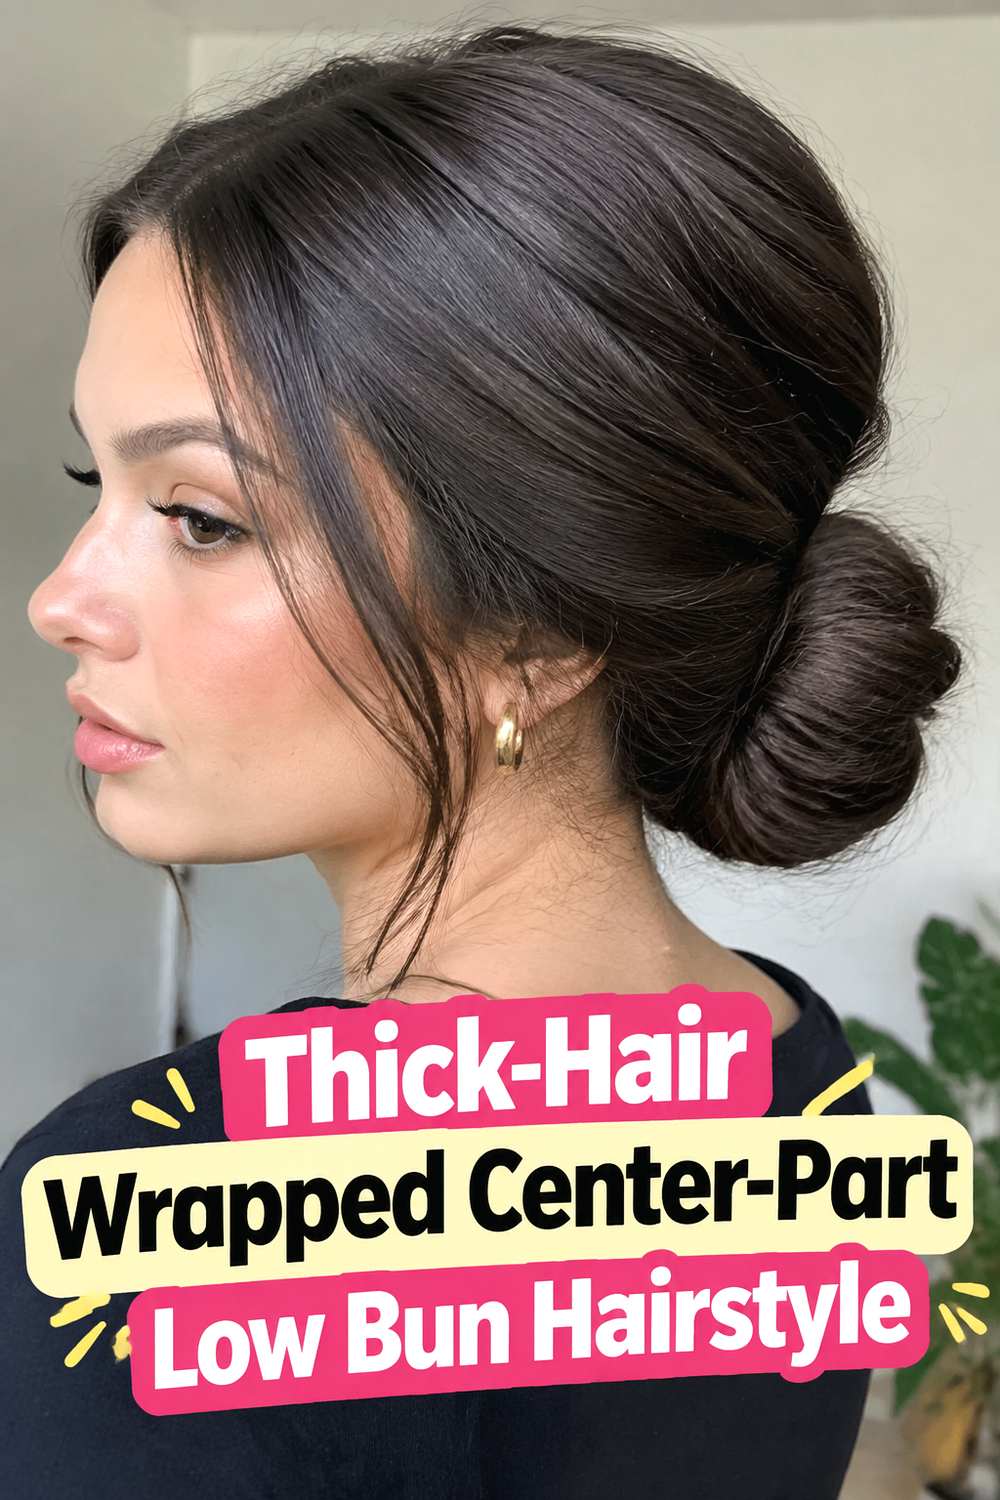
Thick hair gives a center-part low bun natural presence, but controlling that volume is what makes the finished result look polished. This wrapped version uses the hair’s density as a feature, creating a substantial bun with visible overlapping sections around the base. The center part and sides should remain smooth enough to balance the fullness at the nape. Dividing the ponytail into two sections before wrapping can make thick lengths easier to manage and can produce a more even shape than forcing everything into one tight coil. Strong anchoring is important, but distribute the pins around the bun so one area of the scalp does not carry all the weight.
Styling Notes
Work with the hair in sections and smooth each one individually. This provides more control than repeatedly brushing a dense ponytail after it has already been secured.
Wear & Maintenance
For long events, comfort matters as much as hold. Position the ponytail where the bun can rest naturally against the head, reducing the sensation of weight pulling backward.
16. Curly Texture Glossy Center Part Low Bun Hairstyle
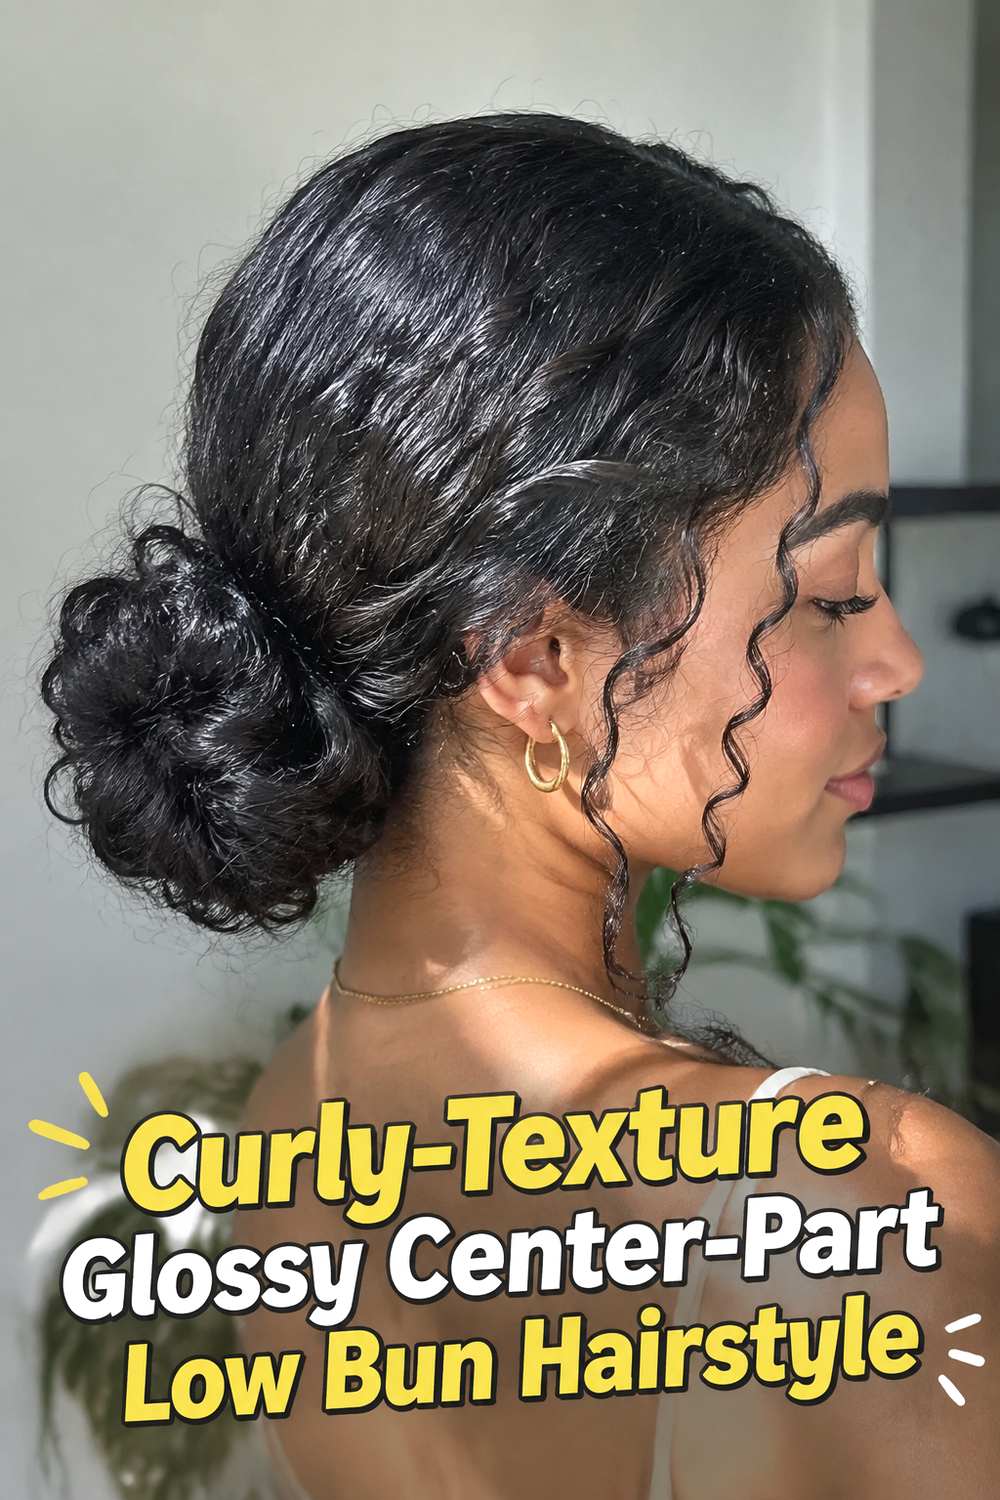
This version celebrates curly texture instead of trying to flatten it completely. The center part remains defined, and the front can be smoothed or lightly refined, but the bun retains visible curls, coils, or textured movement. That contrast creates a beautiful polished-and-natural balance, with shine coming from healthy-looking definition rather than a rigid surface. Depending on the curl pattern, the bun may appear fuller than a straight-hair version even at the same length. Keep the styling approach flexible: some textures may need more moisture and gentle control, while others look best with minimal manipulation. Avoid brushing through defined curls unnecessarily once the bun has been shaped.
Why It Works
Leaving texture visible adds depth and individuality while the center part and low placement preserve the sophisticated structure associated with the style.
Pro Tip
Use smoothing only where you actually want it. Refining the part, hairline, and sides while preserving texture in the bun can create a more dimensional result than slicking every section equally.
17. Minimalist Mirror Shine Center Part Low Bun Hairstyle
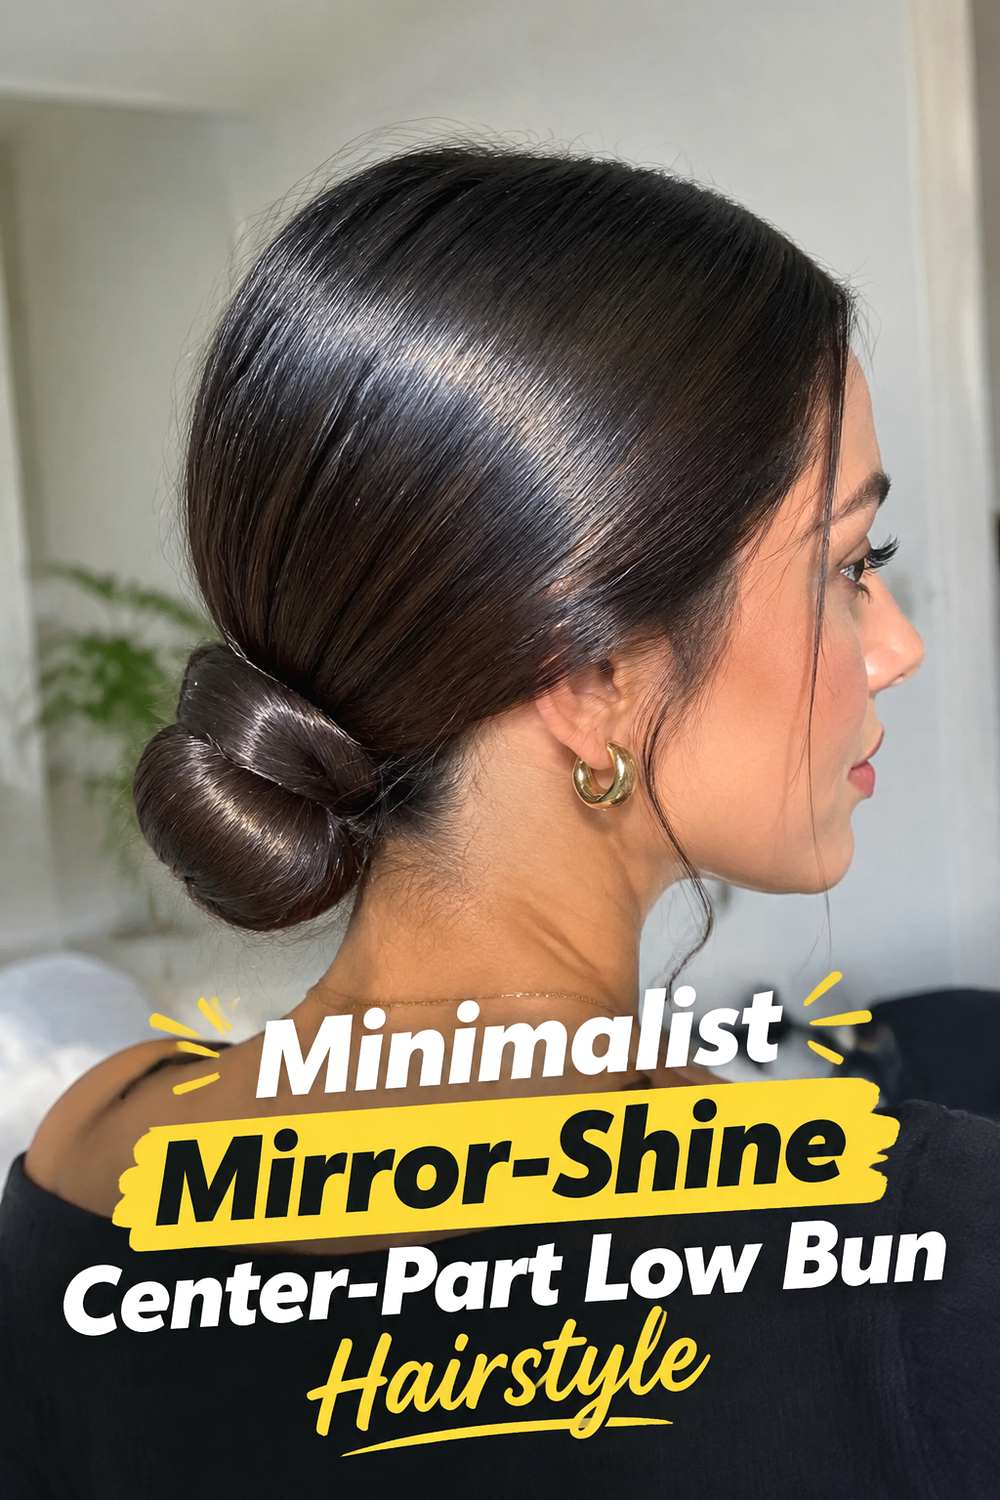
The minimalist mirror-shine bun strips the look back to its most refined elements: a perfectly balanced center part, uninterrupted smooth sides, a compact low bun, and a luminous finish. There are no loose strands, decorative pins, visible braids, or exaggerated shapes, so precision becomes the main feature. This makes the hairstyle especially effective with strong earrings, a high neckline, or an outfit that benefits from a clean backdrop. The shine should look reflective but still reveal individual strands and natural hair density. For the best result, focus on preparation and controlled smoothing rather than adding heavy product at the end, which can make an otherwise elegant style appear coated.
Best For
This is one of the strongest options for minimalist weddings, formal dinners, sleek office styling, black-tie looks, and occasions where understated polish suits the outfit better than ornate hair.
Styling Notes
Refine the center part before gathering the hair and check the silhouette from both sides. With such a simple hairstyle, small inconsistencies in parting or bun placement become more noticeable.
How to Choose the Right Look
Start with your hair length and density. Medium to long hair gives you the most freedom for coils, knots, braids, and wrapped buns, while fine or shorter hair often looks best with a compact shape that does not depend on artificial-looking volume. Thick hair can support larger sculptural buns, but distributing the weight carefully will make the style more comfortable.
Texture also matters. Straight or stretched hair naturally lends itself to mirror-like surfaces, while wavy and curly textures can look equally polished when some movement remains visible. You do not need to remove your natural texture to create a glossy finish; you can concentrate smoothing around the part, hairline, and sides while allowing the bun to retain more dimension.
Think about styling time and hold. A classic coil or tucked bun is relatively straightforward, while braided, twisted, looped, and bridal versions require more shaping and pin placement. For long events, prioritize a stable ponytail base and comfortable pins rather than pulling the entire style tighter.
Your occasion can help narrow the options further. Minimalist and classic buns work well for everyday polish, office settings, dinners, and formalwear. Pearls, metallic cuffs, romantic tendrils, or veil-ready construction are better suited to weddings and special events. A wet-look finish or sculpted loop offers a stronger editorial feel.
Finally, decide how glossy you want the result to appear. Light shine keeps the style soft and wearable, while mirror-shine or wet-look finishes make a stronger statement. Whatever you choose, visible strand detail and a believable hairline usually create a more natural-looking result than an overly coated surface.
Final Thoughts
Glossy center-part low buns can look dramatically different even when they share the same basic silhouette. A simple coil feels timeless, a knot or loop adds structure, soft tendrils introduce romance, and pearls or metallic details quickly shift the style toward special-occasion territory.
Choose the version that works with your actual length, density, and texture rather than trying to recreate volume or smoothness your hair does not naturally support. The most convincing finish is polished but still believable, secure enough for your plans, and comfortable enough to wear for the full occasion.
FAQs
1. How do I make a center-part low bun look glossy without making it greasy?
Use smoothing and shine products sparingly, concentrating them over the surface rather than saturating the roots. Layering a small amount is easier to control than applying too much at once.
2. Can curly or textured hair wear a glossy center-part low bun?
Yes. You can define the center part and smooth selected areas while leaving curls or coils visible in the bun. A glossy finish does not require eliminating all natural texture.
3. Where should a low bun sit?
Most low buns sit around the nape or slightly above it. The best placement depends on comfort, hair length, neck shape, and whether you plan to add accessories such as a veil or decorative cuff.
4. How can I keep a low bun secure for a long event?
Start with a firmly anchored low ponytail, shape the bun around that base, and place pins from different directions. Avoid relying on decorative pins as the main source of support.
5. Which glossy center-part low bun is best for a wedding?
A veil-ready structured bun is practical for brides wearing a veil, while pearl-pinned, soft face-framing, twisted, or minimalist versions can suit different dress styles and levels of formality.
CTA
Save your favorite glossy center-part low bun hairstyles and share this collection whenever you need polished updo inspiration.