17 Mini Twist Side Crown Hairstyle Ideas
Mini twists become especially versatile when the crown is shifted to one side, creating a soft asymmetrical shape with movement, height, and plenty of styling personality.
A mini twist side crown hairstyle uses small twists as the foundation while concentrating lift, gathering, or visual emphasis toward one side of the crown. The effect can be subtle, with only a few twists pinned upward, or much more noticeable with sweeping volume and layered placement.
Length, twist density, parting, crown height, and the treatment of the ends all influence the result. Some versions keep every twist defined and flowing, while others loosen selected ends or use pinned details for a softer finish. The best choice depends on how much asymmetry, height, and everyday styling flexibility you want.
Quick List
- Classic Mini Twist Side Crown Hairstyle
- Deep Side Part Mini Twist Crown Hairstyle
- Pinned Side Crown Mini Twist Hairstyle
- Voluminous Side Crown Mini Twist Hairstyle
- Low Side Crown Mini Twist Hairstyle
- High Side Crown Mini Twist Hairstyle
- Side Swept Mini Twist Crown Hairstyle
- Half Up Side Crown Mini Twist Hairstyle
- Face Framing Side Crown Mini Twist Hairstyle
- Loose End Side Crown Mini Twist Hairstyle
- Curved Part Side Crown Mini Twist Hairstyle
- Asymmetrical Side Crown Mini Twist Hairstyle
- Shoulder Length Side Crown Mini Twist Hairstyle
- Long Side Crown Mini Twist Hairstyle
- Soft Halo Side Crown Mini Twist Hairstyle
- Twist Wrapped Side Crown Hairstyle
- Tousled Side Crown Mini Twist Hairstyle
1. Classic Mini Twist Side Crown Hairstyle
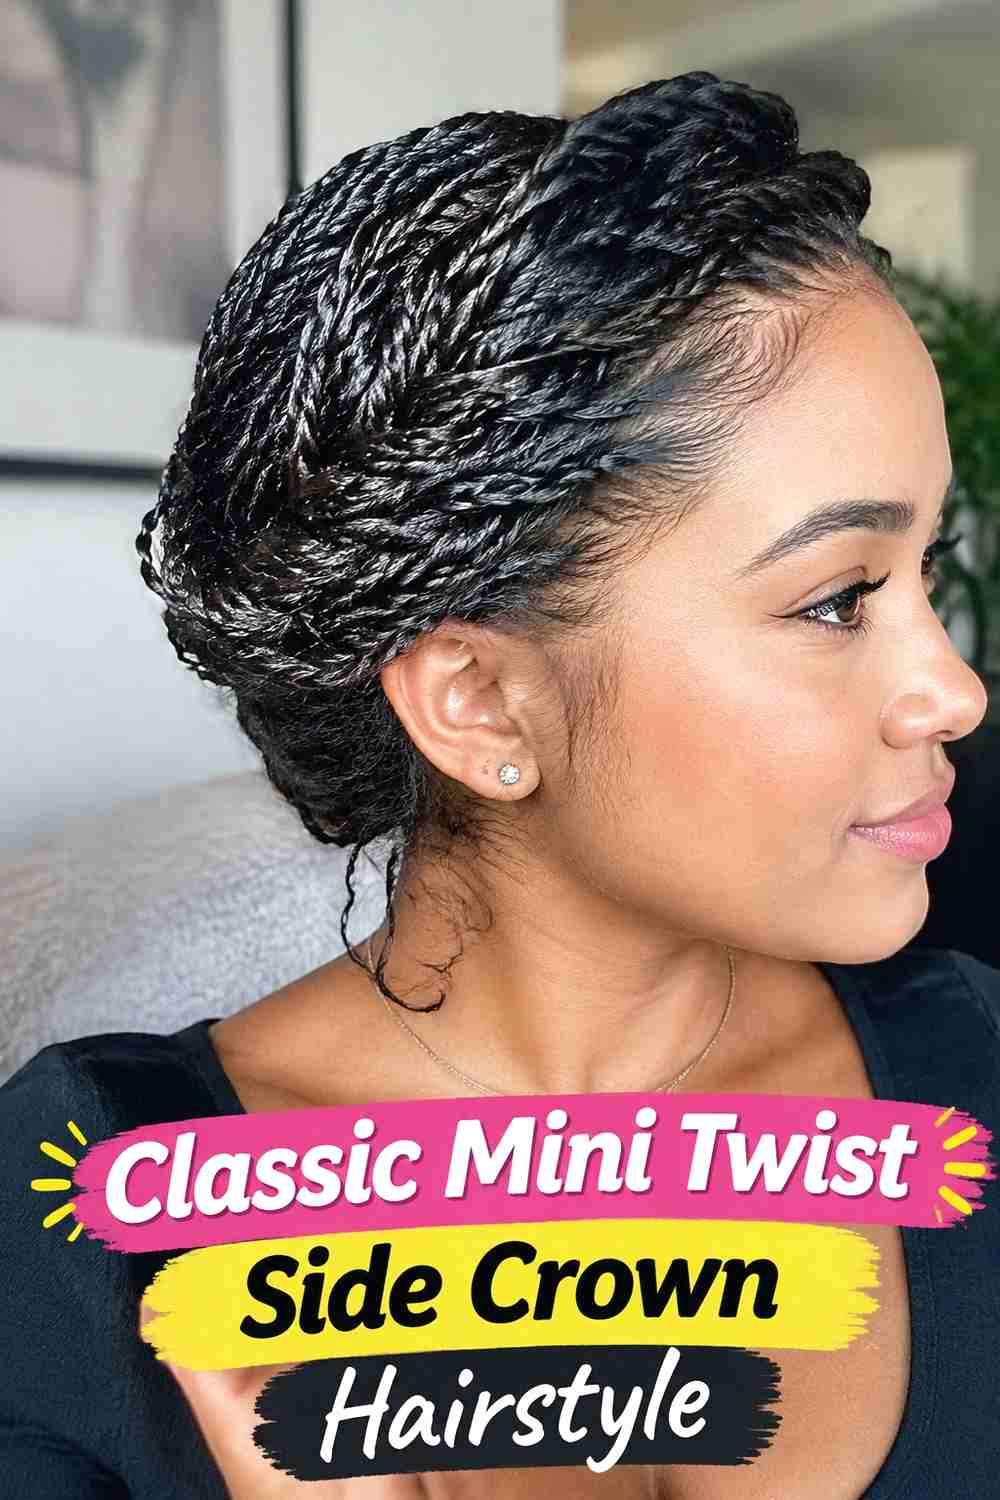
The Classic Mini Twist Side Crown Hairstyle gathers selected twists toward one upper side of the head while leaving the rest to fall naturally. The lifted section creates a visible crown without turning the style into a full updo, and the smaller twist size keeps plenty of texture visible throughout. Medium and longer lengths work particularly well because the loose twists provide enough movement to balance the elevated side. A subtle off-center part can support the direction without looking overly sharp. The crown should feel softly arranged rather than tightly compressed, allowing individual twists to remain visible where they meet the pinned or gathered section.
Styling Notes
Move only the twists needed to establish the crown shape, then let the remaining lengths fall naturally instead of over-securing the entire side.
Best For
This version is a useful starting point if you want noticeable asymmetry without an elaborate pinned design.
2. Deep Side Part Mini Twist Crown Hairstyle
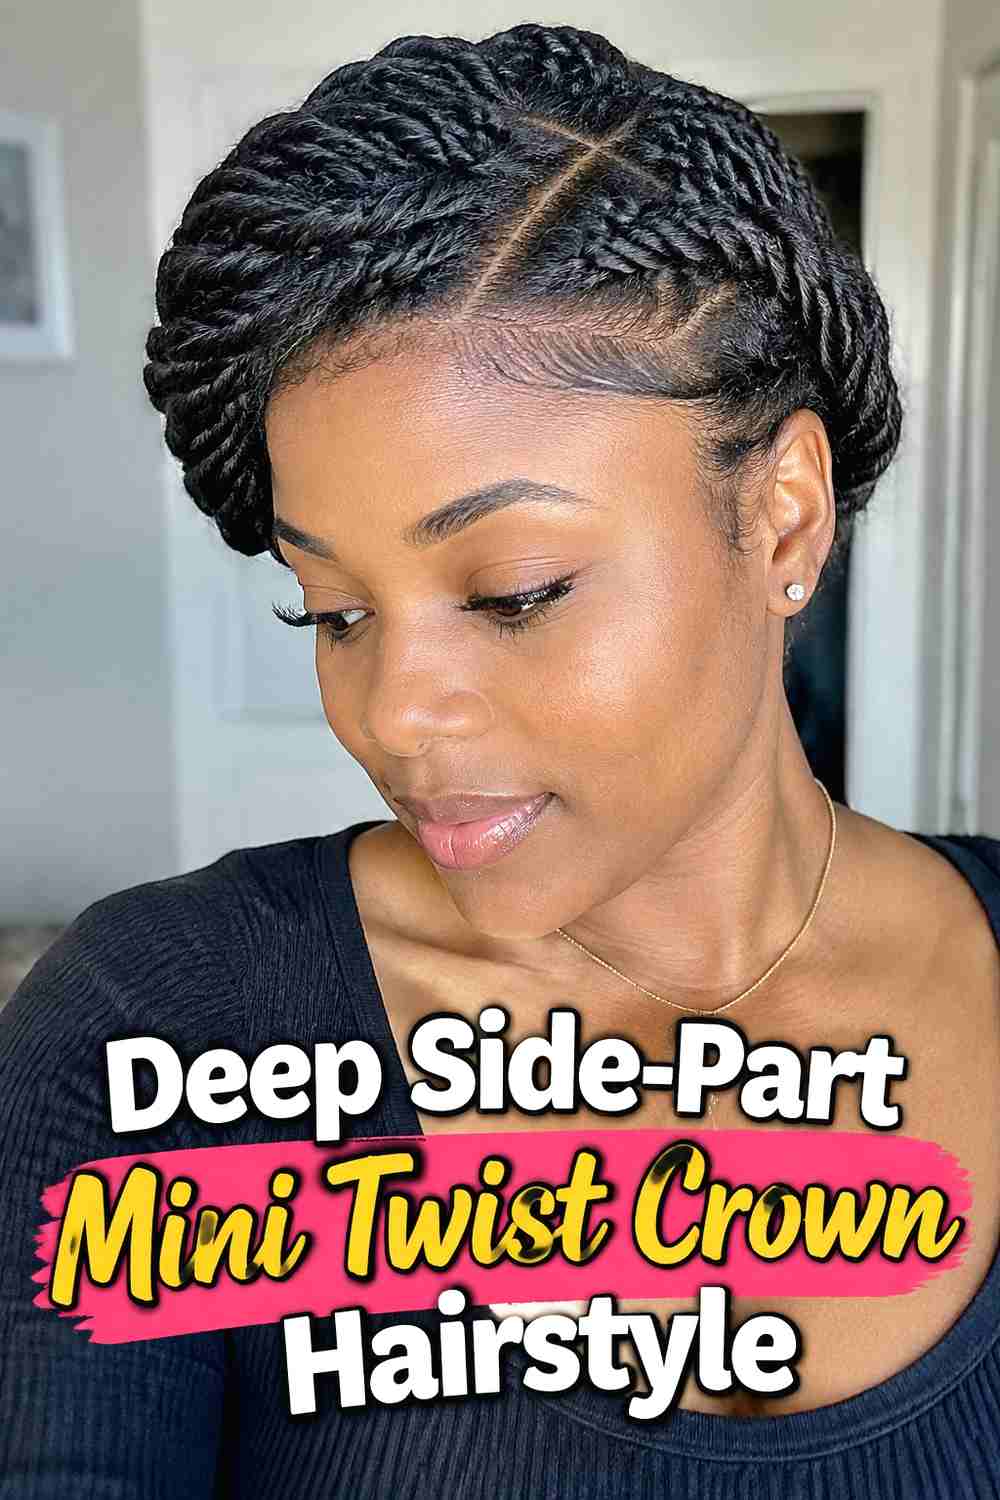
A deep side part creates an immediate foundation for a dramatic side crown by shifting most of the mini twists toward one side. The fuller section can rise gently near the crown before cascading down, while the lighter side remains closer to the head. Because the part already establishes direction, the twists require less repositioning to create the finished shape. This look works especially well with medium-sized mini twists that are small enough to move easily but substantial enough to show individual definition. Keeping the crown softly elevated rather than tightly pulled allows the part, texture, and overall asymmetry to work together without making the style appear overly rigid.
Why It Works
The deep part naturally places more texture on one side, creating crown volume without needing to gather a large amount of hair.
Pro Tip
Choose the part before arranging the crown so the twists naturally fall in the direction you want them to stay.
3. Pinned Side Crown Mini Twist Hairstyle
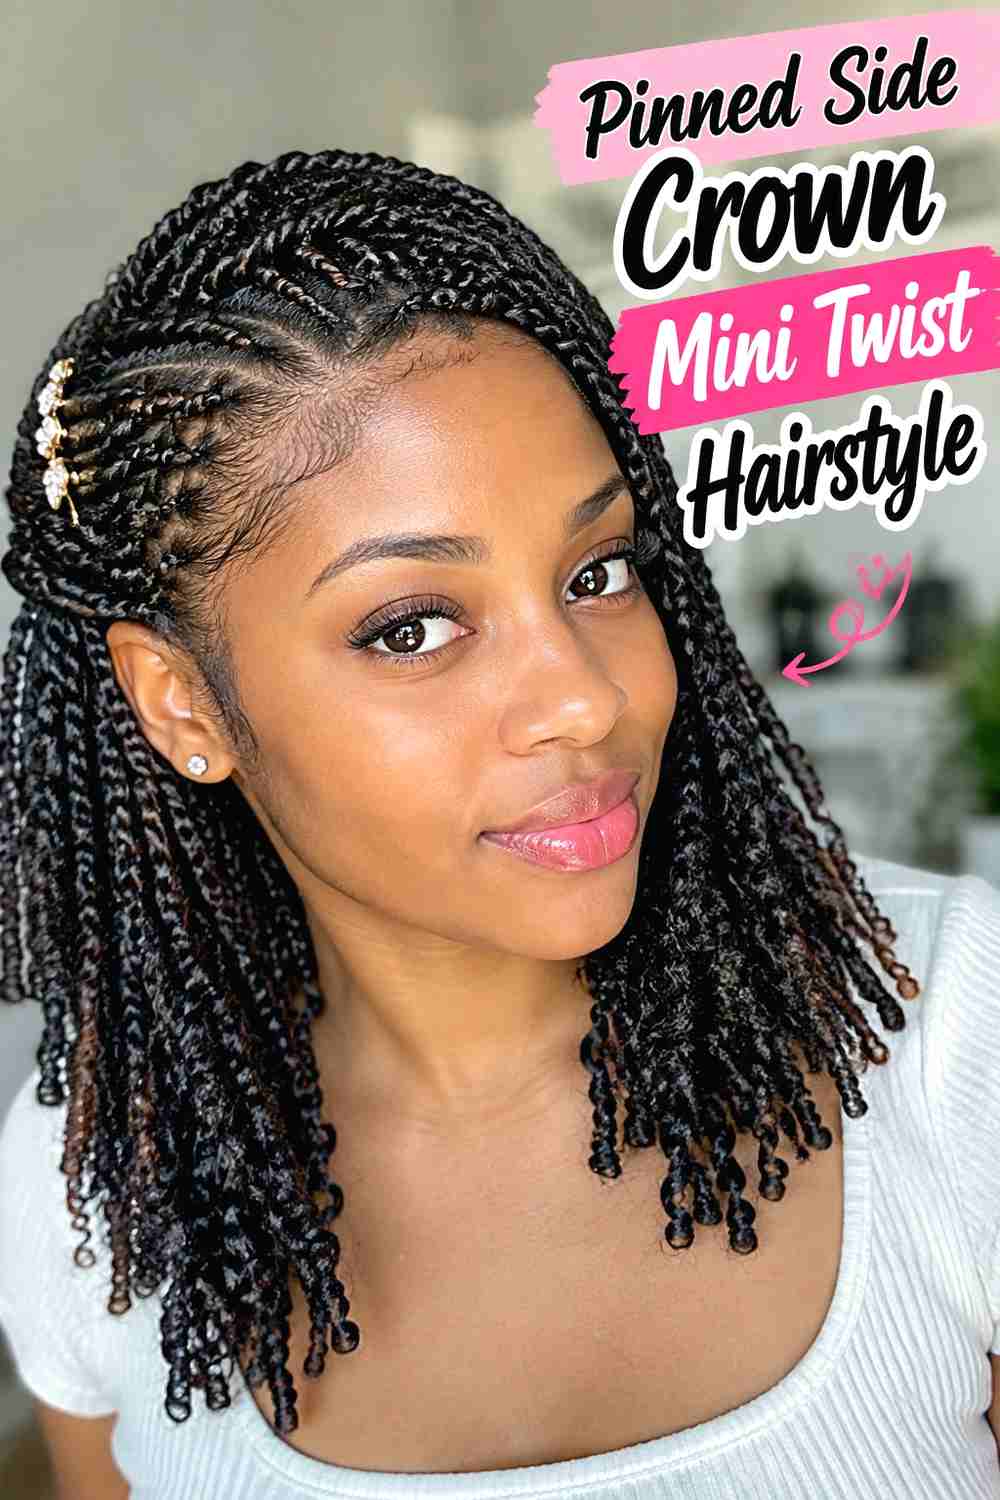
The Pinned Side Crown Mini Twist Hairstyle uses discreet pins to lift a section of twists toward one side of the crown while leaving the rest loose. The pinned area can form a small ridge or gentle mound depending on how many twists are included. This creates a polished silhouette without hiding the individual twist pattern. The most natural finish comes from overlapping small groups rather than moving one large section at once. A few twists can remain loose near the temple to keep the front soft. The pinned crown works particularly well for medium and long mini twists because the free lengths provide contrast with the more structured upper section.
Styling Notes
Secure small groups in stages and cross them lightly so the crown looks textured instead of flattened beneath one large pin.
Wear & Maintenance
Check that pins sit comfortably and do not press sharply against the scalp during extended wear.
4. Voluminous Side Crown Mini Twist Hairstyle
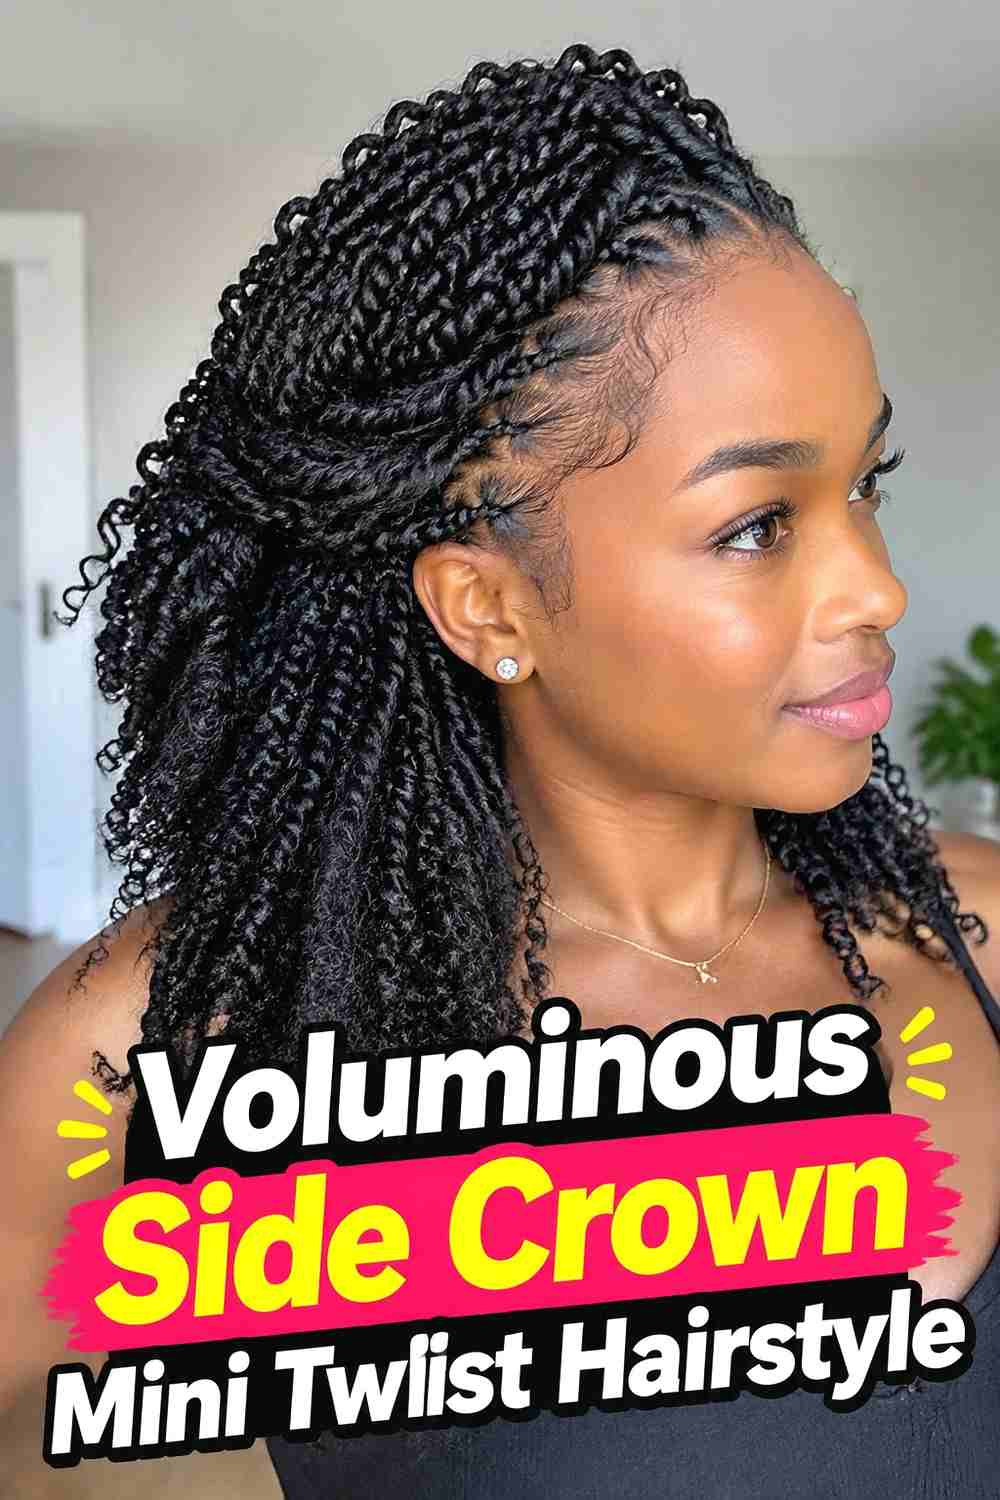
Extra lift at one side of the crown turns mini twists into a fuller, more sculpted style without sacrificing their texture. The upper twists are loosely gathered and arranged upward, while the lower sections remain free to fall around the shoulders or down the back. The key is creating height through placement rather than packing the twists tightly together. Slight differences in direction help the crown look dimensional instead of forming one smooth block. This approach works especially well on dense mini twists because there is enough texture to create visible fullness. Keeping the opposite side more controlled makes the elevated crown stand out even more clearly.
Why It Works
Concentrating fullness on one side creates height and asymmetry while the loose lengths keep the style balanced.
Pro Tip
Build volume gradually, checking the silhouette from the front and side before adding more twists to the crown.
5. Low Side Crown Mini Twist Hairstyle
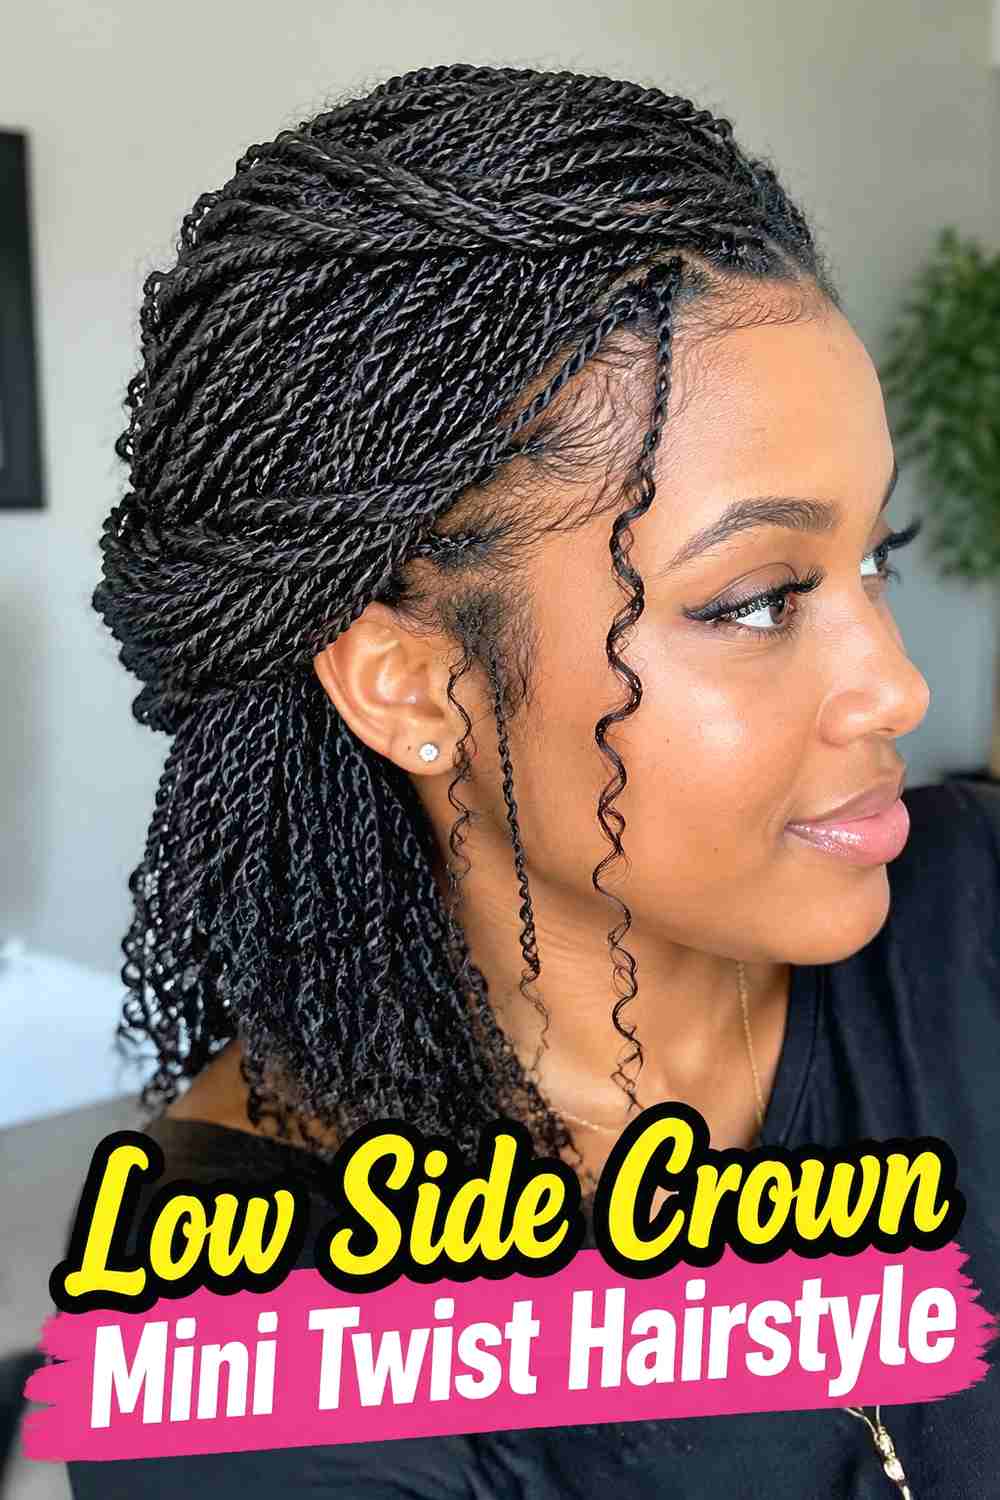
A low side crown sits closer to the area above and behind the ear, giving the hairstyle a softer, less elevated shape. Selected mini twists sweep diagonally toward the side and gather into a small rolled or pinned section, while the remaining twists continue downward. The placement makes this version feel understated and easy to wear while still creating a noticeable asymmetrical detail. It works particularly well on shoulder-length twists because the lower crown blends naturally into the hanging ends. A side part can reinforce the direction, although the style also works with an irregular or nearly invisible part for a more relaxed finish.
Best For
Choose this look when you want the side-crown effect without pronounced height at the top of the head.
Styling Notes
Position the gathering point above the ear rather than directly on the crown to keep the silhouette low and softly angled.
6. High Side Crown Mini Twist Hairstyle
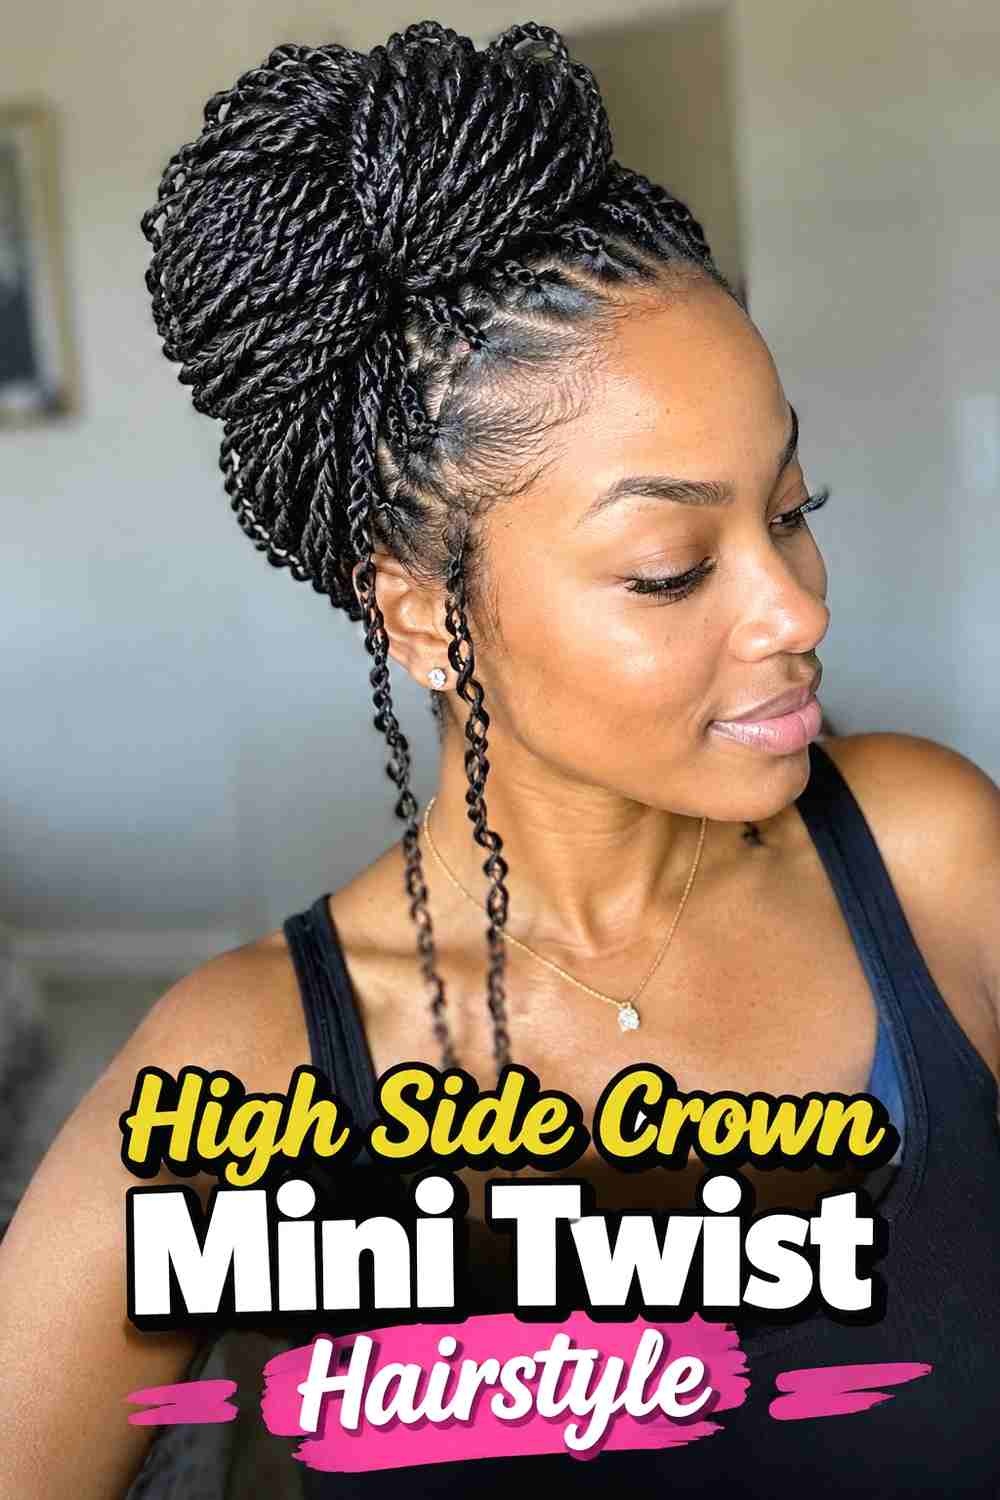
A high side crown places the focal point closer to the upper crown, creating noticeable lift and a more dramatic asymmetrical silhouette. The twists can be swept upward from one side and secured so that several textured loops or curved sections remain visible at the top. Keeping the opposite side relatively sleek allows the elevated placement to stand out. Longer mini twists provide plenty of material for shaping, but medium lengths can produce a compact version with less weight. The crown should remain stable without feeling overly tight, especially when many twists are being redirected upward. A few loose pieces around the front can soften the increased height.
Styling Notes
Build height with loose overlapping sections rather than pulling every twist tightly toward a single point.
Wear & Maintenance
If the gathered crown feels heavy or creates persistent pulling, reduce the number of twists included in the elevated section.
7. Side Swept Mini Twist Crown Hairstyle
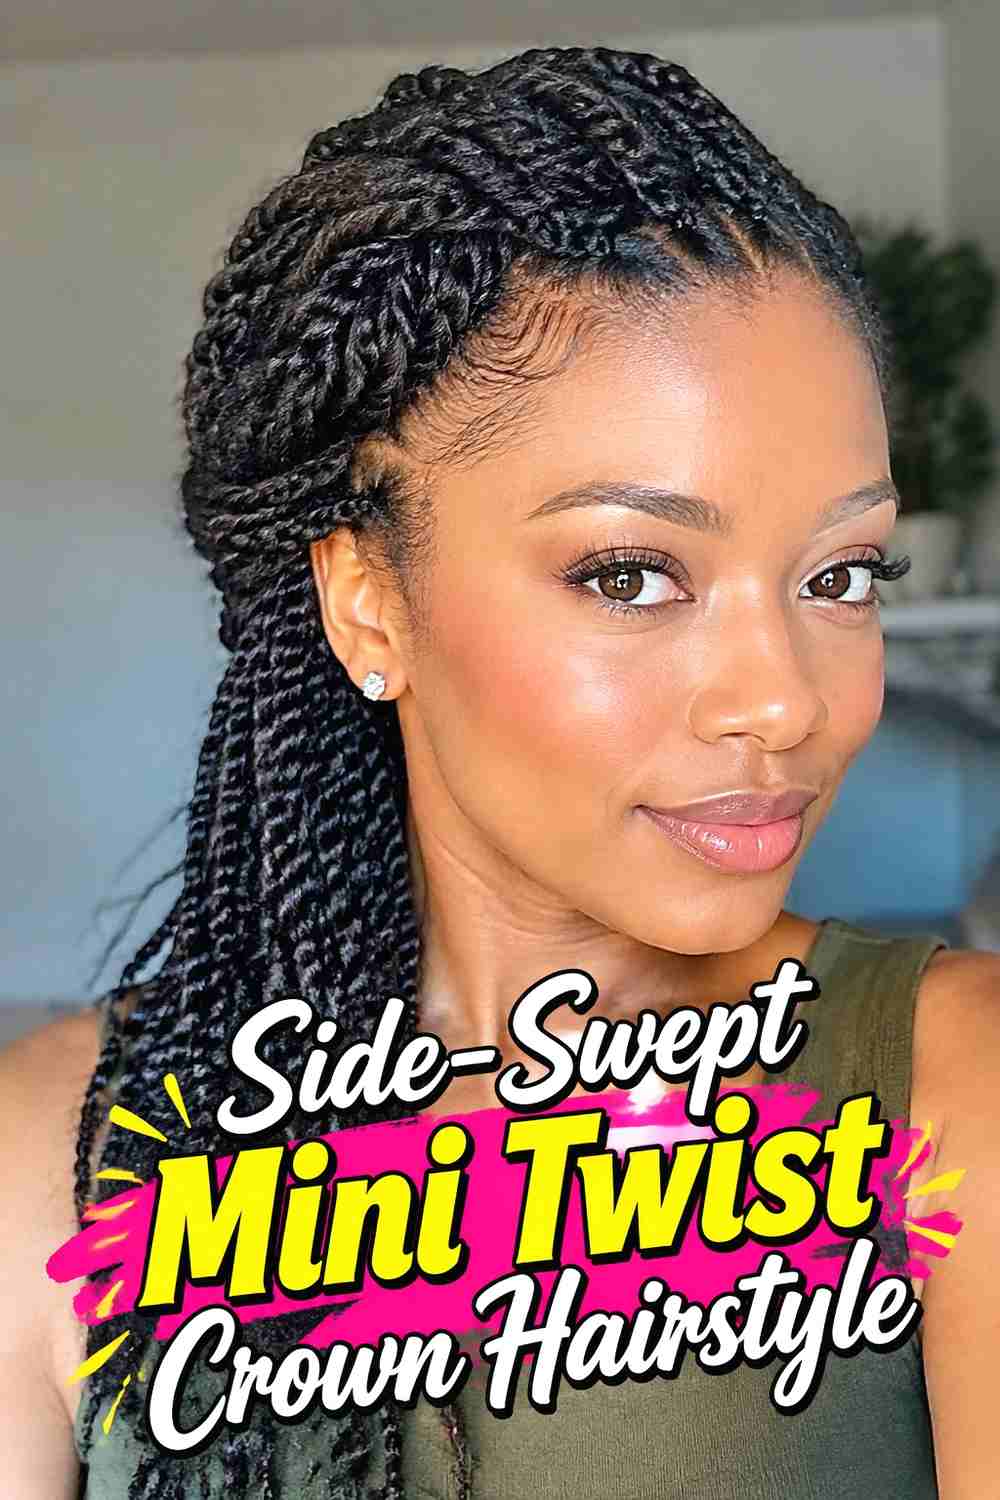
This style uses a broad sweep of mini twists to create movement from one side of the head toward the crown. Instead of forming a compact pinned mound, the twists travel diagonally across the upper section before flowing into the hanging lengths. The result feels fluid and less structured than a traditional pinned crown. A deep or moderate side part can strengthen the direction, while leaving several twists near the front loose helps keep the style relaxed. Medium-to-long lengths work best because the sweep is easier to see when the twists have enough movement. The finish should appear arranged but not overly perfect, with individual twists still clearly visible.
Why It Works
The long diagonal line creates movement across the head while maintaining the natural flow of the mini twists.
Best For
This option is ideal if you like an asymmetrical look but want less obvious pinning or sculpted height.
8. Half Up Side Crown Mini Twist Hairstyle
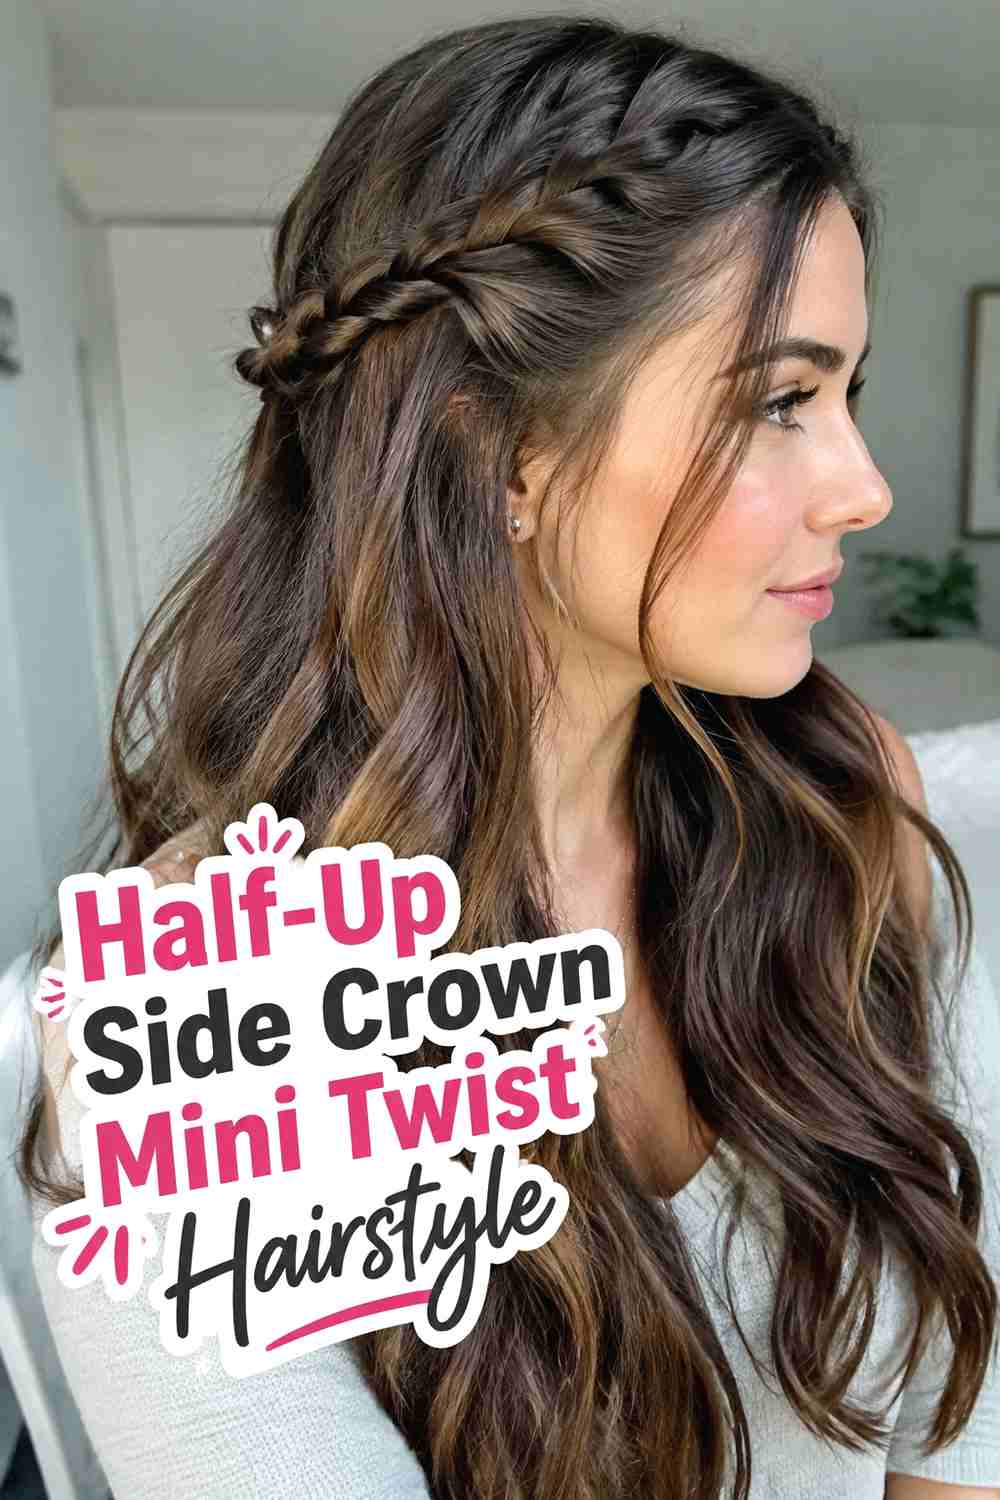
A half-up arrangement gathers the upper mini twists toward one side of the crown while leaving the lower layers loose. The result combines the openness of a half-up style with the asymmetry of side placement. A small tie, clip, or hidden pin can hold the upper section without pulling the entire hairstyle upward. The free twists underneath provide fullness and movement through the back, which helps balance the lifted top. This style works particularly well with shoulder-length and longer mini twists because the two sections remain visually distinct. A slightly messy gathering point can make the finish feel softer and more natural rather than overly formal.
Styling Notes
Gather only the top and temple sections, leaving enough twists down to maintain a full lower silhouette.
Best For
Choose this style when you want hair away from the face while still showing most of your twist length.
9. Face Framing Side Crown Mini Twist Hairstyle
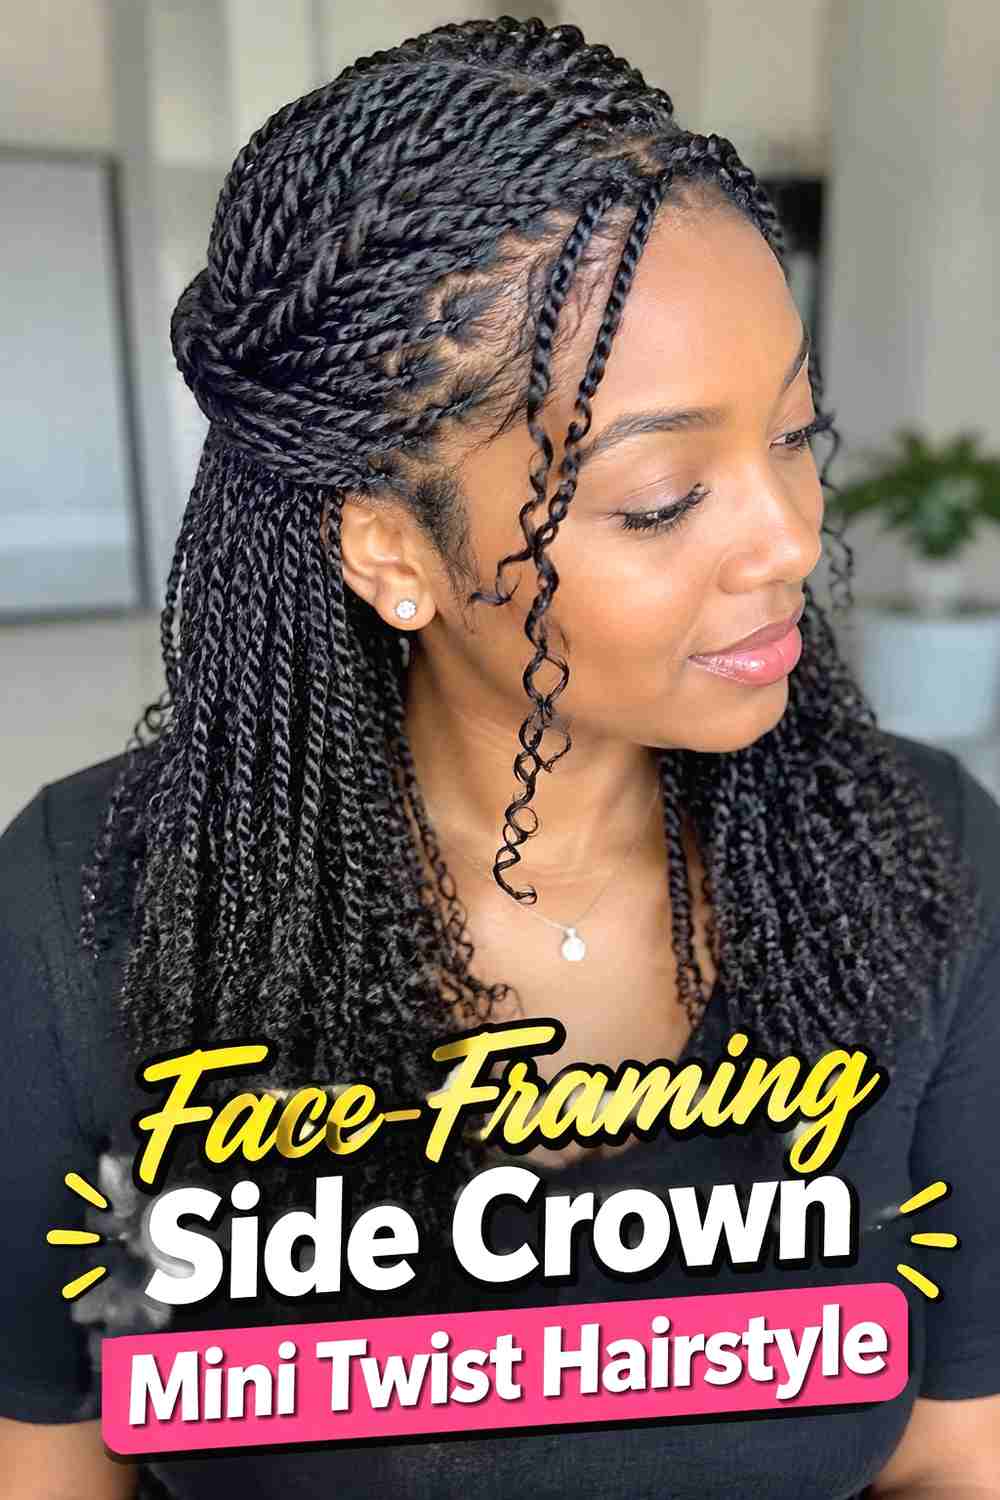
Leaving several mini twists loose around the face softens the stronger structure of a side crown. The main section is swept or pinned toward one side of the upper head, while selected twists near the temples and front remain free. These face-framing pieces can be slightly shorter, curled at the ends, or simply allowed to follow their natural movement. The crown itself should remain compact enough that the loose front sections look intentional rather than disconnected. This variation is particularly appealing when you want an upstyled effect without exposing the entire hairline. The contrast between pinned texture and free twists gives the finished look depth from the front.
Why It Works
Loose front sections break up the structured crown and create movement around the face without hiding the overall shape.
Pro Tip
Leave out only a few twists at first; more can always be released if the front needs additional softness.
10. Loose End Side Crown Mini Twist Hairstyle
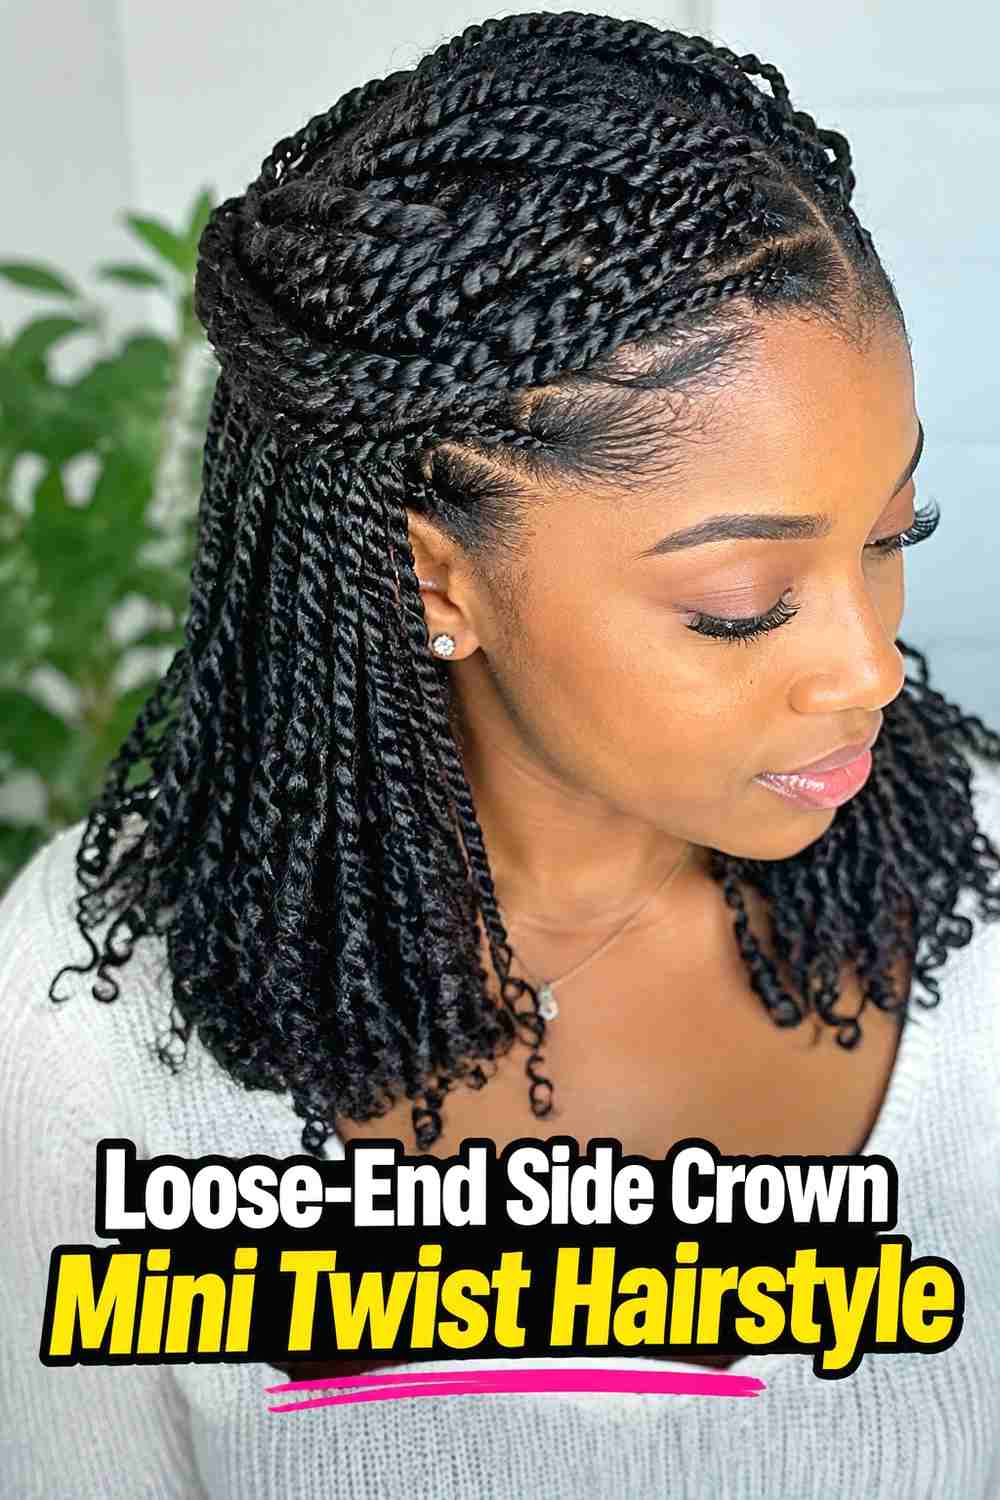
Loose ends introduce a softer texture to a side-crown mini twist style by allowing the tips to transition into curls, coils, or gentle waves. The upper twists can be swept toward one side and secured, while the free ends around the crown and hanging lengths create extra movement. This works especially well when the twist pattern remains neat through most of the hair, since the softer tips provide a clear contrast rather than making the entire hairstyle look undone. Medium and longer lengths give the loose ends enough room to show. Keeping the crown arrangement relatively simple prevents the two textures from competing for attention.
Styling Notes
Maintain defined mini twists through most of the length, then let the final section transition gradually into the chosen loose texture.
Wear & Maintenance
Loose ends may tangle more quickly than fully twisted tips, so handle and separate them gently during refreshes.
11. Curved Part Side Crown Mini Twist Hairstyle
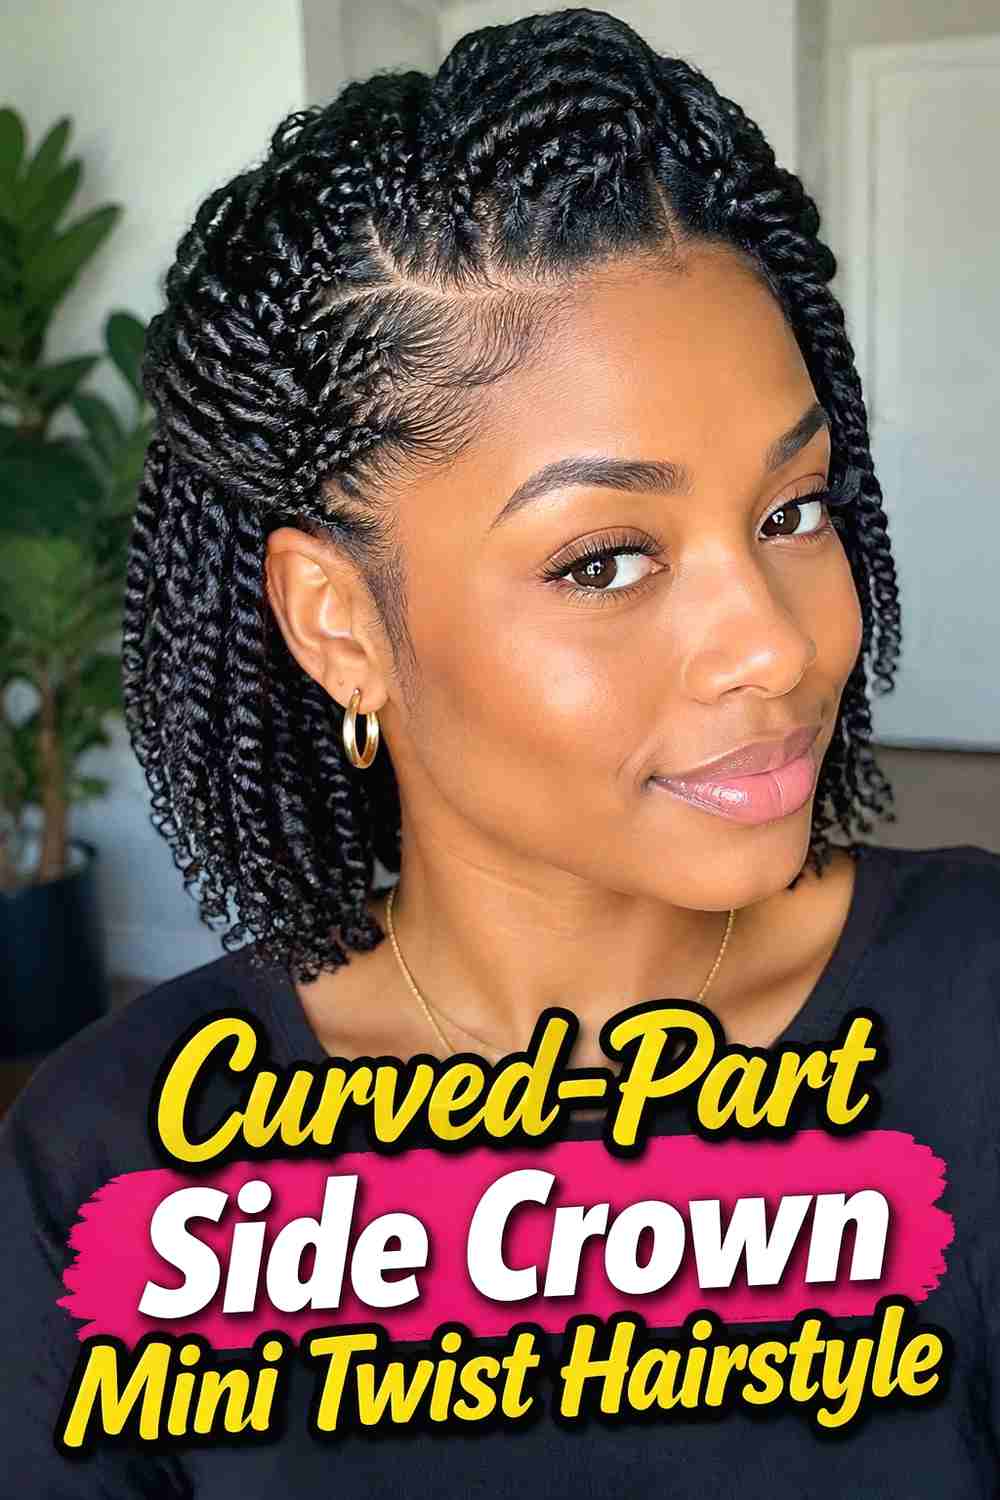
Curved parting gives the side crown an extra decorative element before the mini twists are even arranged. Several sections can follow gentle arcs that guide the eye toward the elevated side, creating a flowing pattern across the scalp. The twists then continue into a pinned or loosely gathered crown while the remaining lengths hang freely. This approach works best when the curved sections are broad enough to remain visible instead of becoming lost beneath very small twists. Repeating a few similar arcs keeps the design cohesive. The finished style feels detailed without needing beads or extra accessories because the parting pattern provides visual interest on its own.
Styling Notes
Plan the crown position first and curve the part lines toward that point so the design looks purposeful rather than randomly sectioned.
Why It Works
The curved sections visually lead into the crown, making the whole style feel connected from root to tip.
12. Asymmetrical Side Crown Mini Twist Hairstyle
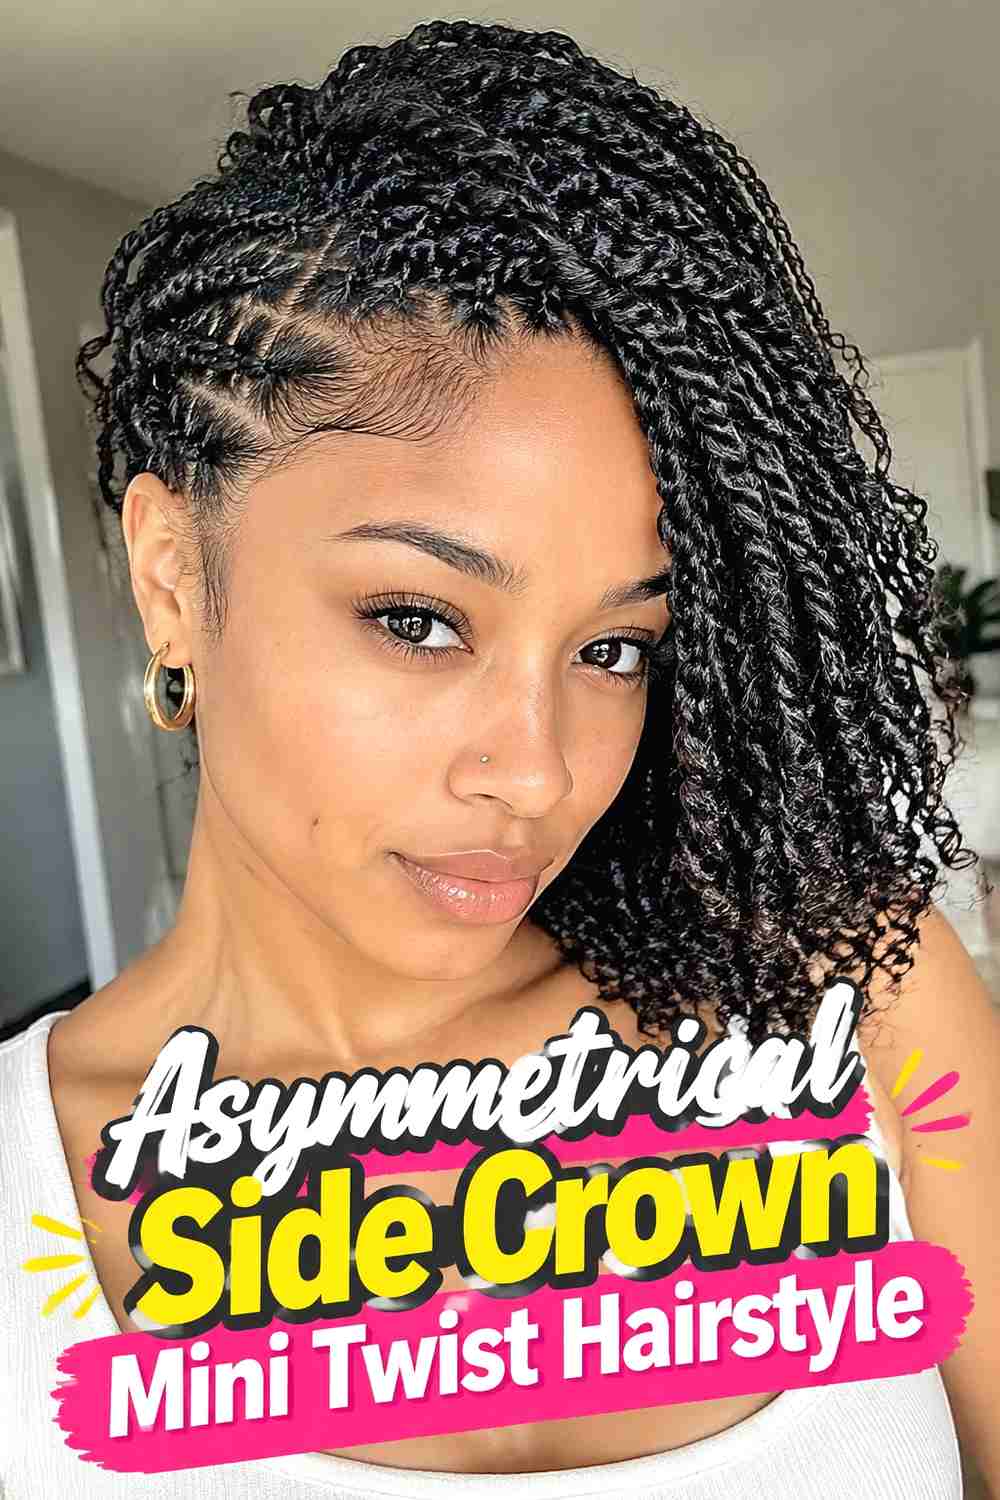
An asymmetrical side crown exaggerates the difference between the two sides of the hairstyle. One side carries most of the crown volume, layered twists, or pinned detail, while the opposite side remains noticeably flatter and simpler. The mini twist texture prevents the imbalance from feeling severe because each section still has soft movement and visible dimension. A deep side part can enhance the effect, while longer twists give the fuller side more room to cascade. The key is making the unevenness intentional: the crown should clearly belong to one side rather than appearing accidentally off-center. Keeping the lower lengths relatively balanced prevents the entire silhouette from becoming lopsided.
Best For
This look works well when you want the side crown to be the obvious focal point rather than a subtle styling detail.
Pro Tip
Create contrast through placement and volume rather than tightly flattening the lighter side against the scalp.
13. Shoulder Length Side Crown Mini Twist Hairstyle
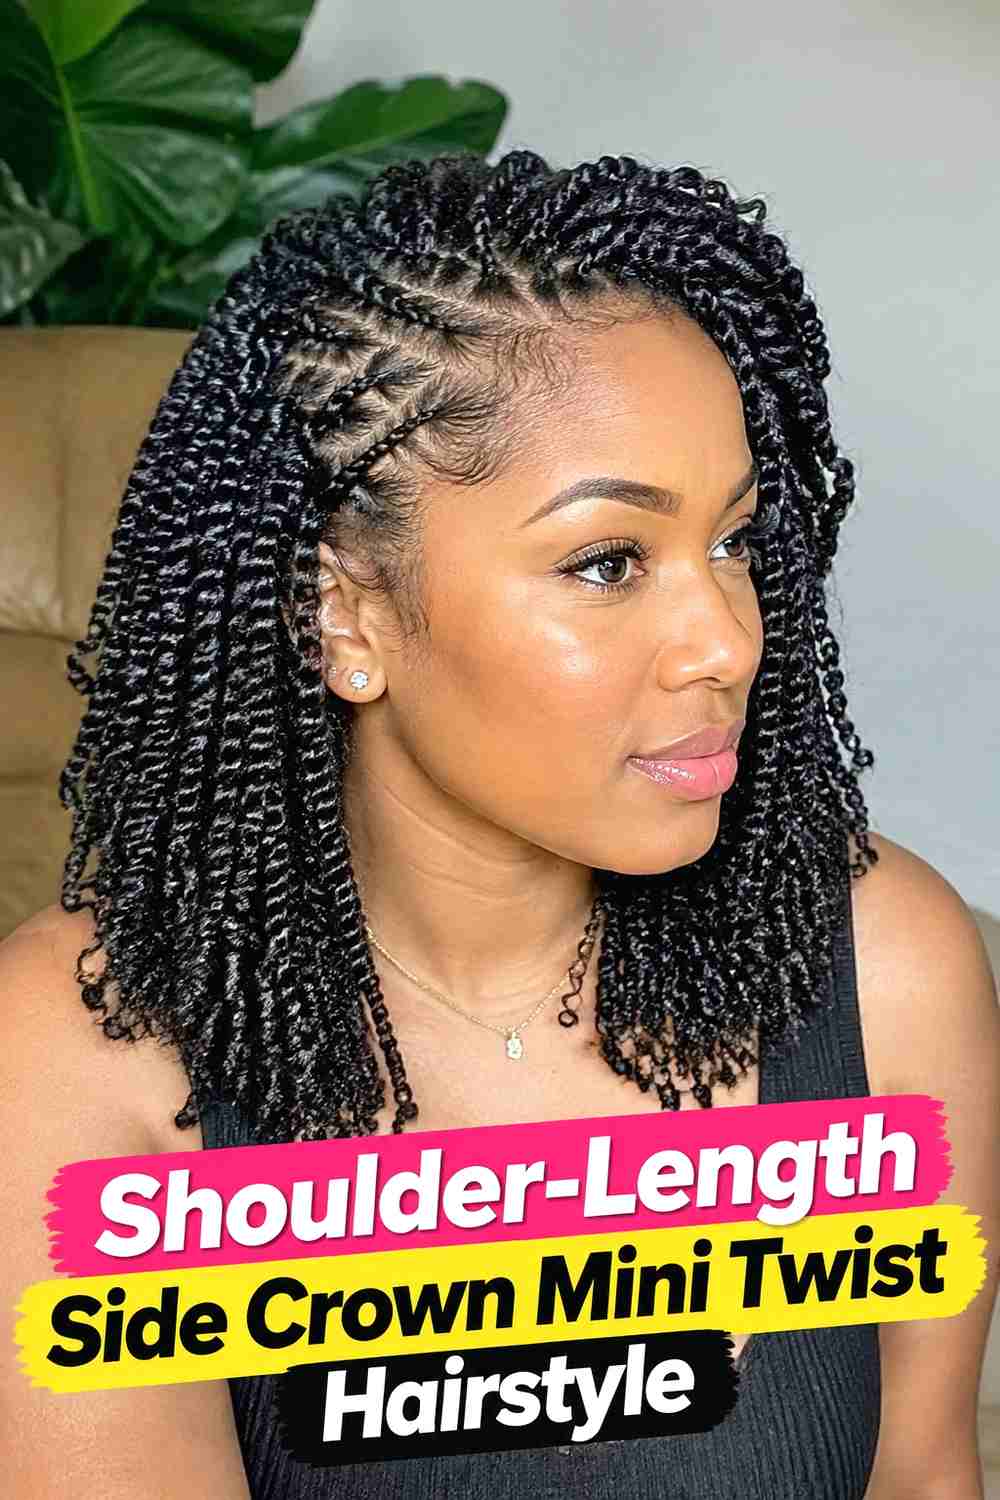
Shoulder-length mini twists create a compact side-crown silhouette that feels light enough for everyday wear. The twists can be swept upward near one temple and pinned around the side crown, while the remaining lengths fall around the shoulders. Because the overall style is shorter, the crown does not need excessive height to be visible. Medium-density mini twists work particularly well because they provide enough texture for the pinned area without becoming bulky. The free ends can remain fully twisted or soften slightly for movement. This length also makes it easier to keep the crown proportional, since there is less weight pulling the arranged section downward.
Hair Type & Length
This variation works best when the twists finish around shoulder level and still have enough flexibility to be redirected toward the crown.
Wear & Maintenance
Keep the pinned section moderate so the shorter lengths do not become crowded or difficult to arrange neatly.
14. Long Side Crown Mini Twist Hairstyle
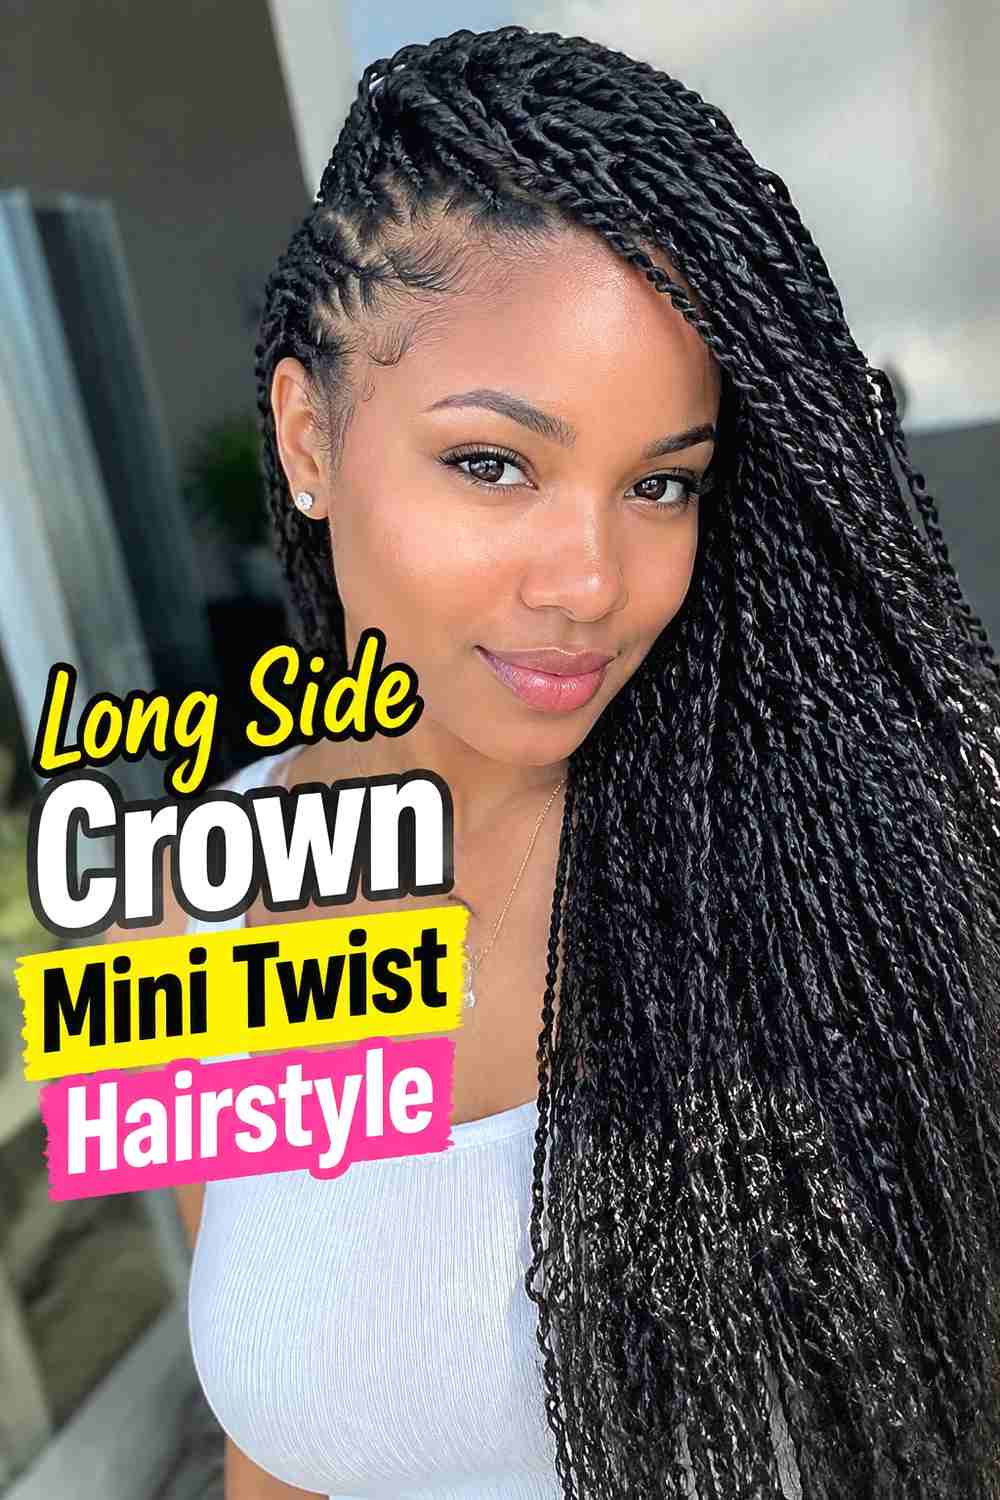
Long mini twists create a dramatic contrast between a sculpted side crown and flowing lengths. The upper twists can be swept, rolled, or pinned toward one side while the remaining hair cascades well past the shoulders. Because longer twists carry more weight, the crown should be built with carefully selected sections rather than gathering too much hair into one point. A low or medium side crown often feels more balanced with extra length, although a high placement can work when the gathered section stays light. The final silhouette should show believable movement through the long twists, with the crown acting as an accent rather than supporting all of the hairstyle’s weight.
Styling Notes
Use only enough long twists to define the crown and leave the majority free so the base remains comfortable and stable.
Wear & Maintenance
Adjust the arrangement if the added length causes persistent pulling around the pinned or gathered area.
15. Soft Halo Side Crown Mini Twist Hairstyle
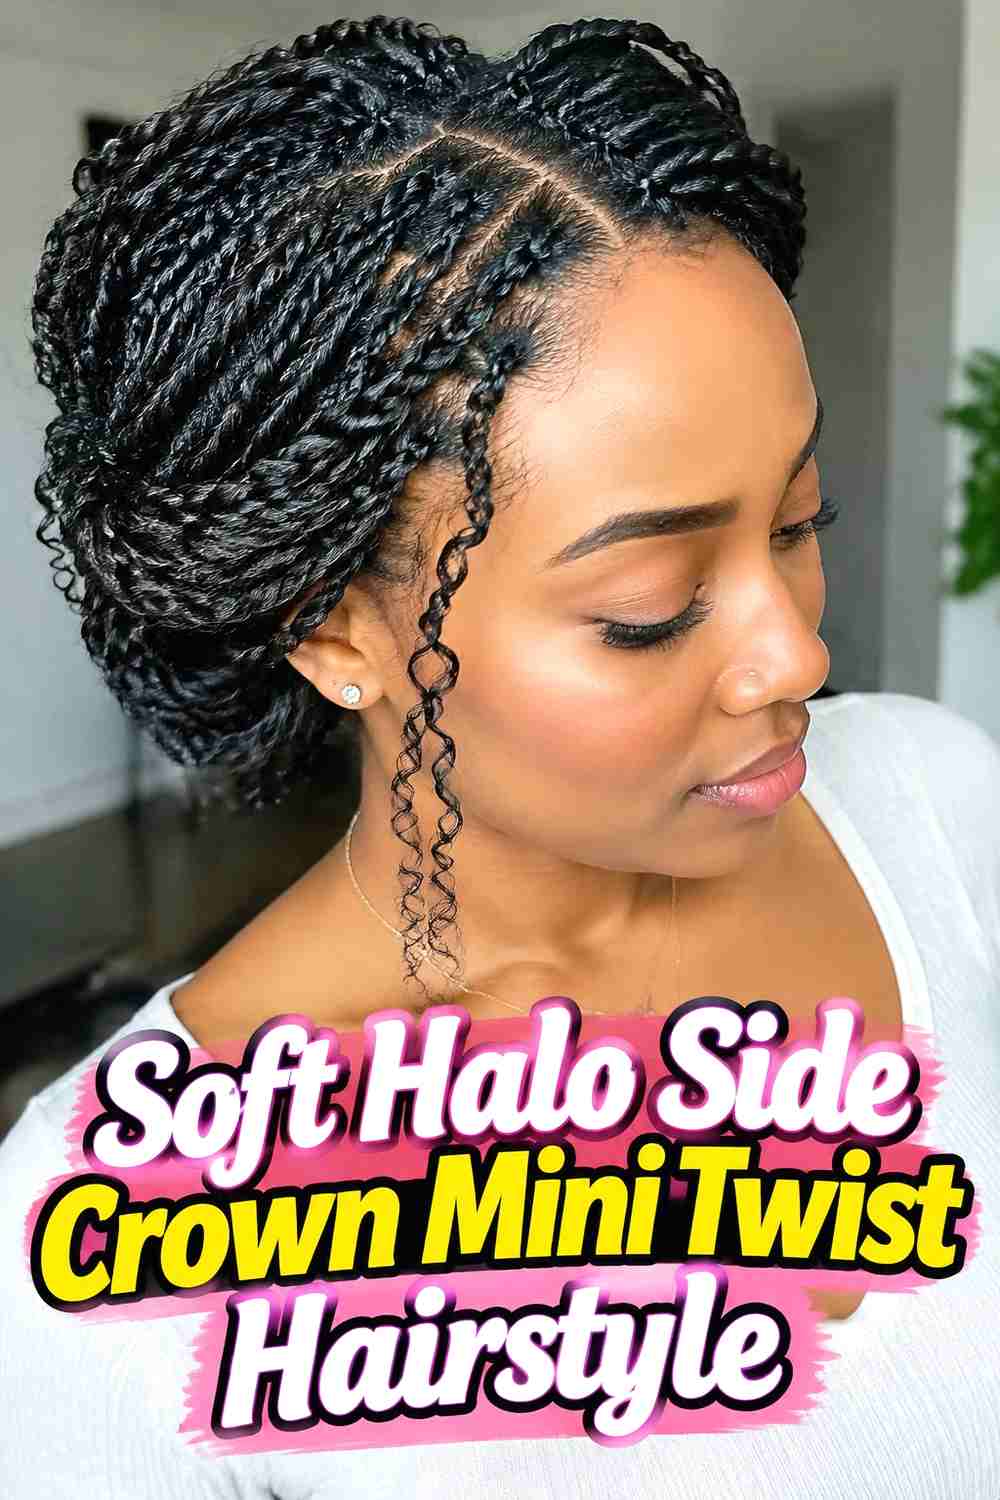
A soft halo finish combines side-crown structure with lightly expanded texture around the rest of the head. The mini twists remain recognizable, but selected sections can be separated or loosened slightly to create airy fullness. The crown sits toward one side, while softer volume travels around the back and opposite side to form a gentle halo-like outline. This works particularly well when the twists have a little natural fuzz or looseness rather than an extremely slick surface. Keeping several twists intact around the crown ensures the hairstyle still reads clearly as a mini twist look instead of becoming a fully loose textured style.
Why It Works
Diffused volume softens the asymmetrical crown and creates a fuller silhouette without hiding the twist pattern completely.
Pro Tip
Expand the surrounding texture gradually and leave more definition near the crown so the focal point remains clear.
16. Twist Wrapped Side Crown Hairstyle
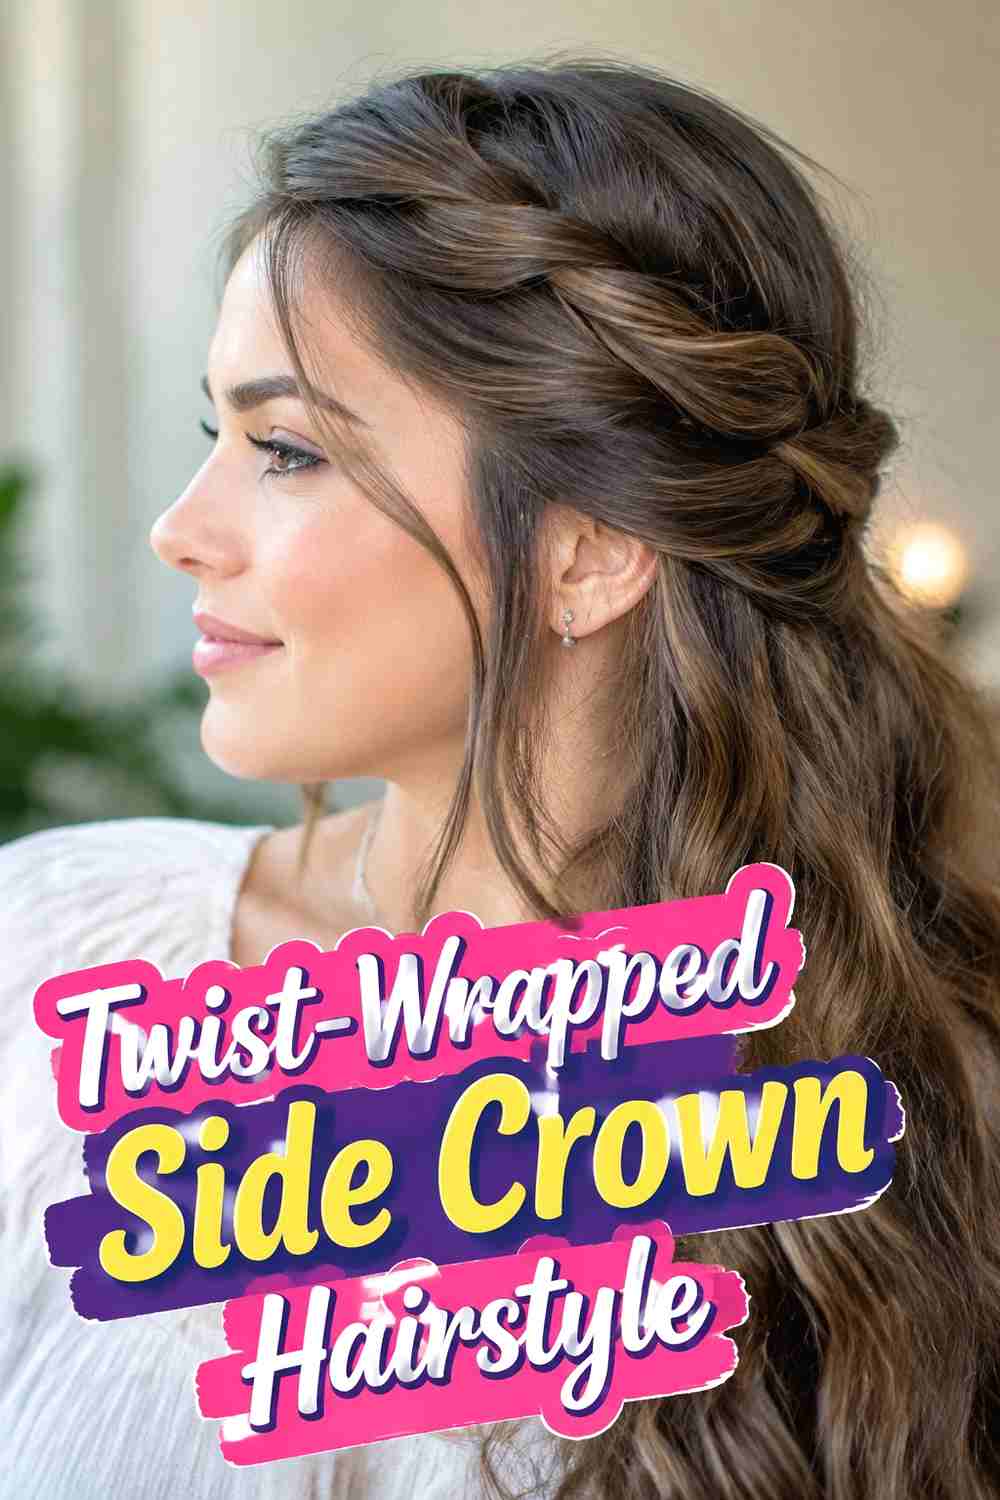
The Twist-Wrapped Side Crown Hairstyle uses several mini twists to create a visible wrapped detail at one side of the crown. Small groups can cross over one another or circle around a central pinned section, producing a textured knot-like accent without forming a full bun. The remaining twists stay loose, which keeps the style from feeling overly formal. Longer twists are especially useful because they provide enough length for a clean wrap, while shorter pieces can be tucked underneath. The wrapped area should remain proportional to the rest of the hairstyle so it looks intentional rather than bulky, and the individual twist texture should still be visible within the finished crown.
Styling Notes
Wrap small groups sequentially instead of twisting one large section into a solid knot, and pin the ends discreetly underneath.
Best For
This option works well when you want a more finished crown detail without putting all of the mini twists into an updo.
17. Tousled Side Crown Mini Twist Hairstyle
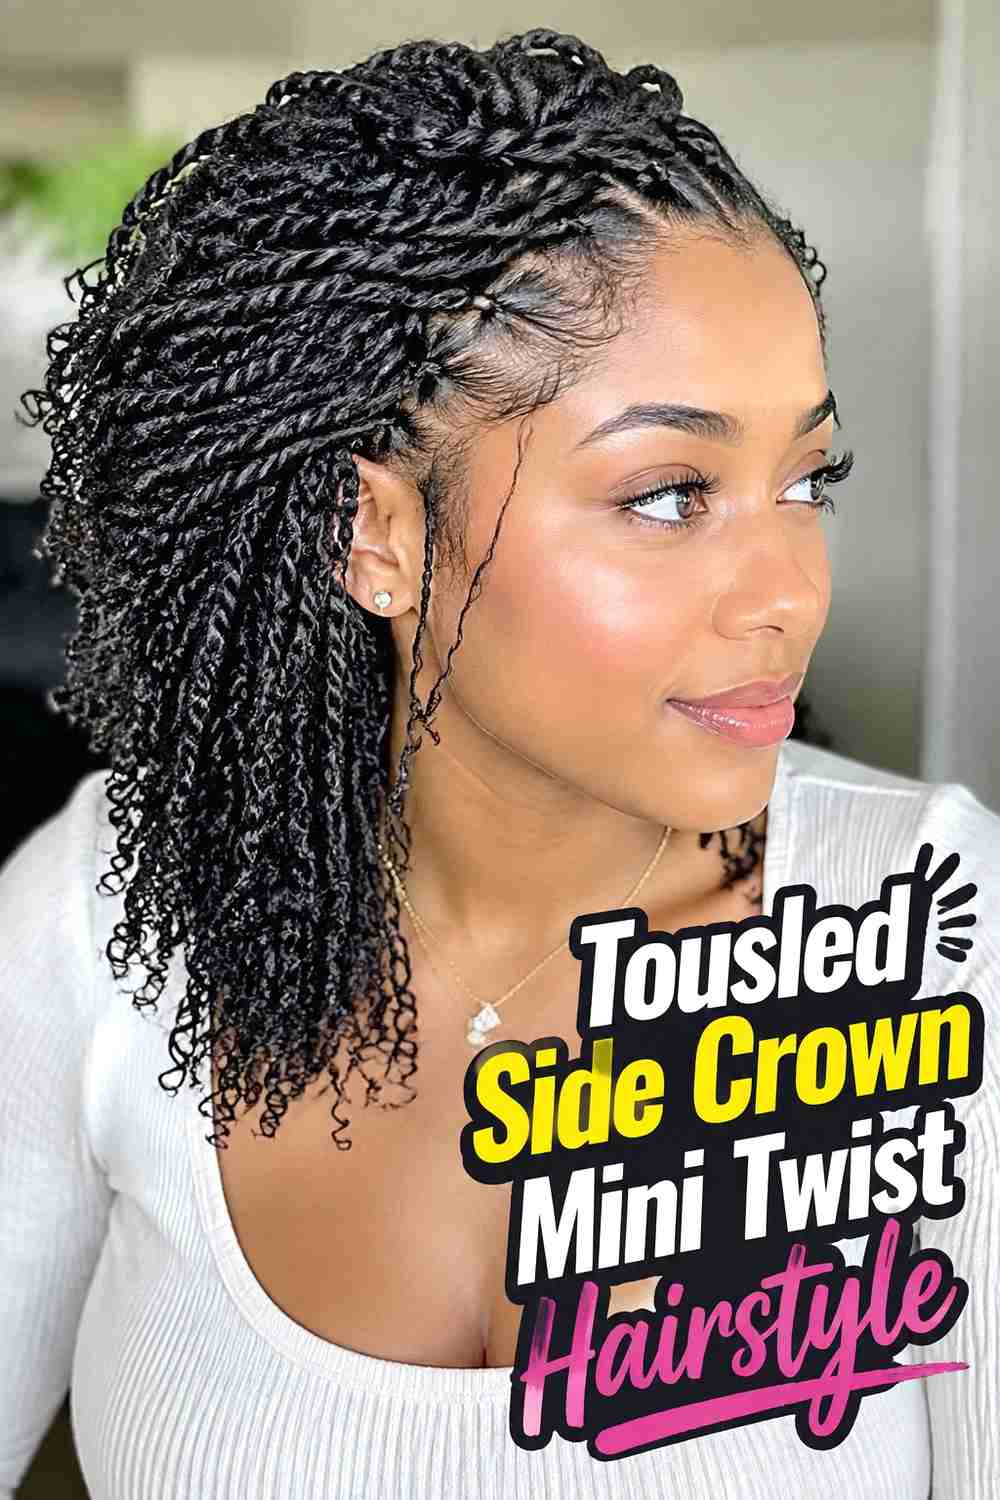
A tousled side crown gives mini twists a relaxed finish by combining loose placement, varied direction, and a little controlled irregularity. The crown remains clearly positioned toward one side, but the twists do not need to sit in perfectly even rows or identical curves. A few pieces can fall forward, others can cross loosely through the crown, and the remaining lengths can hang naturally. The effect works best when there is still enough structure to distinguish the crown from the rest of the hair. Rather than pulling the style apart completely, loosen selected sections and allow small differences in height and direction to create the soft, lived-in appearance.
Styling Notes
Build a secure basic crown first, then loosen only selected twists so the finished arrangement remains stable beneath the tousled surface.
Why It Works
The mix of structure and irregular movement gives the side crown a softer personality while preserving the recognizable mini twist texture.
How to Choose the Right Look
Start with crown placement. A high side crown creates stronger lift and a more dramatic profile, while a low side crown sits closer to the ear and feels softer. Medium placement offers a balanced option if you want the asymmetry to be visible without dominating the entire hairstyle.
Next, consider your twist length. Shoulder-length mini twists create a compact, lighter crown, while long twists provide more material for wrapping and sweeping but can also add weight. If your twists are very long or dense, gathering fewer sections may help keep the crown comfortable.
Parting changes the effect as well. Deep side parts create obvious directional volume, while curved parts make the scalp design more decorative. If you prefer a softer front, face-framing twists or a tousled finish can break up the structure.
Finally, decide how polished you want the style. Pinned and wrapped crowns feel more deliberate, while loose-end, halo, and tousled versions provide more movement. Choose a shape that feels secure without persistent pulling at the crown or hairline.
Final Thoughts
Mini twists are flexible enough to create side-crown styles that range from subtle and everyday to sculpted and dramatic. The biggest differences come from where the crown sits, how many twists are gathered, and how much movement is left through the lengths.
Choose a version that suits your twist length and preferred amount of volume, then build the crown gradually so the texture stays visible and the finished style remains comfortable.
FAQs
1. What is a mini twist side crown hairstyle?
It is a mini twist style that concentrates gathering, volume, or pinned detail toward one side of the crown instead of distributing the twists evenly around the head.
2. Can short mini twists create a side crown?
Yes. Shoulder-length and some shorter mini twists can create a compact side crown, although very short twists may offer less room for wrapping or elaborate pinning.
3. How do you make a mini twist side crown look fuller?
Arrange the twists in overlapping sections and add gentle lift near the crown rather than tightly compressing them into one small point.
4. Can loose ends work with a mini twist side crown?
Yes. Loose curls, coils, or softly textured tips can add movement while the upper twists maintain the structure of the crown.
5. How can you keep a side crown comfortable?
Use only as many twists as needed to create the shape, secure them without excessive pulling, and adjust the style if pins or gathered sections create ongoing discomfort.
Save your favorite mini twist side crown hairstyle ideas for your next textured look, and share the collection whenever you want fresh mini twist inspiration.