12 Pearled Hair Net Bun Hairstyle Ideas
A pearled hair net turns a simple bun into an elegant statement, wrapping polished twists and chignons in delicate pearl detail without hiding the hairstyle underneath.
Pearled hair nets combine function and decoration by enclosing part or all of a bun in fine netting dotted with pearls. The strongest versions let the natural shape of the bun remain visible while the pearl pattern traces its surface, adding texture and soft shine rather than creating a bulky covering.
These ideas range from sleek ballerina buns to romantic low chignons and sculptural formal styles. When choosing one, consider bun size, placement, hair density, net tension, pearl scale, and whether you want the front to look smooth, voluminous, or softly undone.
Quick List
- Classic Low Pearled Hair Net Bun Hairstyle
- Sleek Center Part Pearled Hair Net Bun Hairstyle
- Side Part Pearled Hair Net Bun Hairstyle
- Braided Pearled Hair Net Bun Hairstyle
- Twisted Pearled Hair Net Bun Hairstyle
- Voluminous Pearled Hair Net Bun Hairstyle
- Ballerina Pearled Hair Net Bun Hairstyle
- Low Chignon Pearled Hair Net Bun Hairstyle
- Romantic Tendril Pearled Hair Net Bun Hairstyle
- Vintage Pearled Hair Net Bun Hairstyle
- Side Swept Pearled Hair Net Bun Hairstyle
- Sculptural Pearled Hair Net Bun Hairstyle
1. Classic Low Pearled Hair Net Bun Hairstyle
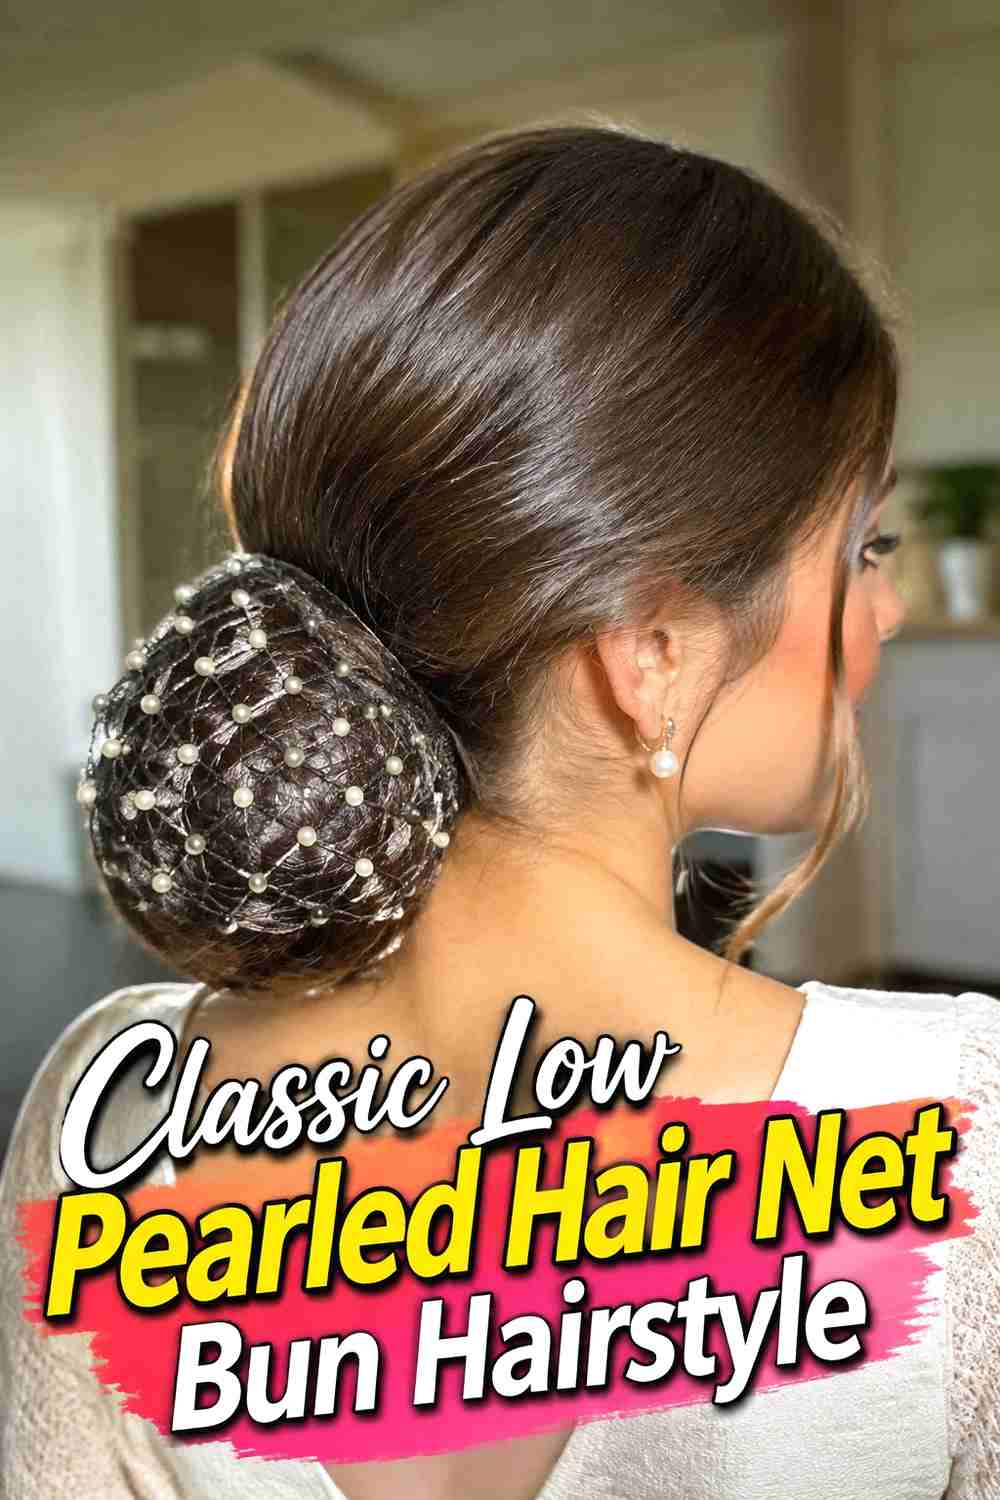
A classic low bun gives a pearled hair net a clean, elegant foundation. The hair is gathered at the nape, twisted into a compact rounded bun, and pinned securely before the fine pearl-dotted net is fitted over the finished shape. Keeping the net close to the bun allows the natural curves of the hair to remain visible beneath the delicate grid. The pearls should be spaced rather than densely packed, creating small points of light around the surface. A softly polished crown keeps the hairstyle formal without appearing rigid, while subtle natural strands along the hairline make the result more believable. This version works particularly well when you want the accessory to enhance rather than dominate.
Styling Notes
Secure the bun independently before placing the net, then anchor the net discreetly beneath the bun so its edges remain hidden.
Best For
This timeless version suits weddings, receptions, dinners, formal events, and elegant bridal styling.
2. Sleek Center Part Pearled Hair Net Bun Hairstyle
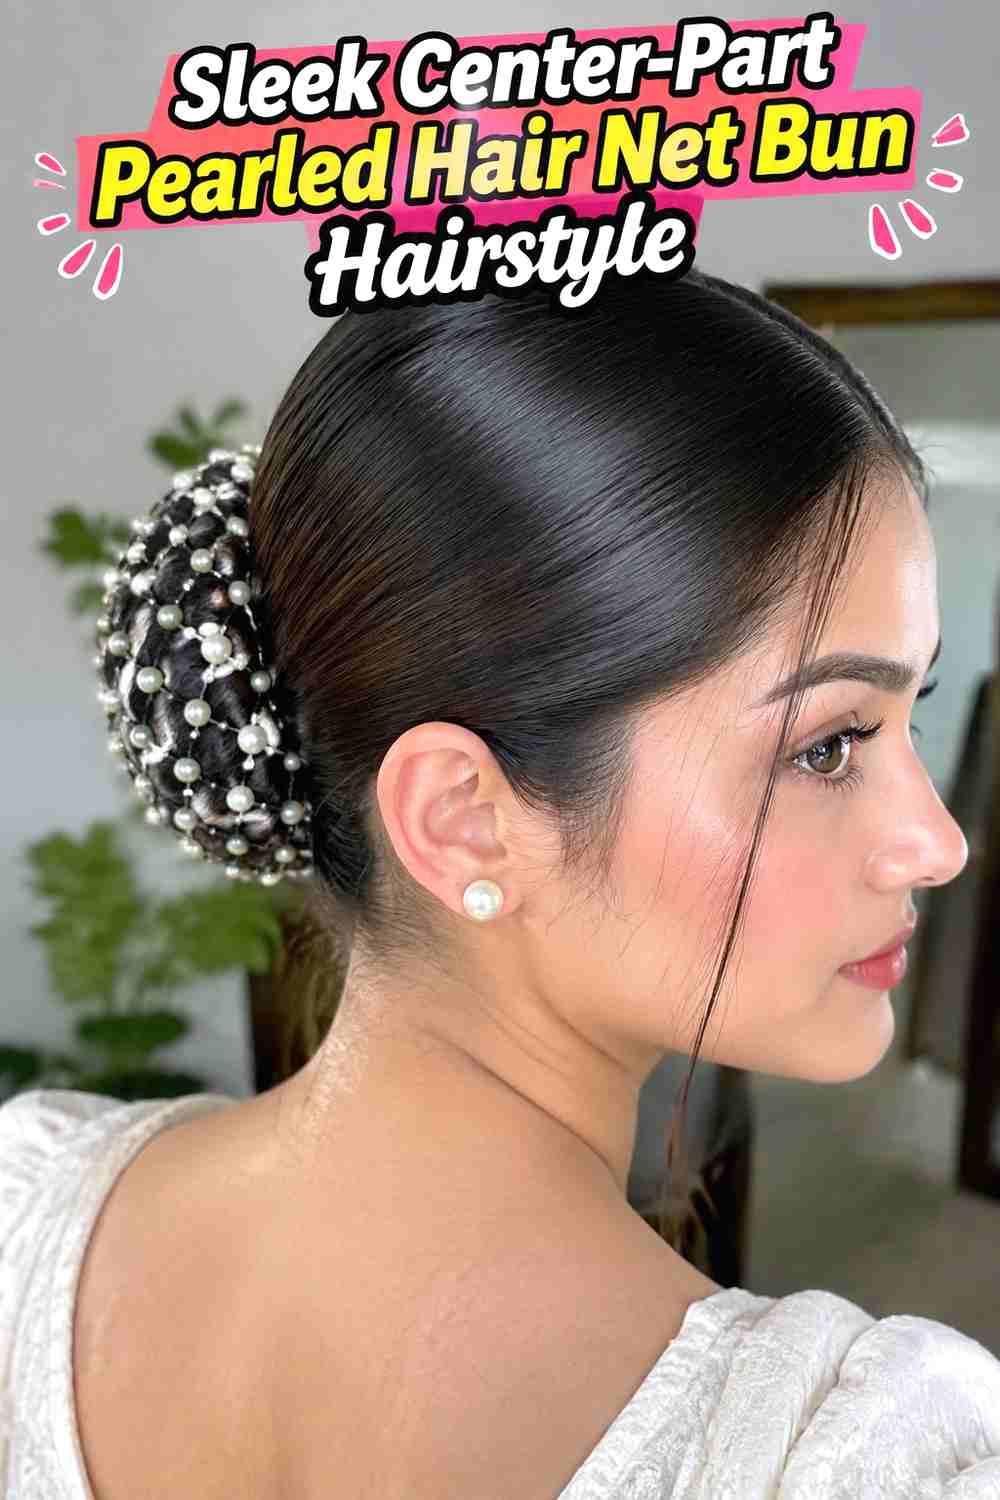
A crisp center part gives the pearled bun a modern, symmetrical appearance. Both front sections are smoothed evenly toward a low or mid-height bun, creating clean lines that contrast beautifully with the delicate texture of the pearl net. The bun itself can remain simple and rounded, letting the accessory become the main detail at the back. Avoid pulling the roots so tightly that the style looks uncomfortable; a smooth surface can still retain natural density and realistic hairlines. The net should fit snugly enough to follow the bun without crushing its shape. Small evenly spaced pearls work especially well with this streamlined version because they reinforce the refined, orderly finish.
Why It Works
The minimalist front balances the decorative bun at the back, keeping the overall hairstyle polished rather than overly embellished.
3. Side Part Pearled Hair Net Bun Hairstyle
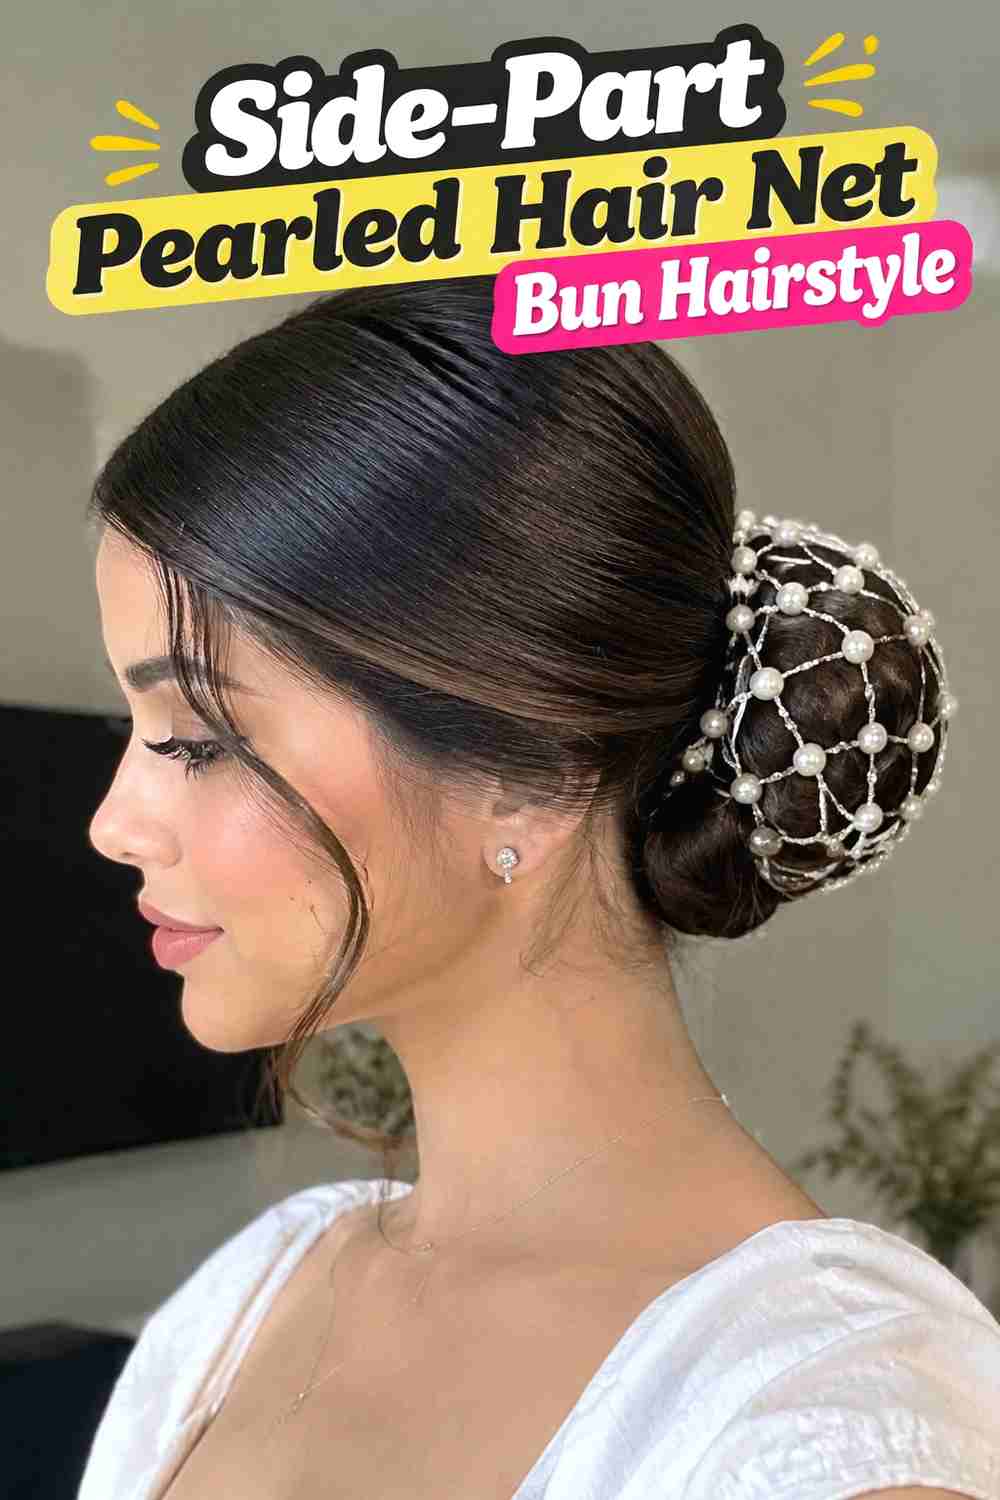
A side part introduces movement into the front of a pearled hair net bun while preserving its formal character. The heavier front section sweeps diagonally toward the back, creating a graceful curve before meeting a low bun wrapped in pearl-dotted netting. The opposite side can remain smoother and closer to the head, making the asymmetry feel intentional. Keep a little lift near the part so the sweep does not collapse against the scalp. At the back, a medium-size bun provides enough surface area for the pearls to remain visible without requiring an oversized accessory. This style can transition easily between romantic and polished depending on how softly the front section is finished.
Styling Notes
Create the side sweep before forming the bun so the front movement flows naturally toward the netted section instead of appearing separate.
4. Braided Pearled Hair Net Bun Hairstyle
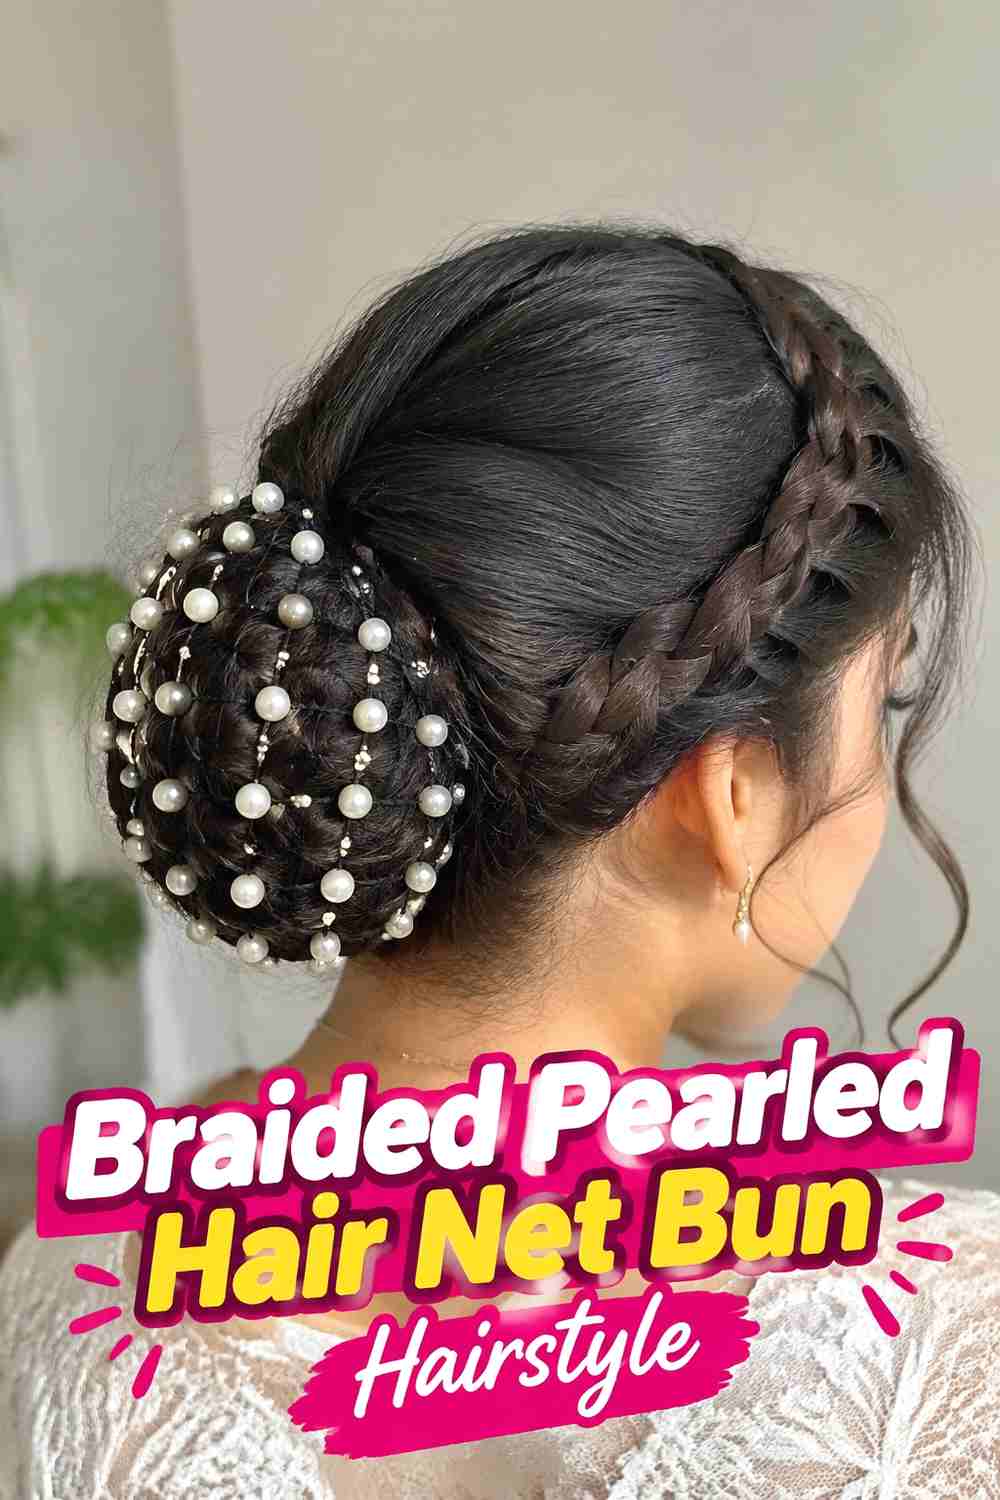
Braided texture adds another layer of detail beneath a pearl hair net. The lengths can be gathered into a low ponytail, braided, and then wrapped into a rounded bun before the net is placed over the finished shape. Because the braid already creates a visible woven pattern, choose a net with relatively open spacing so both textures remain easy to see. The pearls catch light at different points as the braid curves underneath, giving the bun more dimension from the back. Keep the roots comparatively simple to prevent the hairstyle from becoming visually crowded. A softly expanded braid can make the bun appear fuller, but maintain enough tension to keep the wrapped structure secure.
Hair Type & Length
Medium to long hair provides enough length to form a recognizable braided bun while still fitting comfortably beneath the decorative net.
Pro Tip
Position larger pearls over simpler areas of the braid so they do not hide the strongest woven sections.
5. Twisted Pearled Hair Net Bun Hairstyle
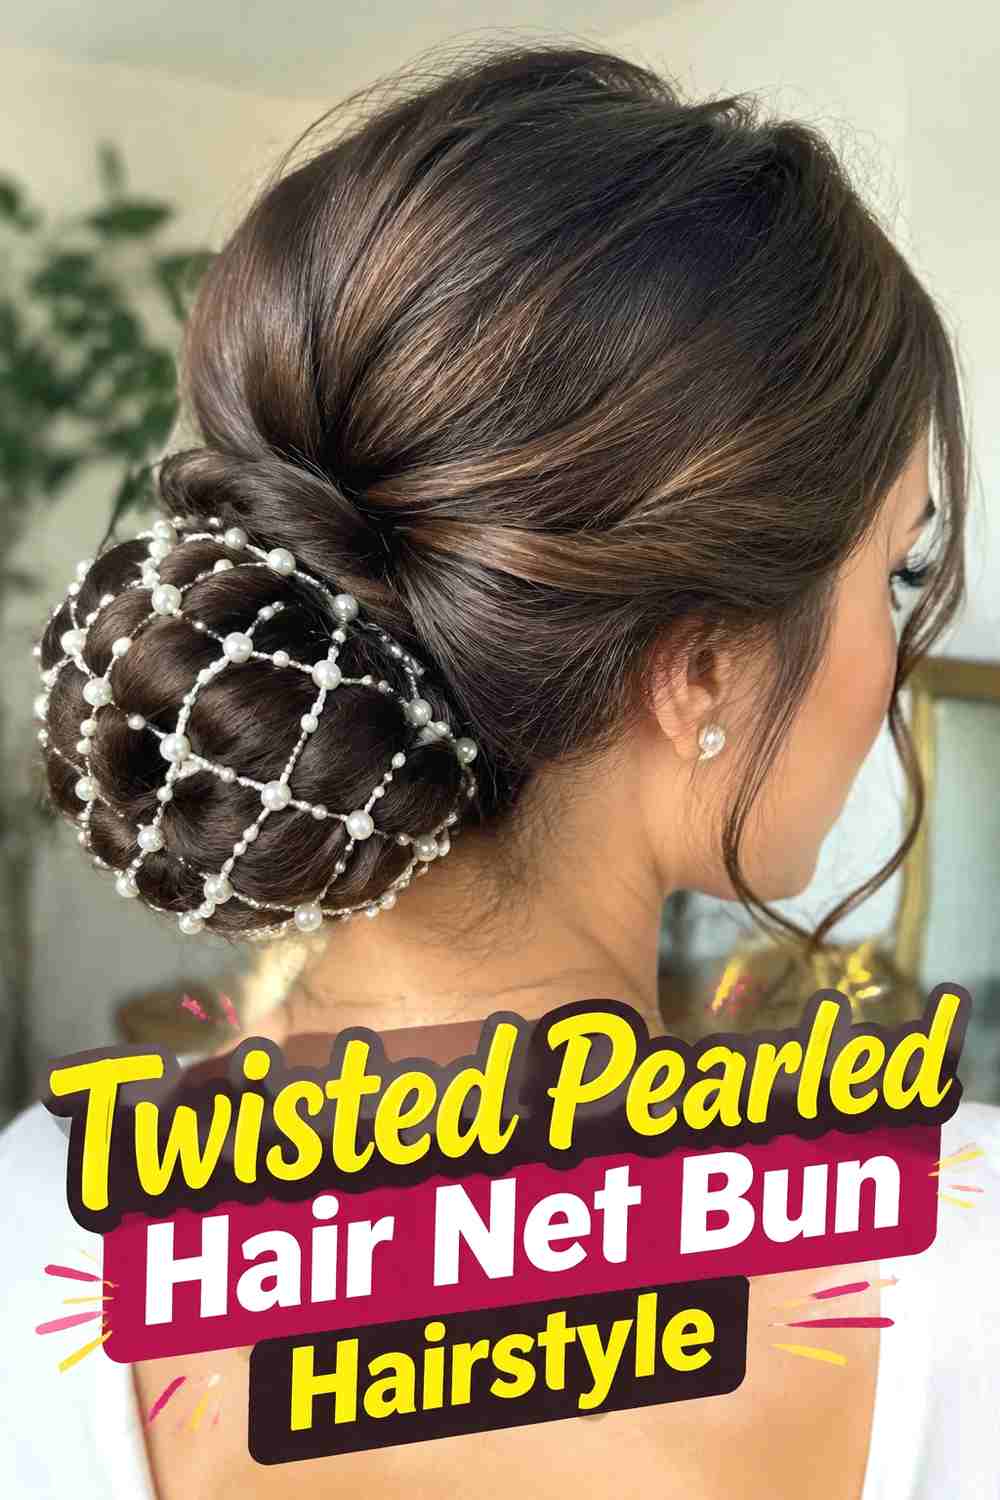
Broad twists create a soft, sculpted bun that looks especially beautiful beneath delicate pearl netting. Instead of wrapping the hair into one tight coil, divide the lengths into two or more sections and twist them loosely before arranging them into a low bun. The net helps unify those curves while still allowing the individual twisted sections to show through. This approach works particularly well for romantic formal styling because the bun has movement without becoming messy. Keep the twists broad rather than rope-tight, and conceal all pins beneath overlapping sections before adding the accessory. The pearl placement should follow the outer shape of the bun rather than pulling the net into uneven pockets.
Why It Works
The curved twists create natural highs and lows beneath the net, allowing pearl details to catch light from several angles.
6. Voluminous Pearled Hair Net Bun Hairstyle
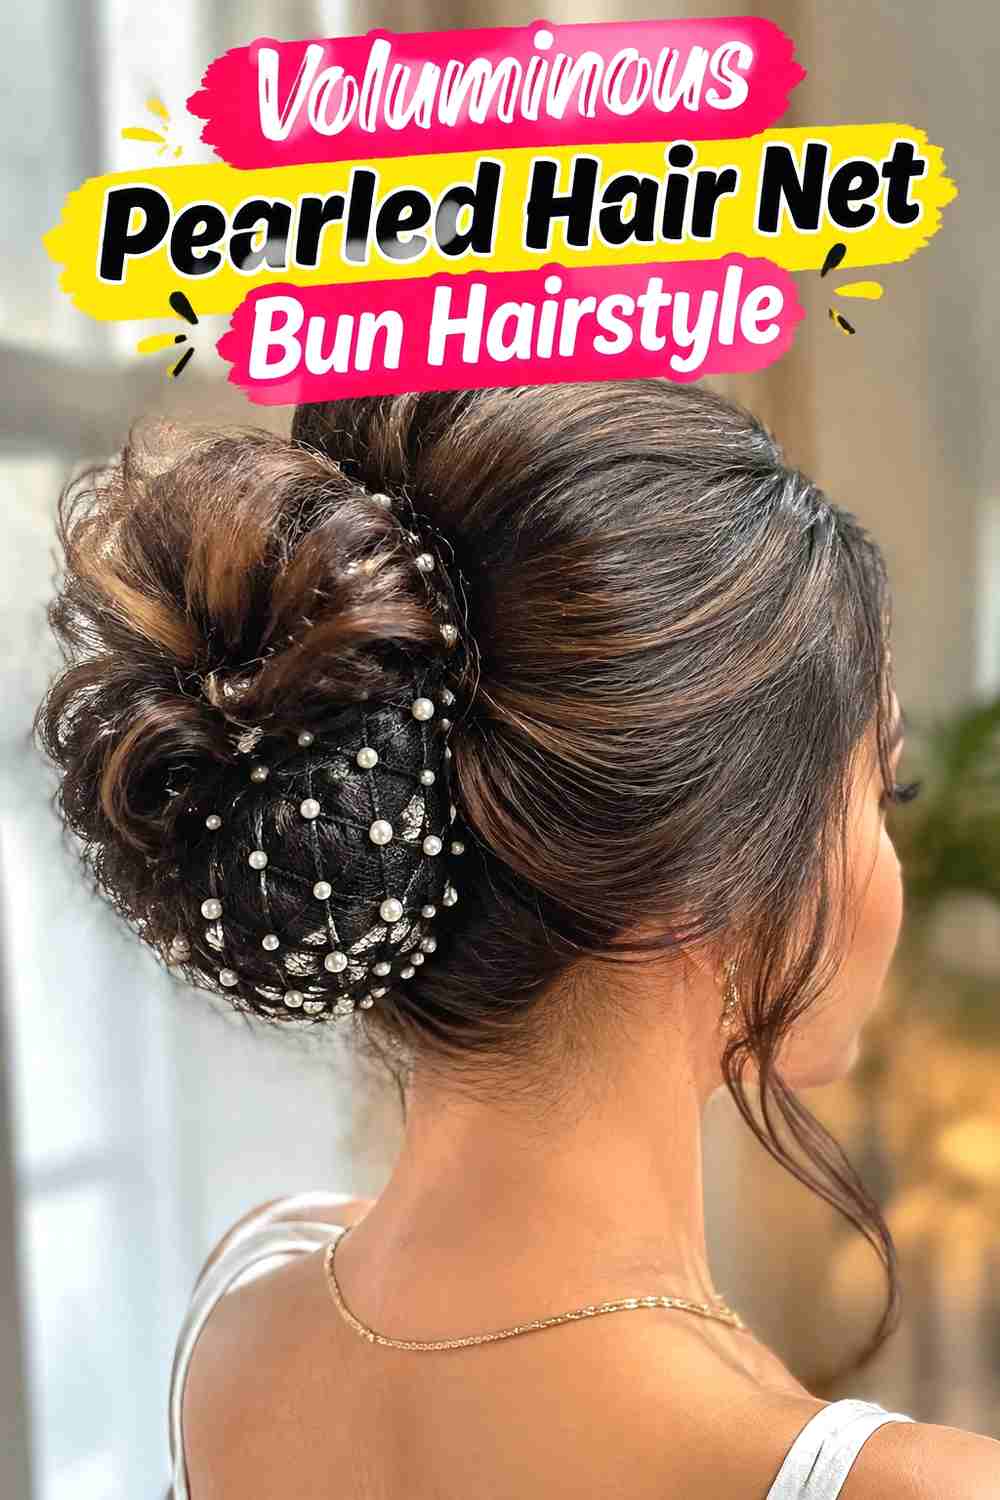
A fuller bun gives the pearled net more surface area and creates a statement silhouette without requiring excessive ornament. Crown volume can be kept soft while the lengths are gathered into a substantial low or mid-height bun at the back. The pearl net stretches neatly across the larger shape, highlighting the bun’s rounded contour. Medium to thick hair may create this fullness naturally, while finer hair can use careful folding or discreet internal support. Keep the outer surface smooth enough for the pearls to remain clearly visible, but avoid flattening every strand. A larger bun pairs best with a slightly more open net pattern so the decorative detail stays balanced rather than crowded.
Styling Notes
Build the bun’s internal volume first, secure it completely, and add the net only after the final size and shape are established.
7. Ballerina Pearled Hair Net Bun Hairstyle
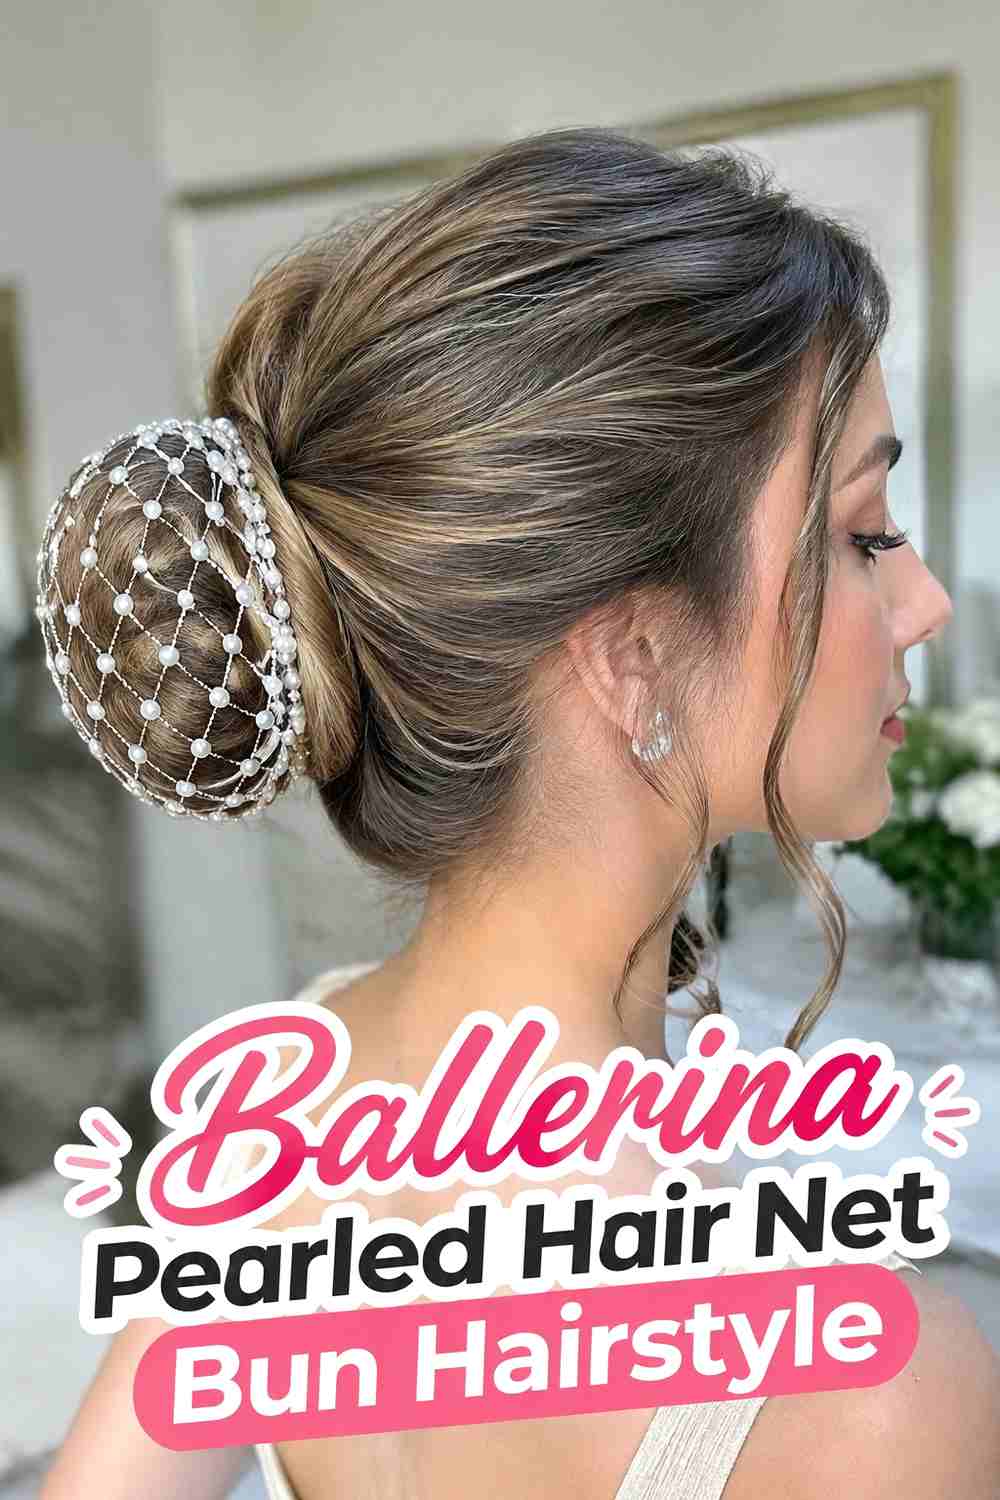
The ballerina-inspired version pairs a neat, compact bun with controlled roots and a precisely fitted pearl hair net. The bun can sit at mid height or slightly higher than a traditional low chignon, creating a graceful profile while keeping the accessory clearly visible. Hair should be smoothed toward the gathering point, but enough natural shine and strand definition should remain to avoid an overly lacquered finish. The net wraps closely around the bun and is tucked underneath so no loose edges show. Small pearls complement the clean shape especially well. This style feels refined and timeless, making it a strong option when you prefer elegant simplicity over loose texture or elaborate braiding.
Wear & Maintenance
Use a secure bun foundation before adding the net so movement or accessory adjustment does not loosen the entire hairstyle.
8. Low Chignon Pearled Hair Net Bun Hairstyle
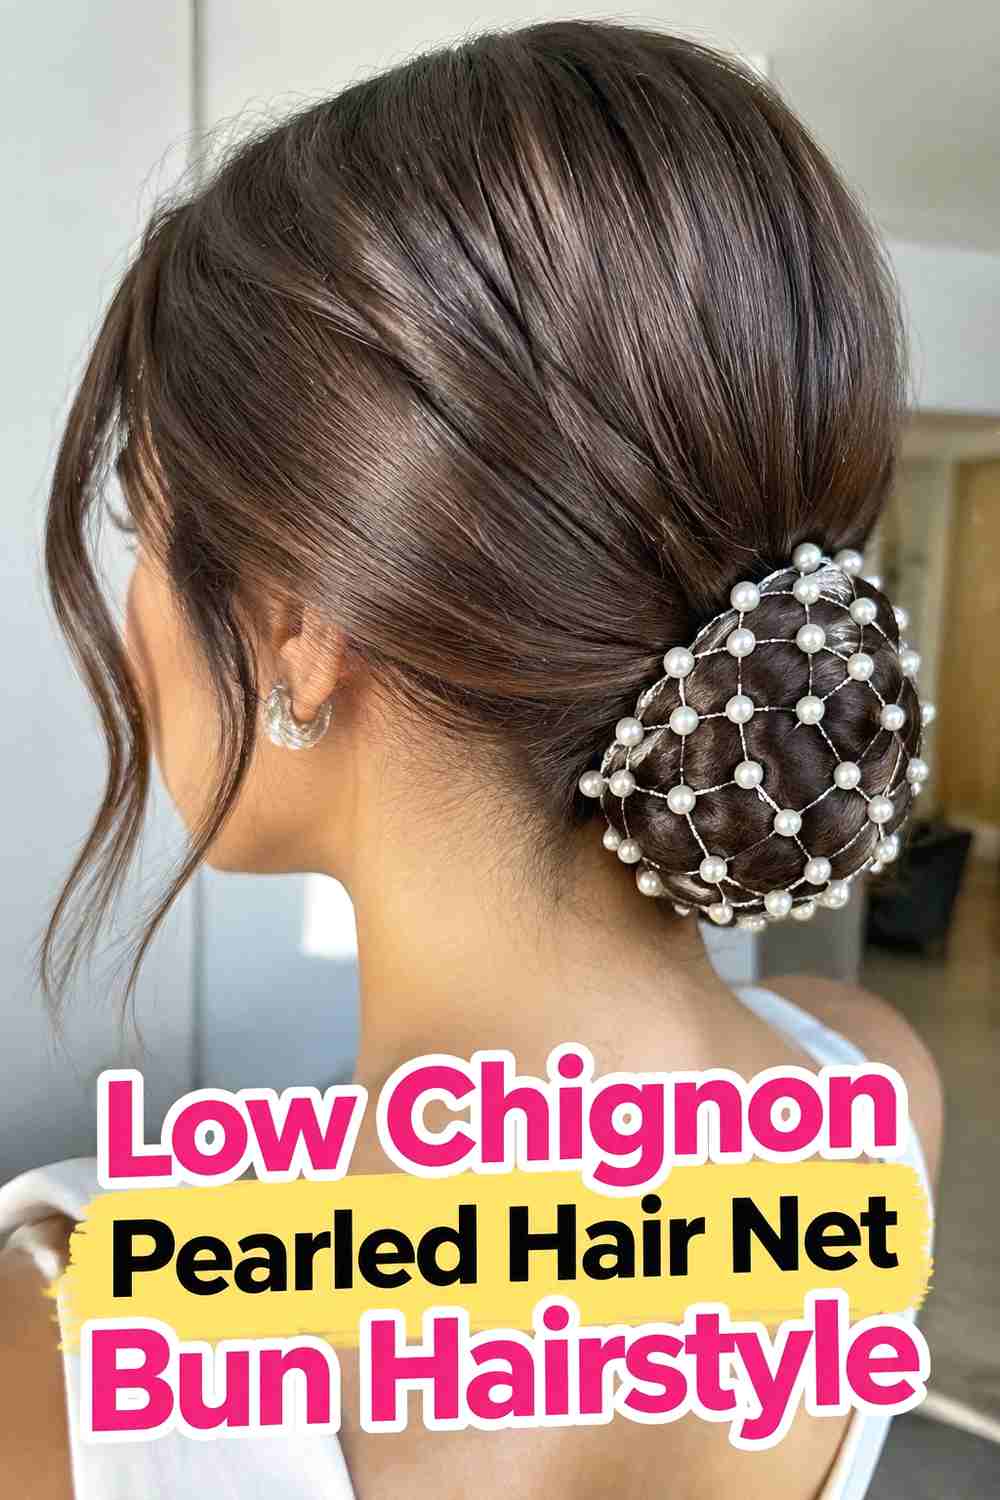
A low chignon creates a wider, softer shape than a tightly rounded bun, giving the pearl net an elegant horizontal silhouette. Hair can be folded inward at the nape and pinned into a slightly elongated form, then covered with a fine net that follows the chignon rather than compressing it. The pearls look especially refined when distributed evenly across the upper surface, allowing the folded hair beneath to remain visible. A gentle side or off-center part complements the low placement, and subtle crown softness prevents the style from appearing too severe. This variation works beautifully with classic eveningwear because the decorative detail remains close to the neckline and feels integrated into the updo.
Best For
This style is especially well suited to bridal looks, formal dinners, receptions, and elegant low-neckline outfits.
Styling Notes
Choose a flexible net that can adapt to the chignon’s wider shape without pulling the ends inward.
9. Romantic Tendril Pearled Hair Net Bun Hairstyle
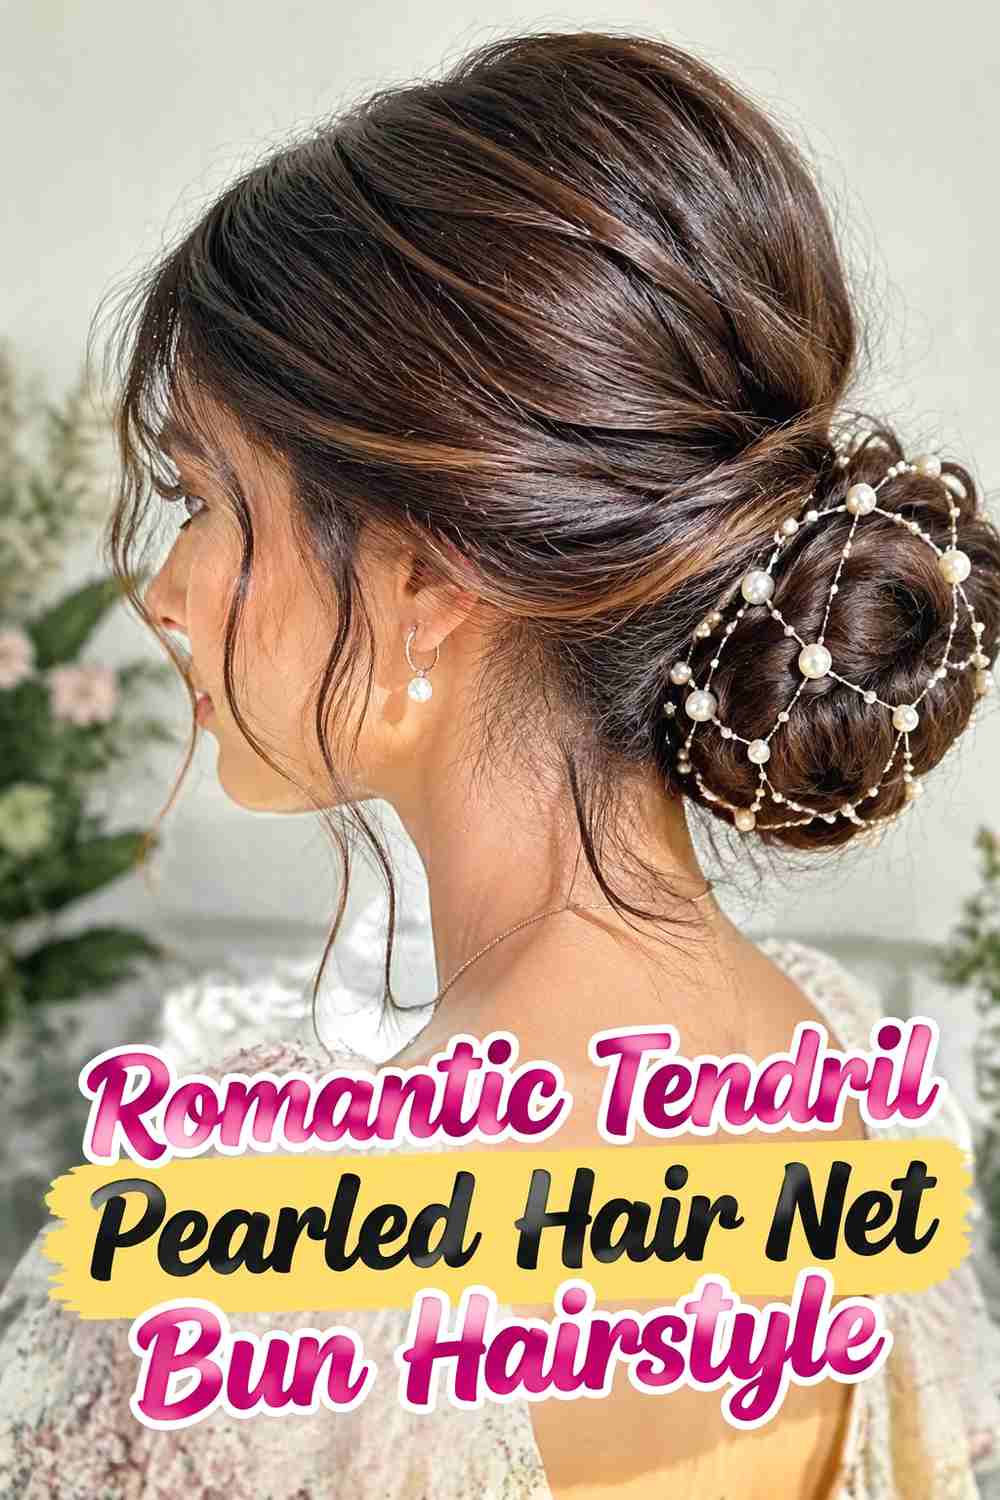
Soft face-framing tendrils add a romantic contrast to the structured pearl-netted bun. The main hair is gathered securely into a low twist or rounded bun, while a few carefully selected sections near the temples and ears remain free. These pieces can be shaped into gentle bends rather than tight curls, creating a more natural finish. At the back, the pearled net provides polish and keeps the bun looking intentional despite the softer front. Keep the number of loose strands limited so the hairstyle feels romantic rather than unfinished. A little crown lift can connect the face-framing softness with the bun, especially when the net itself has delicate, widely spaced pearls.
Pro Tip
Set aside the tendril sections before constructing the bun so you do not have to pull hair out after the net has been secured.
10. Vintage Pearled Hair Net Bun Hairstyle
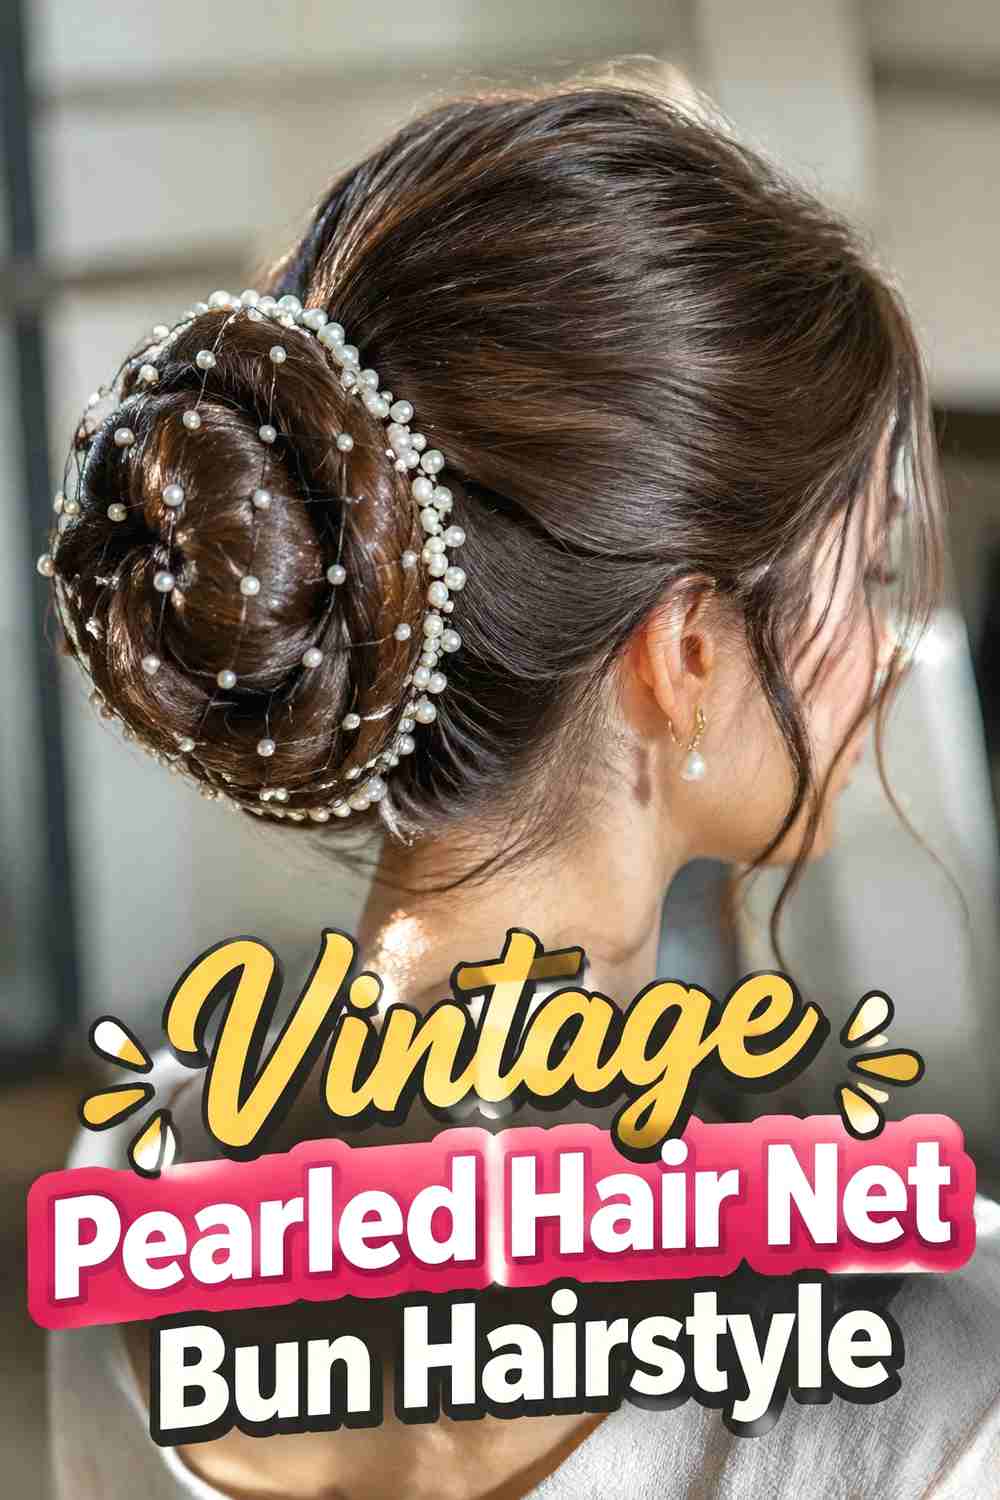
A pearled hair net naturally lends itself to vintage-inspired styling, especially when paired with a softly rolled front and a low, controlled bun. The front can feature a polished side wave or gently curved section, while the back remains compact enough for the pearl net to fit neatly around the bun. The goal is to reference classic hair-net styling without turning the look into a costume, so keep the finish soft, wearable, and free of exaggerated rolls. A net with small ivory pearls can reinforce the nostalgic mood while remaining elegant. Natural shine and subtle texture through the bun help modernize the hairstyle and keep the accessory from appearing overly formal.
Styling Notes
Concentrate the strongest vintage detail around the front and keep the bun simpler so the hairstyle remains balanced and current.
11. Side Swept Pearled Hair Net Bun Hairstyle
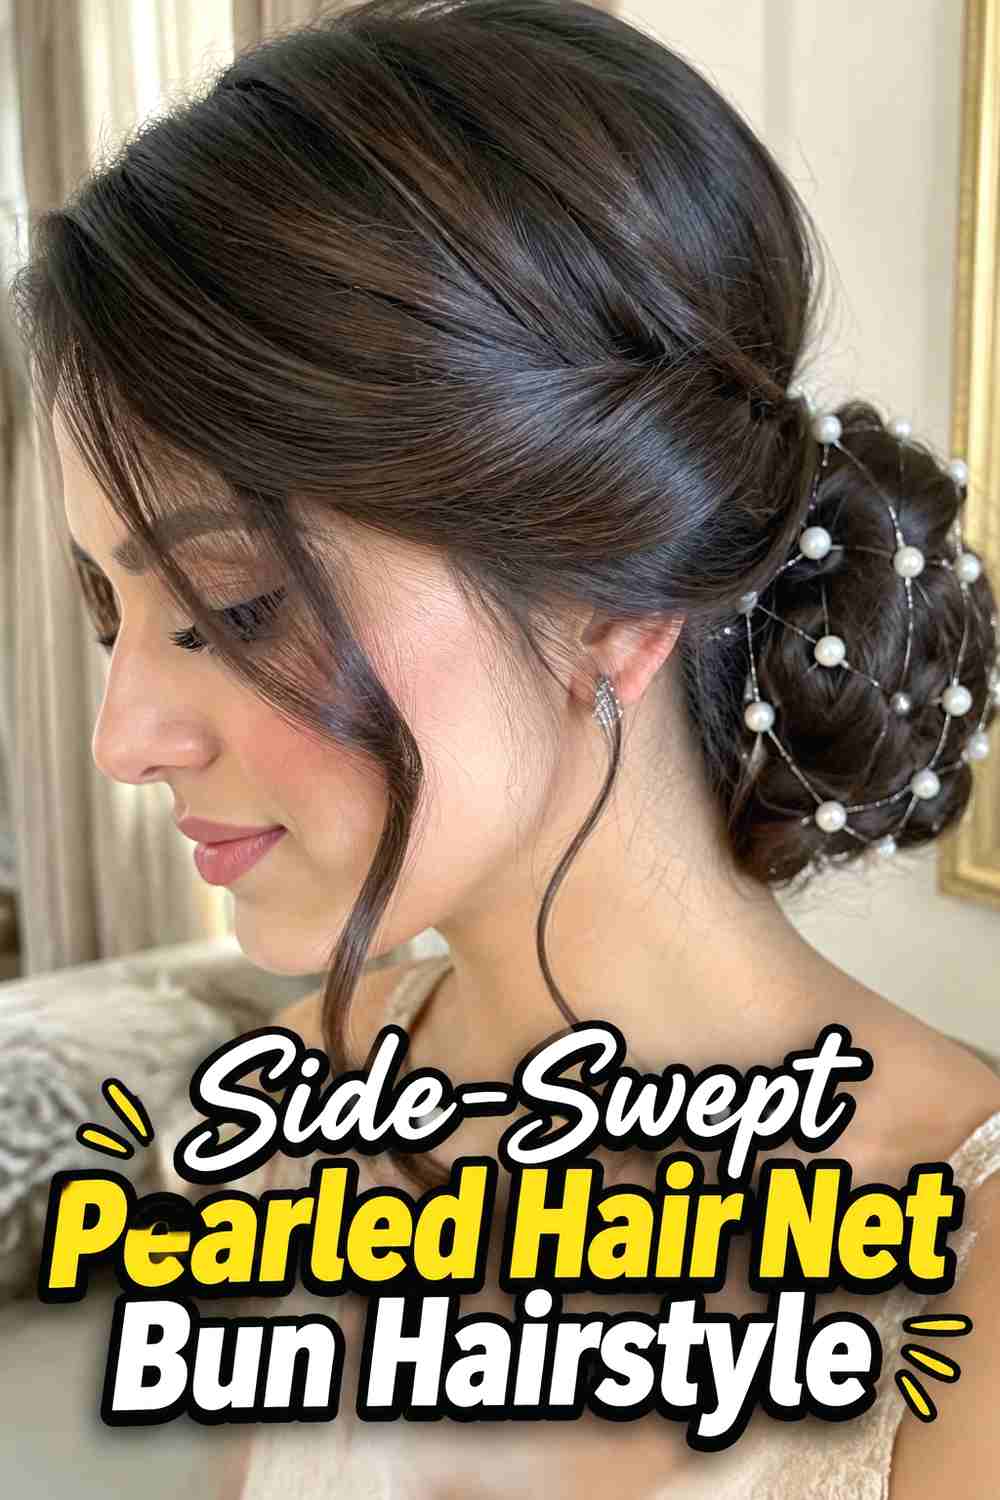
A side-swept bun shifts the pearl-netted detail slightly away from the center, creating an elegant asymmetric finish. Hair moves diagonally from one side of the head toward a low bun positioned near the opposite side of the nape. The pearled net follows the bun’s shape and makes the off-center placement even more noticeable from the back. Keep the bun low enough that it feels balanced rather than sitting directly behind the ear, where the accessory may become bulky. The front can use a matching side sweep or an understated off-center part. This directional flow gives the hairstyle more movement while preserving the secure, polished nature of the netted bun.
Why It Works
The diagonal sweep and off-center bun create visual movement while the pearl net keeps the final shape cohesive and formal.
12. Sculptural Pearled Hair Net Bun Hairstyle
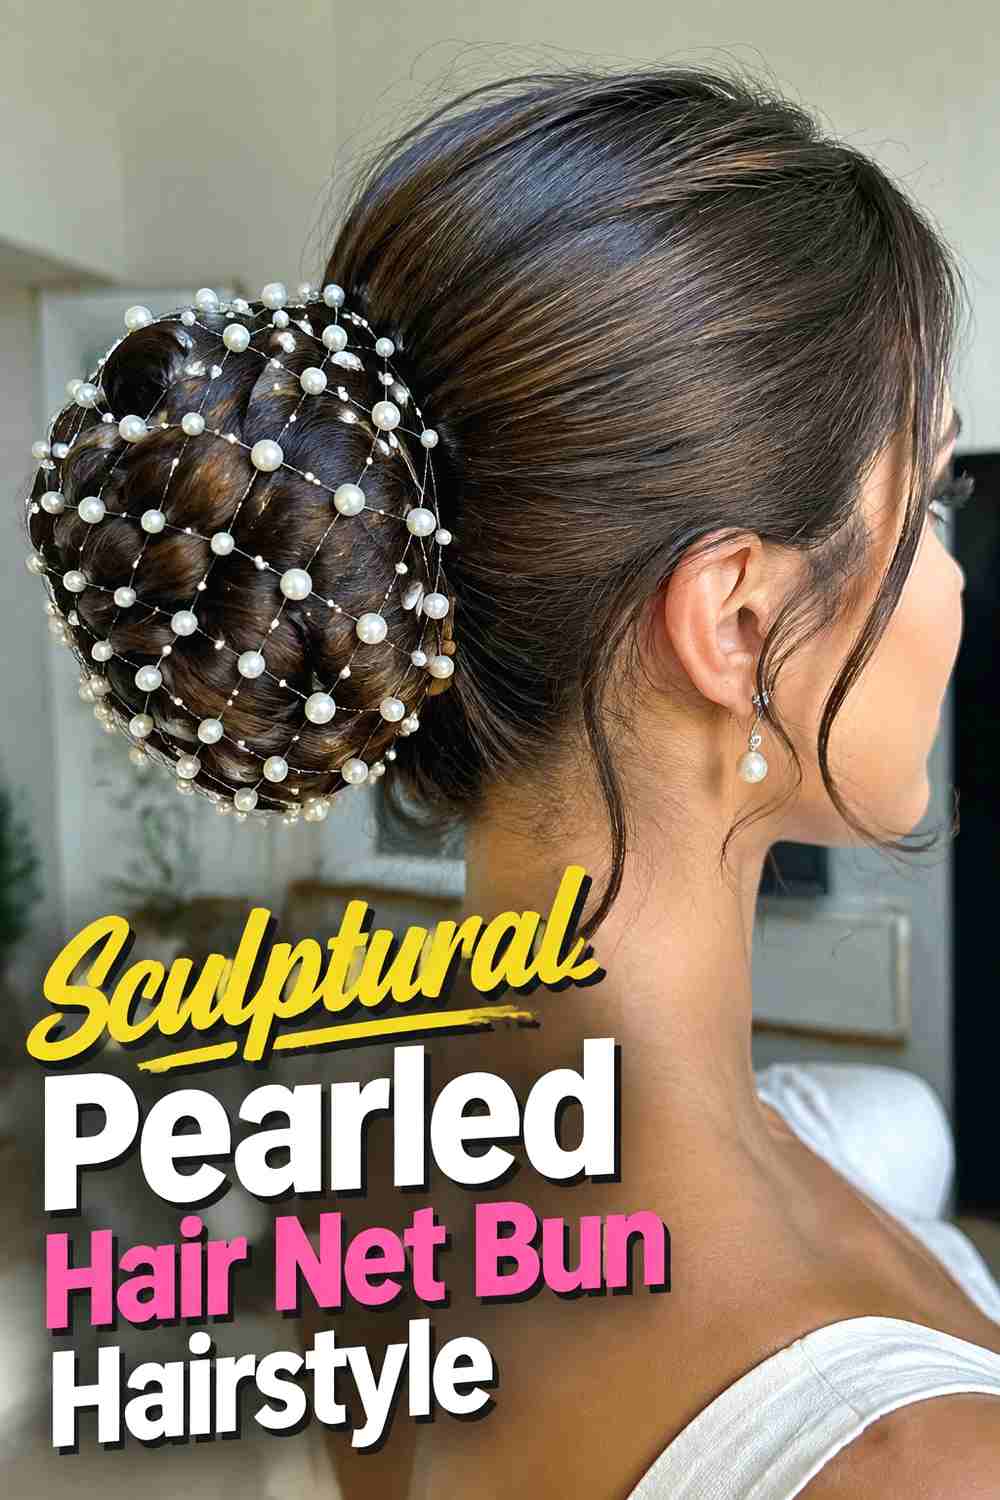
The sculptural version uses broad folds or overlapping loops to create a statement bun before enclosing it in a delicate pearl net. Rather than relying on many small curls, the hair is arranged into two or three substantial shapes that connect naturally to the gathering point. The net should be fine enough to reveal those folds beneath it, with pearls positioned like subtle highlights across the surface. Longer or thicker hair provides more material for building the structure, though internal support can help maintain the shape on finer hair. Hidden pins are essential because visible hardware would interrupt the clean architecture. Despite its dramatic appearance, the bun should remain balanced and physically believable.
Best For
Choose this version for weddings, formal photography, fashion-forward events, or occasions where the updo itself is meant to be a major visual feature.
Styling Notes
Create and secure the dominant folds first, then stretch the pearl net gently over the finished form without flattening its contours.
How to Choose the Right Look
Start with bun placement. Low buns and chignons feel softer and more romantic, while mid-height ballerina buns create a cleaner, more classic silhouette. Side-swept and sculptural versions make the accessory more noticeable and work well when you want the back of the hairstyle to be a focal point.
Next, consider texture. Sleek styles show the pearl net clearly and suit a refined finish, while braids, twists, and soft tendrils add more movement underneath and around the accessory. If the net itself is heavily pearled, a simpler bun usually keeps the overall design balanced.
Hair density matters too. Thick hair can support larger chignons and sculptural folds, while finer hair may be more comfortable in compact buns with lighter netting.
Check the net’s fit before the event. It should sit close enough to follow the bun but not so tightly that it collapses the shape or pulls at the scalp.
Finally, coordinate pearl scale with bun size. Tiny pearls suit minimalist and ballerina styles, while a larger bun can handle slightly more visible pearl spacing without looking overwhelmed.
Final Thoughts
Pearled hair net buns combine the structure of a polished updo with delicate accessory detail. A simple low bun can feel timeless, while braids, twists, tendrils, or sculptural folds give the same pearl-net concept a completely different personality.
Choose the bun shape first, secure it comfortably, and then fit the net around the hairstyle so the pearls highlight the structure rather than hide it.
FAQs
1. What is a pearled hair net bun hairstyle?
It is a bun or chignon partially or fully enclosed in a fine hair net decorated with pearls, creating a secure updo with an elegant textured finish.
2. Should the bun be secured before adding the pearl hair net?
Yes. Building a stable bun first usually makes the finished style more secure and allows the net to function mainly as a decorative finishing layer.
3. Can a pearl hair net work with a braided bun?
Yes. An open, lightly pearled net can look especially attractive over a braided bun because the woven hair remains visible underneath.
4. What bun placement works best with a pearled hair net?
Low, mid-height, ballerina, side-swept, and chignon placements can all work. The right option depends on the net size, hair length, and desired silhouette.
5. Are pearled hair net buns suitable for weddings?
Yes. They work especially well for bridal, bridesmaid, reception, and formal guest hairstyles because the pearl detail adds decoration without requiring multiple separate accessories.
Save your favorite pearled hair net bun ideas, share them for inspiration, and explore more elegant accessory-based updos for weddings and special occasions.