20 Rake-Mark Wet Hair Hairstyle Ideas for Glossy Sculpted Texture
Glossy roots, visible rake lines, and controlled movement give wet-look hair a sculpted finish that can feel sleek, directional, or softly editorial.
Rake-mark wet hair styling is defined by visible separation through the roots and upper lengths, usually created by fingers or a wide-tooth comb through a glossy styling product. Instead of smoothing every strand into one flat surface, the marks remain intentionally visible, adding rhythm and texture to the finish.
The look can be adapted to loose hair, short cuts, ponytails, buns, knots, and half-up styles. The key is balancing shine with believable hair texture so the finish looks deliberately damp rather than oily or plastered down. These 20 ideas offer different ways to use parting, direction, volume, and defined rake lines.
Quick List
- Classic Slicked Back Rake Mark Wet Hair Hairstyle
- Center Part Rake Mark Wet Hair Hairstyle
- Deep Side Part Rake Mark Wet Hair Hairstyle
- Finger Raked Crown Wet Hair Hairstyle
- Side Swept Rake Mark Wet Hair Hairstyle
- Rake Mark Wet Bob Hairstyle
- Long Layered Rake Mark Wet Hair Hairstyle
- Sculpted Wave Rake Mark Wet Hair Hairstyle
- Low Ponytail Rake Mark Wet Hair Hairstyle
- High Ponytail Rake Mark Wet Hair Hairstyle
- Half Up Rake Mark Wet Hair Hairstyle
- Low Bun Rake Mark Wet Hair Hairstyle
- Twisted Low Knot Rake Mark Wet Hair Hairstyle
- Curled End Rake Mark Wet Hair Hairstyle
- Face Framing Rake Mark Wet Hair Hairstyle
- Asymmetrical Rake Mark Wet Hair Hairstyle
- Zigzag Rake Mark Wet Hair Hairstyle
- Defined Root Loose End Rake Mark Wet Hair Hairstyle
- Wet Look Shag Rake Mark Hairstyle
- High Crown Rake Mark Wet Hair Hairstyle
1. Classic Slicked Back Rake Mark Wet Hair Hairstyle
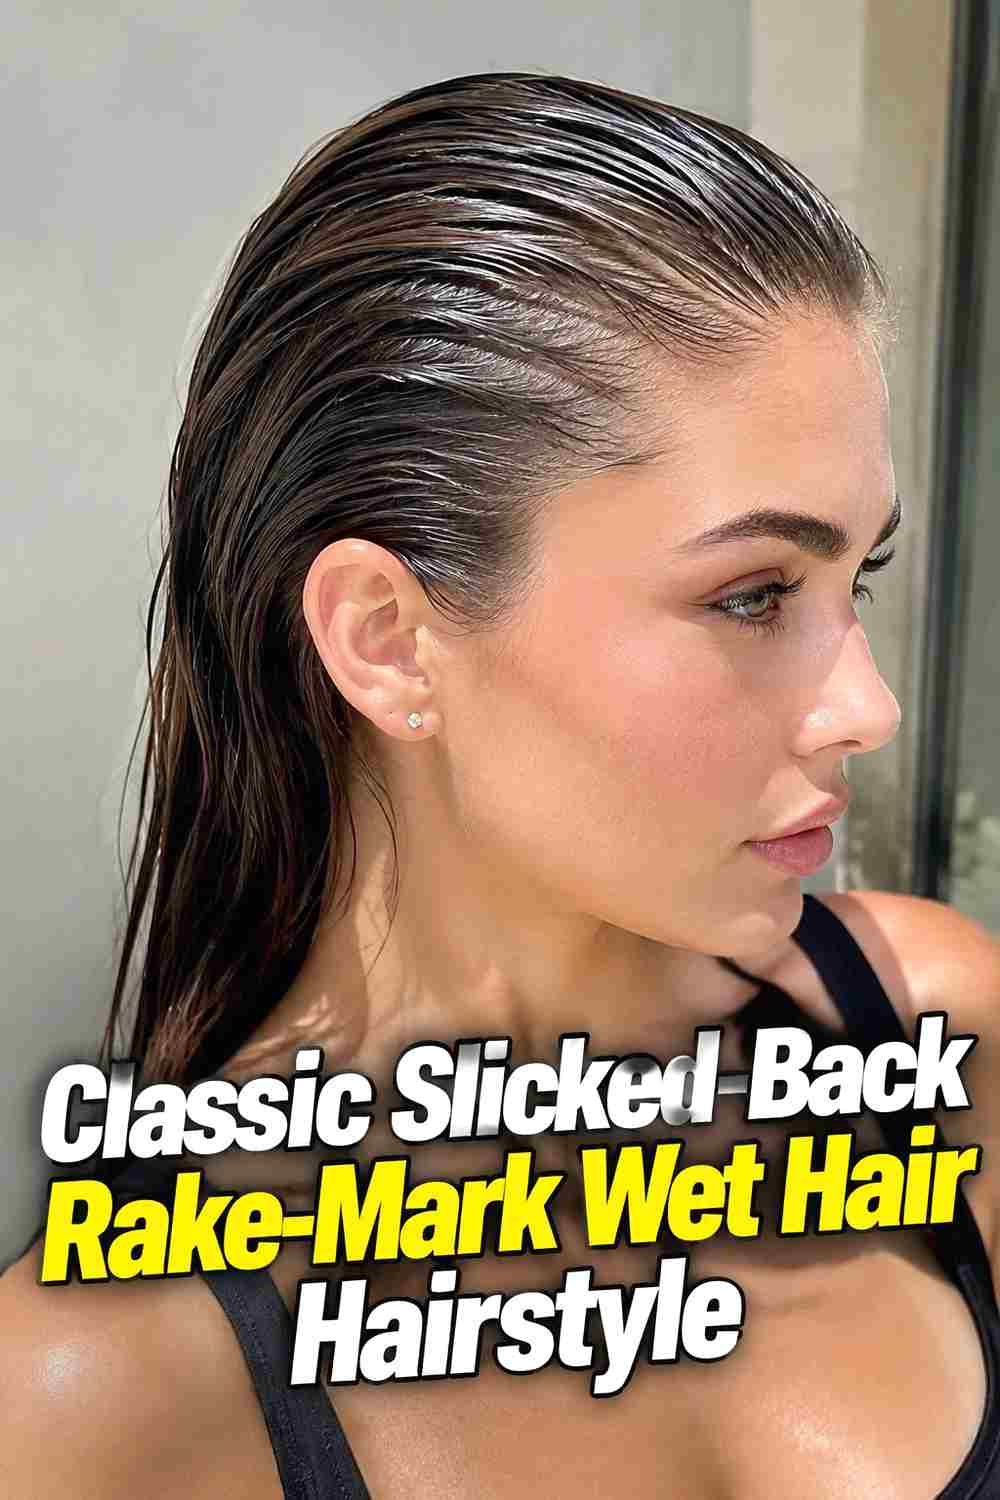
The classic slicked-back version keeps the face completely open while making the rake marks visible from the hairline toward the crown. Instead of brushing the surface perfectly smooth, run fingers or a wide-tooth comb backward through glossy product so narrow channels remain between sections. The upper hair should look controlled and damp, while the mid-lengths can gradually soften into more natural movement. This contrast prevents the entire style from appearing stiff or heavily coated. The look works especially well when the rake marks remain roughly parallel and the crown follows the natural shape of the head rather than being flattened completely.
Styling Notes
Apply product in smaller amounts and build gradually so the roots stay defined without making the lengths look saturated.
2. Center Part Rake Mark Wet Hair Hairstyle
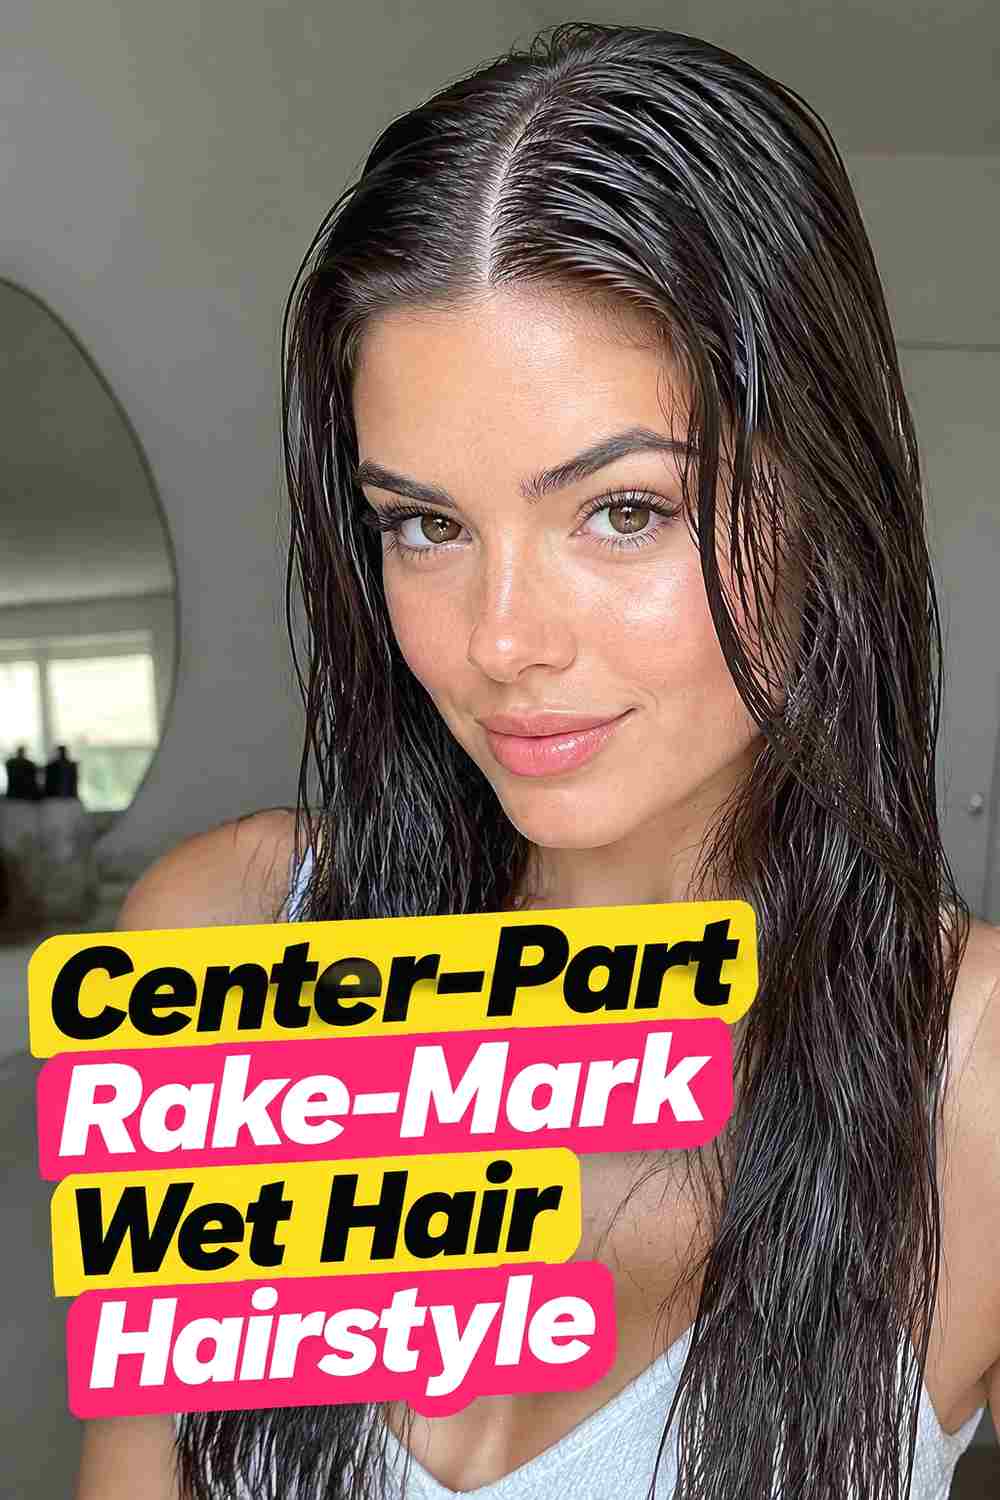
A center part gives rake-mark wet hair a balanced, graphic foundation. Create the part first, then direct the hair away from it on both sides using fingers or a wide-tooth comb so the rake lines mirror each other without looking mechanically identical. Keeping the roots glossy makes the separation easy to see, while softer ends prevent the hairstyle from feeling too severe. Medium and long lengths can fall behind the shoulders, while shorter hair can curve around the jaw. This version works particularly well when the part remains crisp but the rake marks themselves have a little natural variation in width and direction.
Why It Works
The centered structure makes the rake pattern easy to read and gives the glossy finish a clean, intentional rhythm.
3. Deep Side Part Rake Mark Wet Hair Hairstyle
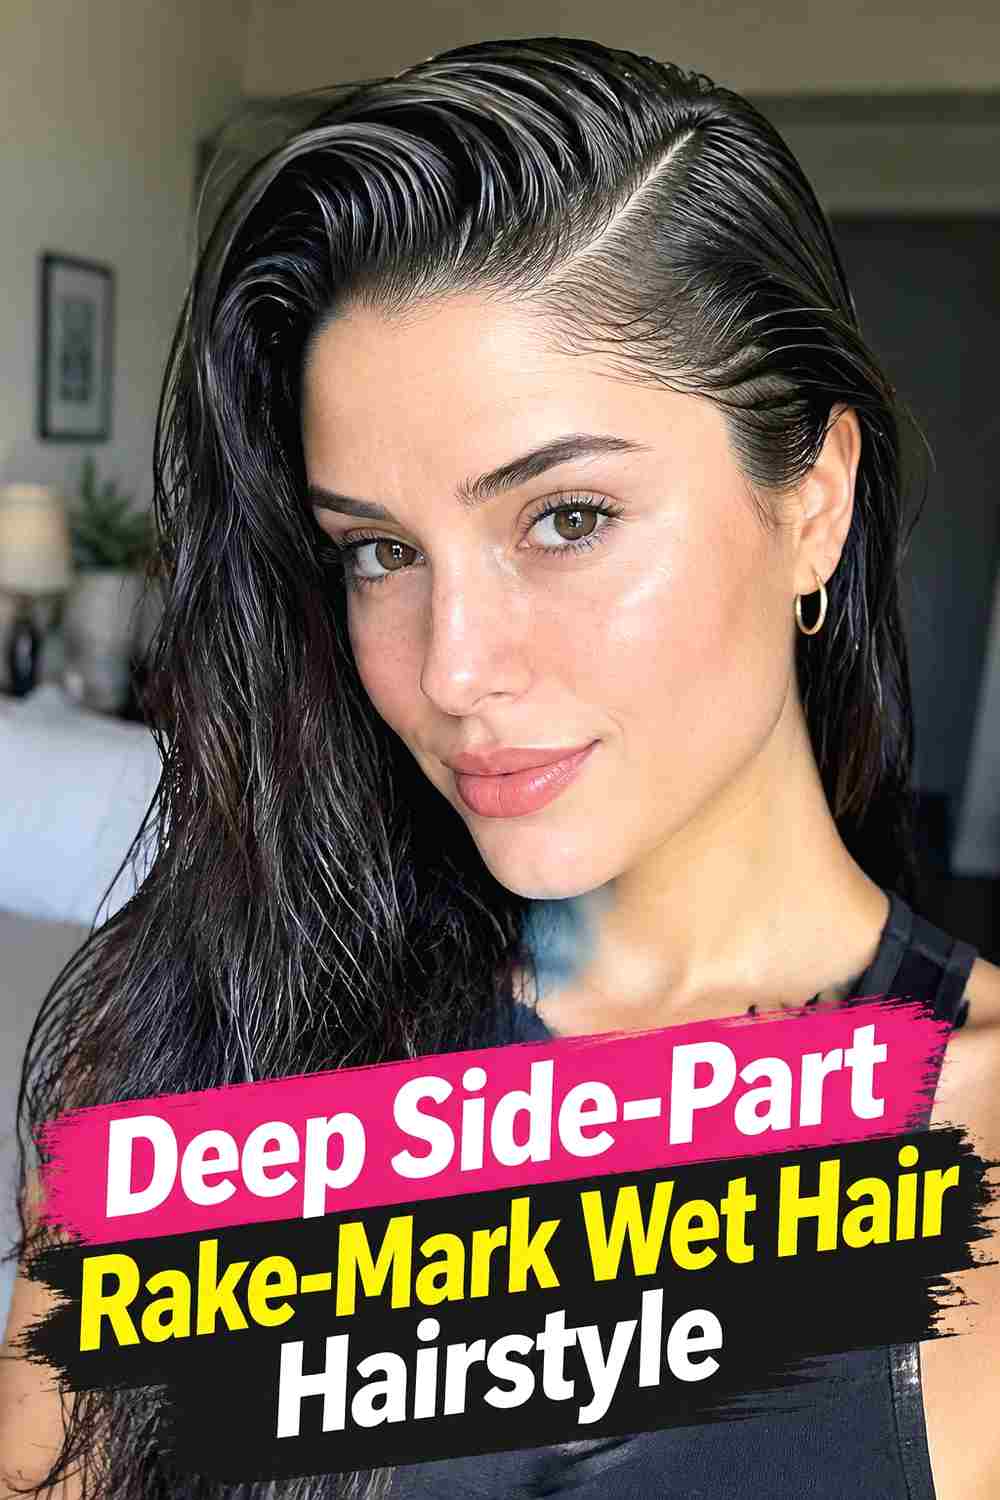
A deep side part creates stronger movement by sending most of the hair in one direction. The fuller side can sweep across the crown with broad rake marks that follow the curve of the head, while the smaller side stays closer to the scalp. Gloss at the roots emphasizes the directional lines and gives the style a polished, editorial quality. The lengths may remain straight, softly waved, or slightly separated depending on how dramatic you want the contrast to feel. This look is especially effective from three-quarter angles because the part, the rake pattern, and the heavier sweep all remain visible at once.
Styling Notes
Create the deep part before applying most of the styling product so the separation stays clean instead of becoming blurred.
4. Finger Raked Crown Wet Hair Hairstyle
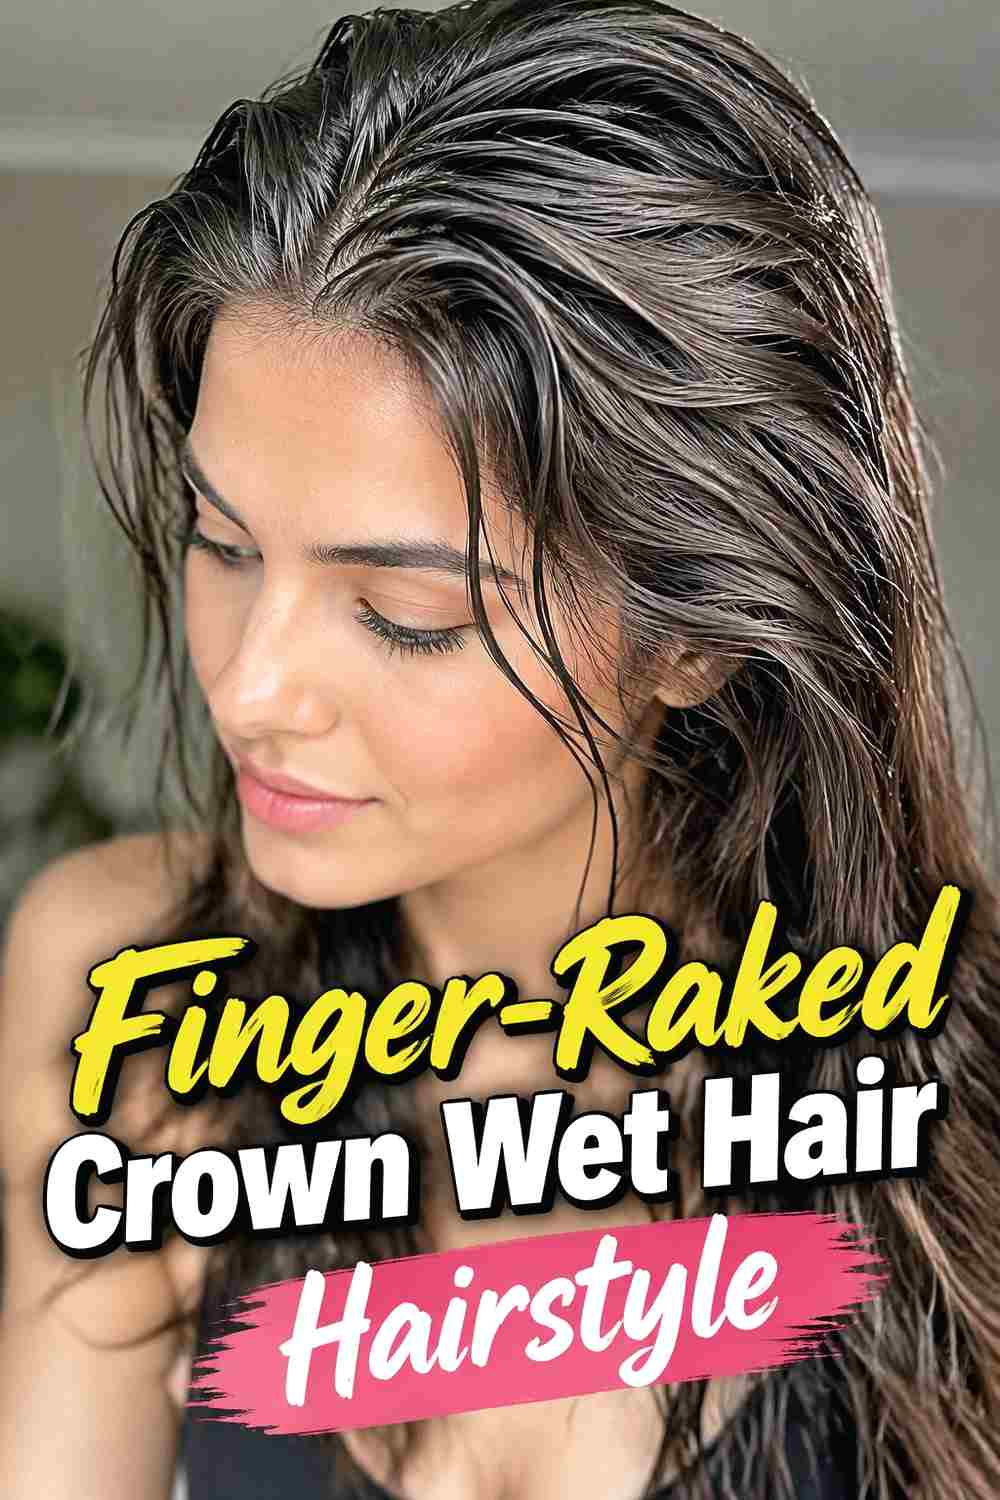
This variation focuses the strongest rake marks directly through the crown, using fingers rather than a comb to create wider, more organic channels. Push the hair backward from the forehead while keeping a little lift at the roots, then allow the lines to soften as they approach the back of the head. The result should look sculpted but not perfectly uniform. Leaving the lengths looser creates a useful contrast between deliberate root texture and natural movement below. This approach works particularly well if you want the wet look concentrated through the most visible upper area without coating every inch of the hair in the same glossy finish.
Why It Works
Finger spacing creates irregular but intentional lines that feel softer and more natural than tightly combed grooves.
5. Side Swept Rake Mark Wet Hair Hairstyle

The side-swept version directs the rake marks diagonally across the head rather than straight backward. Start with an off-center part or simply push the hair toward one side, using fingers or a wide-tooth comb to maintain visible separation through the roots. The fuller side can fall over one shoulder while the opposite side sits flatter behind the ear. Keeping the marks angled reinforces the sweep and makes the hairstyle look deliberate from the front. The lengths can remain softly damp-looking near the top while transitioning into a more natural finish below, which keeps the overall style wearable instead of excessively slick.
Best For
Medium to long hair gives the directional sweep enough length to continue naturally beyond the crown.
6. Rake Mark Wet Bob Hairstyle
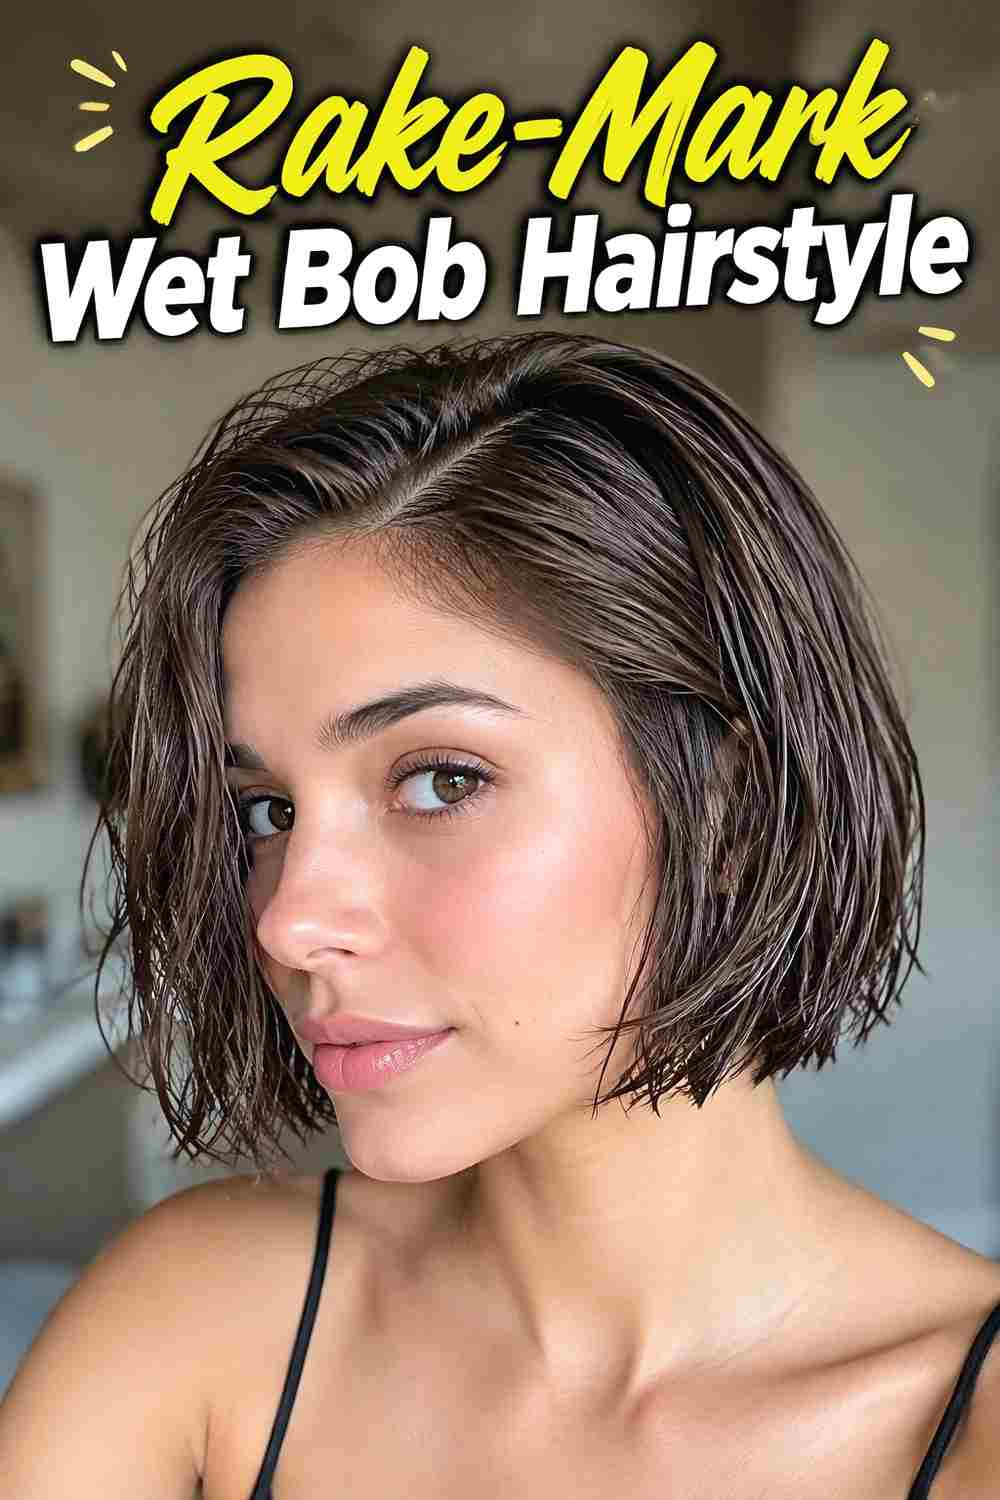
A bob makes rake-mark wet styling feel compact and graphic because the visible grooves lead directly into a short, defined perimeter. Create the rake marks from the hairline or part through the crown, then let the bob settle around the jaw or chin with slightly softer texture at the ends. A straight bob creates a sharper finish, while a wavy bob adds more movement. Avoid pressing the entire cut flat; a little root lift and separation helps the short silhouette retain dimension. This version works particularly well when the glossy upper section contrasts with a clean bob shape rather than trying to create exaggerated volume.
Styling Notes
Keep product concentrated near the roots and upper lengths so the bob ends still show movement and natural strand detail.
7. Long Layered Rake Mark Wet Hair Hairstyle

Long layers create a dramatic contrast between controlled rake marks at the top and flowing movement through the lower lengths. Work the roots backward or away from a part, keeping the rake lines visible through the crown before allowing the layers to separate naturally around the shoulders. Because long hair can easily look weighed down with too much wet-look product, the finish should become progressively lighter toward the ends. Face-framing layers can curve away from the cheeks or stay tucked behind the ears. The result feels glossy and sculpted near the head while still preserving enough softness for the long layered shape to remain visible.
Why It Works
The layered lengths keep the wet-look roots from making the entire hairstyle appear heavy or uniformly coated.
8. Sculpted Wave Rake Mark Wet Hair Hairstyle
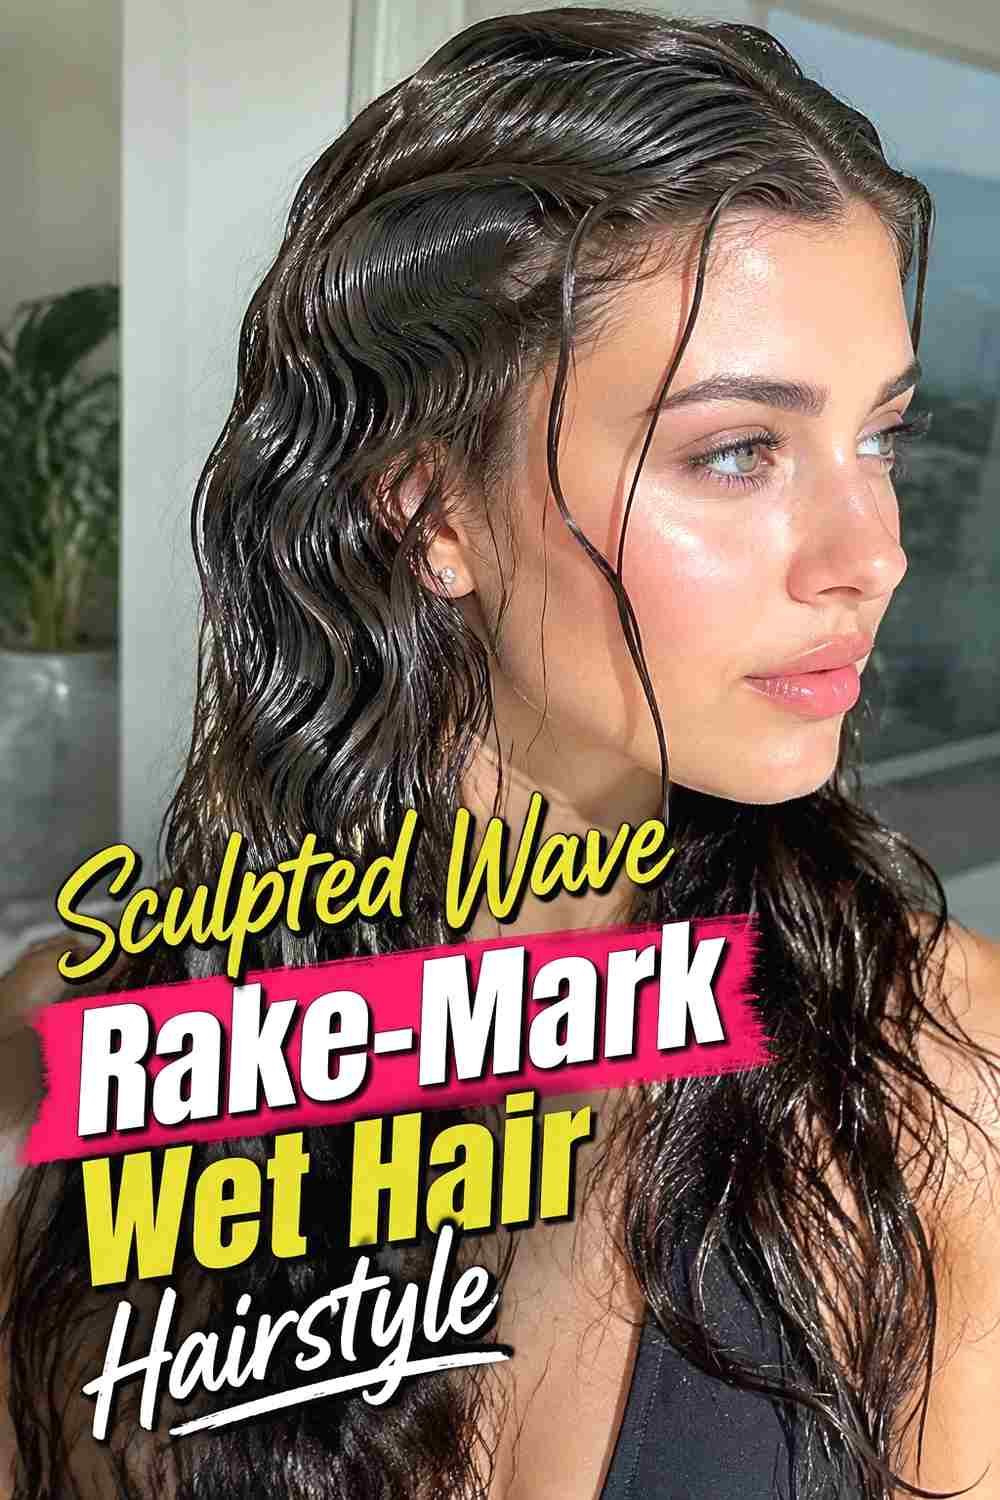
This style combines visible root rake marks with larger sculpted waves through the mid-lengths. Start by directing the hair backward or to one side, then transition the separated root lines into controlled S-shaped bends. The change in texture makes the style feel more editorial than a simple slick back while still maintaining believable movement. The waves should remain broad and smooth instead of forming stiff, repetitive ridges. A glossy surface works best around the upper section, while the wave lengths can reflect light naturally without appearing fully wet. This version is particularly striking on medium-long hair where the wave pattern has room to develop.
Styling Notes
Keep the transition from rake marks to waves gradual so the two textures feel connected rather than like separate hairstyles.
9. Low Ponytail Rake Mark Wet Hair Hairstyle
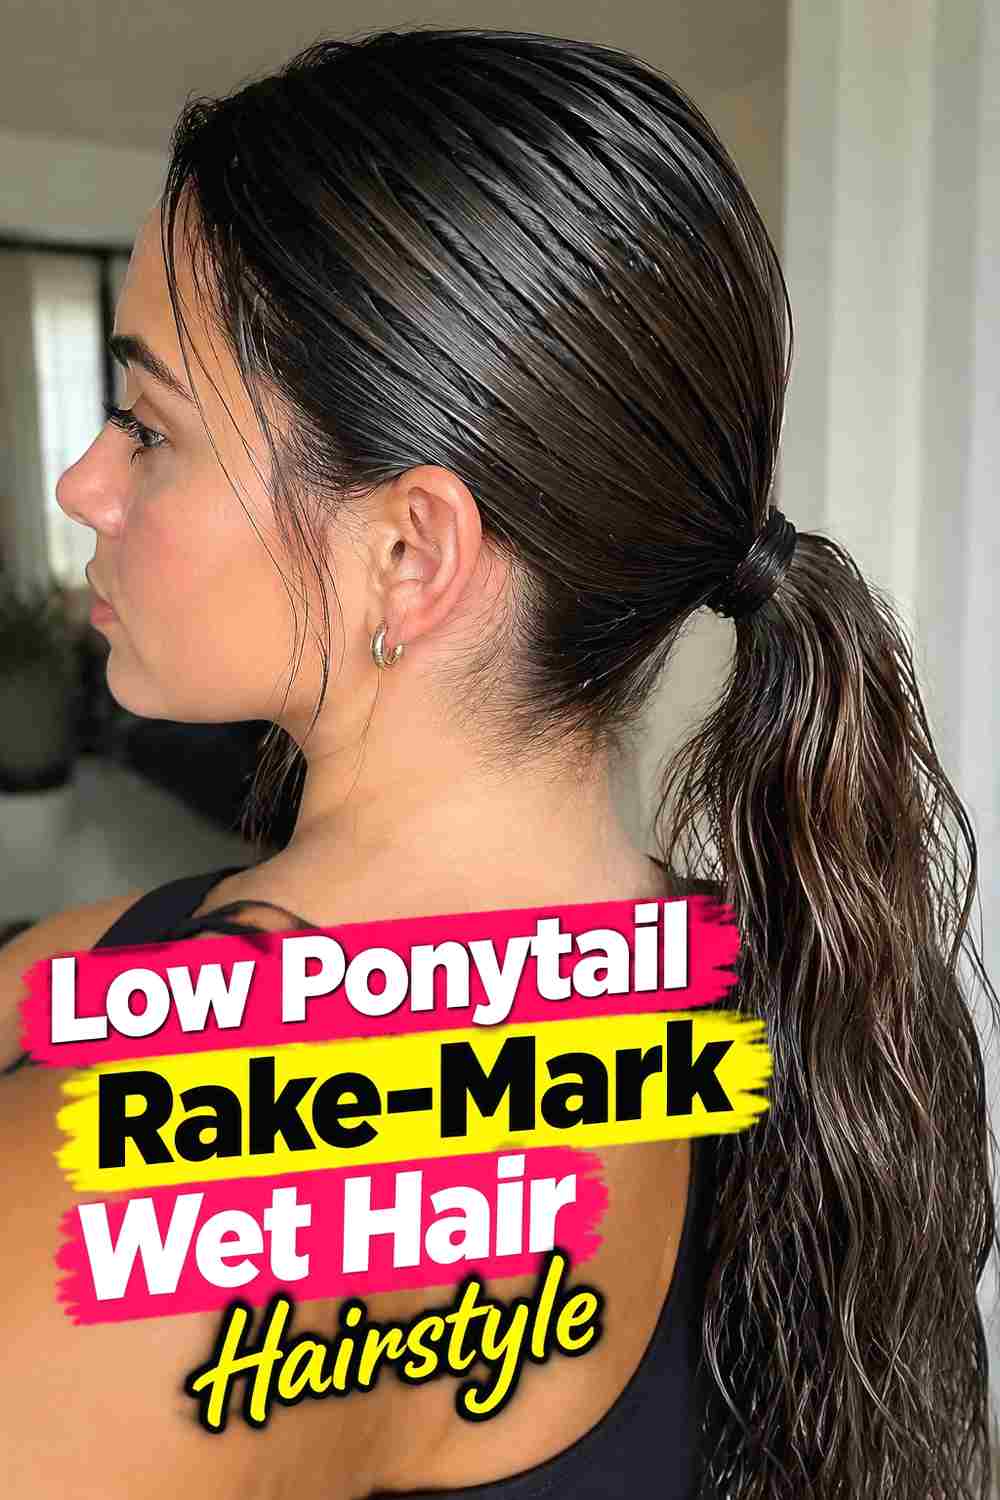
A low ponytail gives the rake marks a practical endpoint at the nape. Create a center, side, or part-free front, then rake the hair backward with visible channels leading toward the ponytail base. Secure the hair independently and allow the ponytail itself to remain straight, softly waved, or naturally textured. The contrast between glossy structured roots and freer lengths makes the hairstyle feel polished without coating the whole ponytail. A wrapped base can conceal the elastic if you want an especially clean finish. The most successful versions keep the rake lines intact while avoiding excessive root tension that would flatten every trace of dimension.
Wear & Maintenance
Use enough hold to preserve the root pattern but keep the ponytail tie comfortable for longer wear.
10. High Ponytail Rake Mark Wet Hair Hairstyle
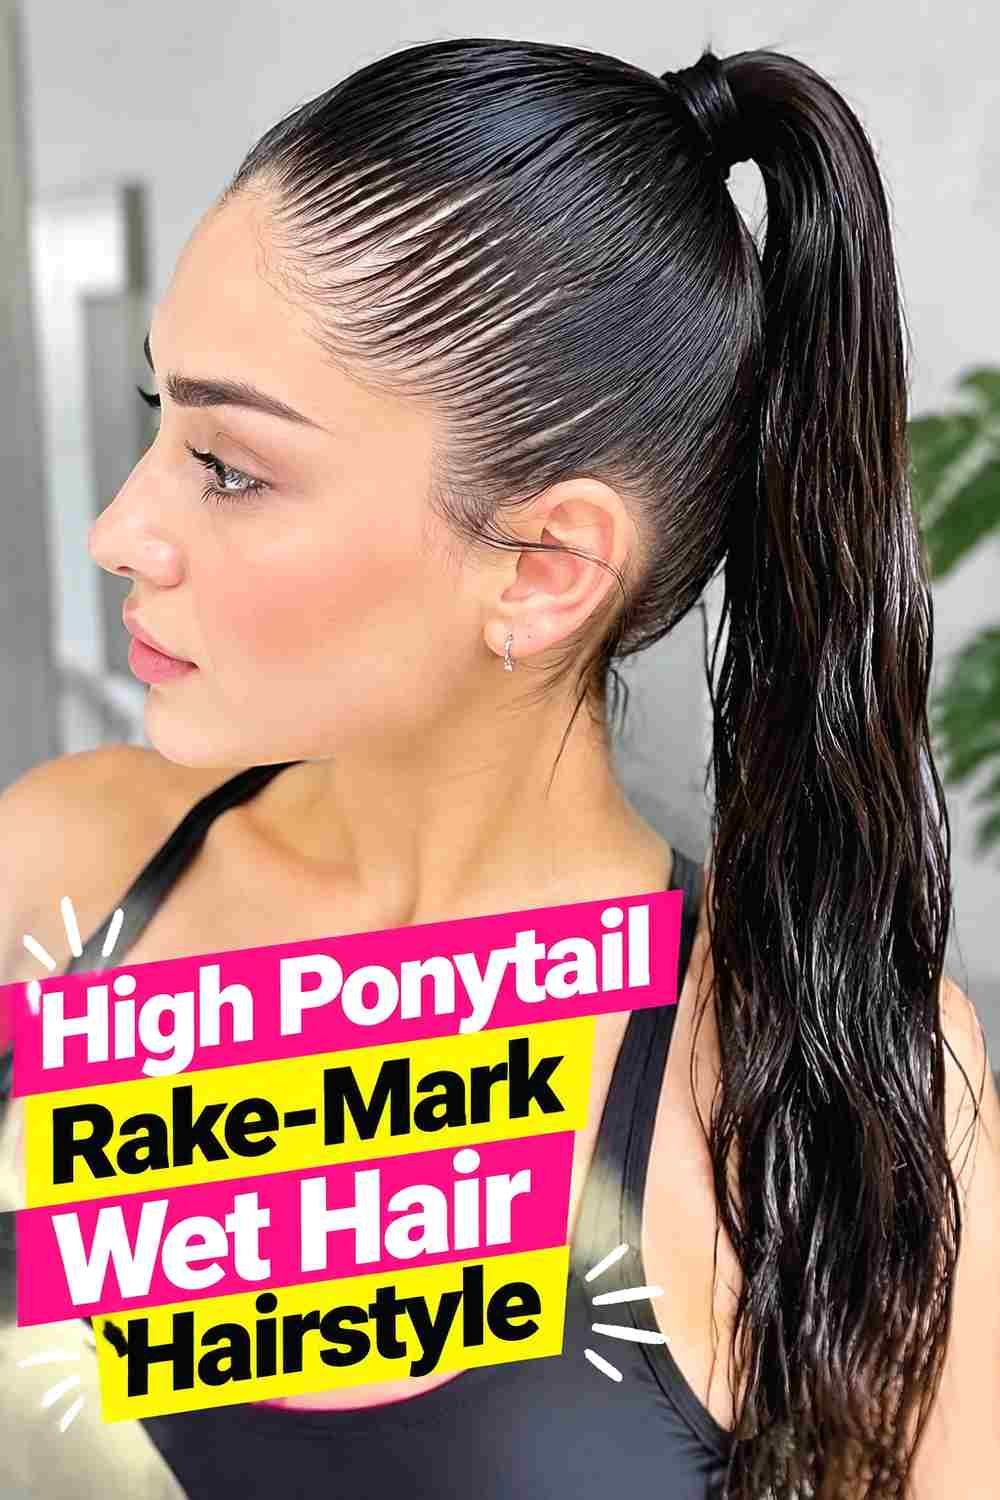
A high ponytail makes the rake marks rise toward the crown, creating an energetic lifted shape. Direct the hair upward and back in visible separated tracks, then gather it near the crown without brushing those lines completely smooth. Once secured, the ponytail can stay sleek or gain curls, waves, or natural texture for contrast. The height naturally emphasizes the direction of the root pattern, especially from side angles. This style works best when the hairline looks controlled but still realistic, with slight variation between sections instead of perfectly stamped grooves. Keeping the ponytail itself lighter in product also prevents the style from feeling overly rigid.
Pro Tip
Form the rake marks before the final ponytail is tightened so you do not have to recreate them against excessive tension.
11. Half Up Rake Mark Wet Hair Hairstyle

A half-up wet look lets the rake pattern control the crown while the lower lengths remain loose. Direct the upper section backward with fingers or a wide-tooth comb, then secure it with a small ponytail, clip, or discreet elastic. The visible rake marks should continue naturally toward the gathering point, while the hair underneath can stay dry-looking, wavy, curly, or softly textured. This creates an appealing contrast between sculpted polish and free movement. Because less hair is pulled back, the style can feel lighter than a full ponytail and works well when you want to expose the face without losing the drama of loose length.
Why It Works
The half-up structure confines the strongest wet-look detail to the crown, keeping the rest of the hairstyle soft and wearable.
12. Low Bun Rake Mark Wet Hair Hairstyle
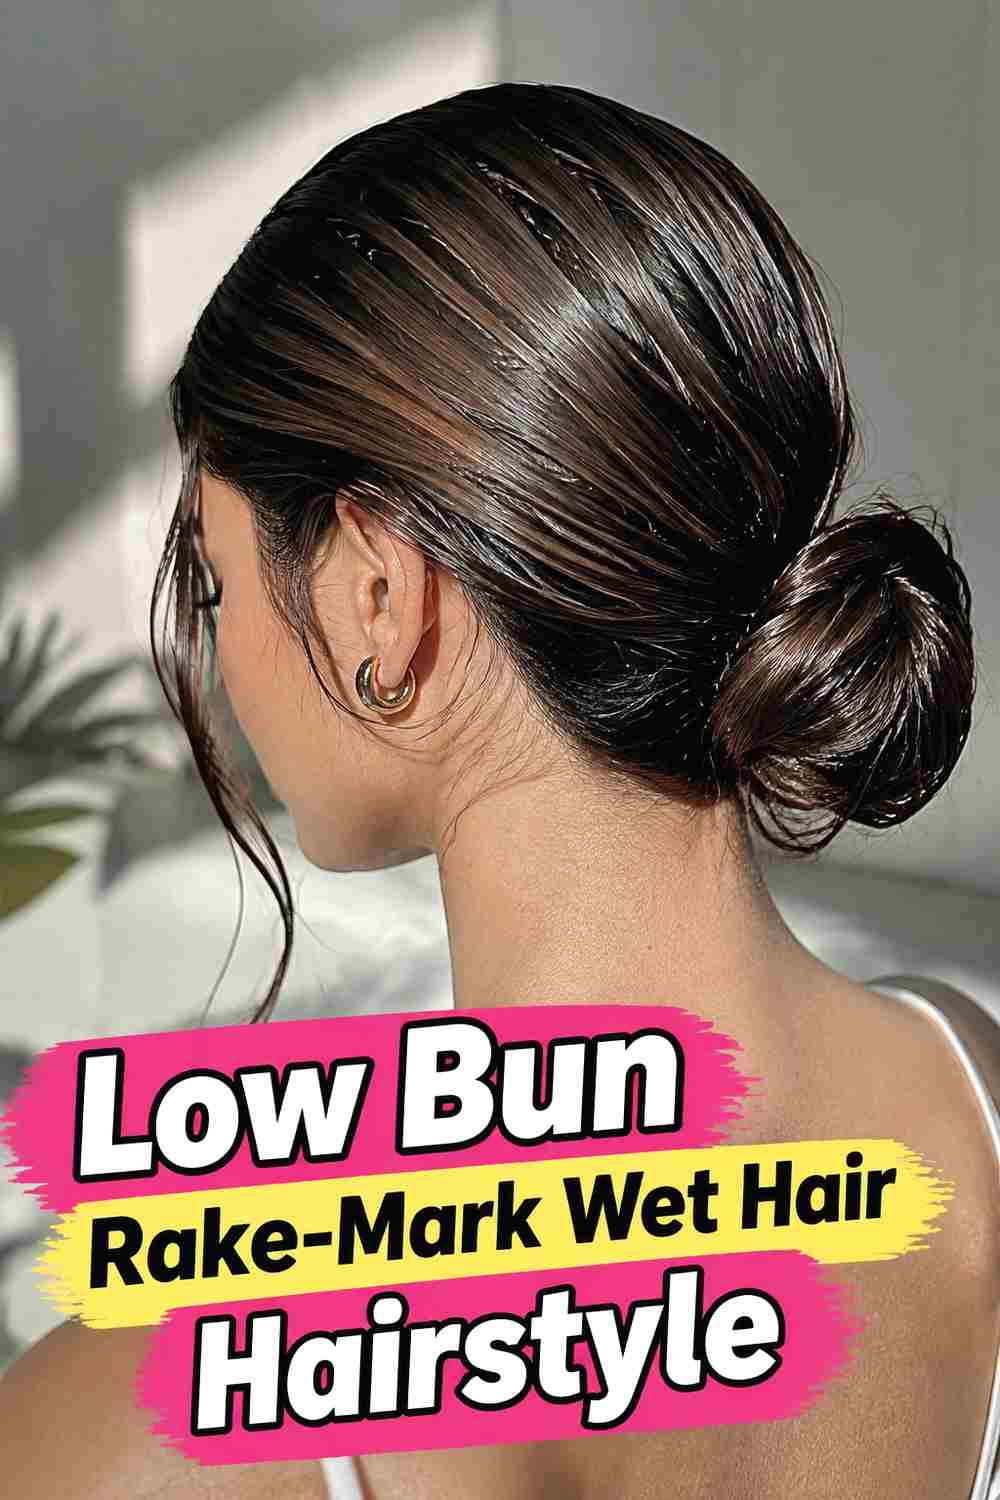
A low bun pairs naturally with rake-mark roots because the lines can lead cleanly from the hairline to the nape. Create the grooves first, then gather the hair into a ponytail and form a compact bun without disturbing the upper surface. A center part creates symmetry, while a part-free slick back feels more minimal. The bun can be smooth and neat or lightly twisted for extra dimension, but it should remain secure independently of the styling product. This look is useful when you want a polished updo with more texture than a completely brushed-flat wet style, especially for evening outfits or clean, modern event styling.
Styling Notes
Preserve the rake pattern while gathering the hair by guiding sections into the bun rather than brushing over them repeatedly.
13. Twisted Low Knot Rake Mark Wet Hair Hairstyle
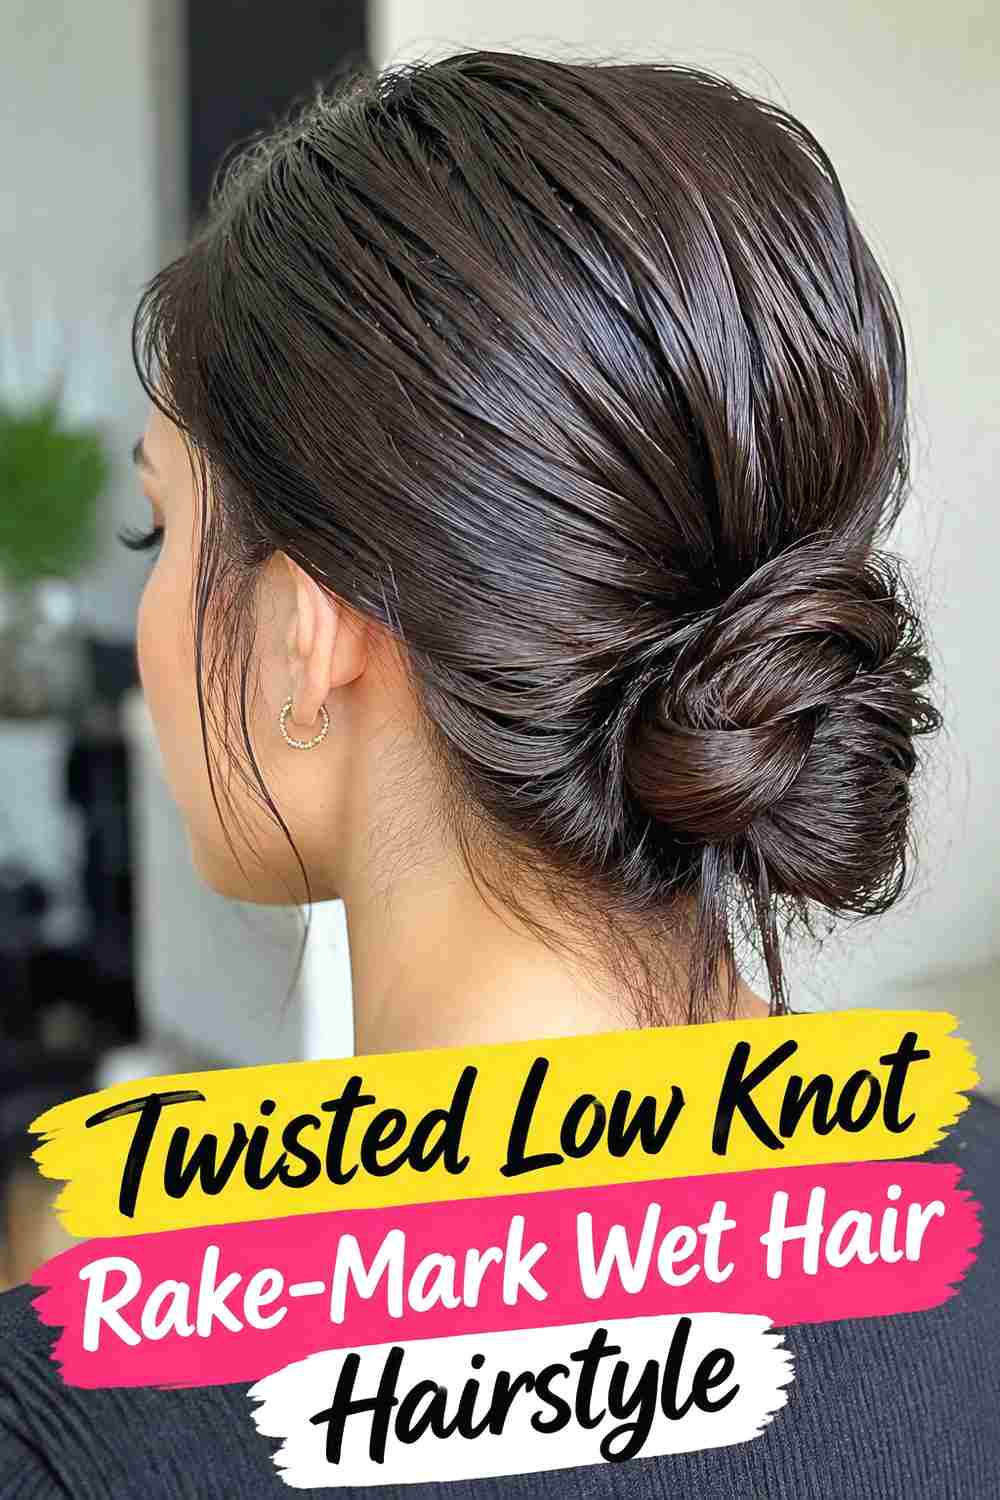
A twisted low knot gives the glossy root pattern a sculptural finish at the nape. Rake the upper hair backward in clear sections, gather everything low, then twist the length before folding it into a compact knot. The smooth twist contrasts nicely with the separated root lines and keeps the style visually interesting from both front and back. Slightly off-center placement can make the knot feel more modern, while a centered knot keeps the effect restrained. Because the twist provides physical structure, the wet-look product can stay focused mainly on the roots instead of being used to force the entire updo into place.
Why It Works
The linear rake marks and rounded knot create two different shapes that still connect through one clean directional flow.
14. Curled End Rake Mark Wet Hair Hairstyle
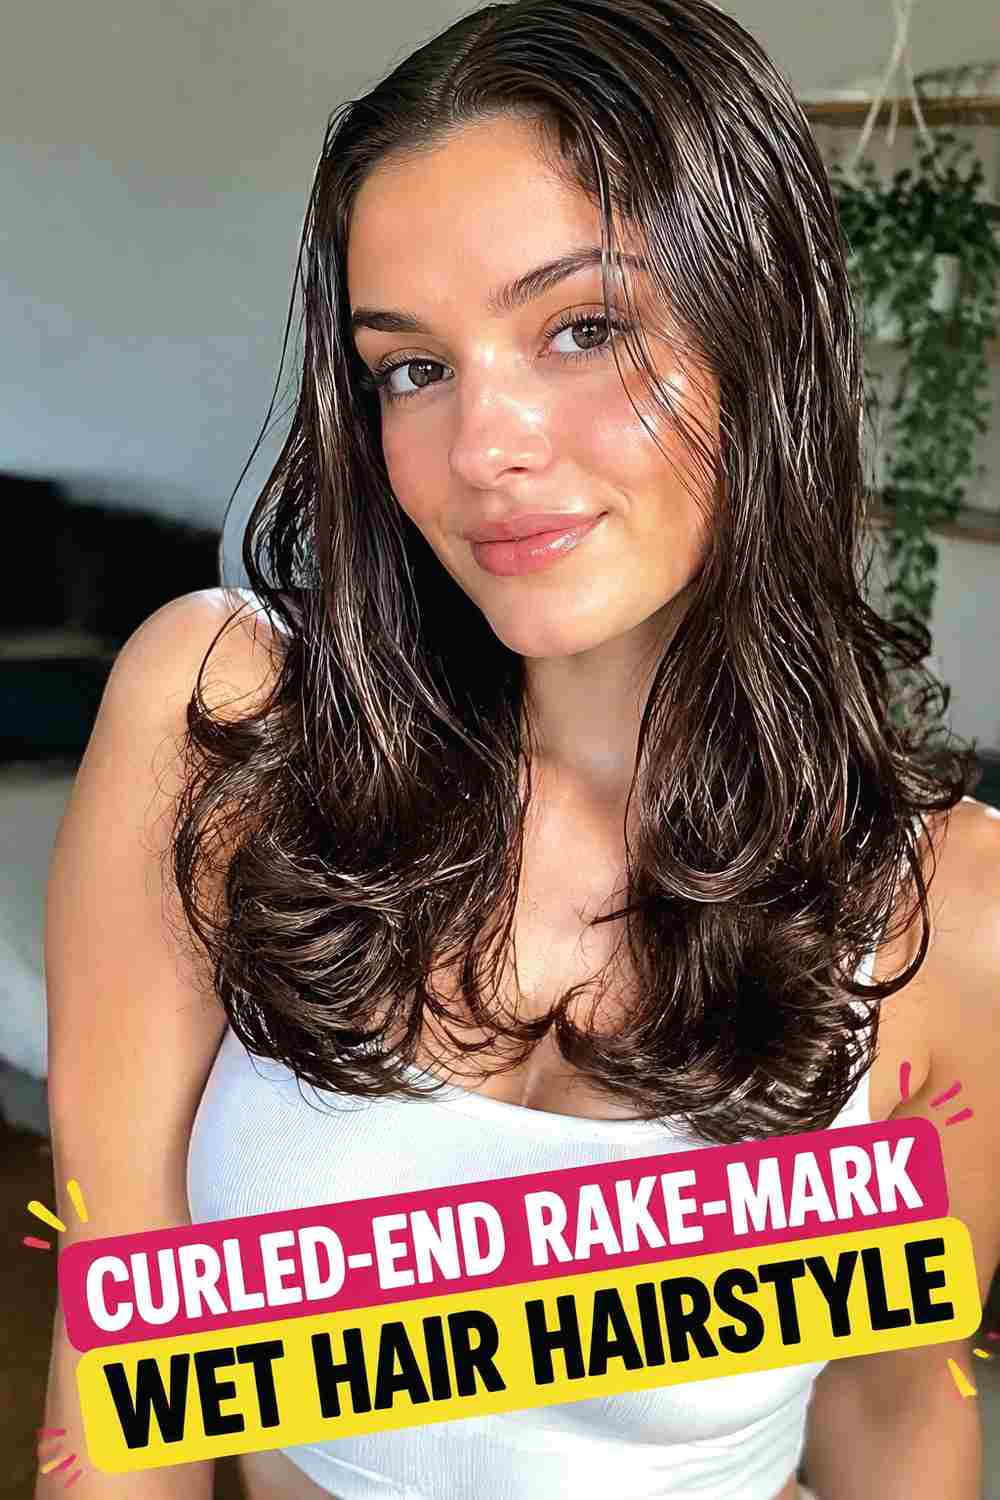
This variation combines sleek, separated wet-look roots with curled or softly flipped ends. Rake the hair backward or away from a part, keeping the upper section glossy and defined, then let the finish transition into dry-looking curls through the lower lengths. The contrast makes the hairstyle feel intentionally styled rather than simply wet from root to tip. Large curls or bends work better than many tight spirals because they preserve a clean silhouette beneath the sculpted top. This option suits medium and long hair particularly well and can shift easily from daytime polish to a dressier evening finish depending on the curl size.
Styling Notes
Keep most wet-look product away from the curled ends so they remain light, flexible, and clearly separated from the glossy root texture.
15. Face Framing Rake Mark Wet Hair Hairstyle
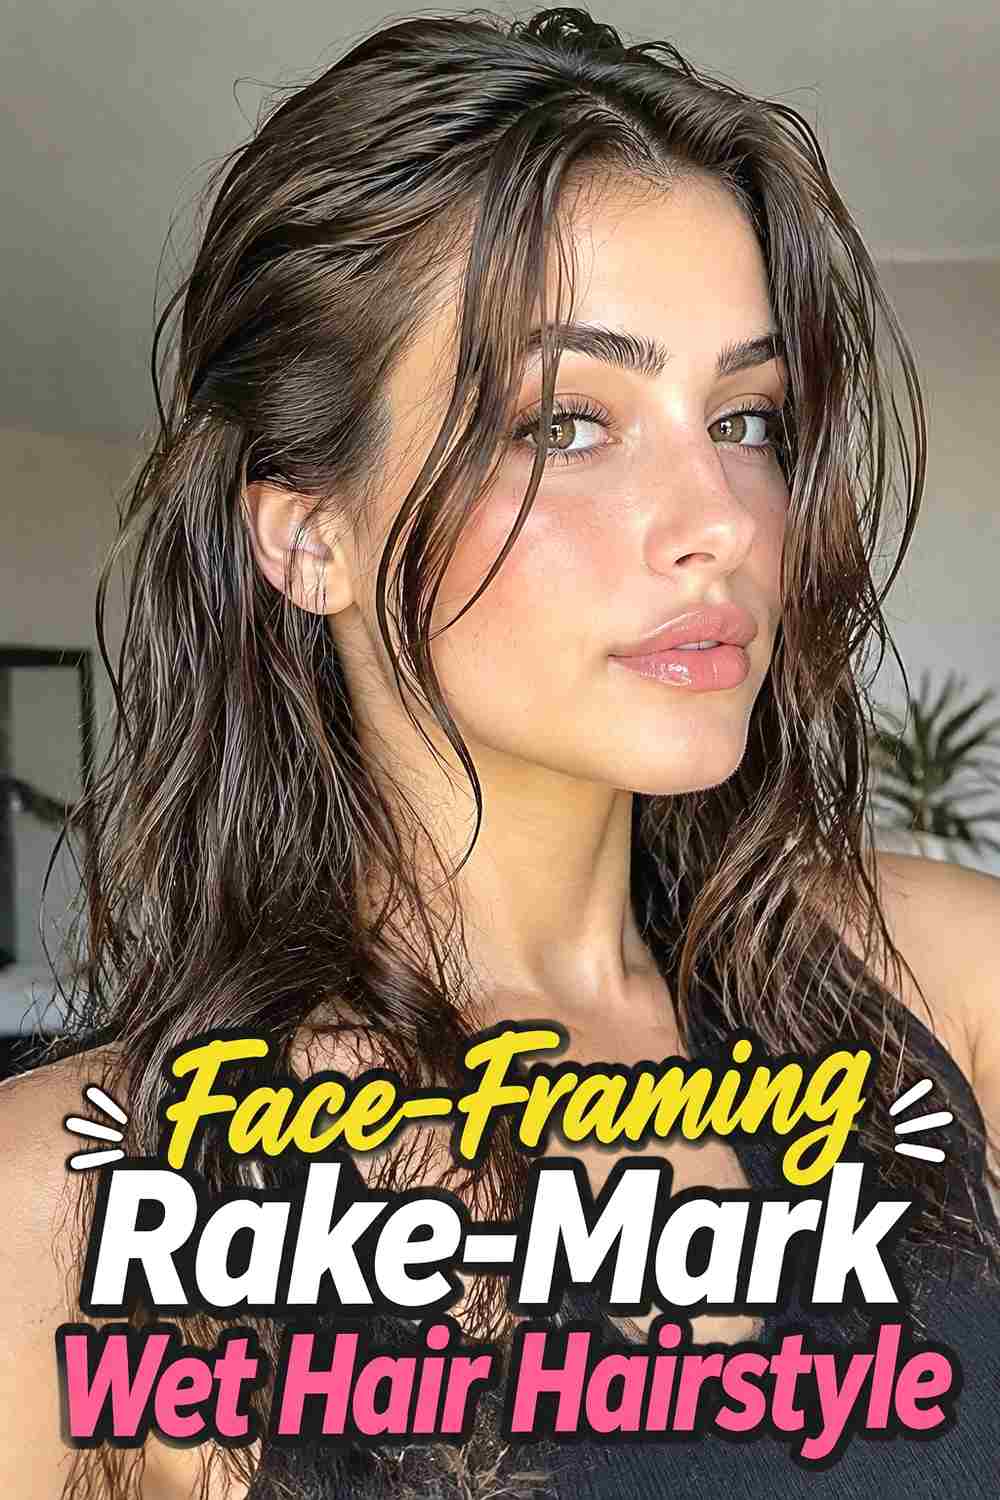
Face-framing sections add softness to a rake-mark wet look by leaving a small number of pieces free around the temples or cheeks. The remaining hair is directed backward with visible channels, creating a clear contrast between the controlled crown and the loose front pieces. Those sections can stay softly waved, curved, or lightly damp-looking, but they should connect naturally with the rest of the hairstyle. Keeping only a few pieces forward prevents the front from becoming cluttered and ensures the rake pattern remains the dominant feature. This variation is especially useful when a fully exposed hairline feels too severe for the finish you want.
Best For
Medium and long hair with shorter front layers that naturally separate from the main length.
16. Asymmetrical Rake Mark Wet Hair Hairstyle
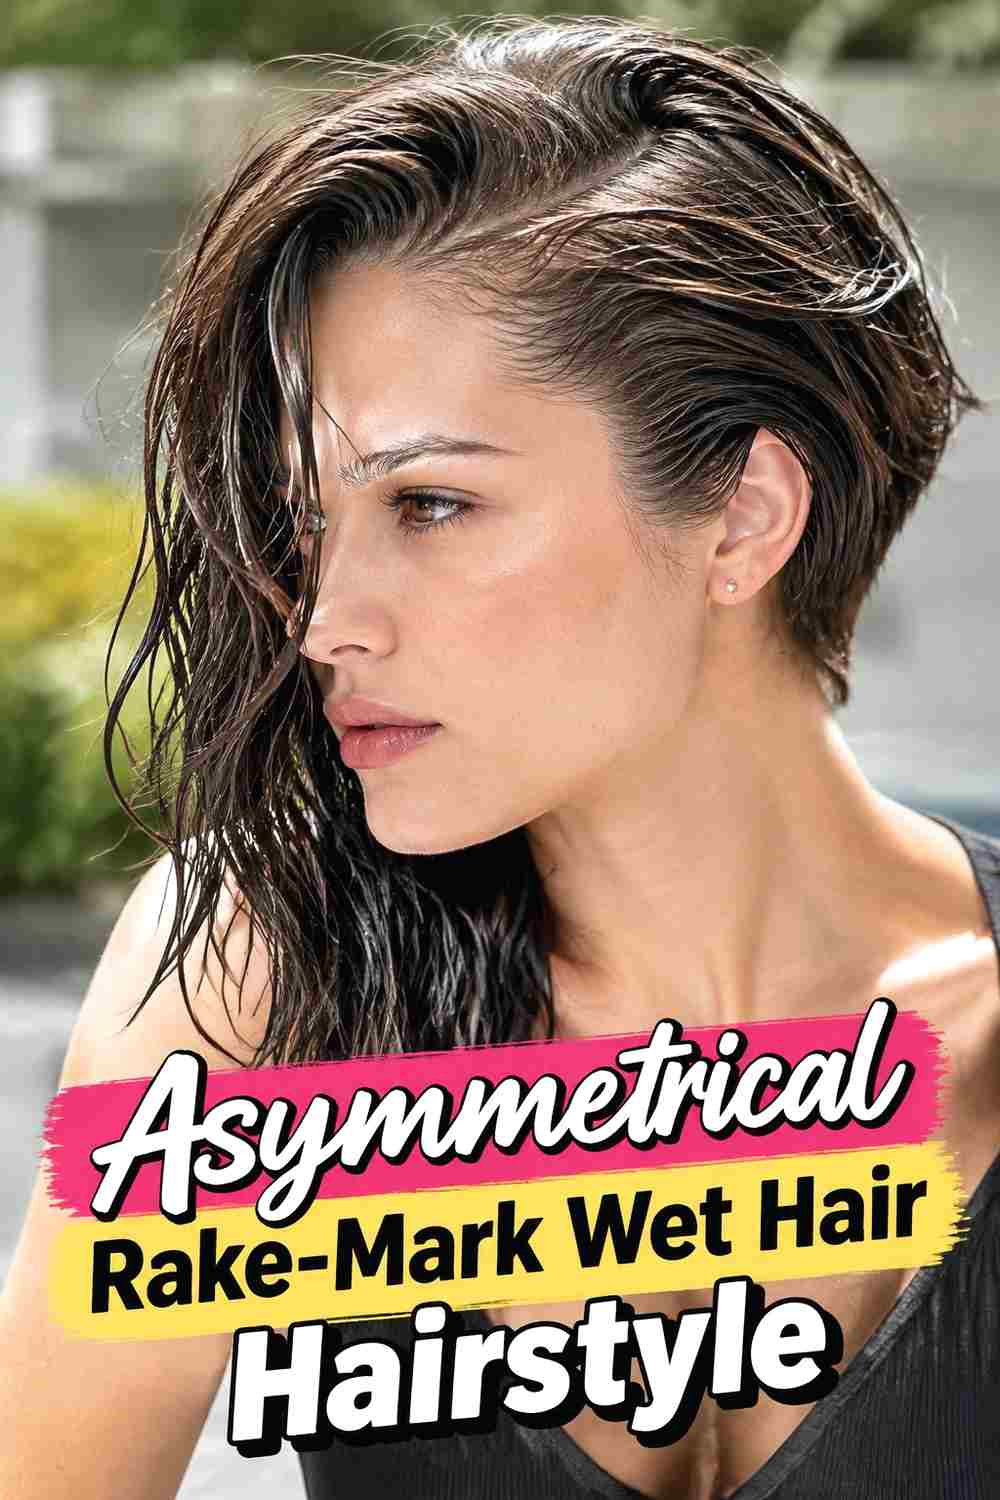
An asymmetrical rake-mark style uses uneven direction as part of the design. One side may be pressed closer to the head while the opposite side carries more lift, sweep, or visible rake spacing. The lines can travel diagonally rather than parallel, creating a deliberate imbalance that feels modern and sculptural. A deep side part often supports the effect, but the look can also be created without a formal part by redirecting the entire crown. Keep the lengths simpler so the directional root work remains easy to read. This version is especially effective when you want wet-look styling to feel artistic instead of purely sleek.
Why It Works
Uneven volume and rake direction create movement while still keeping the glossy upper section controlled.
17. Zigzag Rake Mark Wet Hair Hairstyle
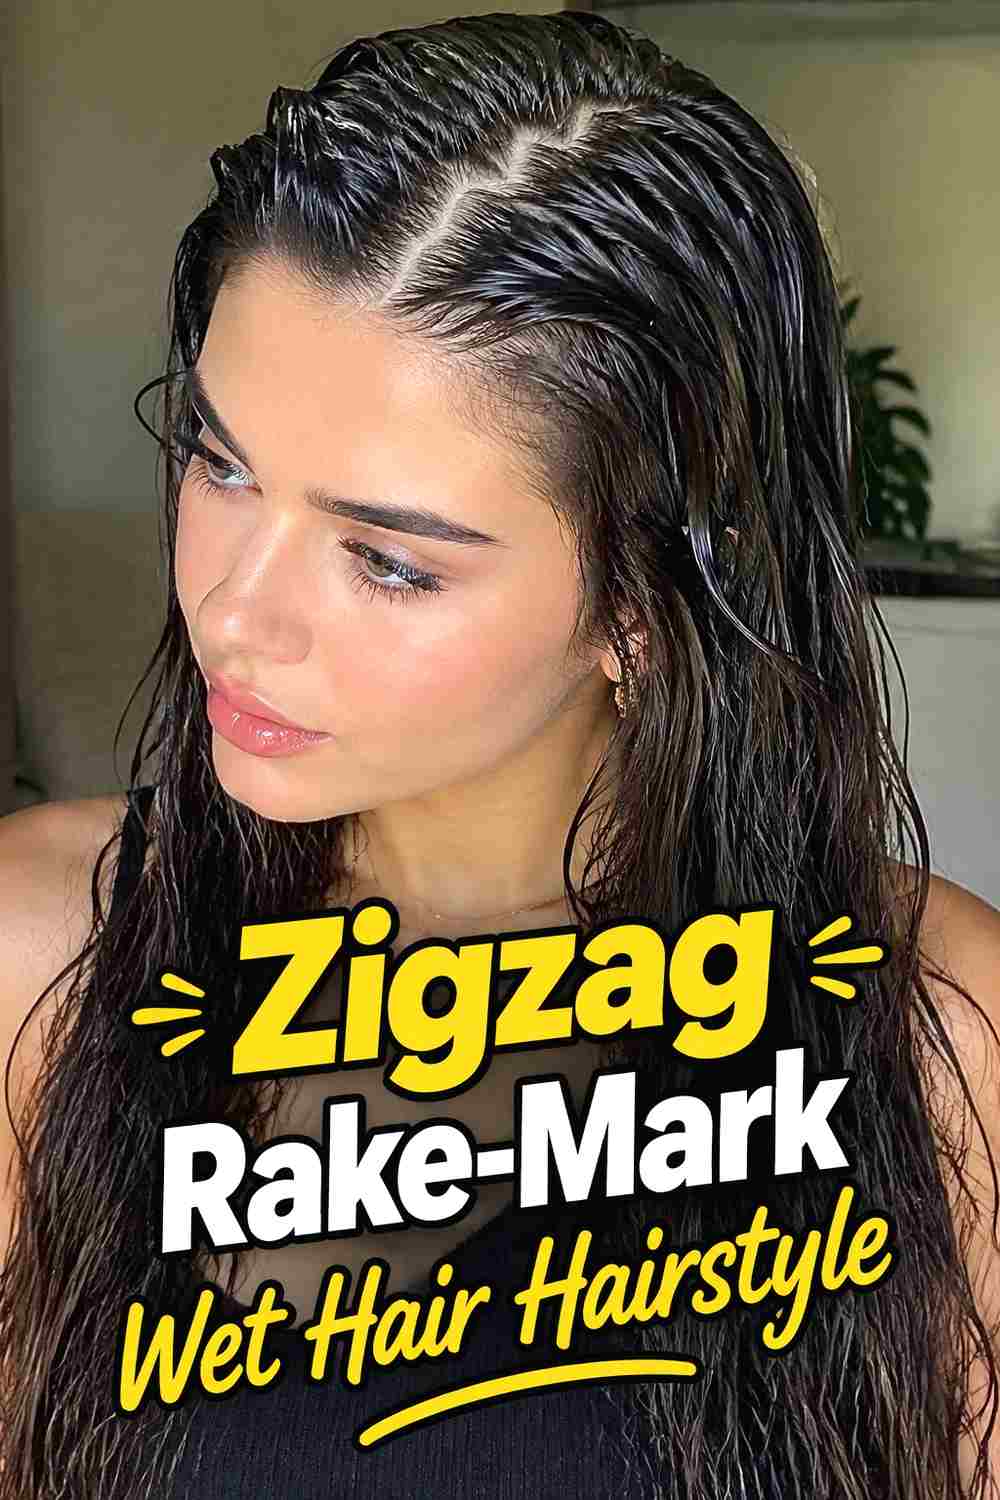
A zigzag rake-mark style introduces a more graphic pattern through the upper hair by changing the direction of selected grooves. Instead of combing every section straight backward, alternate slightly angled lines to create a subtle repeated zigzag effect across the crown. The pattern should remain broad and wearable rather than overly sharp or costume-like. Keeping the lengths straight or softly waved prevents the overall look from becoming too busy. This technique works best when the hair surface has enough shine to make the separated channels visible under natural light, while individual strands and small irregularities keep the finish realistic.
Styling Notes
Work in larger sections and keep the zigzag subtle so the pattern reads clearly without turning into a rigid grid.
18. Defined Root Loose End Rake Mark Wet Hair Hairstyle
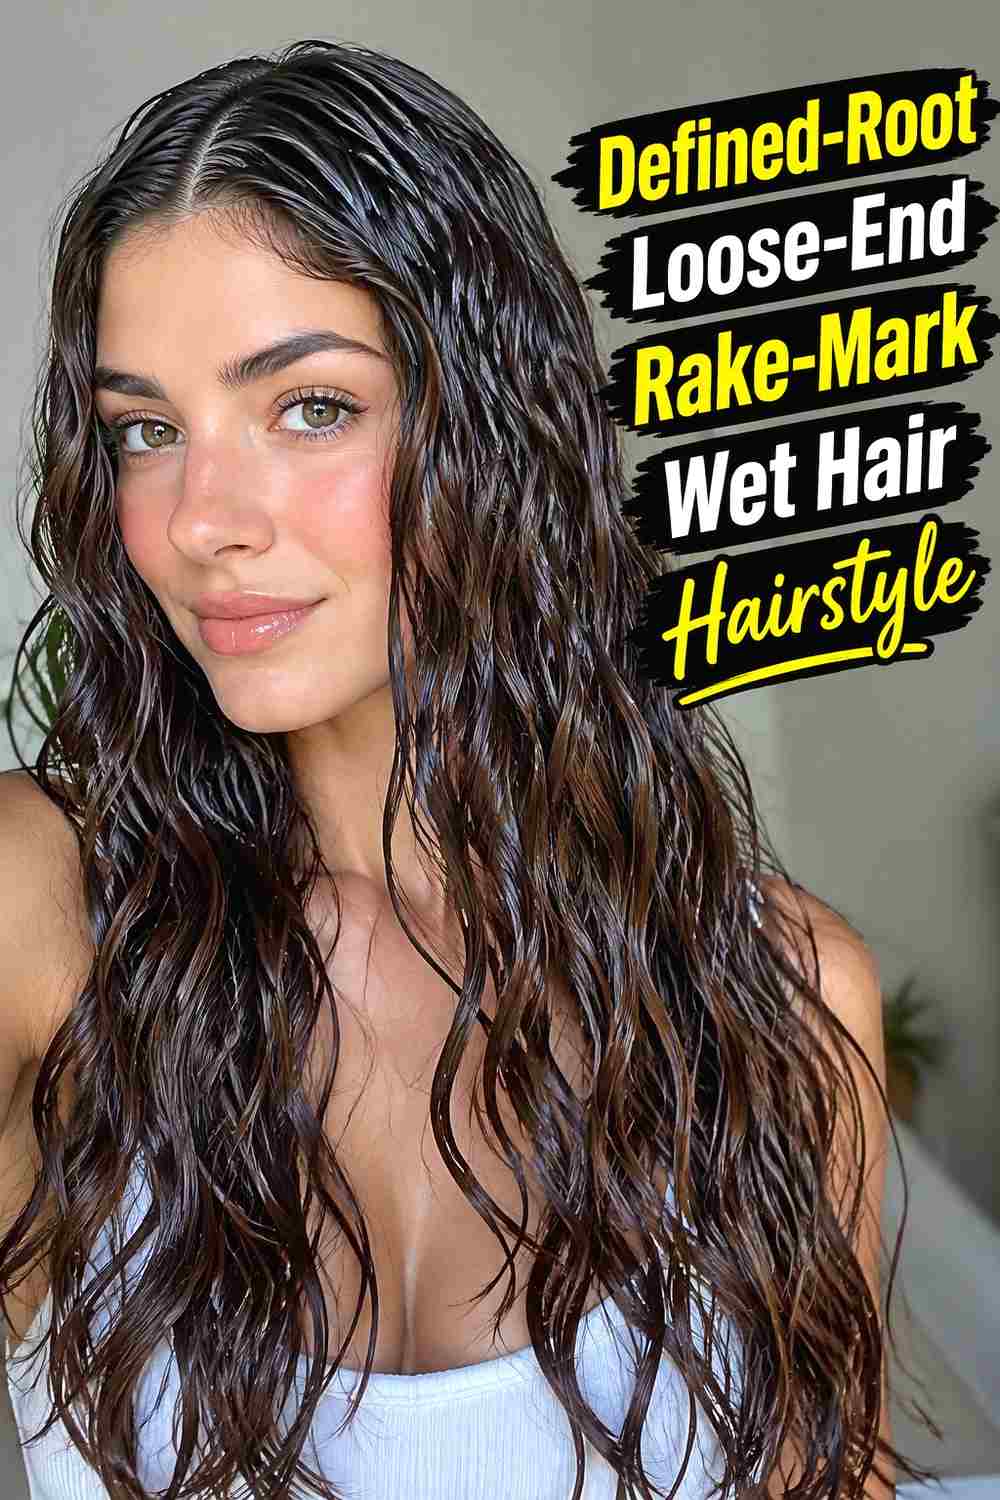
This style keeps the strongest wet-look effect strictly at the roots, then lets the hair loosen progressively through the mid-lengths and ends. Rake the upper section backward or away from a part, stopping the most visible separation around the crown. From there, allow the hair to fall with its natural straight, wavy, or curly texture. The result feels lighter than an all-over wet look and is easier to adapt for everyday styling because the ends still move freely. It also creates a believable visual transition, as though the roots were intentionally sculpted while the rest of the hairstyle remained soft and touchable.
Why It Works
Concentrating the shine at the roots keeps the rake marks prominent without making long hair appear heavy from top to bottom.
19. Wet Look Shag Rake Mark Hairstyle

A shag cut brings extra movement to wet-look rake marks because the shorter crown layers naturally separate from the longer pieces below. Work glossy product through the upper layers with fingers, allowing the rake lines to break and change direction as they move through the layered shape. Fringe or shorter face pieces can remain piecey rather than pushed completely away from the face. The ends should stay lighter and more textured so the shag retains its characteristic movement. This version feels more undone than a sleek wet style, making it a good choice when you want a glossy finish without sacrificing layered texture and irregularity.
Styling Notes
Avoid flattening the shorter crown layers; let them retain some lift so the shag shape remains recognizable.
20. High Crown Rake Mark Wet Hair Hairstyle
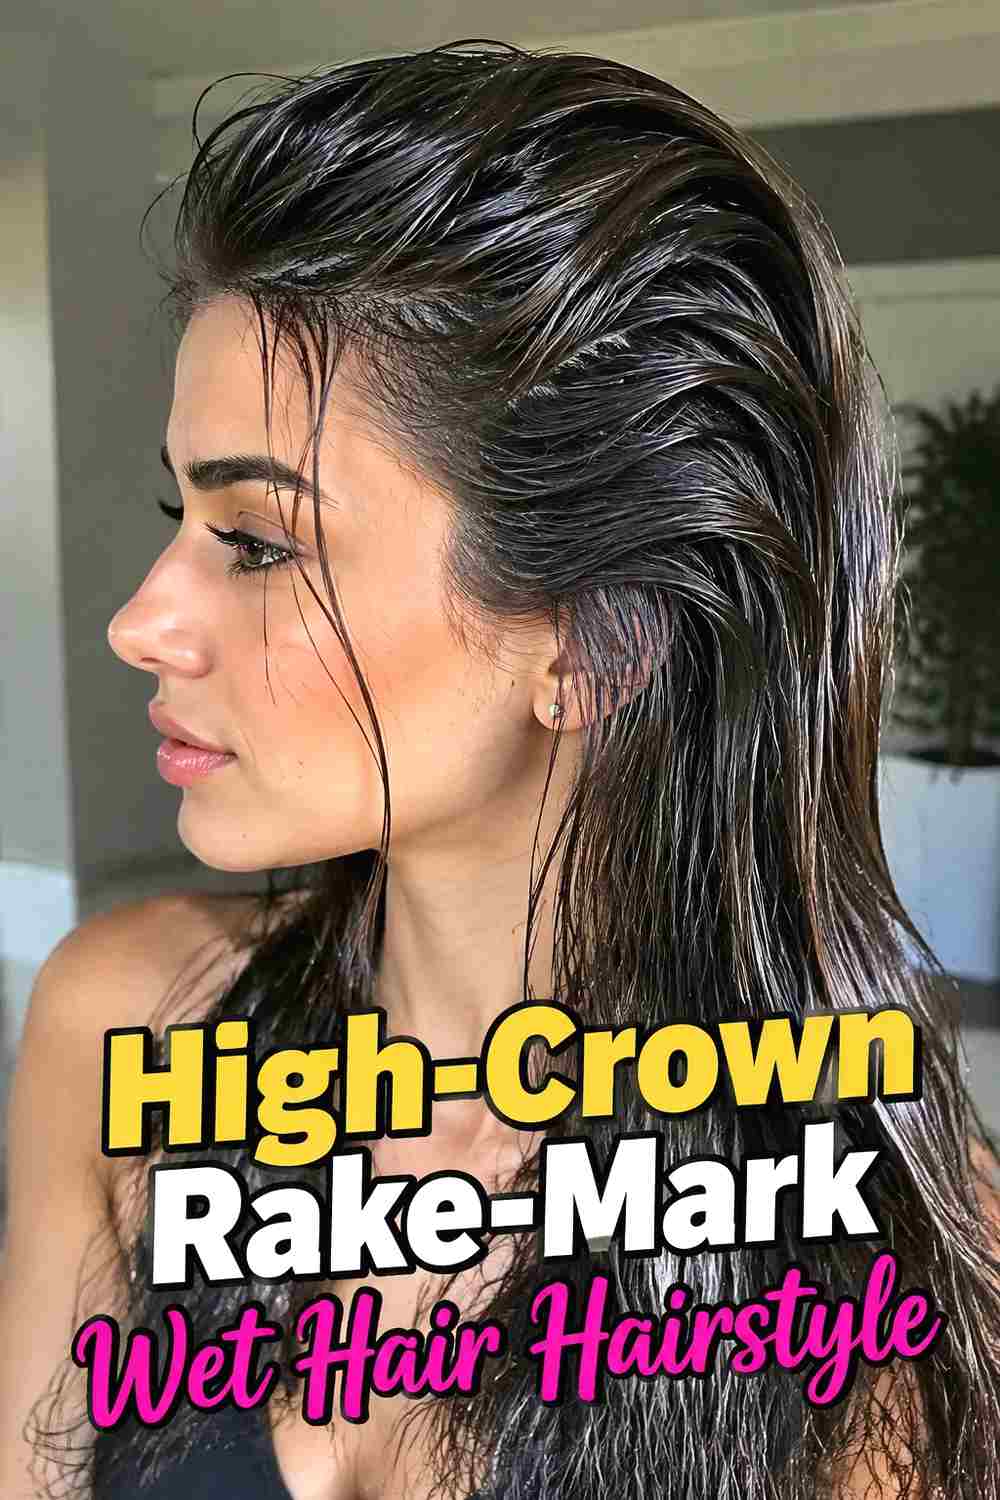
A high-crown rake-mark style combines glossy separation with visible lift through the upper back of the head. Direct the front hair backward in defined grooves, then raise the roots at the crown so the lines travel over a softly elevated shape instead of lying flat. The sides can remain closer to the head to emphasize the height. Medium and long hair can fall straight or softly waved beneath the sculpted crown, while shorter cuts can keep the silhouette more compact. The goal is controlled height rather than teased volume, with enough natural strand texture to prevent the wet finish from appearing molded or artificial.
Pro Tip
Build the crown lift before finalizing the rake marks so the grooves follow the finished shape instead of collapsing when the roots are raised.
How to Choose the Right Look
Start with how much of the hair you want to appear wet. Defined-root and long-layered versions keep most of the gloss near the scalp, while classic slicked-back and sculpted-wave styles carry the effect farther into the lengths.
Parting makes a major difference. Center parts create symmetry, deep side parts create sweep, and part-free styles emphasize the rake marks themselves. If you prefer a softer front, face-framing pieces or shag layers can reduce the severity of a fully exposed hairline.
Hair length also affects the options. Bobs make rake lines compact and graphic, while medium and long hair can transition into curls, layers, ponytails, or loose ends. For updos, low buns and twisted knots give the rake marks a clear direction toward the nape.
Finally, control the amount of shine carefully. A convincing wet look still needs visible strands, realistic density, and natural movement. Build product gradually and keep the finish deliberate rather than simply saturating the hair.
Final Thoughts
Rake-mark wet hair can range from sleek and minimal to sculpted, wavy, asymmetrical, or softly layered. The most effective versions use visible root separation as a design feature while preserving realistic texture through the rest of the hair. Choose your part, direction, and finish first, then let the rake pattern reinforce that shape.
FAQs
1. What are rake marks in wet-look hair?
Rake marks are visible separated lines created when fingers or a wide-tooth comb are drawn through styled hair, leaving deliberate grooves or channels through the roots and upper lengths.
2. Does rake-mark hair need to look completely wet?
No. The wet-look effect can stay concentrated near the roots while the ends remain softer and more natural. This often creates more believable contrast and movement.
3. Can rake-mark wet hair work on short hair?
Yes. Bobs, shags, and other short cuts can show the rake pattern especially clearly because the glossy roots lead into a compact silhouette.
4. Can I combine rake marks with a ponytail or bun?
Yes. The marks can direct the hair toward a low or high ponytail, bun, or knot while the gathered section remains smooth, curled, or naturally textured.
5. How do I keep wet-look hair from appearing greasy?
Use styling product intentionally, concentrate it where the rake pattern needs definition, and preserve visible strand separation and natural movement instead of coating the entire hair length heavily.
Save your favorite rake-mark wet hair ideas and explore more hairstyle inspiration for glossy, sculpted, and directional finishes.