16 Pancaked Dutch Braid Hairstyle Ideas
Wide, dimensional, and beautifully textured, these pancaked Dutch braids turn a defined inside-out braid into a softer statement with eye-catching volume.
A pancaked Dutch braid starts with the raised structure of a Dutch braid, then gently widens the outer loops to create a fuller appearance. The most believable versions still show secure braid connections, realistic strand direction, and natural density rather than impossible volume.
How far you expand the braid changes its personality. A lightly pancaked braid can look polished and controlled, while broader loops create a softer, romantic finish. Placement matters too: crown braids emphasize the head shape, ponytail and bun combinations add structure, and half-up versions let you balance the bold braid with loose waves or curls.
Quick List
- Classic Pancaked Dutch Braid Hairstyle
- Side Swept Pancaked Dutch Braid Hairstyle
- Double Pancaked Dutch Braid Hairstyle
- Half Up Pancaked Dutch Braid Hairstyle
- Pancaked Dutch Crown Braid Hairstyle
- Pancaked Dutch Braid Ponytail Hairstyle
- Pancaked Dutch Braid Low Bun Hairstyle
- Pancaked Dutch Braid With Loose Waves Hairstyle
- Pancaked Dutch Braid With Face Framing Pieces Hairstyle
- Pancaked Dutch Braid With Ribbon Hairstyle
- Pearl Accented Pancaked Dutch Braid Hairstyle
- Floral Pancaked Dutch Braid Hairstyle
- Messy Textured Pancaked Dutch Braid Hairstyle
- Long Hair Pancaked Dutch Braid Hairstyle
- Curly Pancaked Dutch Braid Hairstyle
- Bridal Pancaked Dutch Braid Hairstyle
1. Classic Pancaked Dutch Braid Hairstyle
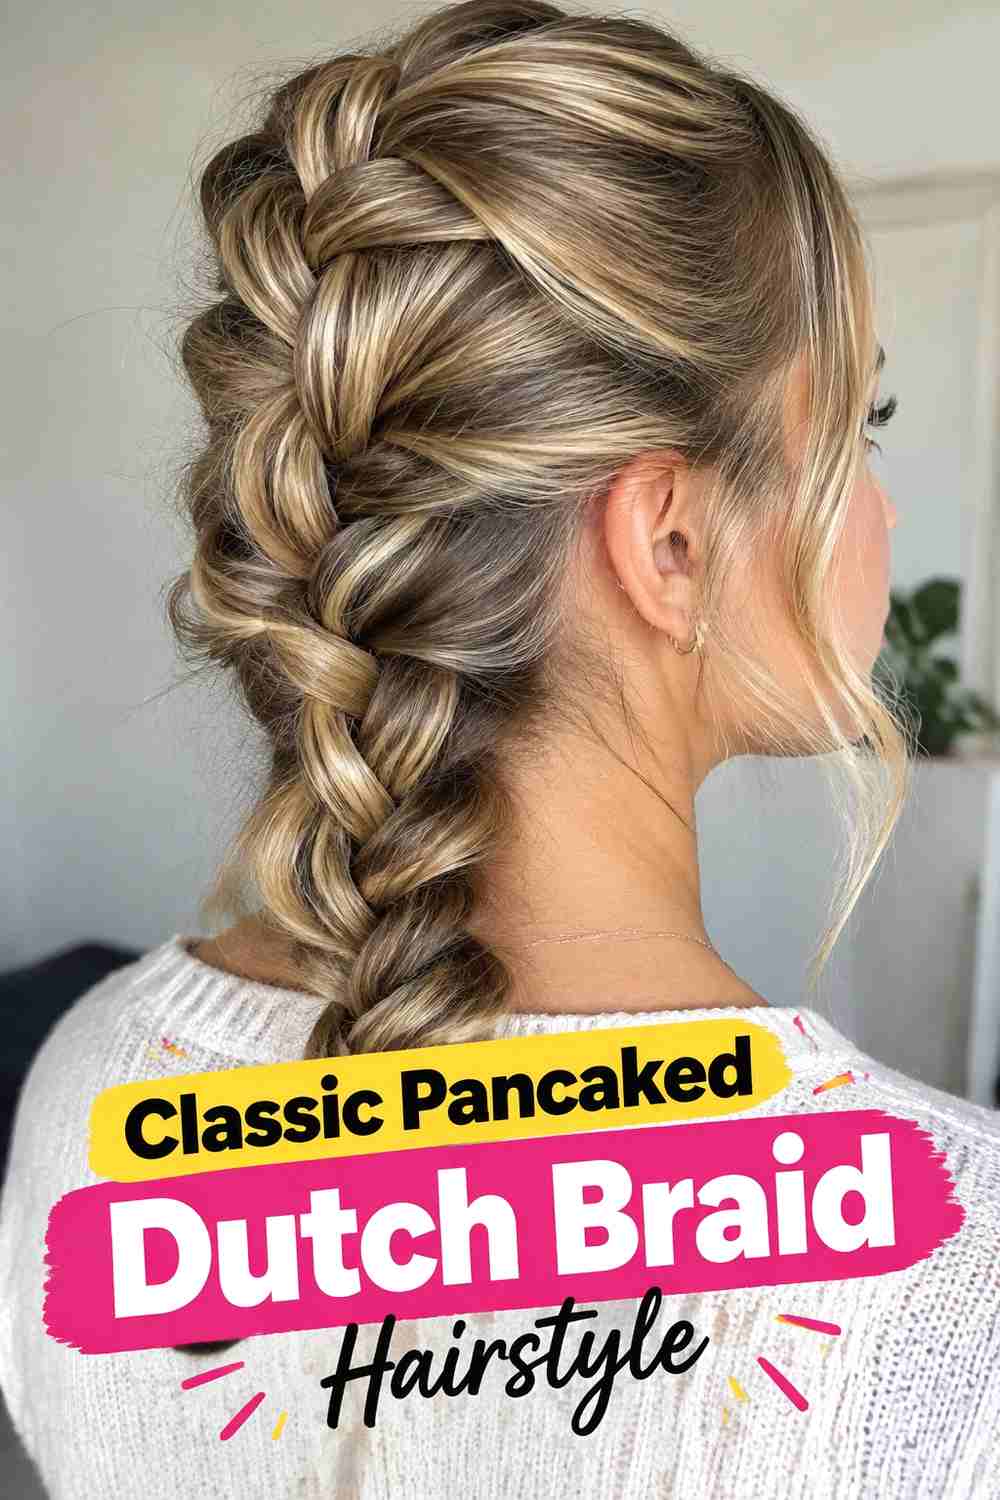
The Classic Pancaked Dutch Braid Hairstyle puts the braid itself at center stage. Hair is woven underneath rather than over, creating the raised Dutch-braid structure, then the outer edges are gently widened after the braid is secure. That expansion gives each section a softer, fuller appearance without erasing the recognizable woven pattern. A single braid running from the crown toward the nape works especially well because the gradual widening is easy to see from top to bottom. Medium-long and long hair provide the clearest result. Keep the center of the braid firm while loosening only the outer loops, which helps preserve stability and prevents the entire braid from becoming shapeless.
Styling Notes
Finish and secure the braid before widening it. Pull tiny amounts from each outer loop rather than tugging large sections at once.
Why It Works
The raised Dutch structure creates a strong foundation, while pancaking adds width and softness without requiring extensions or oversized accessories.
2. Side Swept Pancaked Dutch Braid Hairstyle
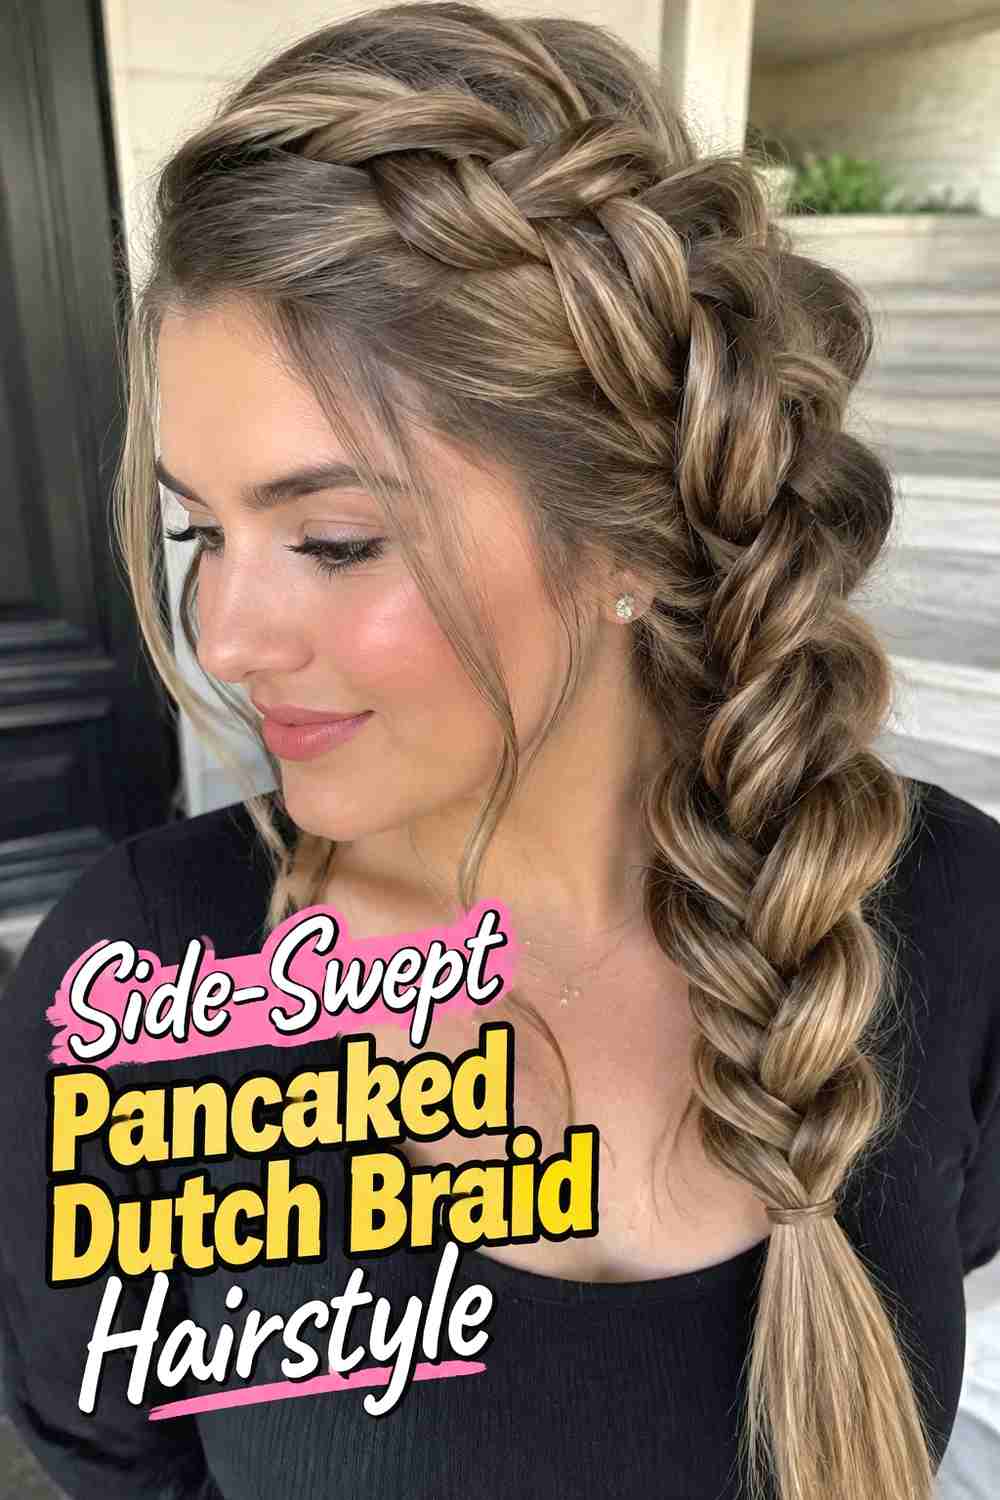
The Side-Swept Pancaked Dutch Braid Hairstyle creates a diagonal line that travels across the head and toward one shoulder. Starting near the temple or upper side of the crown, the braid gradually moves backward while collecting hair and building a raised pattern. Once secured, gently expanding the outer loops gives the braid extra width and makes the diagonal movement easier to see. Long hair can continue into a loose side braid, while medium lengths may finish closer to the nape. Keep the opposite side relatively smooth so the asymmetrical braid remains the focal point. A few natural flyaways can soften the finish, but the main sections should stay securely connected.
Best For
This variation works well for dinners, parties, outdoor events, and romantic styling where a centered braid feels too symmetrical.
Pro Tip
Pancake the braid gradually from the bottom upward so you can control the width and keep the diagonal shape balanced.
3. Double Pancaked Dutch Braid Hairstyle
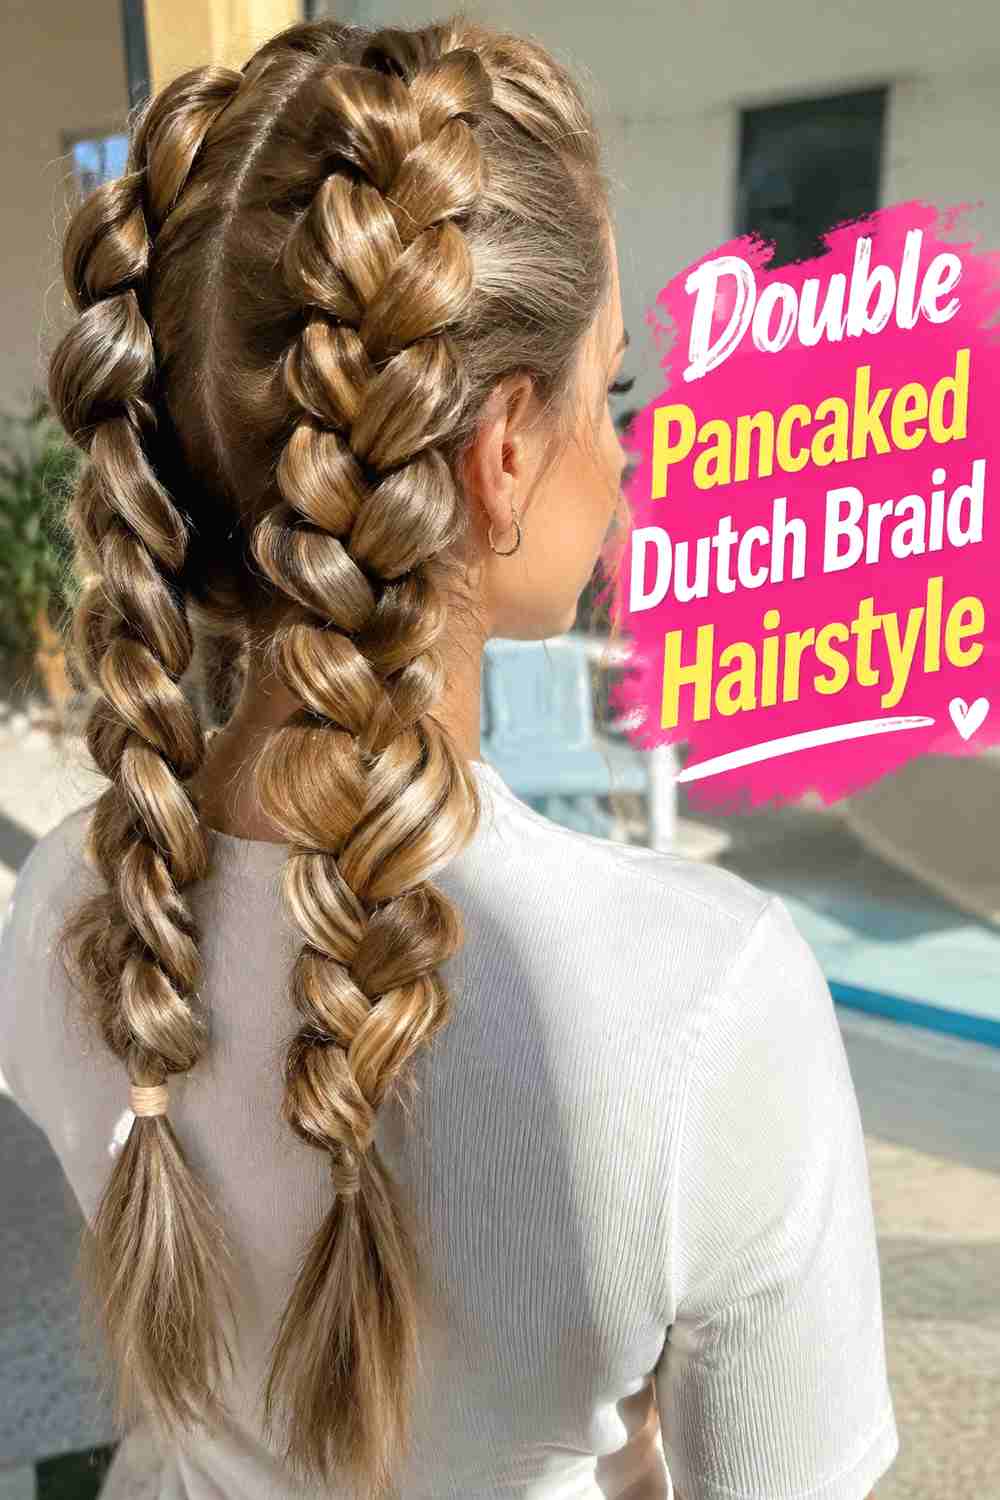
The Double Pancaked Dutch Braid Hairstyle divides the hair into two raised braids, creating strong symmetry and plenty of visible texture. Each braid begins near the front and follows its own path toward the back, where the lengths can remain braided, join together, or transition into ponytails. Pancaking the outer loops makes both braids appear wider, but they should stay similar in proportion so one side does not visually dominate the other. This version works particularly well on medium-long or long hair with enough density to support two substantial sections. Keep the center part clean and widen the braids only after both are secure so you can compare their shape as you work.
Styling Notes
Alternate between the two finished braids while pancaking, adjusting corresponding sections so their widths stay visually balanced.
Wear & Maintenance
Use secure elastics at both ends because widening the braid reduces some of the tension that initially keeps the woven sections compact.
4. Half Up Pancaked Dutch Braid Hairstyle
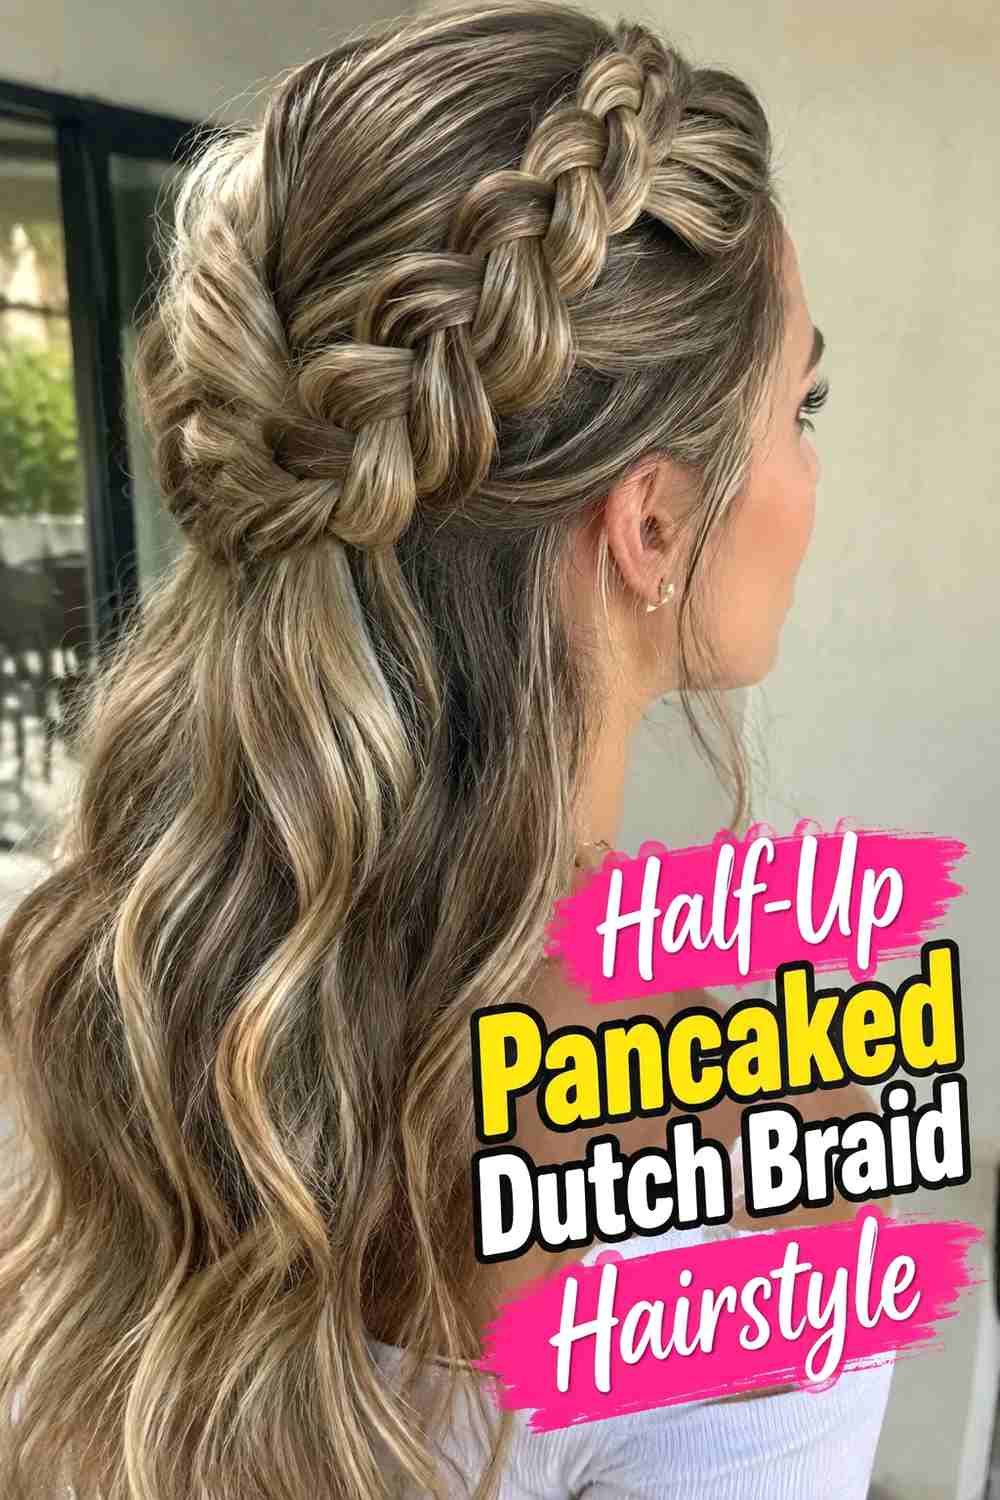
The Half-Up Pancaked Dutch Braid Hairstyle combines a bold woven detail with loose lengths underneath. A Dutch braid can travel across the upper back of the head, or two side braids can meet centrally before being secured. The outer loops are then gently widened to create the signature pancaked effect, while the lower hair stays straight, waved, or softly curled. This construction is especially useful when you want the volume of a large braid without gathering all the hair into an updo. Medium-long and long hair provide enough length for both visible braiding and flowing ends. Keep the braid proportionate so it frames the loose hair instead of visually overwhelming the entire hairstyle.
Hair Type & Length
Medium-long to long hair gives the half-up braid enough room to appear substantial while leaving plenty of loose movement below.
Why It Works
The wide braid adds structure across the crown, while the loose lengths keep the finished hairstyle soft and versatile.
5. Pancaked Dutch Crown Braid Hairstyle
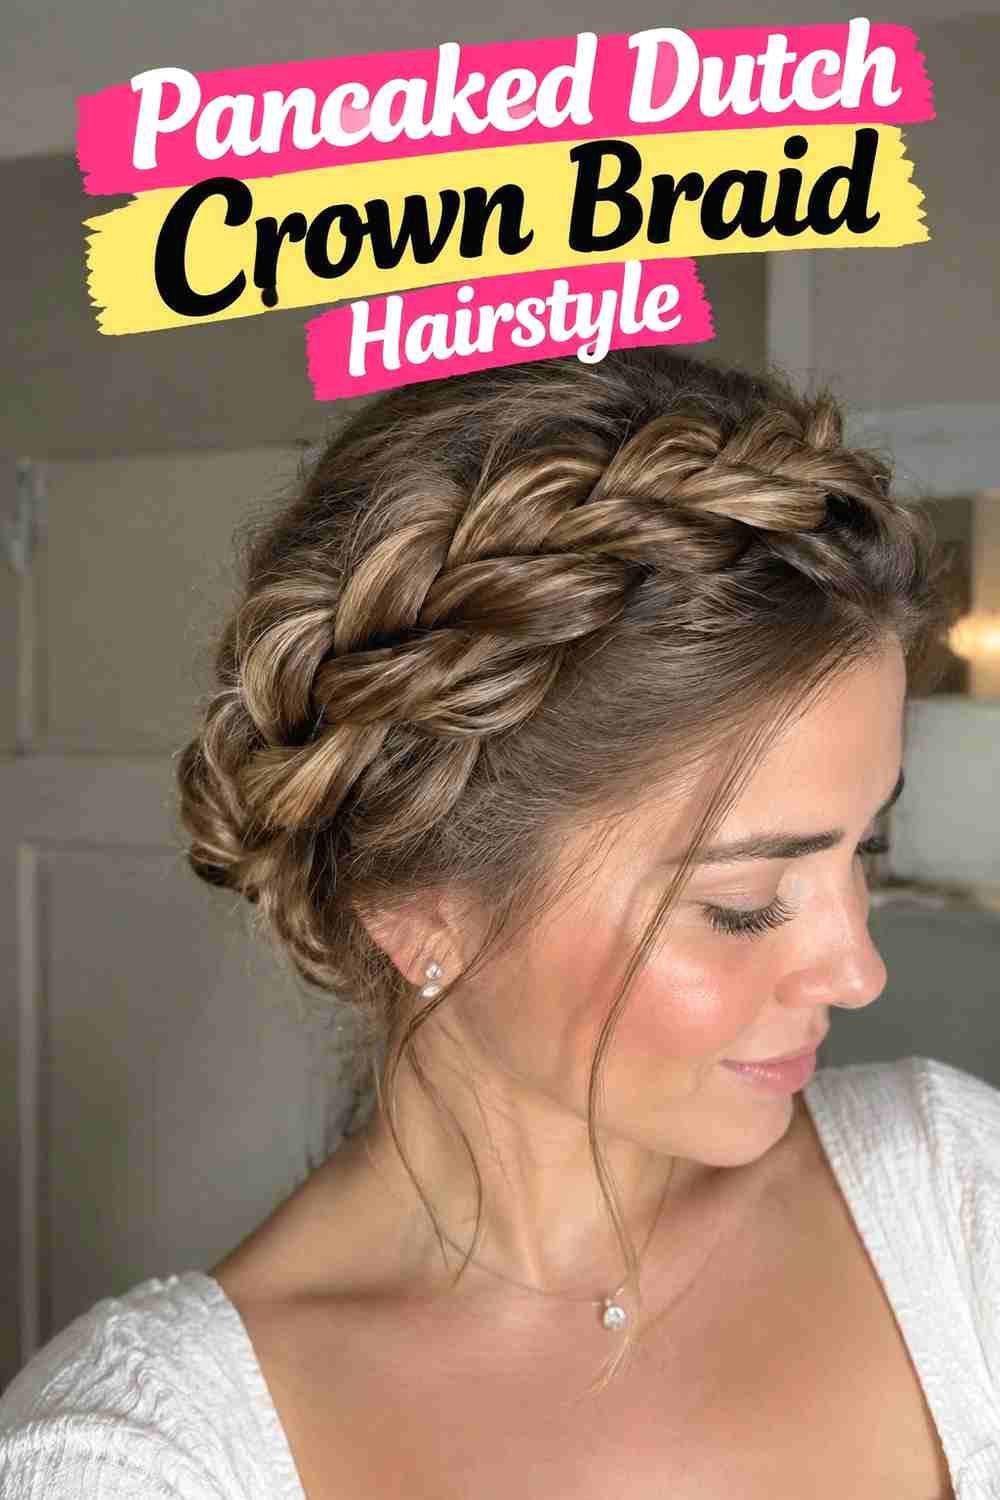
The Pancaked Dutch Crown Braid Hairstyle wraps the raised braid around the head to form a fuller halo. Because the braid sits on the surface, widening its outer loops creates a striking crown effect without needing padding or oversized accessories. The braid should follow the natural curve of the head, with secure hidden pins supporting the sections that pass around the back. Pancaking can be slightly stronger along the upper edge to emphasize the crown silhouette, but avoid pulling so far that the woven center loses definition. This style is especially attractive on long hair, though medium lengths may work with joined sections. The final result can feel polished, romantic, or bridal depending on the finish.
Styling Notes
Secure the complete crown first, then widen the loops in small increments while checking the silhouette from several angles.
Best For
This version suits weddings, formal events, festivals, romantic portraits, and occasions where the braid should be the main statement.
6. Pancaked Dutch Braid Ponytail Hairstyle
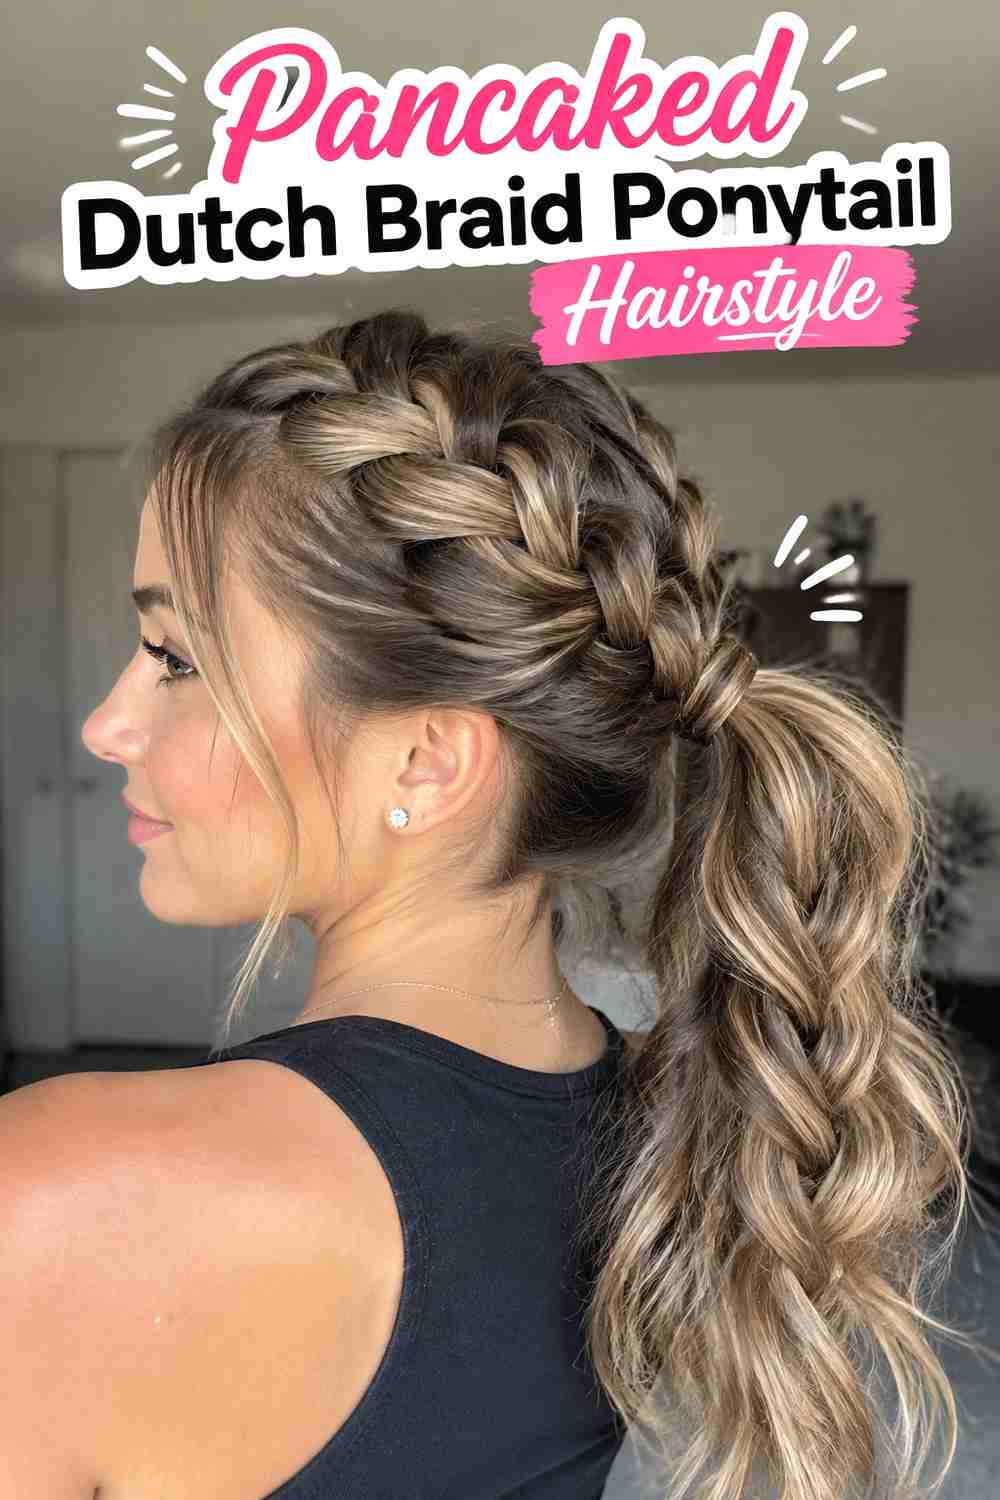
The Pancaked Dutch Braid Ponytail Hairstyle combines a wide braid through the crown with free-flowing lengths below the tie point. The Dutch braid can begin at the front hairline and travel straight toward a mid-height ponytail, or it can follow a diagonal path for more movement. Once the braid is secured, gently widening its outer sections gives the upper half dramatic texture while the ponytail keeps the style practical. Straight lengths create strong contrast, while waves or curls make the transition softer. Keep the ponytail base stable before pancaking so pulling on the braid does not loosen the elastic. A wrapped base can provide an extra polished finishing detail.
Pro Tip
Pancake only the braid, not the hair immediately around the ponytail base, so the connection remains secure and clean.
Why It Works
The braid adds volume above the tie point while the ponytail leaves the lower hair mobile and easy to wear.
7. Pancaked Dutch Braid Low Bun Hairstyle
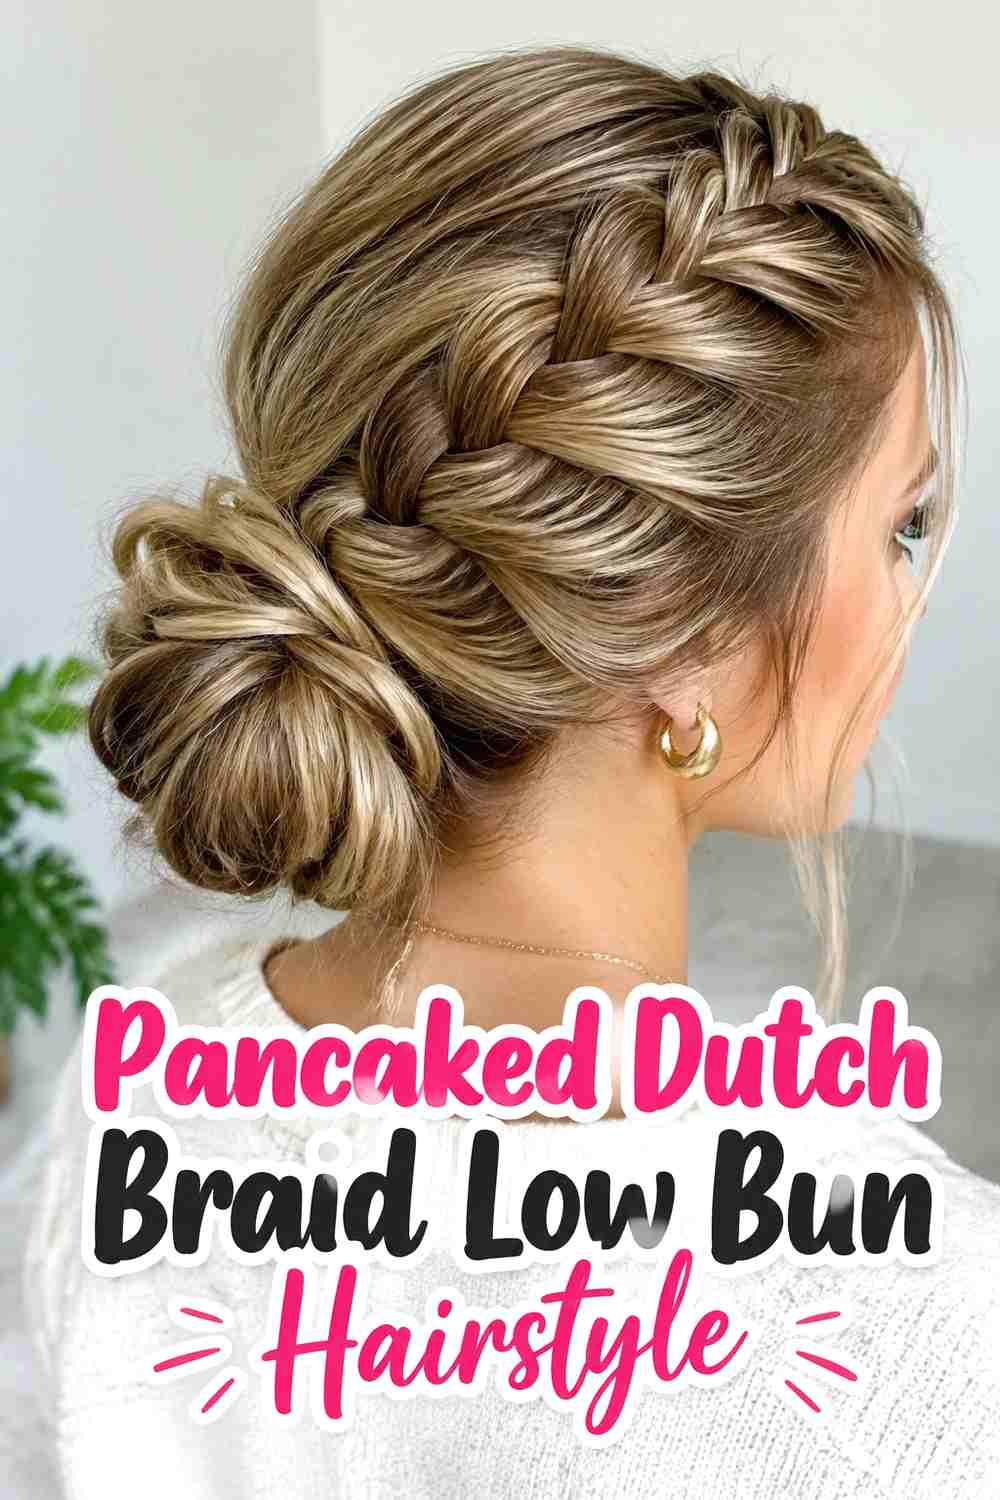
The Pancaked Dutch Braid Low Bun Hairstyle uses a broad braid to guide the eye toward a compact bun at the nape. The braid can begin along the crown or one side, gradually widening as it travels backward before joining the remaining hair. Once the bun is formed, the braid can wrap partly around its base or finish directly above it. This creates visual texture without requiring a large bun. Medium-long and long hair work best because there is enough length for both elements to remain distinct. Keep the bun secure before widening nearby braid sections, since aggressive pulling around the nape can disturb the updo and make the finish feel unstable.
Styling Notes
Build the bun first once the braid reaches the nape, secure everything, then return to gently widen the Dutch-braid loops.
Best For
This polished combination suits weddings, bridesmaids, dinners, formal events, and romantic low-updo styling.
8. Pancaked Dutch Braid With Loose Waves Hairstyle
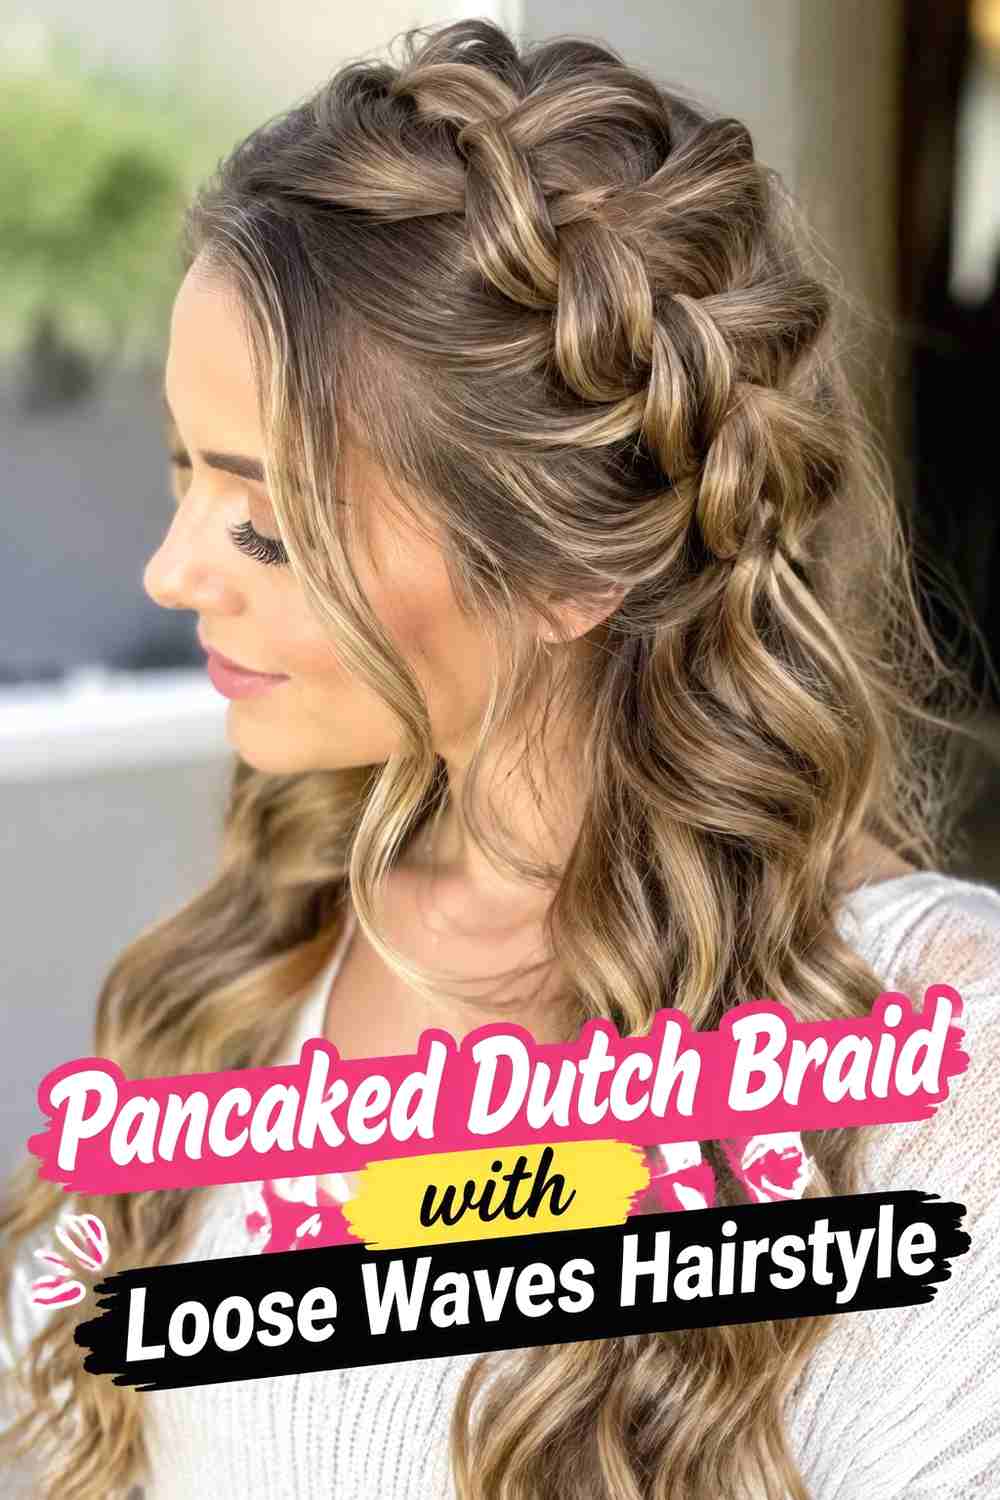
The Pancaked Dutch Braid with Loose Waves Hairstyle balances structured weaving with flowing texture. A Dutch braid can travel along one side, across the crown, or through the center before finishing above loose waved lengths. After securing the braid, the outer sections are gently expanded until the braid looks broad and dimensional without becoming fluffy. The waves underneath should remain soft and elongated so they complement rather than compete with the woven detail. Long layered hair works especially well because the lower sections can move independently beneath the braid. Styling the waves before braiding often makes the process easier and reduces the chance of disturbing the finished braid while curling afterward.
Styling Notes
Create the loose waves first, braid only the sections you need, and pancake the braid as the final shaping step.
Why It Works
The contrast between a wide structured braid and soft loose waves gives the hairstyle dimension without making it feel overly formal.
9. Pancaked Dutch Braid With Face Framing Pieces Hairstyle
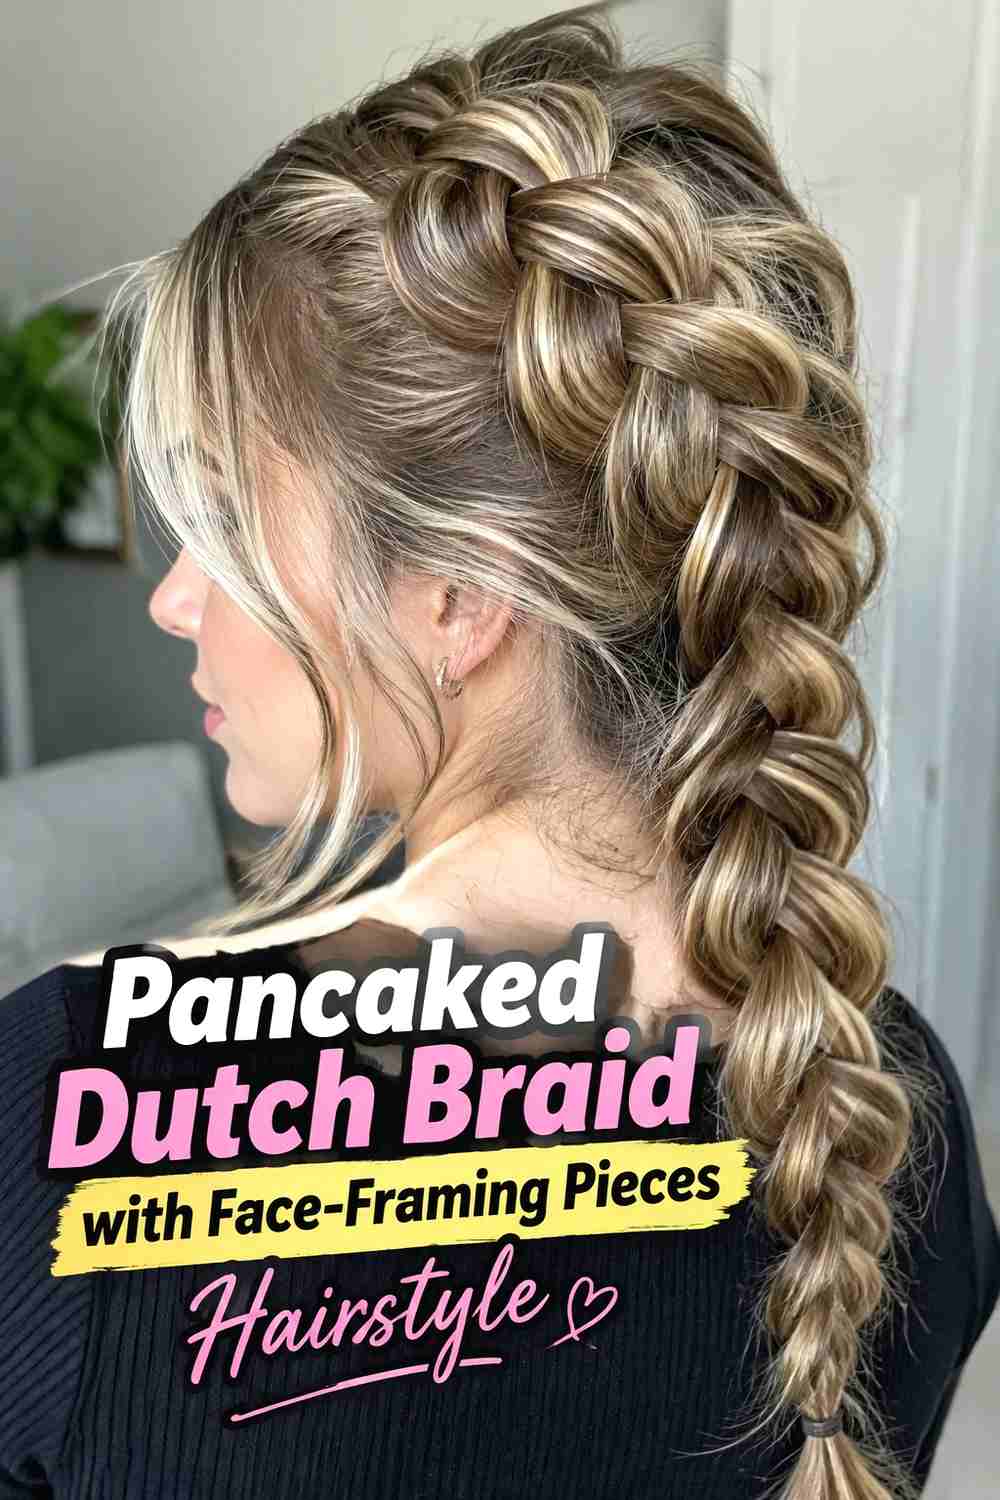
The Pancaked Dutch Braid with Face-Framing Pieces Hairstyle keeps the braid bold while softening the front with a few deliberately loose strands. Before braiding, narrow sections near the temples or cheekbones are left free. The remaining hair is woven into a Dutch braid and gently pancaked to create width, while the loose pieces can stay straight or receive a slight bend. This works especially well with layered hair because shorter front strands naturally separate from the braid. Keep the pieces narrow enough that they frame rather than hide the face. The combination feels relaxed and romantic while preserving enough braid structure to look intentional from the side and back.
Styling Notes
Separate the face-framing strands before braiding so you do not need to pull them out of widened sections later.
Best For
This version works beautifully for date nights, parties, engagement photos, weddings, and softly styled everyday looks.
10. Pancaked Dutch Braid With Ribbon Hairstyle
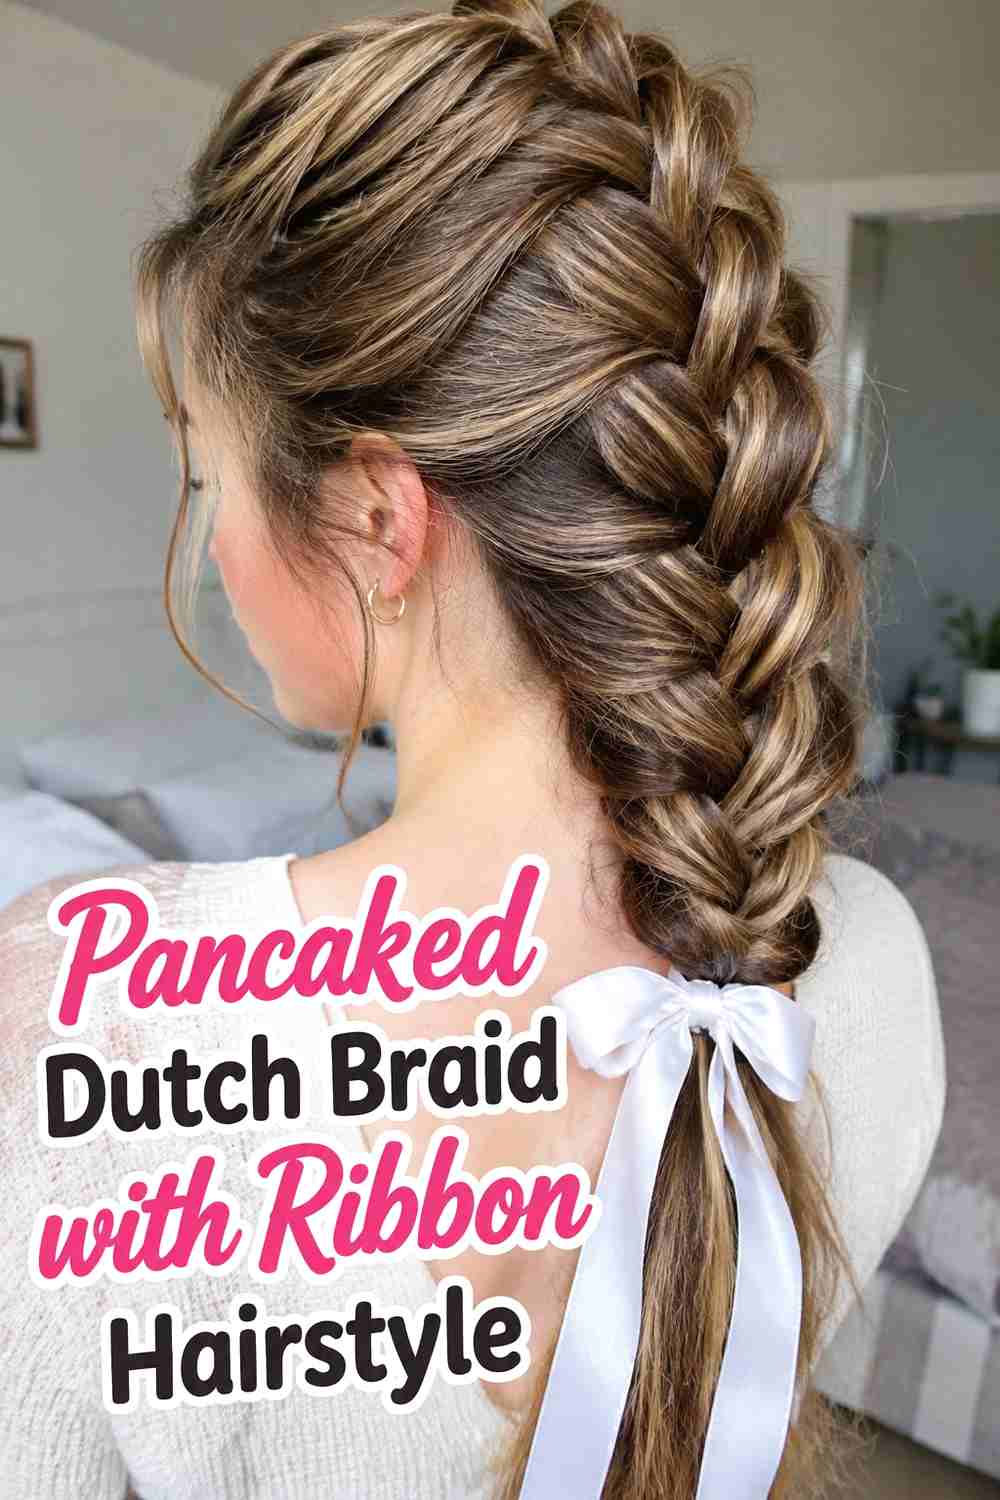
The Pancaked Dutch Braid with Ribbon Hairstyle uses a slim fabric accent to highlight the braid’s widened structure. A narrow satin, velvet, or grosgrain ribbon can be woven beside one strand, threaded through selected loops, or tied near the end of the finished braid. Because pancaking already creates significant width, the ribbon should stay relatively slim so the woven hair remains the primary feature. The contrast between broad braid loops and a neat ribbon can feel playful, romantic, or polished depending on the color and placement. Secure the braid completely before making major width adjustments, especially if the ribbon has been incorporated into the weave, since uneven pulling can shift the decorative pattern.
Styling Notes
Choose a narrow ribbon with enough flexibility to follow the braid and widen the hair sections gradually around it.
Wear & Maintenance
Treat the ribbon as decoration rather than structural support so the braid remains secure even if the bow or woven section shifts.
11. Pearl Accented Pancaked Dutch Braid Hairstyle
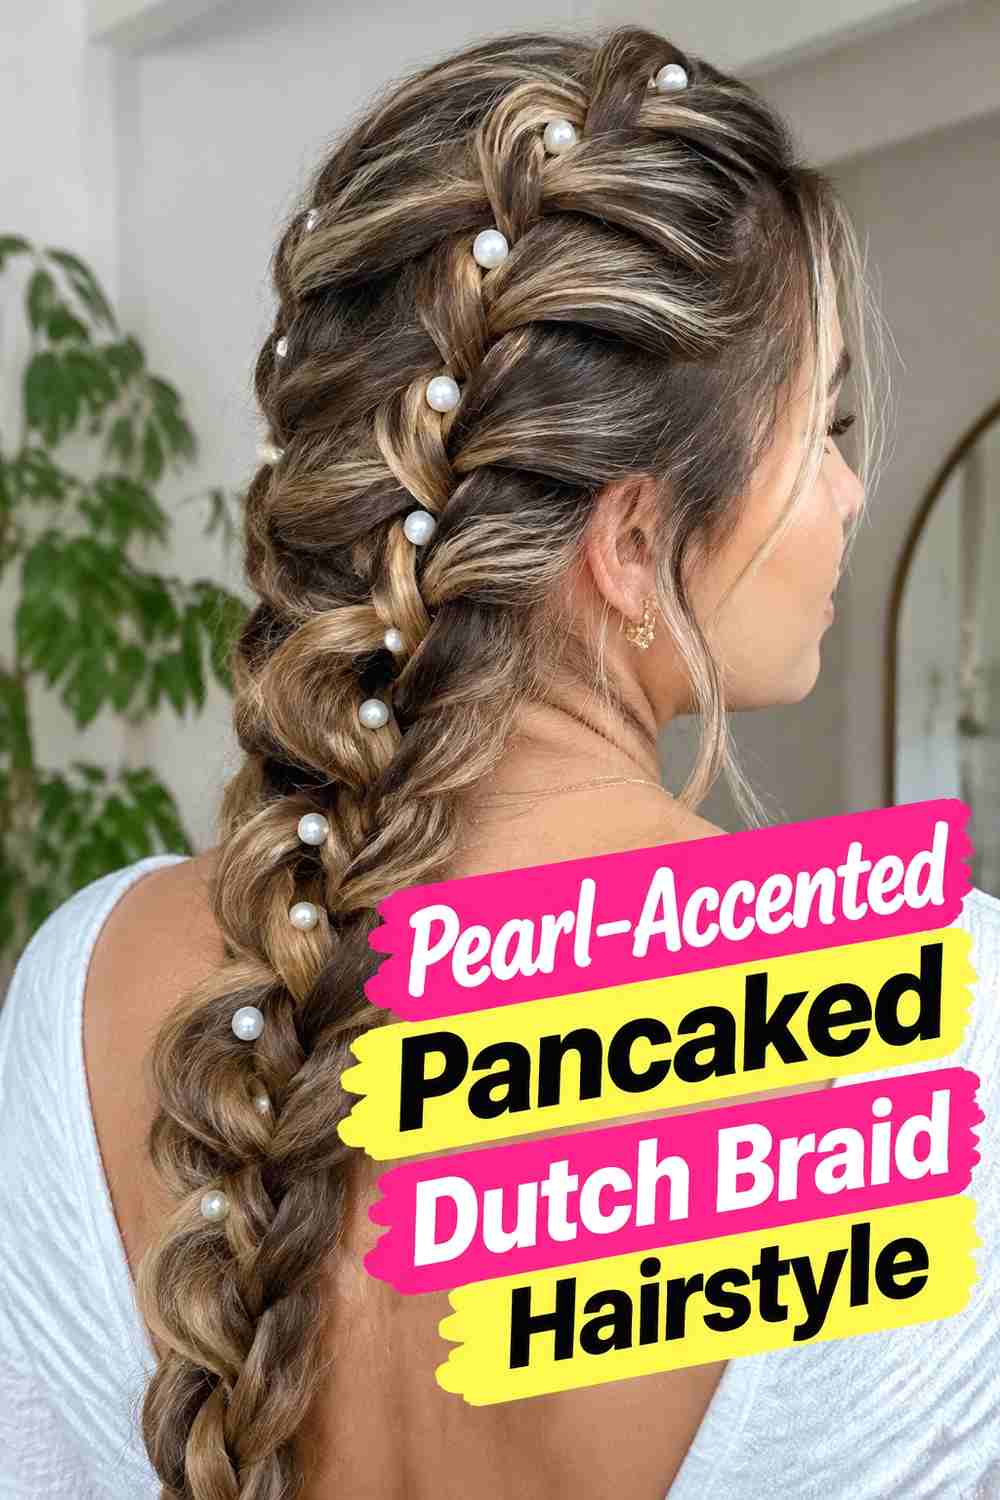
The Pearl-Accented Pancaked Dutch Braid Hairstyle adds small refined details between the widened braid sections. After creating and securing the Dutch braid, the outer loops are pancaked until the desired width is reached. Pearl-tipped pins can then be placed sparingly along one side or tucked into selected crossings. Keeping the accessories minimal is important because the broad braid already provides substantial visual texture. Pearls look especially effective against a polished or softly romantic braid where each woven section remains clearly visible. Hidden structural pins or elastics should support the hairstyle independently, allowing the decorative pearls to be adjusted without loosening the braid or changing its carefully balanced width.
Why It Works
Small pearls create light-catching accents while leaving enough open space for the dimensional braid pattern to remain the main feature.
Pro Tip
Finish all pancaking before placing pearl pins so the accessories do not restrict or distort the braid as you widen it.
12. Floral Pancaked Dutch Braid Hairstyle
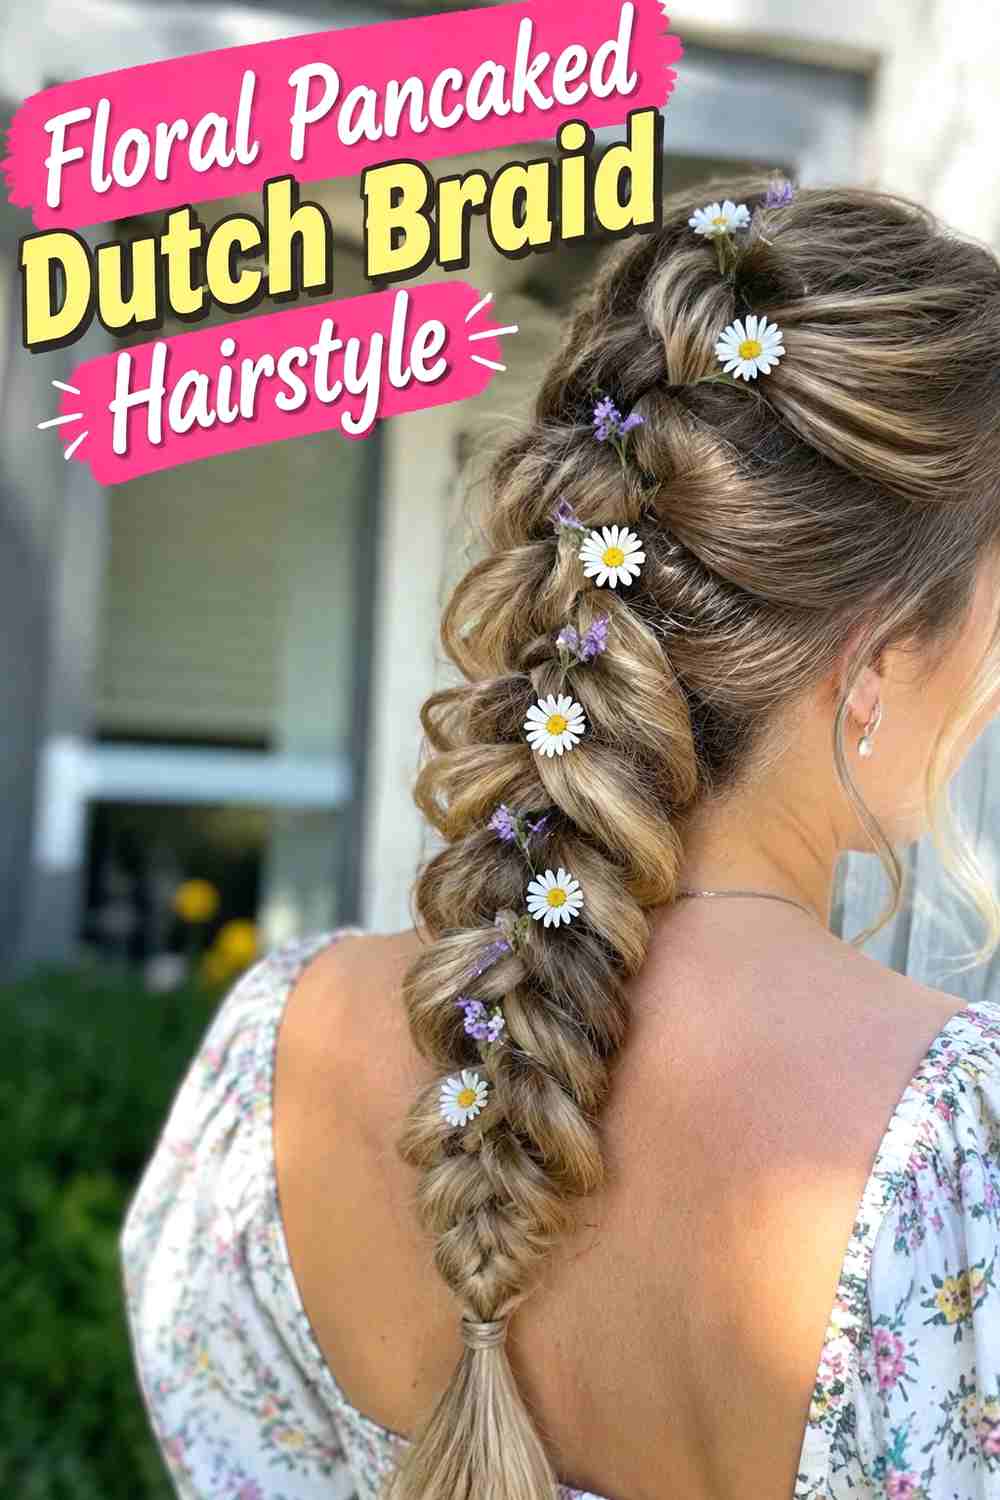
The Floral Pancaked Dutch Braid Hairstyle combines oversized-looking braid loops with restrained botanical detail. Small flowers or delicate floral pins can be placed along one side of the finished braid, following its direction instead of covering the entire surface. The braid itself should be widened first so you know exactly where each accent will sit. A slightly textured finish suits this variation particularly well because the organic braid shape and floral details feel naturally connected. Medium-long and long hair provide enough room for a substantial Dutch braid, while a side or crown placement can make the flowers more visible from the front. Keep the blooms small enough that individual braid sections remain easy to distinguish.
Styling Notes
Secure and pancake the braid completely before adding flowers, and place each accent into stable sections rather than loose outer loops.
Best For
This variation suits garden weddings, festivals, outdoor celebrations, spring events, and romantic photo sessions.
13. Messy Textured Pancaked Dutch Braid Hairstyle
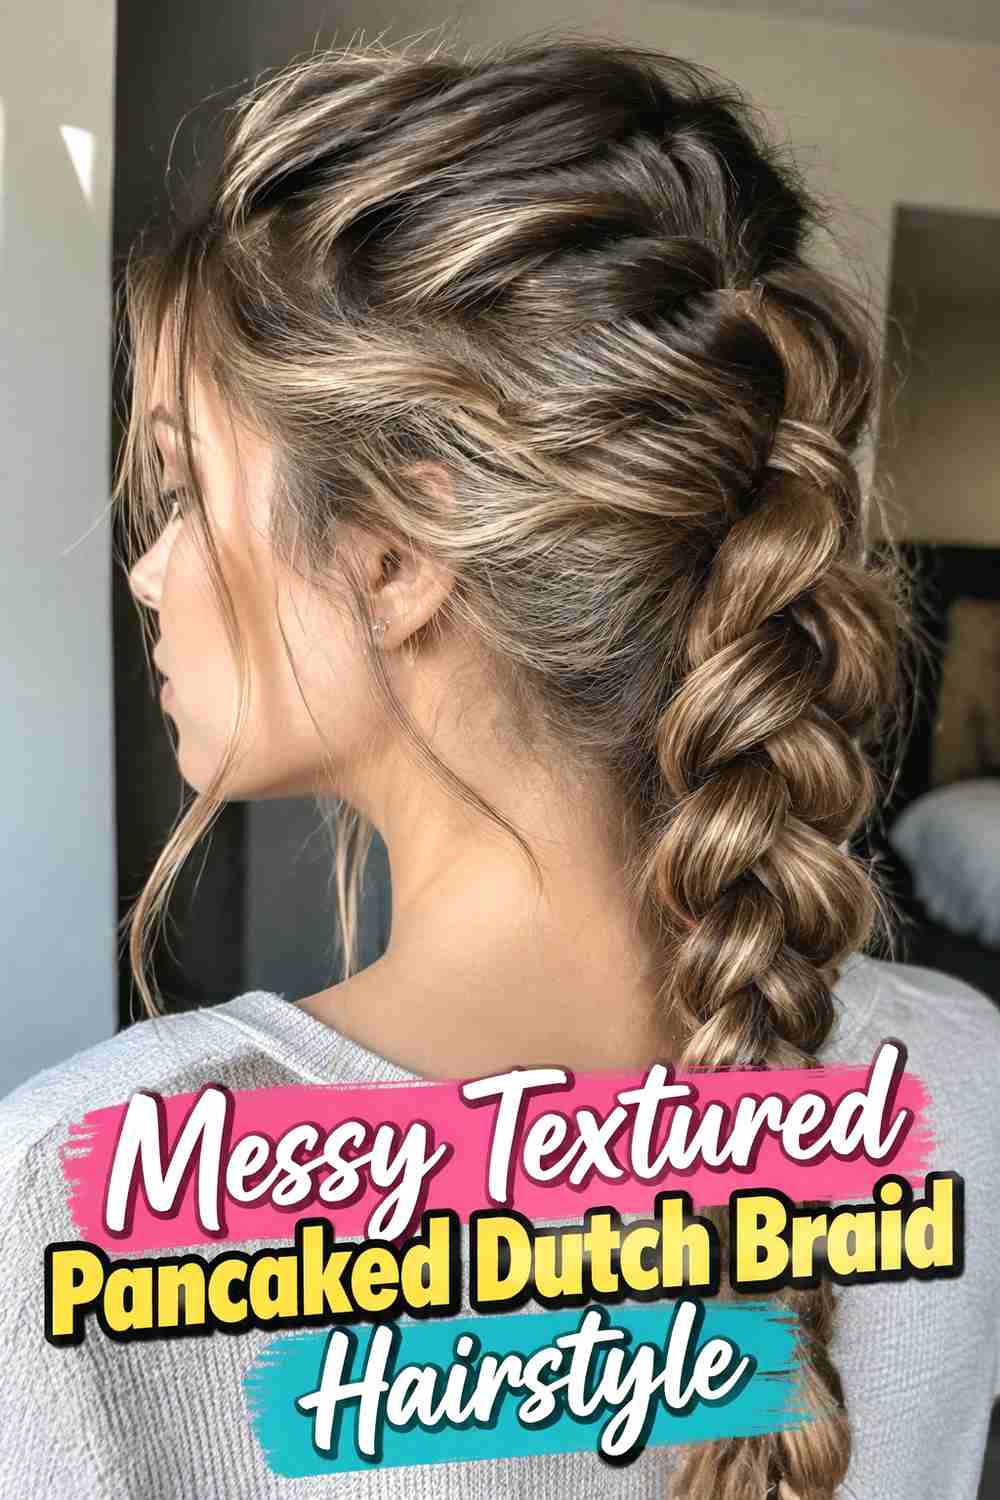
The Messy Textured Pancaked Dutch Braid Hairstyle pushes the widened effect further with airy loops, natural flyaways, and softly irregular edges. Hair can be prepped with gentle waves or texture before braiding, giving the Dutch sections more grip and dimension. Once the braid is secure, selected loops are expanded more than others so the result feels relaxed rather than perfectly uniform. The underlying weave should still remain physically connected and stable, even if the outer surface appears loose. This style is particularly flattering on layered hair because shorter pieces naturally contribute to the undone finish. Avoid pulling every section excessively; varied width usually looks more believable and keeps the braid from collapsing.
Styling Notes
Create light texture before braiding, then widen alternating sections slightly more to avoid a perfectly repeated pattern.
Wear & Maintenance
Use flexible hold on the outer surface and keep the central braid structure firm enough to support the deliberately loosened loops.
14. Long Hair Pancaked Dutch Braid Hairstyle
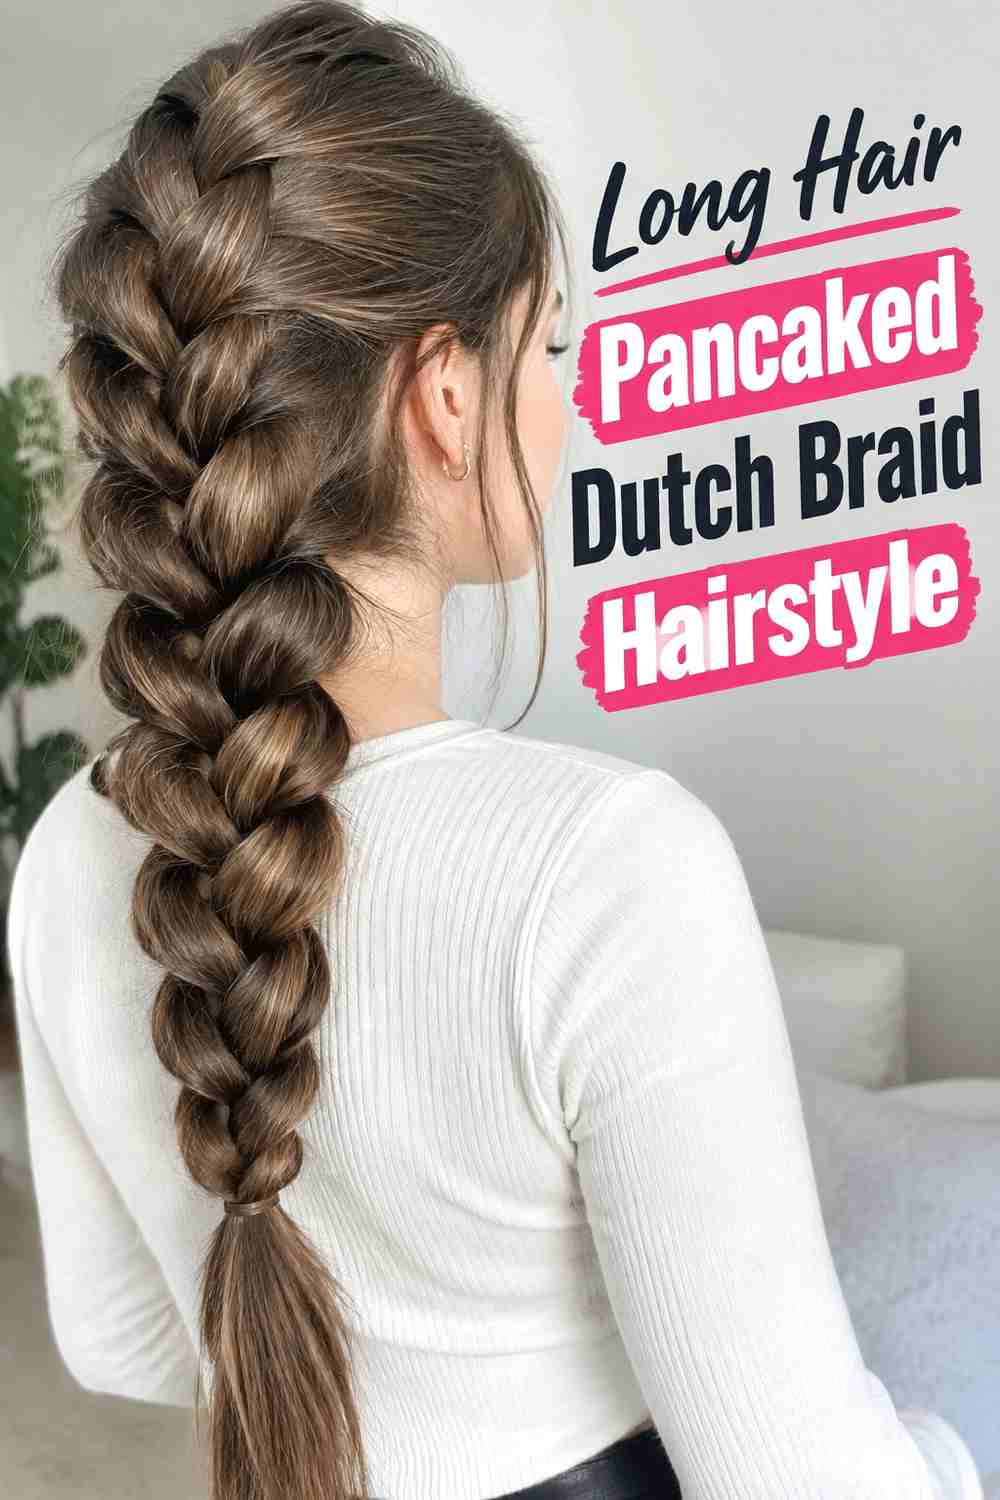
The Long Hair Pancaked Dutch Braid Hairstyle uses extra length to create a dramatic braid with a gradual, flowing silhouette. Beginning near the crown, the Dutch braid can continue through the entire back length, with each section widened after the end is secured. Long hair allows the pancaked pattern to repeat many times, which makes consistency important. The upper loops can stay slightly smaller and widen gradually through the lower braid for a natural progression. Thick hair creates substantial volume, while finer long hair can still benefit from careful pancaking that expands the visible surface. Keep the braid centered and avoid over-pulling the ends, where shorter layers may be more likely to escape.
Hair Type & Length
Long to extra-long hair gives this style its most dramatic effect, particularly when the braid has enough density to support repeated widened loops.
Pro Tip
Work from the bottom upward in small increments so the braid expands evenly without losing its central alignment.
15. Curly Pancaked Dutch Braid Hairstyle
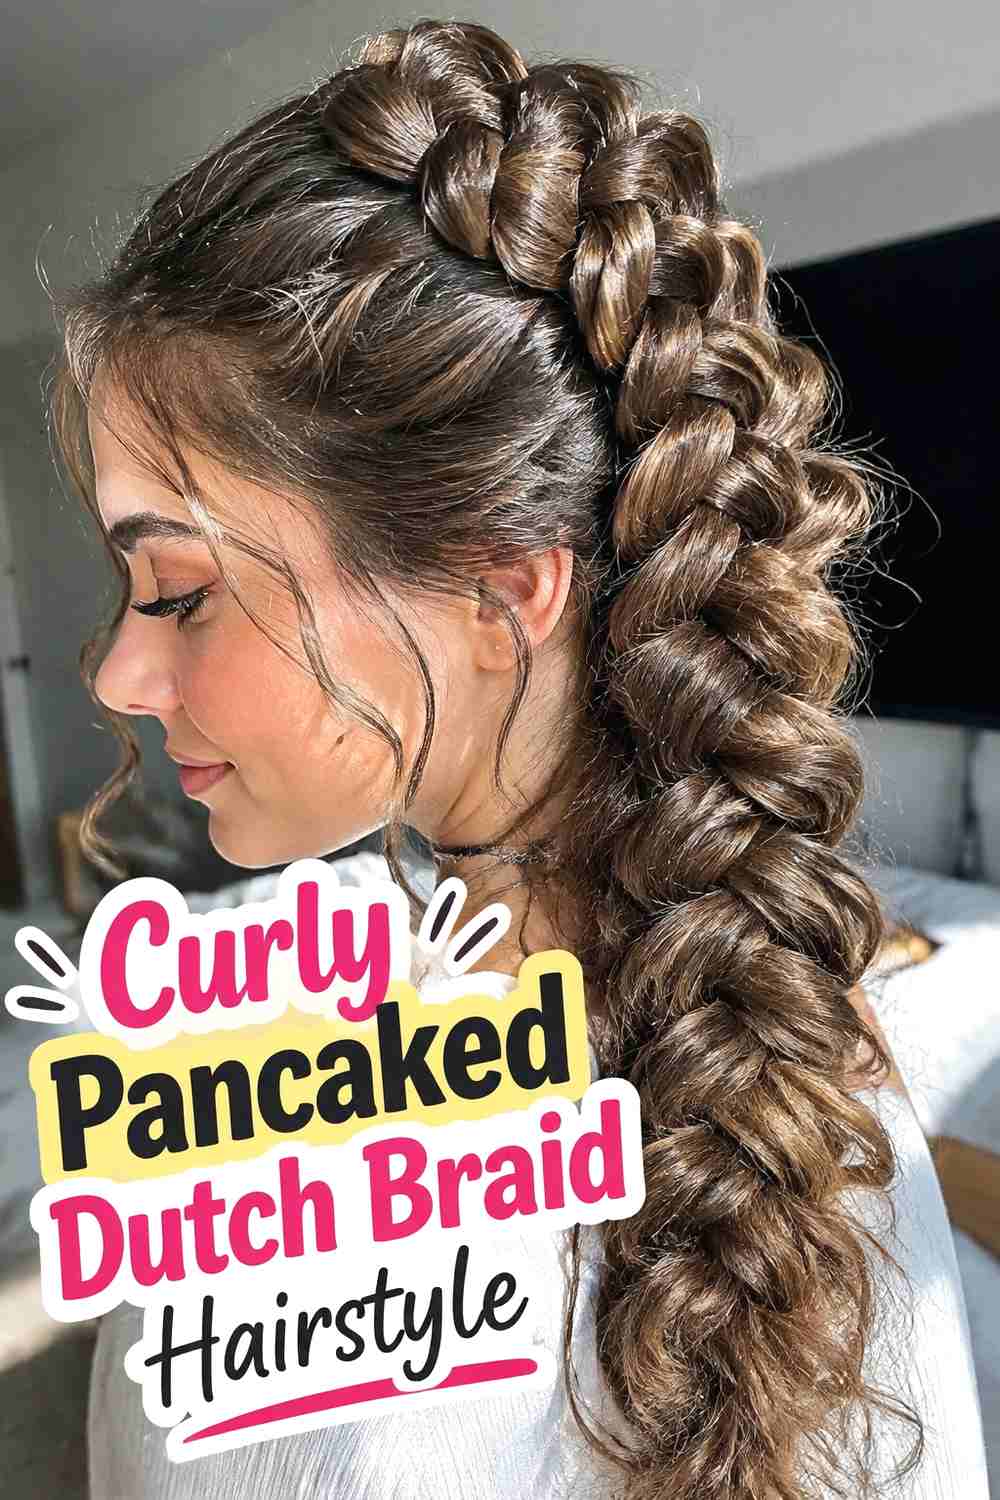
The Curly Pancaked Dutch Braid Hairstyle combines natural texture with the raised, widened structure of a Dutch braid. Rather than straightening the hair first, curls or coils can be incorporated into the braid while preserving some of their visible variation. Once secured, the outer braid sections are gently expanded, but they do not need to become perfectly symmetrical. Natural curl density can make the braid appear especially full, so use controlled pancaking rather than automatically pulling each section to its maximum width. The crown can retain some natural texture for a cohesive finish. Depending on length, the braid may continue through the ends or transition into a textured ponytail or bun.
Hair Type & Length
Curly, coily, or strongly wavy medium-long to long hair can create a naturally dimensional pancaked braid with less need for aggressive widening.
Styling Notes
Handle the curls in manageable sections and preserve natural clumping where possible instead of brushing everything smooth before braiding.
16. Bridal Pancaked Dutch Braid Hairstyle
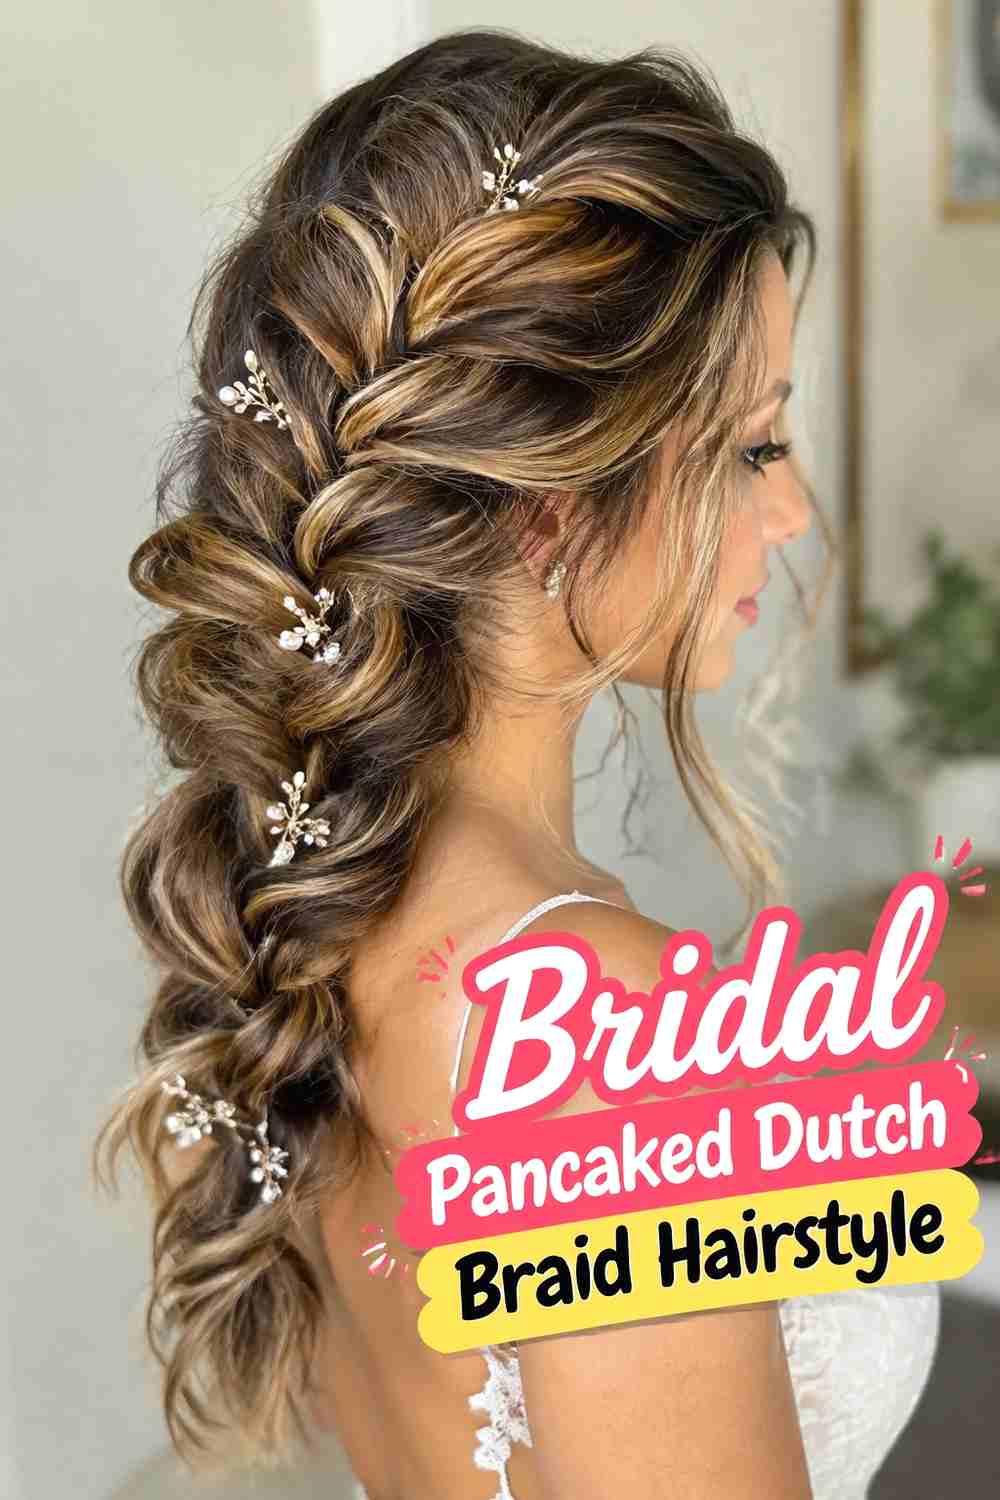
The Bridal Pancaked Dutch Braid Hairstyle combines controlled width, soft texture, and carefully placed accents for an event-ready finish. The braid may sweep across the crown, travel down one side, or flow into a low bun, but the widened Dutch sections should remain clearly visible throughout. Gentle crown softness and narrow face-framing pieces can make the look more romantic, while crystals, pearls, or tiny florals can be added sparingly after the braid is secure. Avoid loading the outer loops with heavy decorations, since they are intentionally loosened and should not provide structural support. The final hairstyle should balance volume with stability so the braid retains its shape through photographs, ceremony movement, and extended wear.
Styling Notes
Build and secure the complete hairstyle first, pancake the braid second, and add bridal accessories only after the final width and balance are established.
Wear & Maintenance
Place structural pins beneath the braid and keep decorative accessories light so loosened loops remain soft without becoming unstable.
How to Choose the Right Look
Start with braid placement. A single braid down the back creates the clearest classic look, while a side-swept braid adds movement. Crown braids emphasize width around the head, and half-up versions let you keep more of your hair loose.
Next, consider how much pancaking suits your hair. Dense hair may need only a small amount of widening to look substantial, while finer hair can benefit from more careful expansion. Always pull the outer loops gradually rather than loosening the center of the braid.
Think about length and texture too. Long hair supports dramatic repeated sections, curls add natural dimension, and waves pair beautifully with partial or half-up braids.
For occasion styling, ponytails and messy braids work well for relaxed looks, while buns, pearls, florals, and polished crowns can feel more formal or bridal.
Finally, prioritize hold. Secure the braid before pancaking it. The widened loops are decorative, while the tighter central weave and hidden pins or elastics should provide the actual structure.
Final Thoughts
Pancaked Dutch braids stand out because they combine the definition of an inside-out braid with a softer, wider silhouette. Small adjustments in placement, loop width, texture, and finishing details can make the style feel sporty, romantic, bohemian, or formal.
Choose a single or double braid for strong woven texture, a ponytail or half-up version for everyday movement, or a crown, bun, floral, or bridal variation for occasions. Whatever version you try, widen the braid gradually after securing it so you maintain both fullness and stability.
FAQs
1. What is a pancaked Dutch braid?
It is a Dutch braid whose outer loops are gently pulled wider after braiding, creating a broader and more dimensional appearance while keeping the central weave intact.
2. Should I pancake a Dutch braid before or after securing it?
Secure the braid first. Widening the loops afterward gives you more control and reduces the chance of the braid loosening completely while you work.
3. Can fine hair wear a pancaked Dutch braid?
Yes. Fine hair can benefit from careful pancaking because widening the visible braid loops can create a fuller-looking shape. Work gradually so shorter strands stay secure.
4. Can curly hair be used for a pancaked Dutch braid?
Yes. Curly and coily textures can create naturally dimensional Dutch braids. You may need less pancaking because the texture itself can already provide significant fullness.
5. How do I stop a pancaked braid from falling apart?
Keep the central braid firm, secure the end before widening, and pull only the outer edges of each loop. Hidden pins can add support to crown, side, or updo versions.
Save your favorite pancaked Dutch braid ideas for your next styling session, and share this collection with anyone who loves full, dimensional braided hairstyles.